
Popular categories
Looking for a yarn?


Comments / Questions (180)
![]() Lydia Havenaar wrote:
Lydia Havenaar wrote:
Hallo, Een vraag, valt dit model erg groot?
15.07.2013 - 09:07DROPS Design answered:
Hoi Lydia. Zie de afmetingen in cm per maat onderaan het patroon.
15.07.2013 - 20:24
![]() Elaine Sue wrote:
Elaine Sue wrote:
I wonder if there are directions in place of the charts. For me it is difficult to follow the charts M1 and M2. I would appreciate any help with this. Thank you
02.07.2013 - 03:57DROPS Design answered:
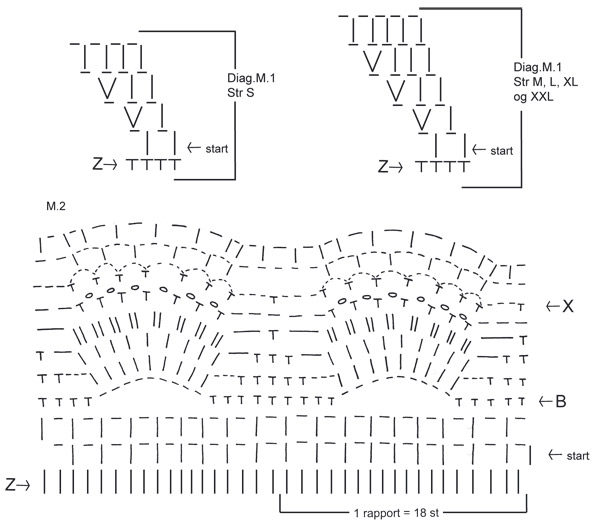
Dear Mrs Sue, you will find at the end of the written pattern and just above the measurement charts all text to diagrams. Choose M.1 for your size and start diagrams at the arrow or as stated, repeat diagrams all the round. Happy crocheting!
02.07.2013 - 08:44
![]() Karen Hartigan wrote:
Karen Hartigan wrote:
Mussel pattern. What does the large B indicate? Am I misinterpreting the two rows above the B to be two rows of tr with the next row being to tr in each tr below it? In looking closely at the photo, it appears that there are not two rows of tr and then two tr in each tr below it. It appears to be a row of tr, a row of dc and chain and then two tr in stitches below. Any clarification would be greatly appreciated. Perhaps you have the pattern written in stich format rather than the diagram?
24.06.2013 - 18:19DROPS Design answered:
Dear Mrs Hartigan, the arrow B in M.2 is used when you repeat the diagram, you then start at this arrow. You first work M.2 starting on the arrow "start", then repeat from arrow B. Happy crocheting!
10.07.2013 - 09:43Pnina wrote:
It`'s beautiful dress. but the direction is wrong. it's decreasing even in the diagram
01.06.2013 - 20:22DROPS Design answered:
Dear Pnina, diagram is correct, you start reading it at the bottom corner right and then will work 2 tr (UK english) / 2 dc (US english) regularly in diag M.1 to inc. Happy crocheting!
03.06.2013 - 09:55
![]() Ank wrote:
Ank wrote:
Ik heb deze nu 3x gehaakt en kom steeds niet uit .in het begin is het al fout je moet de lus maken voor de armsgaten en dan nog een tour en dan moet je al al op een hoogte zijn van 23 cm dat kan nooit en als je het patroon van m2 moet gaan doen dan kom ik uit op 21 lussen het gevolg is dat hij heel wijd is als een soort tafel kleed ,er staat ook steeds dat je moet meerderen maar nooit dat je moet minderen iemand nog een tip of ook deze fout ondekt heeft of doe ik het echt helemaal fout
21.04.2013 - 13:08DROPS Design answered:
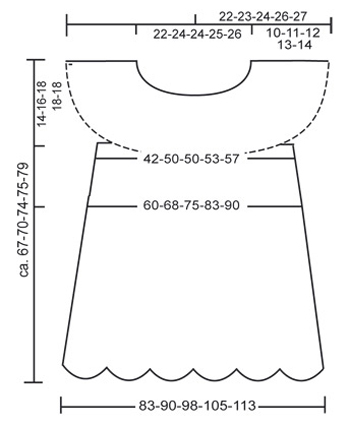
Beste Ank. Het patroon is correct. De hoogte van 23 cm klopt als u meerdert volgens het patroon. Het is niet helemaal duidelijk wat u bedoelt met de 21 lussen na 23 cm. Wij raden u aan de stekenverhouding goed te controleren. Het model heeft een A-lijn, zie ook de tekening. U hoeft inderdaad niet te minderen. Wij vermoeden dat u maat L haakt. De onderbreedte is dan inderdaad 98 cm aan het einde = 196 cm rondom. Als u dat te wijd vindt, raden we u aan een ander maat of model te maken.
16.05.2013 - 13:28
![]() Irina wrote:
Irina wrote:
Jeg kan simpel ikke finde ud af det .Videre hækles der 1 omg med lm-buer samtidig med at der tages 4-2-2-14-14 st ud jævnt fordelt – læs Udtagningstips 2 - = 144-162-180-198-216 st/lm. Jeg kan ikke finde ud af om det skal være 198 st. Der skal være eller om lm også skal tælles med har nu pillet der op så mange gange
04.04.2013 - 10:32DROPS Design answered:
Det er totalt 198 masker st og lm til sammen
04.04.2013 - 17:27
![]() Teri wrote:
Teri wrote:
I love this pattern. I am used to working crochet charts, although I am not an expert. In M2 chart, row Z, supposedly the last row in the written pattern consists of all dc. However the last written row is in 1 dc 1 ch loops. What am I missing? I understand the row that I am supposed to start with in the chart where it says "start" just not understanding row Z
28.03.2013 - 15:15DROPS Design answered:
Dear Teri, row Z in diagram M.2 shows the number of sts on previous round to let you see how to work 1st row (arrow start). Happy crocheting!
02.04.2013 - 10:09
![]() Bettina Hornscheidt wrote:
Bettina Hornscheidt wrote:
Liebes Team, habe dieses wunderschöne Modell angefangen zu häkeln und bin nun an der Stelle, wo die Markeirungsfäden eingezogen werden. Mir ist nicht genau klar, wo genau und warum ist das notwendig.Oder dient das nur dazu, um klar zu haben, was ist Vorderteil und was Rückenteil ist ? Vielen Dank für Eure Hilfe... L.G. Bettina Hornschiedt
18.03.2013 - 17:54DROPS Design answered:
Liebe Bettina, die Markierungsfäden kennzeichnen die Stelle, an der aufgenommen wird.
19.03.2013 - 07:41
![]() Becky wrote:
Becky wrote:
Nevermind I figured out the arm shaping. I forgot what the ch-loop meant lol but I have it now. I do have another question though. I was wondering am I allowed to sell any of the finished products I make from here on my shop website as long as I put that it was made from DROPS DESIGNS patterns?
24.02.2013 - 00:29DROPS Design answered:
Dear Becky, you will find all relevant informations at the very bottom of the page. Happy crocheting !
25.02.2013 - 10:54
![]() Becky wrote:
Becky wrote:
I am confused on the first round of the underarm where you chain. I got the skip 17 ch-loops and chain 8. I attached it in the 18th chain but I don't know what crochet to do in the next 21 stitches. Is it single or double crochet or am I supposed to do something else?
23.02.2013 - 23:11DROPS Design answered:
Dear Becky, you work ch-loops as before (1 ch-loop = 1 dc + 1 ch) on sts for front piece and back piece. Happy crocheting!
25.02.2013 - 10:03
|
||||||||||||||||||||||
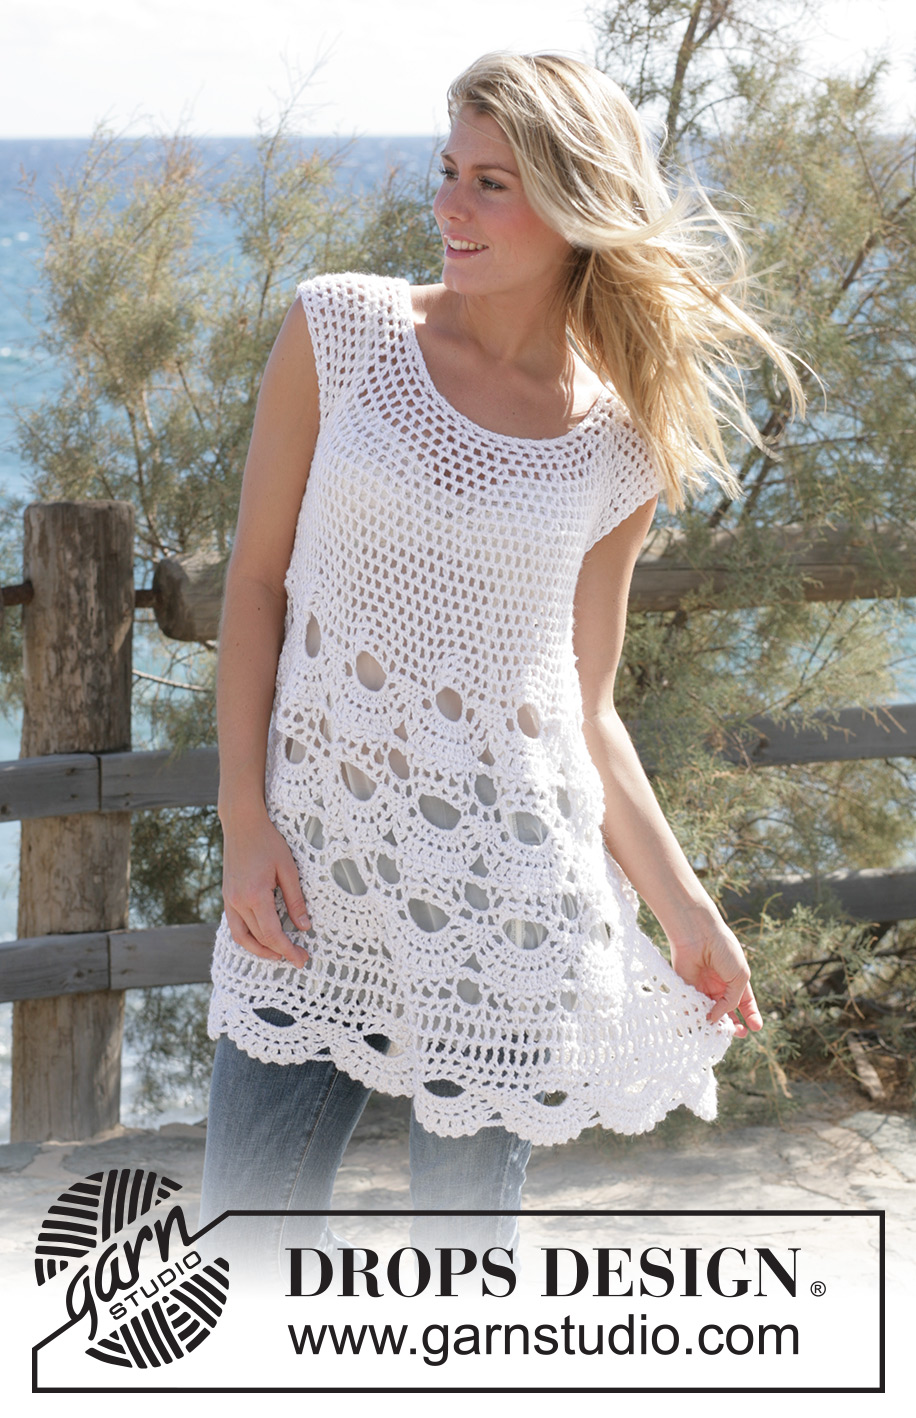
Breath of Summer#breathofsummertunic |
||||||||||||||||||||||
|
|
||||||||||||||||||||||
Crochet DROPS tunic with mussel pattern with 1 thread Alpaca and 1 thread Cotton Viscose or Bomull-Lin. Size S - XXL
DROPS 99-4 |
||||||||||||||||||||||
|
Crochet tension: 12 tr x 7 rows with 1 thread Alpaca and 1 thread Cotton Vicose or 1 thread Bomull-Lin = 10 x 10 cm. 1 repeat of mussel pattern = width approx 12 cm. Increasing tip 1: To inc 1 dc: crochet 2 dc in 1 dc. Increasing tip 2: To inc 1 tr: crochet 2 tr in 1 tr (no ch in between). Increasing tip 3: To inc 1 ch-loop: crochet 2 ch-loops in the same st. Crochet info: At the beg of each round replace the first tr with 3 ch. Replace first dtr with 4 ch. Finish each round with 1 sl st in 3rd/4th ch from beg of round. Pattern: See diagrams M.1 and M.2. The diagram is seen from the RS. Measuring tip: Because of the weight of the wool all measurements should be made whilst the garment is hanging. Back and front piece: The tunic is crochet in the round from the top down. Loosely crochet 71-75-75-79-83 ch on crochet hook size 5 mm with 1 thread Drops Alpaca and 1 thread Drops Cotton Viscose (double thread)or 1 thread Bomull-Lin. Form a ring with a sl st in the first ch. Crochet next round as follows: 1 dc in each of the first 3 ch, *skip 1 ch, 1 dc in each of the 3 next ch*, repeat from *-* = 54-57-57-60-63 dc. Now crochet a round of dc, at the same time inc 22-15-19-20-21 dc evenly – see Increasing tip 1 = 76-72-76-80-84 dc. Continue in M.1 – see Crochet info. After M.1 there are 76-90-95-100-105 ch-loops on round (1 ch-loop = 1 tr + 1 ch). Continue with tr in ch and ch over tr until piece measures 10-11-12-13-14 cm. Crochet next round as follows: Skip 17-19-21-22-22 ch-loops from previous round (= right sleeve), crochet 8 ch (= under arm), crochet 21-26-26-28-30 ch-loops (= front piece), skip 17-19-21-22-22 ch-loops from previous round (= left sleeve), crochet 8 ch (= under arm), crochet 21-26-27-28-31 ch-loops (= back piece). Insert a marking thread each side, in between the 8 ch crochet mid under arm. Continue in ch-loops. NB! On the first round crochet the 8 ch under each arm as follows: 1 tr in the first ch, 1 ch, skip 1 ch, 1 tr in next ch, 1 ch, 1 tr in the same ch, 1 ch, skip 1 ch, 1 tr in next ch, 1 ch, 1 tr in the same ch, 1 ch, skip 1 ch, 1 tr in next ch, 1 ch and skip 1 ch (= 6 ch-loops under each arm) = 54-64-65-68-73 ch-loops on round in total. Continue in ch-loops in the round, at the same time inc 1 ch-loop – see Increasing tip 3 – on each side of both MT on every round a total of 4-4-6-6-7 times = 70-80-89-92-101 ch-loops. After all inc piece measures approx 19-20-23-24-27 cm measured from ch-chain at neckline (you have now reached mid chest; if you wish to adjust this crochet additional rounds in ch-loops after the inc). Now crochet 1 round in ch-loops, at the same time inc 4-2-2-14-14 tr evenly on round – see Increasing tip 2 = 144-162-180-198-216 tr/ch. Now continue in mussel pattern M.2 (beg at start arrow in diagram) = 8-9-10-11-12 horizontal repeats on round. Crochet 3 vertical repeats of M.2, but beg the second and third repeat by the Arrow-B in diagram. After M.2 crochet 2-3-3-3-4 rounds in dtr as follows: Round 1: Remember crochet info! Crochet 1 dtr in each ch-loop with 1 ch in between each and finish with 1 dtr in the last tr = 72-81-90-99-108 dtr. Round 2: crochet 1 dtr in each dtr from previous round with 2 ch in between each dtr (instead of 1) – finish size S here before the last mussel pattern = 72 dtr. Round 3: crochet 1 dtr in each dtr from previous round with 3 ch between each dtr - finish size M, L and XL here before the last mussel pattern = 81-90-99 dtr. Round 4: crochet 1 dtr in each dtr from previous round with 3 ch between each dtr - finish size XXL here before the last mussel pattern = 108dtr. Now crochet a round in ch-loops as follows: 1 tr and 1 ch (= 1 ch-loop) in each dtr from previous round, at the same time inc 1 ch-loop – see Increasing tip 3 – in every 3-3-4-4-4 dtr. NB! For size L and XL finish with 1 tr and 1 ch in each of the last 2-3 dtr = 96-108-112-123-135 ch-loops. Continue with 1 round of ch-loops, at the same time inc 6-0-10-6-0 tr – see Increasing tip 2 = 198-216-234-252-270 tr/ch. Now crochet M.2 again (beg at start arrow in diagram), but finish the pattern after row 7. |
||||||||||||||||||||||
Diagram explanations |
||||||||||||||||||||||
|
||||||||||||||||||||||
 |
||||||||||||||||||||||
 |
||||||||||||||||||||||
Have you finished this pattern?Tag your pictures with #dropspattern #breathofsummertunic or submit them to the #dropsfan gallery. Do you need help with this pattern?You'll find 7 tutorial videos, a Comments/Questions area and more by visiting the pattern on garnstudio.com. © 1982-2026 DROPS Design A/S. We reserve all rights. This document, including all its sub-sections, has copyrights. Read more about what you can do with our patterns at the bottom of each pattern on our site. |
||||||||||||||||||||||


With over 40 years in knitting and crochet design, DROPS Design offers one of the most extensive collections of free patterns on the internet - translated to 17 languages. As of today we count 324 catalogues and 12290 patterns translated into English (UK/cm).
We work hard to bring you the best knitting and crochet have to offer, inspiration and advice as well as great quality yarns at incredible prices! Would you like to use our patterns for other than personal use? You can read what you are allowed to do in the Copyright text at the bottom of all our patterns. Happy crafting!
Post a comment to pattern DROPS 99-4
We would love to hear what you have to say about this pattern!
If you want to leave a question, please make sure you select the correct category in the form below, to speed up the answering process. Required fields are marked *.