
Popular categories
Looking for a yarn?


Comments / Questions (195)
![]() Luisa wrote:
Luisa wrote:
Npn riesco a comprendere questa spiegazione per la diminuzione degli scalfi. A conti fatti, contando le maglie che dovrei avere dpo la diminuzione, dovrei diminuire 8 maglie totali e non 7 per llcome descritto. Grazie per l aiuto il lavoro misura 32-40-41-42-43 cm intrecciare 7 m. a ogni lato per gli scalfi (= intrecciare le m. con il segnapunti + 3 m. a ogni lato di questa m.) = 67-73-77-85-93 m. sul dietro 36-38-40-44-48 m. su ogni davanti
13.10.2022 - 18:13DROPS Design answered:
Buonasera Luisa, deve intrecciare 7 maglie per ogni lato (la maglia con il segnapunti e 3 maglie a ogni lato di questa maglia), quindi 14 maglie in totale per lato, passando ad esempio da 153 maglie a 139 maglie. Buon lavoro!
13.10.2022 - 22:47
![]() Luisa wrote:
Luisa wrote:
Non riesco a comprendere questo passaggio perche dai conti fatti i punti da diminuire per lo scalfo sono 4 per lato e non t come indicato. Mi potete aiutare per favore? Grazie per la risposta. Quando il lavoro misura 32-40-41-42-43 cm intrecciare 7 m. a ogni lato per gli scalfi (= intrecciare le m. con il segnapunti + 3 m. a ogni lato di questa m.) = 67-73-77-85-93 m. sul dietro 36-38-40-44-48 m. su ogni davanti
13.10.2022 - 17:19DROPS Design answered:
Buonasera Luisa, deve intrecciare 7 maglie per ogni lato (la maglia con il segnapunti e 3 maglie a ogni lato di questa maglia), quindi 14 maglie in totale per lato, passando ad esempio da 153 maglie a 139 maglie. Buon lavoro!
13.10.2022 - 22:47
![]() Christine wrote:
Christine wrote:
Goede morgen, Het vest is af en mooi geworden! Wel met de nodige aanpassingen voor de maat Heeft u tips voor het inzetten van de rits? Heeft u tips
02.09.2022 - 12:21DROPS Design answered:
Dag Christine,
De rits kun je het beste met een naaimachine inzetten met een speciaal ritsvoetje (zit standaard bij de meeste naaimachines). Zorg ervoor dat je het breiwerk niet uitrekt bij het inzetten van de rits, anders gaat de rits bobbelen.
14.09.2022 - 12:11
![]() Birgith Christensen wrote:
Birgith Christensen wrote:
Har strikket denne cardigan til min mand i de garner som opskriften anbefaler, og blev færdig i dag, alle glade, så ville jeg lige vaske den. jeg vaskede den på 30* og brugte hår shampo som jeg altid bruger når jeg vasker uldvask og altid med godt resultat, men den cardigan jeg fik ud kunne passe et barn, vi var meget skuffede, vi fulgte vaskeanvisningen præcis og det er jo mange penge og et stort arbejde som jeg brugt mange timer på
02.05.2022 - 20:25
![]() Hildegard Müller-Ruster wrote:
Hildegard Müller-Ruster wrote:
Kann die Jacke, gestrickt aus Karisma und Alpaca Mix, ind der Waschmaschine gewaschen werden? Vielen Dank für die sehr gute Anleitung.
29.04.2022 - 22:49DROPS Design answered:
Liebe Frau Müller-Ruster, nur Karisma ist Superwash und kann dann in der Waschmaschine gewaschen werden; aber dann können Sie ein anderes Garn der Garngruppe A anstatt Alpaca wählen, das auch Superwash ist (Baby Merino, Fabel z.B.) - benutzen Sie den Garnumrechner um die Alternative zu finden. Viel Spaß beim stricken!
02.05.2022 - 08:03
![]() Gabriella Monti wrote:
Gabriella Monti wrote:
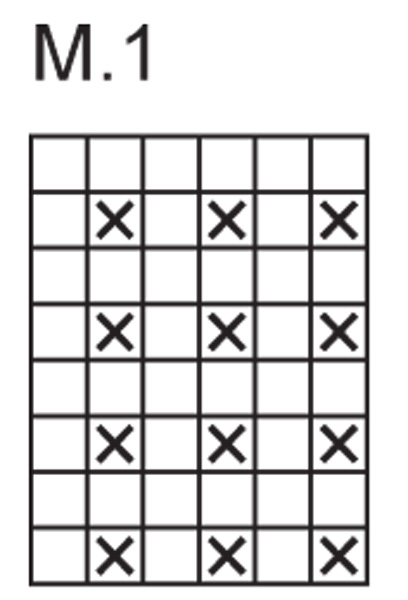
Buongiorno sto eseguendo il diagramma M 1 del modello RICHARD. Il risultato che ottengo dal mio lavoro seguendo lo schema, non è uguale a quello proposto da voi nella fotografia: \\r\\nnon mi risultano i quadretti divisi da una costa verticale. Il mio lavoro somiglia di più ad una costa 1/1. Forse ci vogliono punti a rovescio ritorto? Purtroppo la fotografia, un pò sfuocata, non si può ingrandire. Grazie.
04.03.2022 - 11:54DROPS Design answered:
Buonasera Gabriella, le indicazioni sono corrette: sta lavorando il diagramma dal basso verso l'alto? Buon lavoro!
04.03.2022 - 17:44
![]() Aly De Boer wrote:
Aly De Boer wrote:
Ik brei de xl en het aantal stken dat ik overhou aan het eind van de raglan klopt niet. 299 steken aan het begin 25 x8 steken minderen is 99 over dan 2x6 op hulpdraad en dan nog 2x2 x2x1 minderen dan kom ik op 75 steken over ipv 71 zoals in het patroon staat.
08.02.2022 - 21:59
![]() Lilian Boe wrote:
Lilian Boe wrote:
I skriver at strikkefasthedes skal laves i glatstrik, altså 15 m X 21 p =10 cm Inde i opskriften under Ryg- og forstykke: skriver i \"Husk på strikkefastheden\" Nu bliver jeg i tvivl om strikkefastheden alligevel skal måles i mønsterstrik (perlestrik) Det vil jo give en helt anden strikkefasthed hvis den måles i mønsterstrik?????? Jeg overvejer at gå et pinde nr. op for at få strikkefastheden i mønsterstrik. Håber at det giver mening..
16.12.2021 - 09:55DROPS Design answered:
Hej Lilian, strikkefastheden er regnet ud efter 15 masker på 10 cm i mønster. Har du 15 masker på 10 cm får du målene i måleskitsen :)
21.12.2021 - 08:45
![]() Johanne Jørgensen wrote:
Johanne Jørgensen wrote:
Hej. Jeg er igang med denne super fine jakke til min far. Jeg er nået til at sætte masker af til halsen (efter at ærmerne er sat på) men jeg forstår ikke hvordan jeg kommer videre. Jeg strikker XXL og mit arbejde måler nu 62 cm foran. Kan i forklare hvad jeg gør med de masker der skal sættes til hvile og hvad jeg gør med resten? Tak 😊
29.11.2021 - 13:42DROPS Design answered:
Hei Johanne. Jo, nå starter fellingene til hals. Sett de 6 første maskene på 1 tråd, strikk til det gjenstår 6 masker. Disse 6 maskene settes også på 1 tråd. Strikk tilbake. På neste pinne starter fellingene. Fell 2 masker, strikk pinnen ut, snu og fell 2 masker, strikk pinnen ut. Gjenta denne fellingen 3 ganger til (husk også å felle til raglan om det ikke er ferdig). Du har da felt 8 masker i hver side. Deretter skal det bare felles 1 maske i hver side og det gjøre 2 ganger. Du har da fell 10 masker i hver side. Du skal nå ha 75 masker på pinnen. mvh DROPS Design
30.11.2021 - 10:13
![]() Christina wrote:
Christina wrote:
Hej Jeg forstår ikke rigtig , det stykke hvor man skal lukke 7 masker af i hver side? Er det ved de to mærketråde? PFT
07.11.2021 - 07:41DROPS Design answered:
Hej Christina. Ja det stämmer, du lukker 7 masker af vid varje mærketråde til ærmegab. Mvh DROPS Design
09.11.2021 - 13:06
|
|||||||
Richard |
|||||||
|
|
|||||||
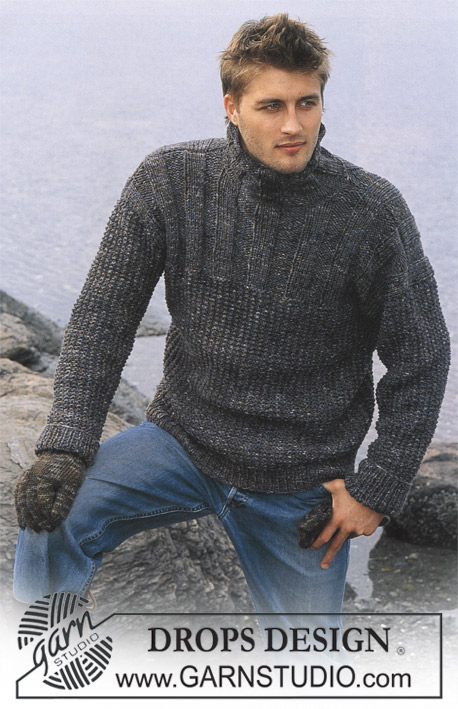
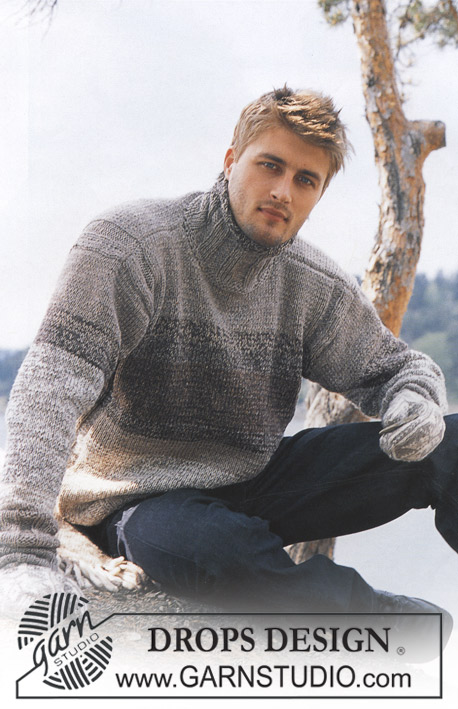
Knitted jacket for men, with raglan, high neck and zipper in DROPS Karisma and DROPS Alpaca
DROPS 85-13 |
|||||||
|
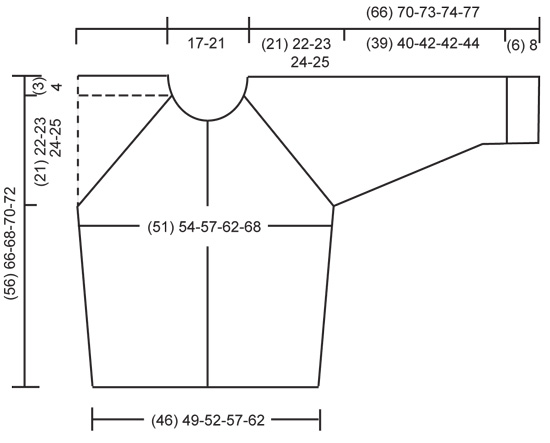
Gauge: 15 sts x 21 rows with 1 strand of each yarn on larger needles in stockinette st = 10 x 10 cm. Rib: *K 1, P 1*, repeat from *-*. Pattern: The diagrams are showing all rows seen from the right side. Decreasing tips (for raglan): All decs are made on the right side. On front- and back piece dec before the 3 sts before/after the marker, and on the sleeves dec right beside the marker. Start 2 sts before the marker on the sleeves and 5 sts before the marker on front and back, and work as follows: K 2 tog, 1 st in seed st, K 1, 1 st in seed st, slip 1 st as if to knit, K 1, psso. ___________________________________________________________________ BODY The cardigan are worked back and fort on circular needle. Cast on 137-147-155-171-187 sts on smaller circular needles with 1 strand Karisma + 1 strand Alpaca. Knit rib, keeping 3 sts in garter st at each side for front edges, and begin and end rib with K 1 (seen from the right side). When the piece measures 3-4-4-4-4 cm change to larger circular needles and Pattern 1, keeping 3 sts in garter st at each side for front edges. See that the K rib in the pattern is above the K rib in ribbing. Place a marker in the 36-38-40-44-48th st in from each side (it will be a K 1), there are 65-71-75-83-91 sts between markers on back. When the piece measures 10-12-12-12-12 cm inc 1 st at each side of both sts with markers. Inc every 5-6-6-6-6 cm a total of 4 times = 153-163-171-187-203 sts – knit the increased sts into the pattern as you go along. When the piece measures 32-40-41-42-43 cm bind off 7 sts at each side for armholes (= bind off the st with the marker + 3 sts each side of that st) = 67-73-77-85-93 sts on back and 36-38-40-44-48 sts on each front. Lay piece aside and knit the sleeves. SLEEVES Sleeves knitted in the round. Cast on 32-34-36-36-40 sts on smaller double-pointed needles with 1 strand Karisma + 1 strand Alpaca; join and place a marker at the join. Knit rib – start with K 1 at marker. When the piece measures 6-8-8-8-8 cm change to larger double-pointed needles and Pattern 1 – see that the K rib in the pattern is above the K rib in the ribbing. When the piece measures 10-14-10-14-10 cm inc 1 st each side of the K st at marker every 2.5-2-2.5-2-2.5 cm a total of 14-16-16-17-17 times = 60-66-68-70-74 sts – knit the increased sts in the pattern as you go along. When the piece measures 45-48-50-50-52 cm bind off 7 sts at marker (bind off the the K st at marker + 3 sts each side of it) = 53-59-61-63-67 sts. Lay piece aside and knit second sleeve. YOKE Put the sleeves in on the same circular needles as Body where you bound off for armholes = 245-267-279-299-323 sts Put a marker in each transition between Body and sleeves = 4 markers. Knit 3-1-1-1-0 rows before beginning shaping. Read entire section before knitting: Raglan shaping: Dec at each side of all markers (= 8 decs) – see Decreasing tips above – every other row 21-23-24-25-27 times. Neck: When the piece measures 49-57-59-60-62 cm put 3-4-5-6-6 sts at each center front edge on st holders for the neck. Then bind off at each neck edge every other row: 2 sts 2-0-0-2-4 times and 1 st 2-6-6-4-2 times. After all shaping is complete 59-63-65-71-75 sts remain. Neckband: Pick up and knit approx. 10-16 sts at each side of neck on fronts (including sts on st holders) with 1 strand of each yarn and put all sts on smaller circular needles. K 1 row from wrong side, then K 1 row from right side, adjusting (inc/dec) to 83-83-91-103-111 sts on 2nd row. Then knit rib, keeping 3 sts in garter st at each side and beginning rib with K 1 (as seen from the right side). When the collar measures 20-22-22-24-24 cm bind off all sts in rib. ASSEMBLY Sew opening under the sleeve. Sew in zipper – start at lower edge. Fold the collar in half to wrong side and stitch in place, covering end of zipper. |
|||||||
Diagram explanations |
|||||||
|
|||||||
 |
|||||||
 |
|||||||
Have you finished this pattern?Tag your pictures with #dropspattern or submit them to the #dropsfan gallery. Do you need help with this pattern?You'll find 23 tutorial videos, a Comments/Questions area and more by visiting the pattern on garnstudio.com. © 1982-2026 DROPS Design A/S. We reserve all rights. This document, including all its sub-sections, has copyrights. Read more about what you can do with our patterns at the bottom of each pattern on our site. |
|||||||


With over 40 years in knitting and crochet design, DROPS Design offers one of the most extensive collections of free patterns on the internet - translated to 17 languages. As of today we count 324 catalogues and 12267 patterns translated into English (UK/cm).
We work hard to bring you the best knitting and crochet have to offer, inspiration and advice as well as great quality yarns at incredible prices! Would you like to use our patterns for other than personal use? You can read what you are allowed to do in the Copyright text at the bottom of all our patterns. Happy crafting!
Post a comment to pattern DROPS 85-13
We would love to hear what you have to say about this pattern!
If you want to leave a question, please make sure you select the correct category in the form below, to speed up the answering process. Required fields are marked *.