
Popular categories
Looking for a yarn?


Comments / Questions (32)
![]() Lorraine Green wrote:
Lorraine Green wrote:
When binding off stitches on sleeve, do i bind off 7 at each end of row. 7 stitches each side of centre marker.
24.04.2024 - 11:56DROPS Design answered:
Dear Mrs Green, cast off the first 7 sts at the beg of the round + the last 7 sts at the end of the row, so that the pattern will work on yoke. Happy knitting!
24.04.2024 - 13:00
![]() Elin-Beathe Gjertsen wrote:
Elin-Beathe Gjertsen wrote:
Strikker Espuma bolero, skal begynne felling på bærestykket, og får ikke maskene til å stemme med mønster og felling. Etter min str skal jeg ha 242m på pinnen , når jeg har strikket første pinne så har jeg bare 125 men det står at jeg skal ha 130? Og på neste pinne fra vrangen skal det jo felles o hver ende av rapporten lurer på hva jeg gjør galt
04.10.2023 - 13:08DROPS Design answered:
Hei Elin-Beathe. I str M/L skal du ha 242 masker og nå skal det felles / strikkes etter M.2, bortsett fra de 5+5 ytterste maskene i hver side. Altså du har 242 masker - 5+5 ytterstemasker = 432 masker som du skal strikke M.2 over. Du strikker 8 rapporter av M.2 (1 rapport = 29 masker x 8 rapporter = 232 masker). Når du har strikket M.2 1 gang i høyden består 1 rapport av M.2 av 15 masker (8 rapporter x 15 masker = 120 masker + 5+5 ytterste masker i hver side = 130 masker. mvh DROPS Design
16.10.2023 - 12:04
![]() Lilian Nafula wrote:
Lilian Nafula wrote:
Hello ,i find this Bolero beautiful but i need a larger size XL and am thinking i can just increase the nr. of the stitches by the diffrence of the 2 sizes and just work that through the whole Bolero maxbe i can get a few tips Thanxx
31.03.2022 - 20:57
![]() Anna wrote:
Anna wrote:
Scusate, mi sono resa conto che la prima domanda del quesito precedente è inopportuna in quanto, trattandosi di un cardigan, la lavorazione in tondo non si può fare. Rimane in piedi solo la seconda domanda sull'uso dei ferri circolari per la lavorazione delle maniche. Grazie.
10.05.2020 - 13:42DROPS Design answered:
Buongiorno Anna. Può lavorare le maniche sui ferri dritti; avvia il numero delle maglie indicate e aggiunge 1 m vivagno da ciascun lato per la cucitura. Anche queste maglie andranno chiuse quando intreccia per gli scalfi. Buon lavoro!
10.05.2020 - 14:37
![]() Anna wrote:
Anna wrote:
Buonasera, sono una principiante dei ferri circolari. Vorrei sapere se il davanti/dietro va lavorato avanti e indietro o in tondo e se le maniche possono essere lavorate su ferri circolari anzichè su ferri a doppia punta. Grazie.
09.05.2020 - 23:45
![]() Benedetta wrote:
Benedetta wrote:
Grazie!
16.03.2017 - 12:36
![]() Benedetta wrote:
Benedetta wrote:
Buongiorno,,quando devo intrecciare x gli scalfi?nell'ultimo ferro del diagramma A 1 o nel precedente?
16.03.2017 - 11:35DROPS Design answered:
Buongiorno Benedetta, deve intrecciare per gli scalfi sull'ultimo ferro del diagramma. Buon lavoro!
16.03.2017 - 12:00
![]() Benedetta wrote:
Benedetta wrote:
Grazie mille!Preziose, come sempre!
12.03.2017 - 16:18
![]() Benedetta wrote:
Benedetta wrote:
Buongiorno, scusate ma il diagramma M1 è composto da 4 ferri,quindi si ripetono sempre questi ferri e poi si lavora M2 per il carré?
12.03.2017 - 14:56DROPS Design answered:
Buongiorno Benedetta. Sì esatto, lavora i quattro ferri del diagramma M1 fino agli scalfi e poi sul carré segue il diagramma M2. Buon lavoro!
12.03.2017 - 15:51
![]() Loaec Francoise wrote:
Loaec Francoise wrote:
Suite à ma question précédente : le corps et l empiècement se tricote en aller retour mais pas les manches qui se tricote en rond. D ou ma question sur la façon d àdapter le point dentelle a un tricotage en rond
02.10.2016 - 10:45DROPS Design answered:
Bonjour Mme Loac, quand vous rabattez les m sous la manche, rabattez les 6-7 premières m du tour et les 6-7 dernières m du tour. Ainsi, le motif pourra s'intercaler entre les mailles du dos et de chaque devant: les premières m de la manche se tricoteront à la suite des dernières m du motif du devant et idem pour la 2ème manche. Bon tricot!
03.10.2016 - 09:44
|
|||||||||||||
Espuma |
|||||||||||||
|
|
|||||||||||||
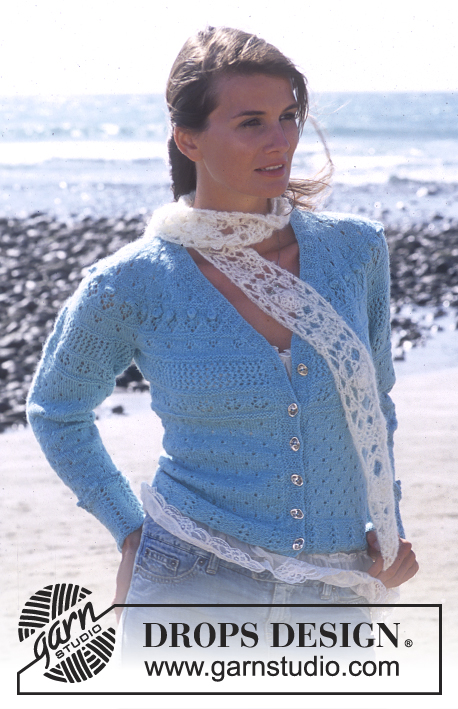
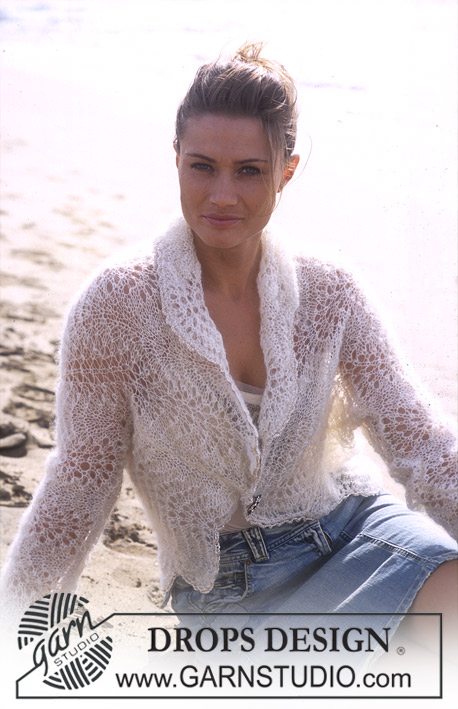
DROPS Small bolero cardigan with a wavy lace pattern in Vivaldi or Brushed Alpaca Silk.
DROPS 94-13 |
|||||||||||||
|
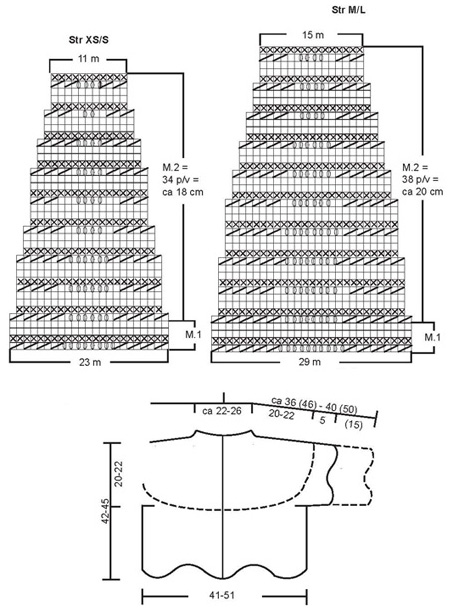
Knitting gauge: 17 sts x 19 rows on needles size 5.5 mm with Vivaldi in wavy lace pattern = 10 x 10 cm. Wavy lace pattern: See diagrams M.1 & M.2. The diagrams are seen from the right side. Bend the circular needle in the middle and cast on 148-184 sts (including 5 edge sts each side, knitted in garter sts throughout) on 2 needles size 5.5 with Vivaldi or Brushed Alpaca Silk (use 2 needles to make the edge more elastic). Pull out 1 needle and knit 2 rows of garter sts (1st row = the right side). Continue in M.1 with 5 edge sts each side – see diagram for the relevant size. Insert a marking thread in the 40-49 st from each side = 68-86 sts between the marking threads for the back piece – let the marking threads follow the piece as you go along. When the piece measures 22-23 cm – adjust so the next row is the last row in M.1 – bind off 11-15 sts each side for armhole (= the st where the marking threads are inserted + 5-7 sts on each side) = 34-41 sts left for each front piece and 58-72 sts left for back piece. Put the work aside and knit the sleeves. Sleeves: The sleeves can be knitted in 2 different lengths; see the measurement chart (the design in the photo is knitted with the shorter version). Cast on 46-58 sts over 2 needles size 5.5 with Vivaldi or Brushed Alpaca Silk. Pull out 1 needle and distribute the sts on the double pointed needles and knit round. Insert a marking thread at the beginning of round = the centre underneath the sleeve. K 1 round and P 1 round. Continue in M.1 – remember diagram for the correct size. When the piece measures 5 cm (short sleeve) or 15 cm (longer sleeve)– adjust so the next row is the last in M.1 – bind off 12-14 sts underneath the sleeve = 34-44 sts left. Put the sleeve aside and knit another one. Yoke: Put the sleeves in on the same circular needle as the front and back piece, where you bound off for the armholes = 194-242 sts on row. Now knit and bind off according to M.2, but continue to knit the 5 edge sts each side in garter sts – 1st row = right side. After 1 repeat of M.2 in the vertical length there are 98-130 sts left on needle. Continue knitting the last 4 rows of M.2 until the piece measures 19-21 cm from the beginning of the yoke. Now K 1 row from the right side, at the same adjusting number of sts evenly on row to 84-100 (do not dec at front edges). P 1 row from the wrong side and bind off loosely in K sts from the right side – in order not to make the edge too tight, make a yo every 6 th st whilst binding off (knit and bind off the yo’s as sts). Assembly: Sew the openings under arms. Crochet a border along the sleeves edges and all along the opening of the cardigan (this means around the neck, along the front edges and along the bottom edge) on hook side 3 with Cotton Viscose as follows: crochet 1 dc in the 1st st, *3 ch, skip a st, 1 dc in the next st*, repeat from *-* and finish with 3 ch and 1 sl st in the 1st dc from beginning of round. Hold the cardigan together with a broche or similar. |
|||||||||||||
Diagram explanations |
|||||||||||||
|
|||||||||||||
 |
|||||||||||||
Have you finished this pattern?Tag your pictures with #dropspattern or submit them to the #dropsfan gallery. Do you need help with this pattern?You'll find 19 tutorial videos, a Comments/Questions area and more by visiting the pattern on garnstudio.com. © 1982-2026 DROPS Design A/S. We reserve all rights. This document, including all its sub-sections, has copyrights. Read more about what you can do with our patterns at the bottom of each pattern on our site. |
|||||||||||||


With over 40 years in knitting and crochet design, DROPS Design offers one of the most extensive collections of free patterns on the internet - translated to 17 languages. As of today we count 324 catalogues and 12290 patterns translated into English (UK/cm).
We work hard to bring you the best knitting and crochet have to offer, inspiration and advice as well as great quality yarns at incredible prices! Would you like to use our patterns for other than personal use? You can read what you are allowed to do in the Copyright text at the bottom of all our patterns. Happy crafting!
Post a comment to pattern DROPS 94-13
We would love to hear what you have to say about this pattern!
If you want to leave a question, please make sure you select the correct category in the form below, to speed up the answering process. Required fields are marked *.