
Popular categories
Looking for a yarn?


Comments / Questions (6)
![]() Camila wrote:
Camila wrote:
Hey there, I'm a bit confused when picking up stitches for the shoulders. I'm knitting size S and I can only get to 19/20 stitches but not 21 as mentioned on the pattern. I've already seen the videos and lessons but I can't find what I missed. I've double checked that I did all the increases. How should I pick up the stitches to achieve the 21 that the pattern mentions? Thanks!
19.03.2026 - 16:45DROPS Design answered:
Dear Camila, on back piece in S you worked a total of 23 rows (1 row at the beg + 1 row increasing 11 times on every other row), so you will pick up 1 stitch in each of these rows you worked on back piece. Happy knitting!
20.03.2026 - 07:15
![]() Ariel wrote:
Ariel wrote:
When measuring the front piece after joining the left and right sides, do we measures from the join (the base of the neck) or from where we picked up the stitches (at the shoulder)?
28.02.2026 - 21:54DROPS Design answered:
Dear Ariel, all lengths on front piece are taken from picked up stitches. Happy knitting!
02.03.2026 - 09:34
![]() Inga wrote:
Inga wrote:
Leider habe ich auf meine letzte Frage keine Antwort erhalten. Ich habe den Pullover nochmal angefangen ( diesmal in L, da mir M sehr klein vorkommt) und möchte nun in Reihen stricken und nicht in Runden. Beim durchlesen der Anleitung ist mir aufgefallen das für das Rumpfteil in Runden eine Maschenzahl von 180 angegeben wird. Für das Bündchen sind es dann aber 270 Maschen! Was ist mit den fehlenden 110 Maschen? ( davon ausgehend das für das Bündchen um 10 Maschen reduziert wird)
24.02.2026 - 22:56DROPS Design answered:
Liebe Inga, Sie nehmen tatsächlich 90 Maschen zu, damit das Bündchen locker fällt und den Pullover unten nicht oder nur sehr wenig zusammenzieht. Durch die kleinere Nadelstärke wird das Bündchen dann trotzdem fester. Wenn Sie auf die Fotos schauen, sehen Sie, dass das Bündchen im Vergleich zum restlichen Pullover nur sehr wenig enger ist und der Übergang vom Vollpatent zum Rippenmuster kaum sichtbar verläuft. Viel Spaß beim Stricken!
24.02.2026 - 23:33
![]() Inga wrote:
Inga wrote:
Hi, ich stricke den Pullover in M. Bis zum zusammen führen von Vorder- und Rückenteil hatte ich keine Probleme. Nach der Zusammenfügung sieht das Muster komplett anders aus! Es passt nicht mehr. Hätte ich nach dem aufnehmen der je 3 Maschen erstmal eine Runde stricken müssen? Wieso kann man nicht einfach weiterstricken, sondern soll den Faden neu ansetzen? Leider gibt es kein Video bei dem man die Zusammenführung mit zusätzlich aufgenommenen Maschen gezeigt bekommt.
25.12.2025 - 20:39
![]() Floriane wrote:
Floriane wrote:
Bonjour, lorsqu'il s'agit de passer du tricot à plat au tricot en rond, est-ce-que le rang de jonction (lorsqu'on tricote les deux mailles mousse ensemble) compte pour le premier rang du pattern en rond i.e doit-on tricoter ensemble à l'envers dès le rang suivant? Ou bien commence-t-on la pattern de la maille anglaise en rond à partir du rang 1 après le rang de jonction des deux points mousse? Merci d'avance pour votre aide.
10.12.2025 - 11:23DROPS Design answered:
Bonjour Floriane, au tour où vous montez les mailles entre le dos et le devant, tricotez ce tour sur l'endroit (le dernier rang du dos et du devant doit être un rang sur l'envers), coupez le fil et commencez le tour suivant au milieu de l'un des côtés, commencez alors les côtes anglaises en rond; en commençant par le 1er tour; les mailles lisières sont tricotées en côtes anglaises. Bon tricot!
11.12.2025 - 08:50
![]() Kat wrote:
Kat wrote:
Hi there, I'm trying to follow this pattern and got really confused after finishing BACK PIECE. Could someone please help me identify where exactly to pick, and is it for 27 stitches? I've tried to pick up from the diagonal, but it only counts 15 stitches... I'm knitting size M. Many thanks!
10.12.2025 - 10:59DROPS Design answered:
Dear Kat, please look at the tab Videos/Lessons at the top of the page, next to the tab "pattern", you will see in video an overview on how to work such a yoke, then different tutorials in video and in pictures showing how to work first back piece then how to pick up stitches for both shoulders how to work front piece and how to work body joining pieces together. Happy knitting!
11.12.2025 - 08:43
|
|
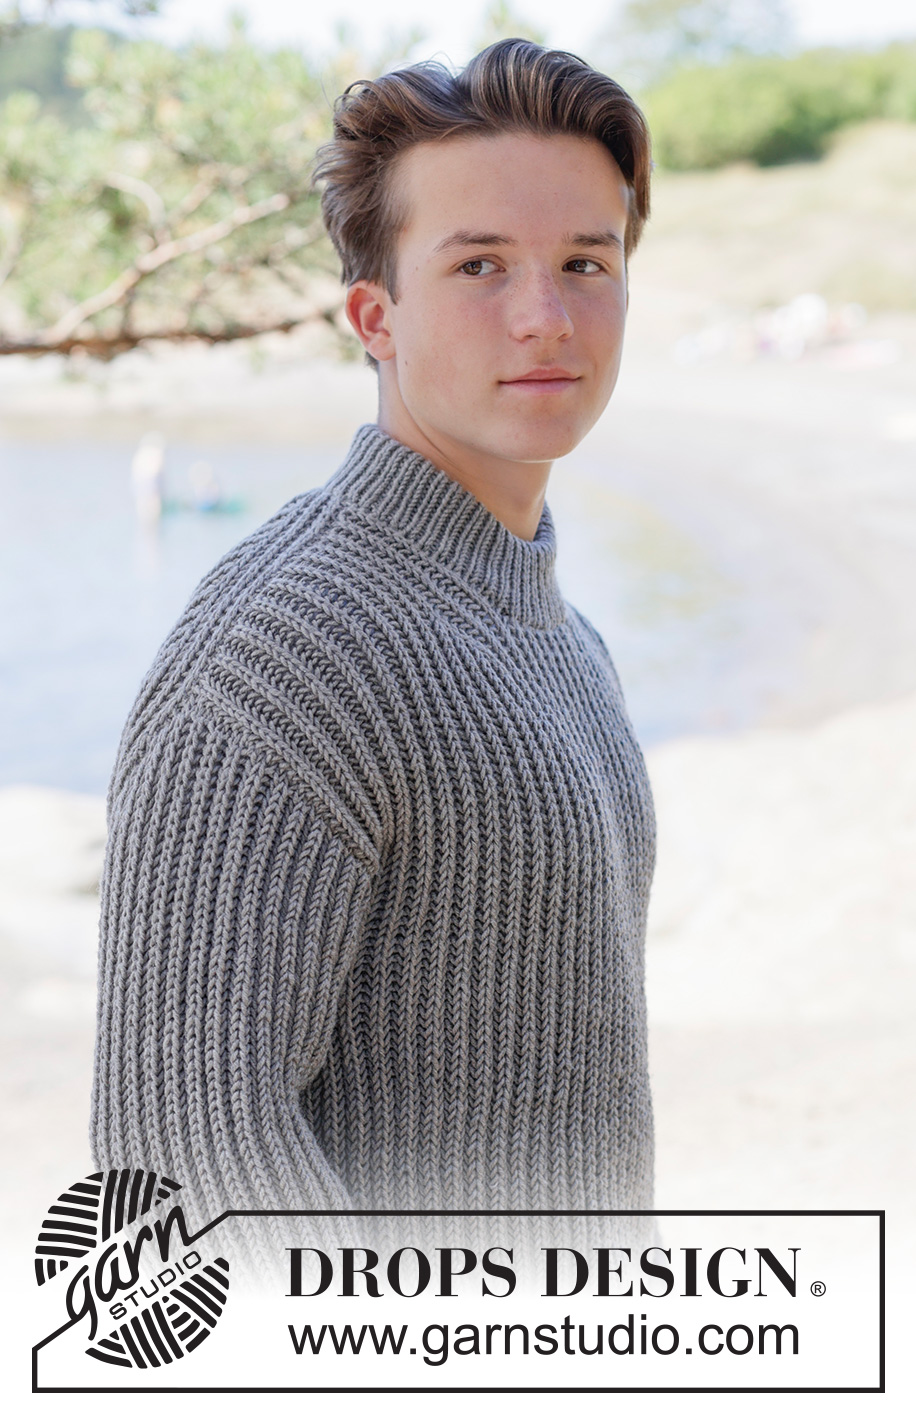
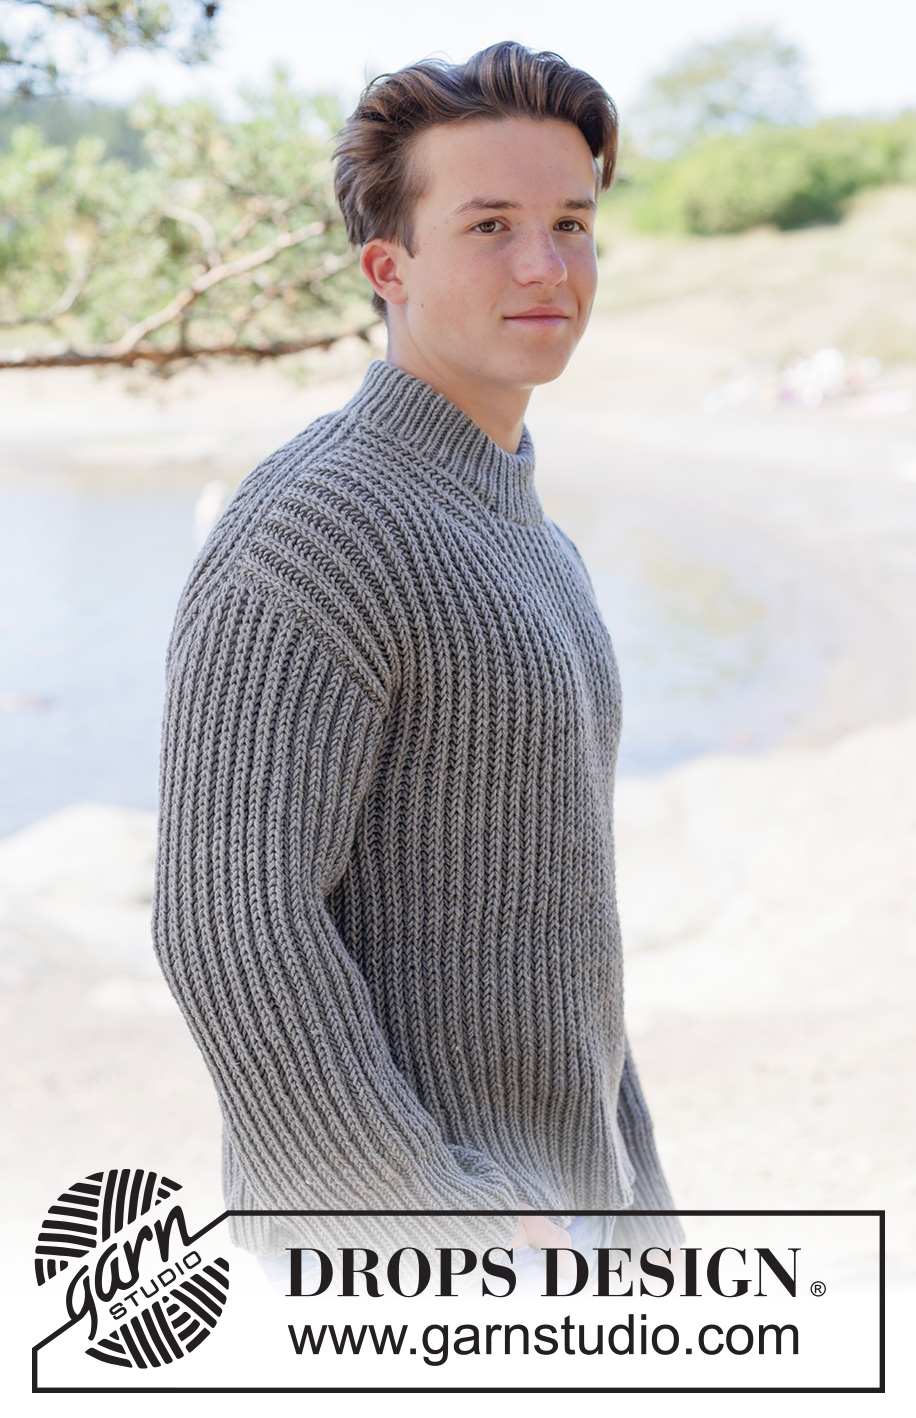
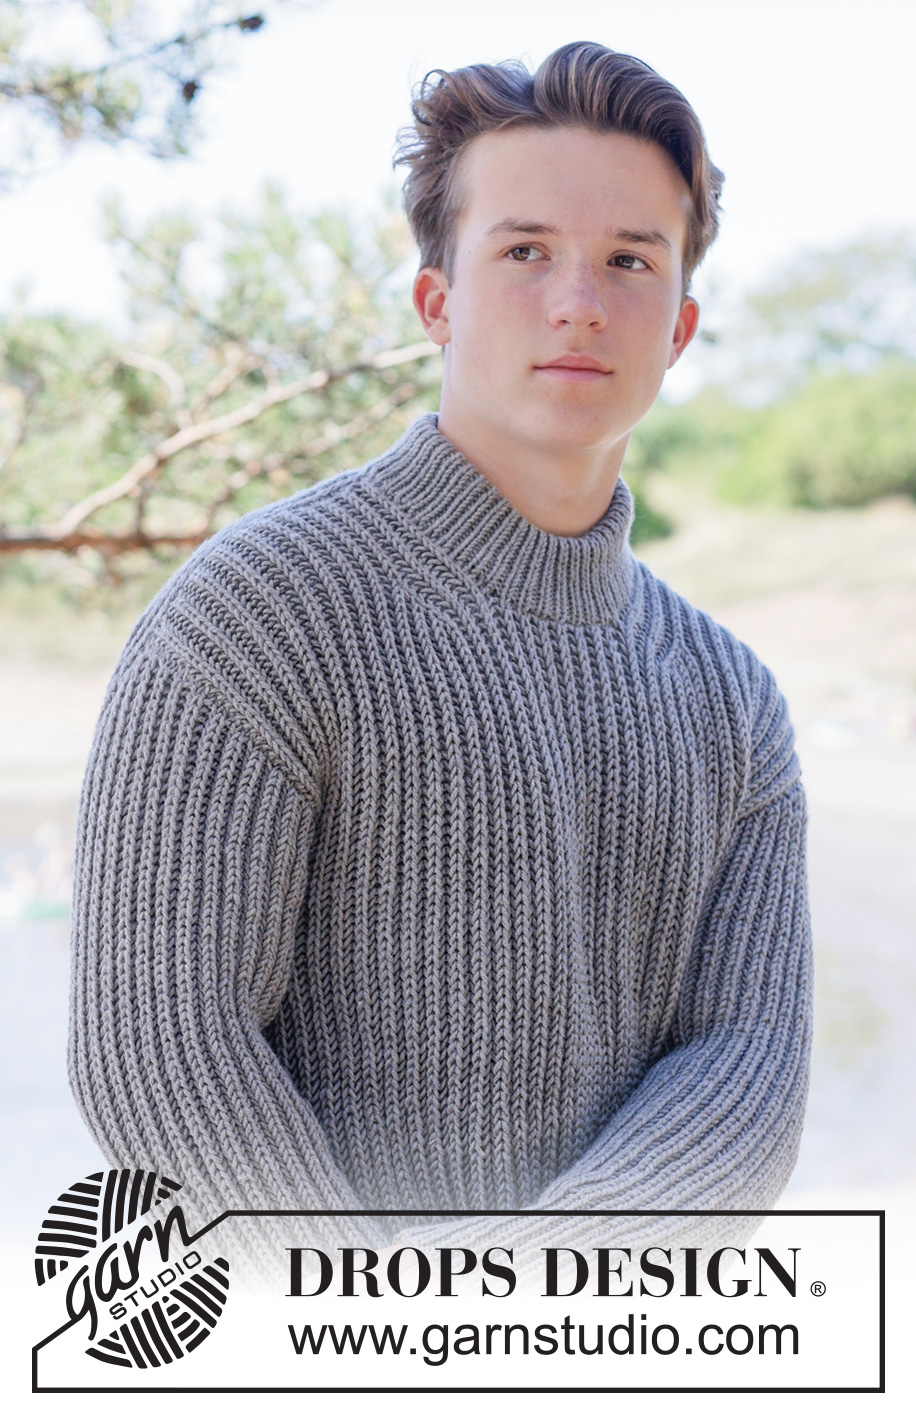
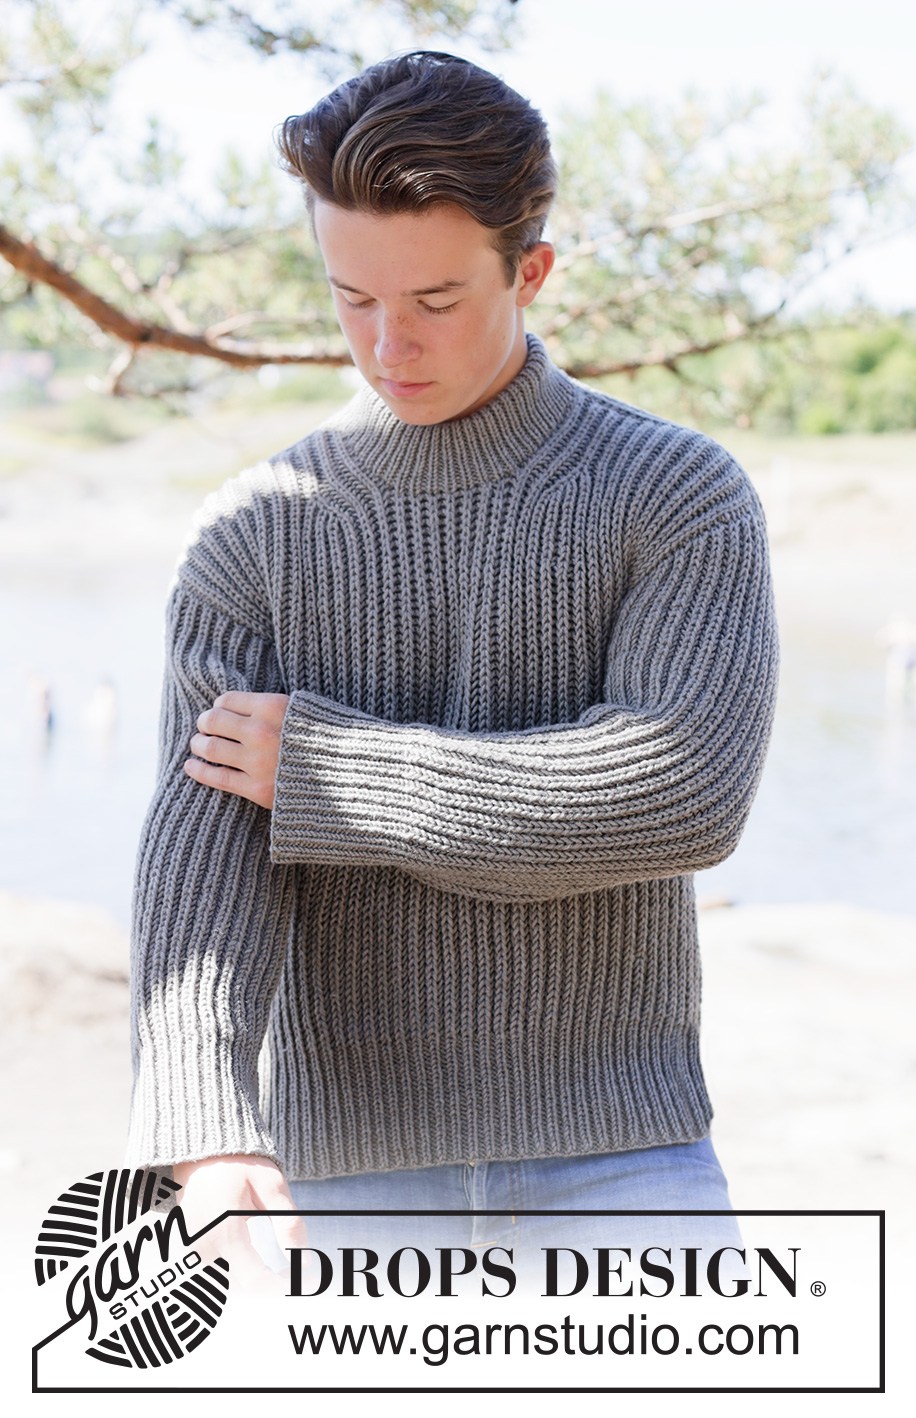
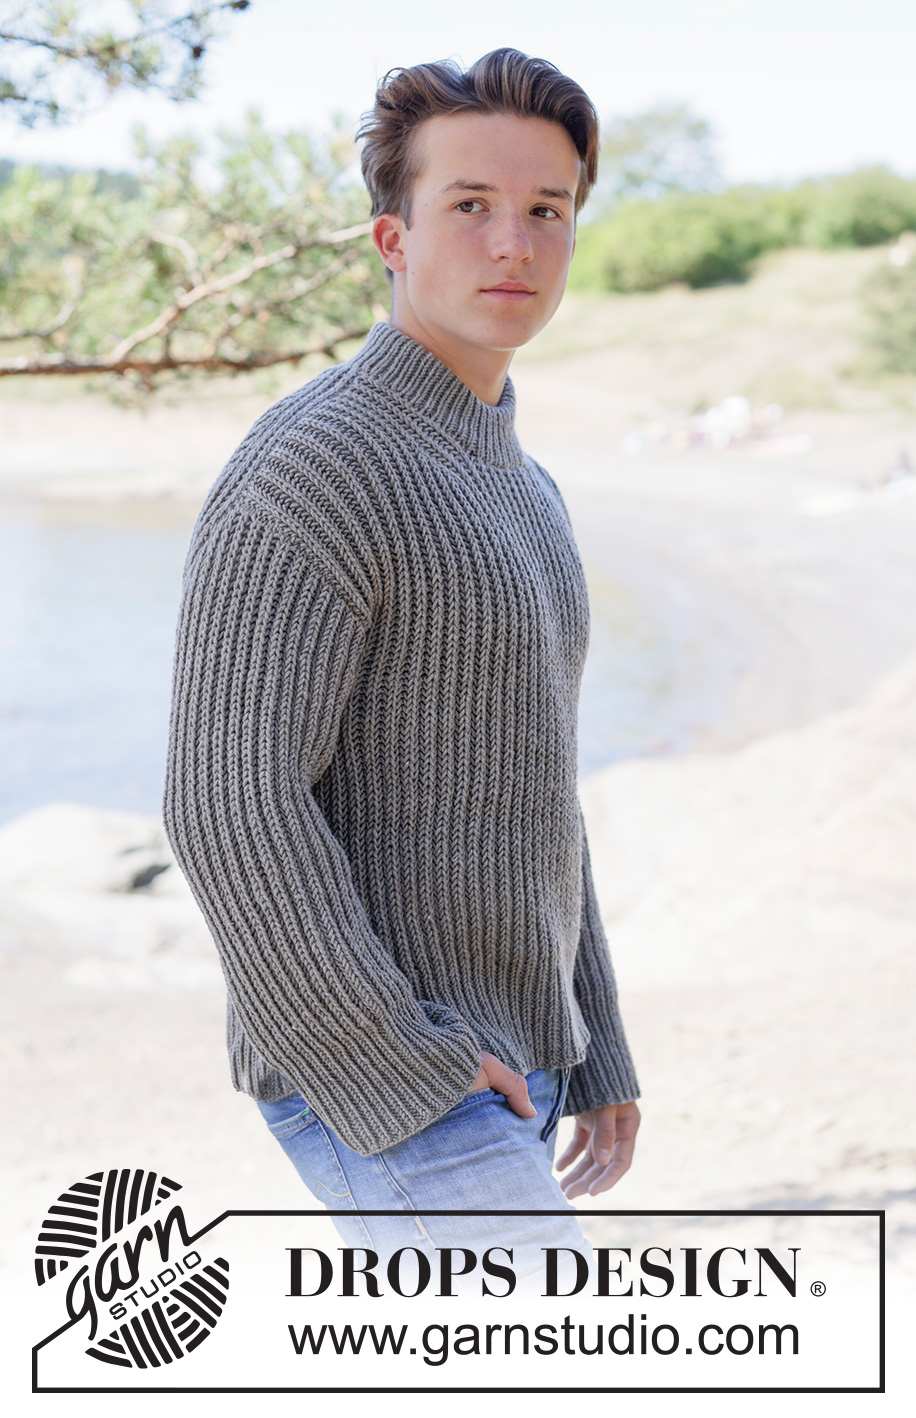
Rock Ridges#rockridgessweater |
|
 |
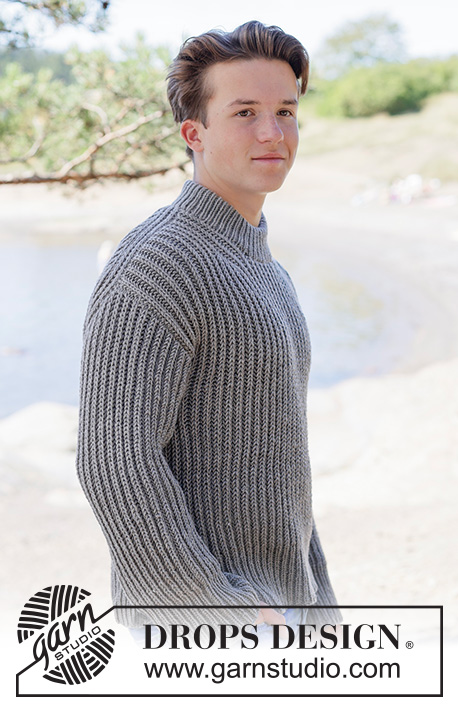 |
Knitted jumper for men in DROPS Big Merino. Piece is knitted top down with European shoulders / diagonal shoulders, English rib and double neck edge. Size XS – XXL.
DROPS 260-21 |
|
|
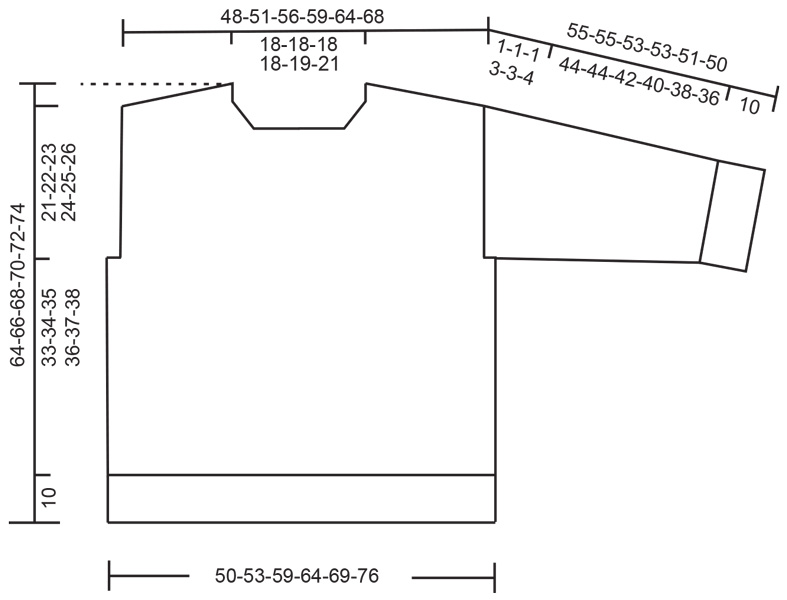
---------------------------------------------------------- EXPLANATION FOR THE PATTERN: ---------------------------------------------------------- GARTER STITCH (when working back and forth): Knit on all rows, i.e. knit from right side and knit from wrong side. 1 ridge vertically = knit 2 rows. ENGLISH RIB-1 (when working back and forth): ROW 1 (= wrong side): Work 1 stitch in garter stitch, * make 1 yarn over, slip 1 stitch on to right needle purlwise, knit 1 *, work from *-* until 2 stitches remain, make 1 yarn over, slip 1 stitch on to right needle purlwise, work 1 stitch in garter stitch. ROW 2 (= right side): Work 1 stitch in garter stitch, * knit yarn over and slipped stitch together, make 1 yarn over, slip 1 stitch on to right needle purlwise *, work from *-* until 2 stitches remain, knit yarn over and slipped stitch together, work 1 stitch in garter stitch. ROW 3 (= wrong side): Work 1 stitch in garter stitch, * make 1 yarn over, slip 1 stitch on to right needle purlwise, knit yarn over and slipped stitch together *, work from *-* until 2 stitches remain, make 1 yarn over, slip 1 stitch on to right needle purlwise, work 1 stitch in garter stitch. Repeat rows 2 and 3. ENGLISH RIB-2 (when working in the round): ROUND 1: * Make 1 yarn over, slip 1 stitch on to right needle purlwise, knit yarn over and slipped stitch together *, repeat from *-* the entire round. ROUND 2: * Purl yarn over and slipped stitch together, make 1 yarn over, slip 1 stitch on to right needle purlwise *, repeat from *-* the entire round. Repeat rounds 1 to 2. INCREASE TIP: Work 3 stitches in 1 knit stitch as follows: Knit yarn over and stitch together but wait to slip stitch and yarn over off the needle, make 1 yarn over on right needle and knit stitch and yarn over together 1 more time, then slip knit stitch and yarn over knitted off left needle = 3 stitches (= 2 stitches increased). DECREASE TIP: Decrease under sleeves in stitches that are closest to purl stitch with marker mid under sleeve. All decreases are done on a round where yarn over and knit stitch are knitted together! DECREASE 2 STITCHES TOWARDS THE LEFT AS FOLLOWS (begin directly after purl stitch with marker): Slip first knit stitch and yarn over loosely on to right needle knitwise, knit the next 2 together (1 purl + knit stitch and yarn over), then pass slipped stitch and yarn over over stitches worked together (= 2 stitches decreased). DECREASE 2 STITCHES TOWARDS THE RIGHT AS FOLLOWS (i.e. begin 3 stitches + 2 yarn overs before purl stitch with marker): Slip first knit stitch and yarn over loosely on to right needle knitwise, purl 1, pass slipped stitch and yarn over over purl stitch, slip stitch back on to left needle, slip stitch and yarn over over stitch slipped back on to left needle, then slip the remaining stitch on to right needle (= 2 stitches decreased). ---------------------------------------------------------- START THE PIECE HERE: ---------------------------------------------------------- JUMPER - SHORT OVERVIEW OF THE PIECE: In this pattern needles of different length have been used, begin with fitting length for number of stitches and switch as needed. First work piece back and forth on circular needle. Begin by casting on stitches in the back of neck. Then work back piece downwards while AT THE SAME TIME increasing in each side of piece until number of stitches for shoulder width is reached. Back piece has a slight diagonal shoulder. Then work down to armholes. Now put back piece a side and work the front piece. Front piece is first worked in 2 parts. Begin by picking up stitches along one shoulder from back piece, work pattern while increasing towards the neck. Repeat on the other shoulder. Put right and left front piece together when increases for neck are done. Then work front piece down to armholes. Now slip front piece and back piece on to same circular needle and work body downwards in the round on circular needle. Pick up stitches for sleeves around the armholes and work sleeves downwards. First work the sleeve cap back and forth, then work the sleeves downwards in the round on needle. Finish by picking up stitches around the neck and work a neck edge. Fold the neck edge double against the wrong side and fasten. The jumper is worked in English rib. BACK PIECE: Cast on 27-27-27-27-29-31 stitches on circular needle size 5.5 mm with DROPS Big Merino. Work 1 row ENGLISH RIB-1 - read explanation above, this row is worked from wrong side. Now work as follows - from right side: Work 1 stitch in GARTER STITCH - read explanation above, work 4 stitches English rib, INCREASE 2 stitches in next stitch (this is a knit stitch that is worked together with yarn over) - read INCREASE TIP, work English rib until 6 stitches remain, INCREASE 2 in next stitch (this is a knit stitch that is worked together with yarn over), work 4 stitches English rib and 1 stitch in garter stitch. Continue with English rib and increase the same way on every other row from right side (i.e. every 4th row, work 3 rows without increase between every increase row), 10-11-13-14-15-16 times in total (increase 4 stitches on every increase). Work the increased stitches in English rib. After last increase there are 67-71-79-83-89-95 stitches on needle. Insert 1 marker in the side. Now measure piece from here! Then work English rib back and forth. Continue until piece measures 15-16-16-16-16-17 cm from marker. Cut the yarn, slip stitches on a thread or stitch holder, and work front piece as explained below. LEFT FRONT PIECE: Find left shoulder on back piece as follows: Place back piece flat with right side up, place back piece so that stitches on thread/stitch holder are towards you, left side of piece = left shoulder. Now pick up stitches along left diagonal shoulder on back piece - begin from right side at the neck and pick up stitches out towards the shoulder as follows: Pick up 1 stitch inside every ridge = 21-23-27-29-31-33 stitches. All length measurements on front piece are done from pick-up edge. Work ENGLISH RIB-1 with 1 stitch in garter stitch in each side - remember explanation above. When piece measures 7 cm from where stitches were picked up, increase stitches towards the neck. Increase at the beginning of every 6th row, increase after 5 stitches (= 1 edge stitch in garter stitch and 4 stitches English rib) - remember INCREASE TIP. Increase 2 stitches every 6th row 3 times in total = 27-29-33-35-37-39 stitches. Work 1 row from wrong side after last increase. Cut the yarn, slip stitches on a thread or stitch holder, now work right front piece along the shoulder – read explanation below. RIGHT FRONT PIECE: Now pick up stitches along left diagonal shoulder on back piece - begin from right side at the shoulder and pick up stitches out towards the neck as follows: Pick up 1 stitch inside every ridge = 21-23-27-29-31-33 stitches. All length measurements on front piece are done from pick-up edge. Work English rib-1 with 1 stitch in garter stitch in each side. When piece measures 7 cm from where stitches were picked up, increase stitches towards the neck. Increase at the end of every 6th row, increase before 5 stitches– remember INCREASE TIP. Increase 2 stitches 3 times in total = 27-29-33-35-37-39 stitches. After last increase work from wrong side. Work next row as follows from right side: Work English rib as before over the 27-29-33-35-37-39 stitches from right front piece, cast on 13-13-13-13-15-17 stitches for neck at the end of this row, then work English rib as before over the 27-29-33-35-37-39 stitches from left front piece = 67-71-79-83-89-95 stitches. Then work English rib back and forth with 1 stitch in garter stitch in each side. Continue until piece measures 27-28-30-32-34-35 cm. Now put front piece and back piece together for body as explained below. BODY: Work as before over the 67-71-79-83-89-95 stitches from front piece, cast on 3-3-3-7-7-11 new stitches at the end of this row (= in the side), work as before over the 67-71-79-83-89-95 stitches from back piece, cast on 3-3-3-7-7-11 new stitches at the end of row = 140-148-164-180-192-212 stitches. Cut the yarn and begin round in the middle of the new stitches cast on in the side - read explanation above. Continue with ENGLISH RIB-2 in the round over all stitches, NOTE! Work the new stitches cast on under sleeve without English rib yarn overs on first round. Continue until piece measures 54-56-58-60-62-64 cm, measures from the top point on shoulder - adjust so that next round is a round where yarn overs are worked together with knit stitches. 10 cm remain until finished measurements. Work next round as follows: Work yarn over together with knit stitch as usual, then make 1 yarn over and purl next stitch (= 2 English rib stitches become knit 1/purl 2) = 210-222-246-270-288-318 stitches. Switch to double pointed needles size 4 mm and work rib = knit 1/purl 2 for 10 cm - NOTE! Work yarn overs twisted on first round to avoid holes. Loosely cast off. Jumper measures approx. 64-66-68-70-72-74 cm, measured furthest in towards neck. SLEEVES: Use circular needle size 4 mm, pick up from right side 61-65-67-75-77-83 stitches along the armhole inside outermost stitch. Work ENGLISH RIB-1 back and forth with 1 stitch in garter stitch in each side until piece measures 1-1-1-3-3-4 cm. Now put piece together on a short circular needle or double pointed needles size 5.5 mm - work the rest of sleeve in the round. When putting piece together, work stitch in garter stitch in each side together into 1 stitch, continue this stitch as a purl stitch in English rib. Insert 1 marker in this stitch (= mid under sleeve) = 60-64-66-74-76-82 stitches. Move marker upwards when working. Now measure the piece from here. Begin round at the marker and work ENGLISH RIB-2 in the round. When sleeve measures 10-10-10-8-6-6 cm from marker, decrease 4 stitches mid under sleeve - read DECREASE TIP. Decrease like this every 10-10-10-8-8-7 cm 3-3-3-4-4-4 times in total = 48-52-54-58-60-66 stitches. Then work until sleeve measures 44-44-42-40-38-36 cm from marker - adjust so that next round is a round where yarn overs are worked together with knit stitches. Approx. 10 cm remain until finished measurements, try the jumper on and work to desired length before rib. Work next round as follows: Work yarn over together with knit stitch as usual, then make 1 yarn over and purl next stitch (= 2 English rib stitches become knit 1/purl 2) = 72-78-81-87-90-93 stitches. Switch to double pointed needles size 4 mm and work rib = knit 1/purl 2 for 10 cm - NOTE! Work yarn overs twisted on first round to avoid holes. Loosely cast off. Sleeve measures approx. 54-54-52-50-48-46 cm from marker and approx. 55-55-53-53-51-50 cm from pick up edge. NECK EDGE: Begin at one shoulder line and pick up from right side inside 1 edge stitch approx. 84 to 92 stitches on a short circular needle size 4 mm. Number of stitches must be divisible by 2. NOTE! Make sure to pick up 1 stitch in every knit stitch and 1 stitch in every purl stitch. Work rib in the round (= knit 1/purl 1) - make sure that rib fits stitches in English rib. Work rib in the round for 10-11-11-12-12-13 cm. Cast off. Fold the rib down on inside of garment. Fasten rib to get a double neck edge. To avoid a tight neck edge that sticks out it is important to keep the seam elastic |
|
 |
|
Have you finished this pattern?Tag your pictures with #dropspattern #rockridgessweater or submit them to the #dropsfan gallery. Do you need help with this pattern?You'll find 29 tutorial videos, a Comments/Questions area and more by visiting the pattern on garnstudio.com. © 1982-2026 DROPS Design A/S. We reserve all rights. This document, including all its sub-sections, has copyrights. Read more about what you can do with our patterns at the bottom of each pattern on our site. |
|


With over 40 years in knitting and crochet design, DROPS Design offers one of the most extensive collections of free patterns on the internet - translated to 17 languages. As of today we count 325 catalogues and 12298 patterns translated into English (UK/cm).
We work hard to bring you the best knitting and crochet have to offer, inspiration and advice as well as great quality yarns at incredible prices! Would you like to use our patterns for other than personal use? You can read what you are allowed to do in the Copyright text at the bottom of all our patterns. Happy crafting!
Post a comment to pattern DROPS 260-21
We would love to hear what you have to say about this pattern!
If you want to leave a question, please make sure you select the correct category in the form below, to speed up the answering process. Required fields are marked *.