
Popular categories
Looking for a yarn?


Comments / Questions (7)
![]() Andreea wrote:
Andreea wrote:
Hello. I am working the flounce in size M and there is something I don’t understand. I picked up 92 stitches and I worked row 1 with purl until 4 remained then I turned and knitted 12 and then worked A1 which is 6 stitches on repeat. It says to work it 10 times until 4 stitches remained. But it 92 stitches with 4 remaining twice and knitting 12 it fits 12 times. What am I missing? Thank you
31.08.2025 - 22:19DROPS Design answered:
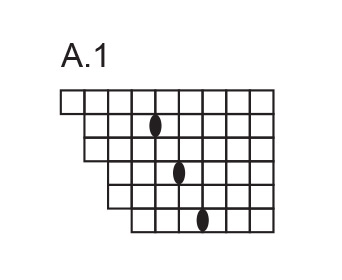
Hi Andrea, ROW 2 (= right side): Knit 12, work A.1 9-10-10-11-11-12 times, knit (12 sts) until 4-4-6-6-8-8 stitches remain on row before 1 marker thread under armhole, turn piece. > you have 92 sts in total, 46 between markers. In the second row you are 4+12=16 stitches after the marker thread. You are left with 30 stitches in one side. You have enough room to knit 5 repeats of A.1. After the marker at the top of armhole you have to do 5 more A.1 diagrams (other side of the armhole), then knit 12 sts and stop when 4 stitches remain on row before marker thread. Happy knitting!
15.09.2025 - 10:33
![]() Vasiliki wrote:
Vasiliki wrote:
I believe there is a mistake on i-cord edge on the pattern. You indicate what to do for the first and last 3 stitches, whereas the first and last 3 st on the same side should be knit on the same manner, if I am not mistaken. The correct version in my opinion should be: Right Side: K1, slip 1 with yarn in front, K1, and do the same on last 3 st Wrong Side: Slip 1 with yarn in front, K1, slip 1 with yarn in front, and do the same on last 3 st. I am correct?
29.05.2025 - 12:37
![]() Vasiliki wrote:
Vasiliki wrote:
Hello. I am lost with icord edges. When I slip a stitch purlwise with yarn in front I get a not expected result. Can you provide the link to a video?
29.05.2025 - 12:28DROPS Design answered:
Dear Mrs Vasiliki, sure you can look at this video, note in that the video we only have 2 I-cord sts, so that it will be a bit different but just work at the beg of the row (slip 1, k1, slip 1) and and at the end of row (K1, slip 1, K1) - when slipping the stitches as if to purl, make sure the yarn is towards wrong side of piece. Happy knitting!
30.05.2025 - 08:54
![]() Pearl wrote:
Pearl wrote:
So to confirm : your "INCREASE TIP-1:" is a simple M1R ? Why having different names and videos for the same thing ? So confusing.
28.03.2025 - 11:49DROPS Design answered:
Dear Pearl, wen note that increasing from RS might be either left or right, so you just have to increase as explained in the pattern, to get the increase leaning in the correct way - this technique is not known by everyone with that name, reason why we just write how to increase, following these explanations will let you manage to increase as explained (either from RS - increase tip-1 or from WS - increase tip -2). Happy knitting!
28.03.2025 - 13:37
![]() Pearl wrote:
Pearl wrote:
Hello, I am lost with your increases types. And the videos are very confusing because they show an entire piece being knitted without sounds or comments, so I cannot see what you call "INCREASE TIP-1:" is for example. Is it a simple M1R ? I am not sure as you say we have to pick up the bar "from row below".
27.03.2025 - 16:59DROPS Design answered:
Dear Pearl, that's right - you can find both M;1R and M.1L also in this video (note that our videos have no sound just because not everyone can speak English, just make sure to follow the text under video. Hope it will help. Happy knitting!
28.03.2025 - 08:02
![]() Sophie wrote:
Sophie wrote:
Merci d'ajouter de plus en plus de photos et maintenant des vidéos! Il serait juste utile de savoir la taille tricotée sur le modèle, meme si nous avons des mesures cela permet d'avoir une idée.
24.03.2025 - 10:03
![]() Alexandra wrote:
Alexandra wrote:
Bonjour Ce modèle est magnifique. Seule la légende est en Français. Les explications de ce modèle sont en anglais.
18.03.2025 - 10:32DROPS Design answered:
Bonjour Alexandra, les explications sont maintenant en français :) Bon tricot!
18.03.2025 - 14:30
|
|||||||
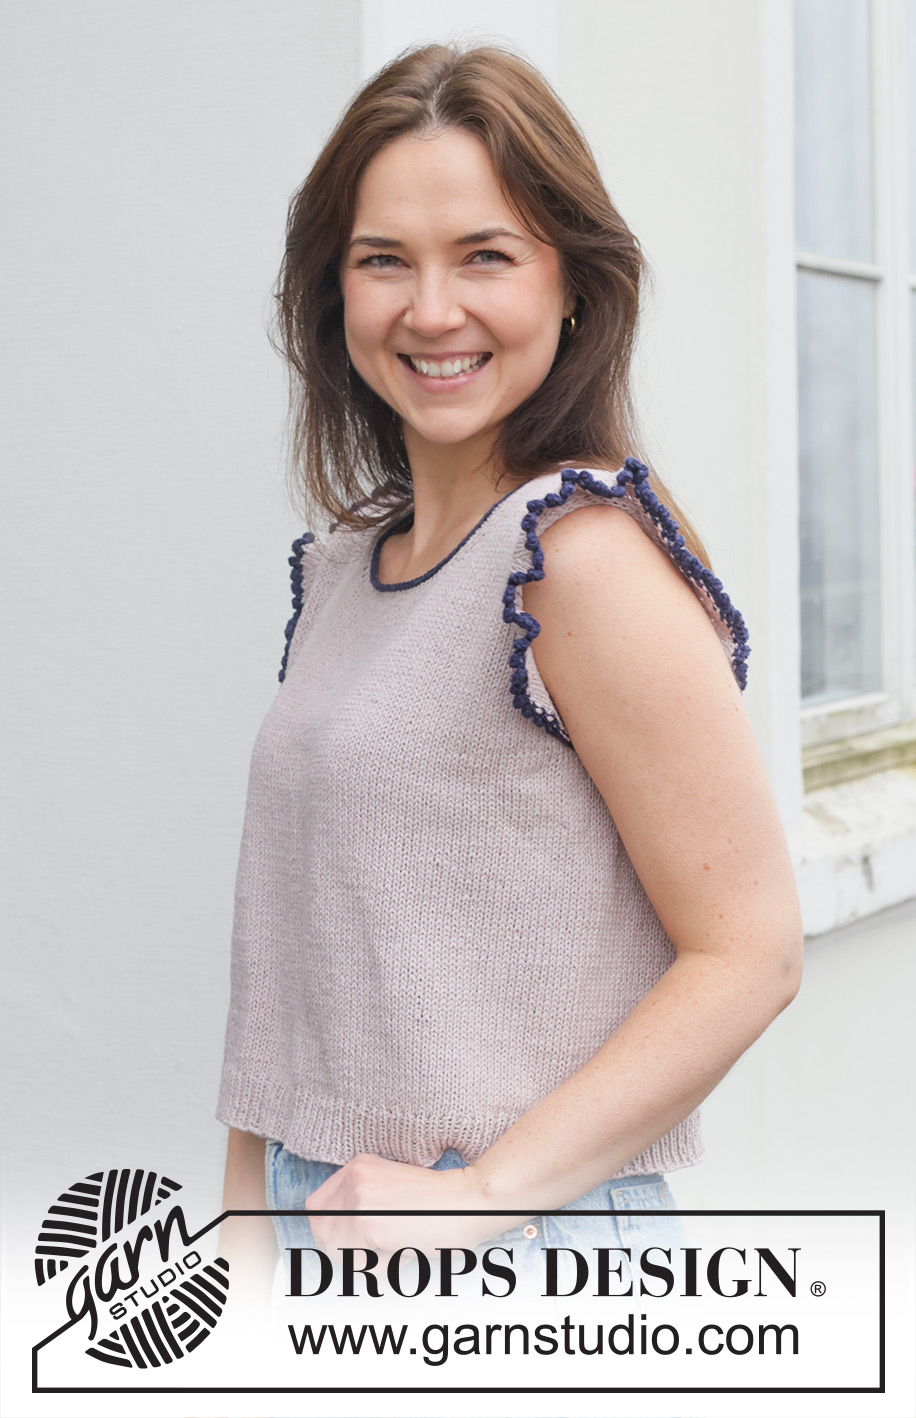
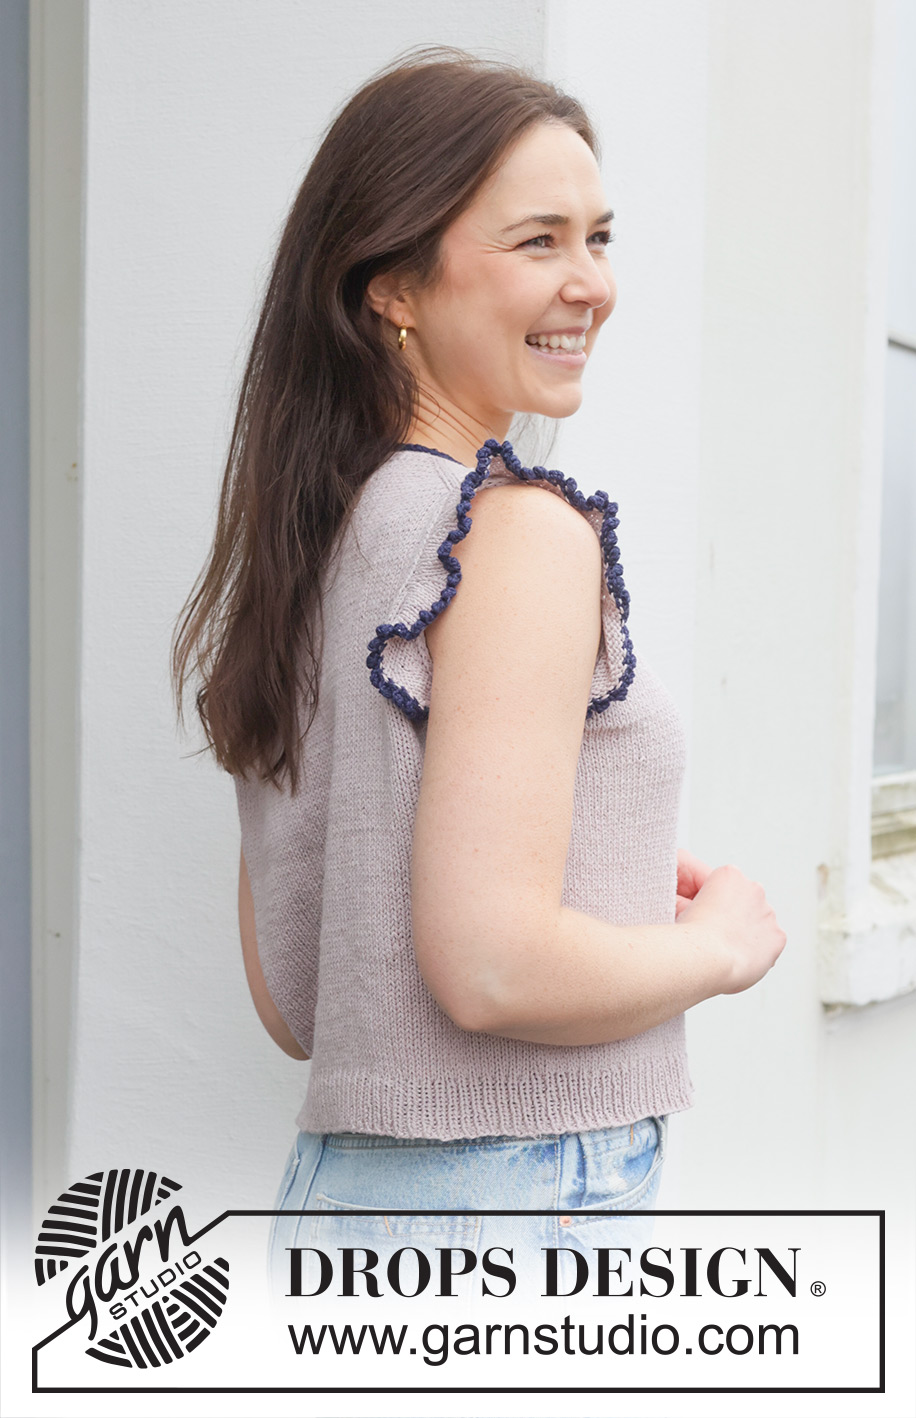
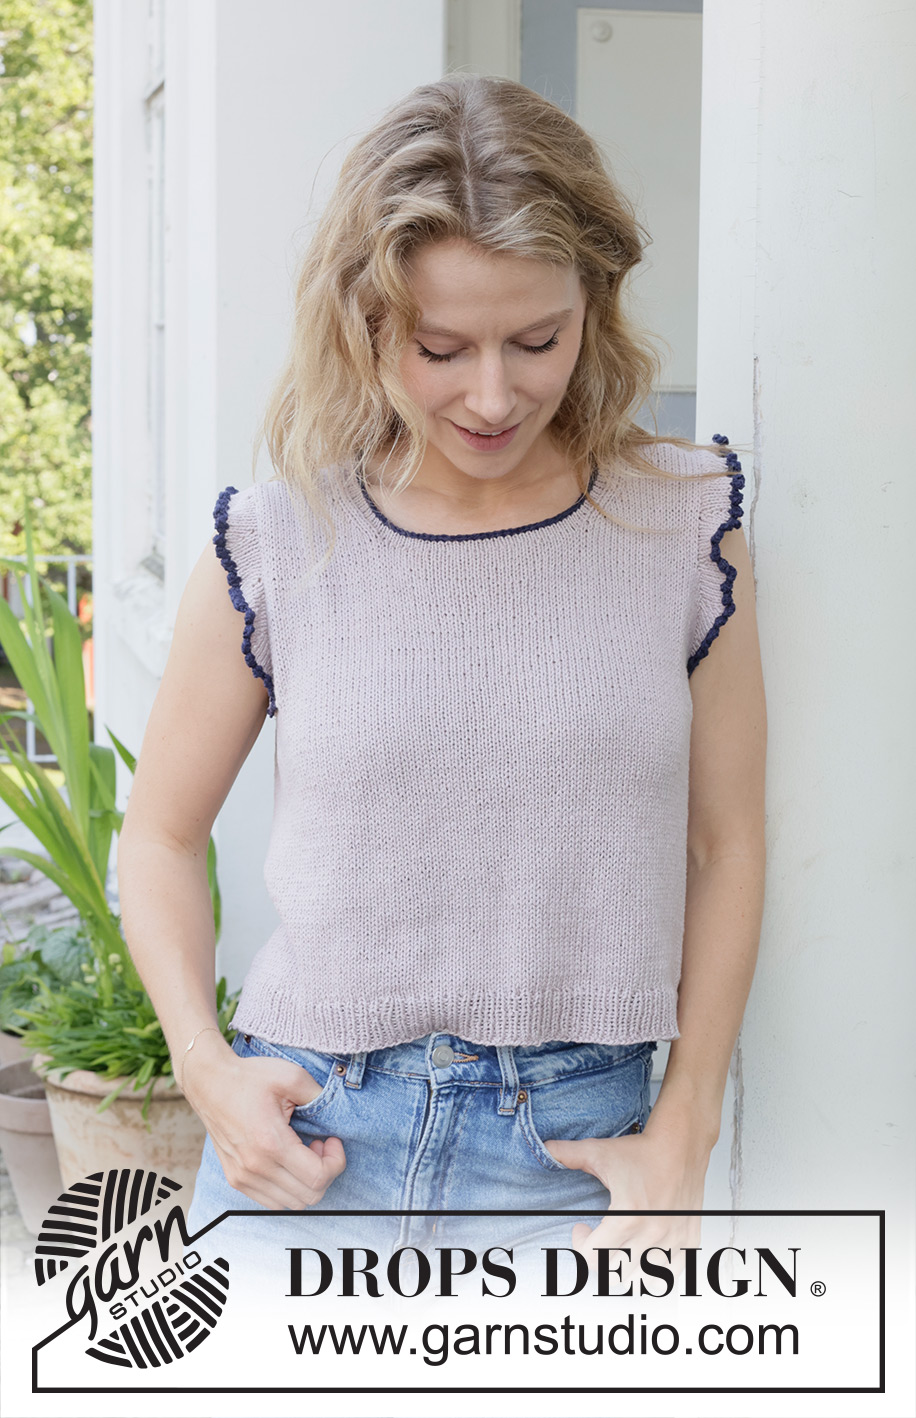
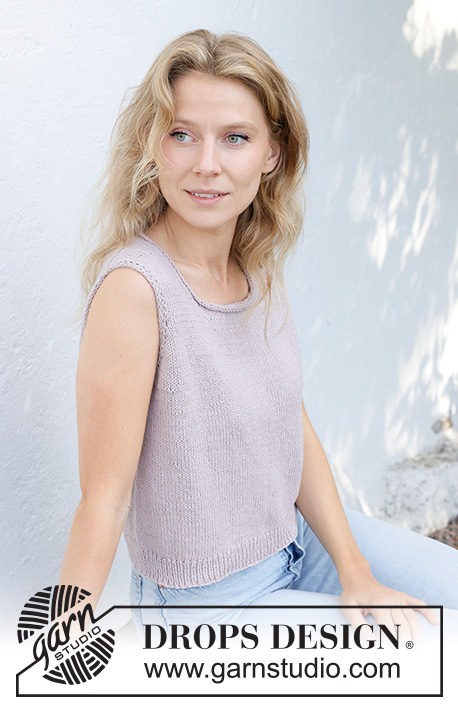
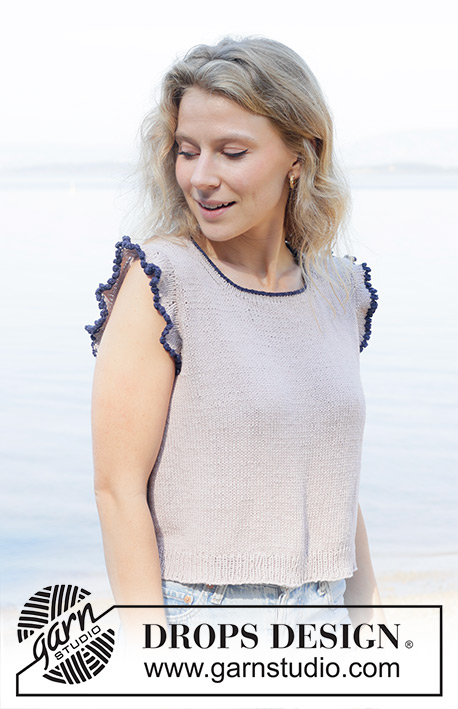
Sailor Frill#sailorfrilltop |
|||||||
 |
 |
||||||
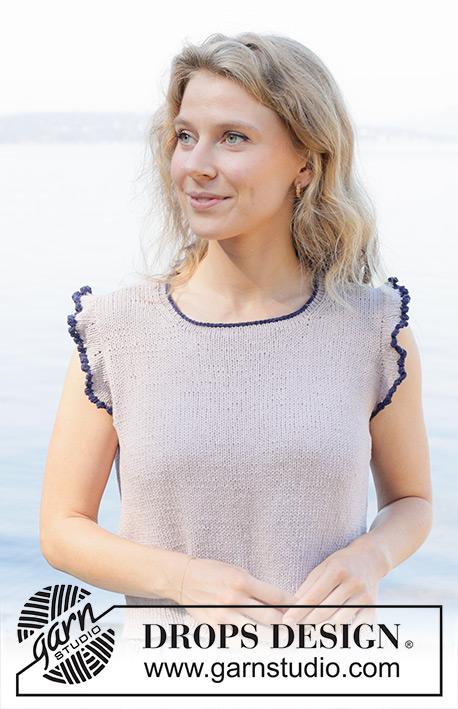
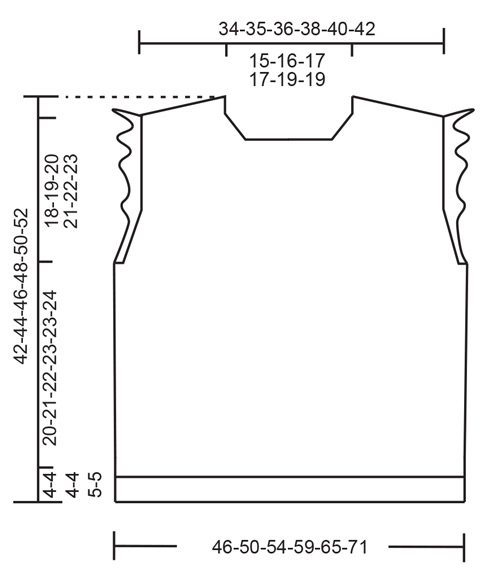
Knitted top in DROPS Belle. Piece is knitted top down with European shoulder / diagonal shoulder, I-cord and flounce with picot. Size: S - XXXL.
DROPS 259-11 |
|||||||
|
---------------------------------------------------------- EXPLANATION FOR THE PATTERN: ---------------------------------------------------------- INCREASE TIP-1: INCREASE 1 STITCH TOWARDS THE LEFT - from RIGHT SIDE: Use left needle to pick up yarn between 2 stitches from row below, pick up yarn from the front and knit in the stitch loop that is on the back of the needle. INCREASE 1 STITCH TOWARDS THE RIGHT - from RIGHT SIDE: Use left needle to pick up yarn between 2 stitches from row below, pick up yarn from the back and knit in the stitch loop that is on the front side of the needle. . INCREASE TIP-2: INCREASE 1 STITCH TOWARDS THE RIGHT - from WRONG SIDE: Use left needle to pick up yarn between 2 stitches from row below, pick up yarn from the back and purl in the stitch loop that is on the front side of the needle. INCREASE 1 STITCH TOWARDS THE LEFT - from WRONG SIDE: Use left needle to pick up yarn between 2 stitches from row below, pick up yarn from the front and purl in the stitch loop that is on the back side of the needle. I-CORD: FIRST 3 STITCHES: Work as follows on every row: Slip 1 stitch purlwise with strand in front of piece, knit 1, slip 1 stitch purlwise with strand in front of piece. LAST 3 STITCHES: Work as follows on every row: Work until 3 stitches remain on needle, knit 1, slip 1 stitch purlwise with strand in front of piece, knit 1. Work the same way both from right side and wrong side. KNITTING TIP: When working short row there will be a small hole when turning the piece - the hole can be closed by tightening the yarn or using the technique German Short Rows on first stitch on next row as follows: Slip first stitch purlwise. Place strand over right needle and tighten well at the back (should lead to two loops on needle). These loops are worked together next time this stitch is worked. PICOT: Loosely cast off from right side as follows: Knit 1, * insert right needle between the first 2 stitches on left needle (i.e. between stitches on needle, not through stitches), make 1 yarn over on right needle, pull yarn over forward between the stitches and slip yarn over on to left needle *, work from *-* 4 times in total (= 4 new stitches on left needle), knit and cast off at the same time off 6 stitches (= 1st stitch on right needle + 3 yarn overs+ 2 stitches). Now continue to work from *-* + cast off 6 stitches the same way along the entire cast-off until 1 stitch remains on row. Cut the yarn and pull it through the last stitch. ---------------------------------------------------------- START THE PIECE HERE: ---------------------------------------------------------- TOP - SHORT OVERVIEW OF THE PIECE: In this pattern needles of different length have been used, begin with fitting length for number of stitches and switch as needed. First work piece back and forth on circular needle. Begin by casting on stitches in the back of neck. Then work back piece downwards while AT THE SAME TIME increasing in each side of piece until number of stitches for shoulder width is reached. Back piece has a slight diagonal shoulder. Then work down to armholes. Now put back piece a side and work the front piece. Front piece is first worked in 2 parts. Begin by picking up stitches along one shoulder from back piece, work pattern while increasing towards the neck. Repeat on the other shoulder. Put right and left front piece together when increases for neck are done. Then work front piece down to armholes. Now slip front piece and back piece on to same circular needle and work body downwards in the round on circular needle. Finish by picking up stitches around the neck for neck edge and around the armholes for flounce. If 0 is given for the chosen size, it means that you skip the information until next information. BACK PIECE: Work piece back and forth on circular needle. Cast on 34-36-38-38-42-42 stitches on circular needle size 4 mm with DROPS Belle. ROW 1 (= wrong side): Purl all stitches. ROW 2 (= right side): Read INCREASE TIP-1 and knit 3, increase 1 stitch towards the left, knit until 3 stitches remain, increase 1 stitch towards the right, knit 3. ROW 3 (= wrong side): Read INCREASE TIP-2 and purl 3, increase 1 stitch towards the right, purl until 3 stitches remain, increase 1 stitch towards the left, purl 3. AFTER 3RD ROW: Work 2nd and 3rd ROW 10-10-10-11-11-12 times (= 20-20-20-22-22-24 rows have been worked), after increase there are 74-76-78-82-86-90 stitches on needle and piece measures approx. 8-9 cm from cast-on edge mid back. Insert 1 marker at the edge in each side. Now measure piece from here! Continue in stocking stitch and 3 stitches stitch I-CORD in each side - read explanation above. Remember to follow the knitting tension! Work until piece measures 11-9-9-10-11-11 cm from marker along armhole. Now increase in each side for armholes. INCREASE FOR ARMHOLES: ROW 1 (= right side): Remember INCREASE TIP-1 and work 3 stitches I-cord as before, knit 1, increase 1 stitch towards the left, knit until 4 stitches remain, increase 1 stitch towards the right, knit 1 and 3 stitches I-cord as before. ROW 2 (= wrong side): Work 3 stitches I-cord, purl until 3 stitches remain and work 3 stitches I-cord as before. Work 1st and 2nd ROW 7-11-12-9-9-6 times in total (= 14-22-24-18-18-12 rows have been worked) = 88-98-102-100-104-102 stitches on needle. Increases in sizes S, M and L are done. Work and increase as follows in sizes XL, XXL and XXXL: ROW 1 (= right side): Work 3 stitches I-cord, knit 1, increase 1 stitch towards the left, knit until 4 stitches remain, increase 1 stitch towards the right, knit 1 and 3 stitches I-cord. ROW 2 (= wrong side): Work 3 stitches I-cord, purl 1, increase 1 stitch towards the left, purl until 4 stitches remain, increase 1 stitch towards the right, purl 1 and 3 stitches I-cord. Work 1st and 2nd ROW 0-0-0-3-4-8 times in total (= 0-0-0-6-8-16 rows have been worked) = 88-98-102-112-120-134 stitches on needle. Work in stocking stitch and 3 stitches I-cord in each side until piece measures 16-17-18-19-20-21 cm, measured from marker along armhole, finish with a row from wrong side. Cut the yarn, slip stitches on a thread or stitch holder, now work left front piece along the left shoulder as explained below. LEFT FRONT PIECE: Find left shoulder on back piece as follows: Place back piece flat with right side up, place back piece so that stitches on thread/stitch holder is towards you, left side of piece = left shoulder. Now pick up stitches along left diagonal shoulder on back piece - begin from right side at the neck and pick up stitches out towards the shoulder as follows: Pick up 1 stitch in every worked row inside outermost stitch up to marker in the side towards the armhole = 20-20-20-22-22-24 stitches. All length measurements on front piece are done from pick up edge. Work in stocking stitch back and forth with 3 stitches I-cord at the edge toward the armhole – read explanation above. When piece measures 7-7-8-8-8-8 cm, increase stitches towards the neck as follows: ROW 1 (= right side): Remember INCREASE TIP-1 and knit 3, increase 1 stitch towards the left, knit until 3 stitches remain, work 3 stitches I-cord. ROW 2 (= wrong side): Work 3 stitches I-cord, purl the rest of row. Work 1st and 2nd ROW 5-5-6-6-7-7 times (= 10-10-12-12-14-14 rows have been worked) = 25-25-26-28-29-31 stitches. Cut the yarn, slip stitches on a thread or stitch holder, now work right front piece along the shoulder – read explanation below. RIGHT FRONT PIECE: Now pick up stitches along right diagonal shoulder on back piece - begin from right side at the marker on shoulder and pick up stitches out towards the neck as follows: Pick up 1 stitch in every worked row inside outermost stitch = 20-20-20-22-22-24 stitches. All length measurements on front piece are done from pick up edge. Work in stocking stitch back and forth with 3 stitches I-cord at the edge toward the armhole. When piece measures 7-7-8-8-8-8 cm, increase stitches towards the neck as follows: ROW 1 (= right side): Work 3 stitches I-cord, knit until 3 stitches remain towards the neck, increase towards the right - read INCREASE-TIP-1, knit 3. ROW 2 (= wrong side): Purl until 3 stitches remain, 3 stitches I-cord. Work 1st and 2nd ROW 5-5-6-6-7-7 times (= 10-10-12-12-14-14 rows have been worked) = 25-25-26-28-29-31 stitches. Then place the front pieces together as explained below. FRONT PIECE (right and left part together): Work first row as follows from right side: Work the 25-25-26-28-29-31 stitches from right front piece as before, cast on 24-26-26-26-28-28 stitches for neck at the end of this row, work the 25-25-26-28-29-31 stitches from left front piece = 74-76-78-82-86-90 stitches on needle. Then work in stocking stitch and 3 stitches I-cord in each side until piece measures 15-13-13-14-15-15 cm from pick-up edge. Now increase in each side for armholes. INCREASE FOR ARMHOLES: ROW 1 (= right side): Remember INCREASE TIP-1 and work 3 stitches I-cord as before, knit 1, increase 1 stitch towards the left, knit until 4 stitches remain, increase 1 stitch towards the right, knit 1 and 3 stitches I-cord as before. ROW 2 (= wrong side): Work 3 stitches I-cord, purl until 3 stitches remain and work 3 stitches I-cord as before. Work 1st and 2nd ROW 7-11-12-9-9-6 times in total (= 14-22-24-18-18-12 rows have been worked) = 88-98-102-100-104-102 stitches on needle. Increases in sizes S, M and L are done. Work and increase as follows in sizes XL, XXL and XXXL: ROW 1 (= right side): Work 3 stitches I-cord, knit 1, increase 1 stitch towards the left, knit until 4 stitches remain, increase 1 stitch towards the right, knit 1 and 3 stitches I-cord. ROW 2 (= wrong side): Work 3 stitches I-cord, purl 1, increase 1 stitch towards the left, purl until 4 stitches remain, increase 1 stitch towards the right, purl 1 and 3 stitches I-cord. Work 1st and 2nd ROW 0-0-0-3-4-8 times in total (= 0-0-0-6-8-16 rows have been worked) = 88-98-102-112-120-134 stitches on needle. Work in stocking stitch and 3 stitches I-cord in each side until piece measures 20-21-22-23-24-25 cm from pick-up edge, finish with a row from wrong side. Now put front piece and back piece together for body as explained below. Now measure the piece from here. BODY: Work the 88-98-102-112-120-134 stitches from front piece as before, cast on 8-8-12-12-16-16 new stitches (= in the side mid under armhole), work the 88-98-102-112-120-134 stitches from back piece as before, cast on 8-8-12-12-16-16 new stitches on row (= in the side mid under armhole) = 192-212-228-248-272-300 stitches on needle. Then work in the round on needle. Work in stocking stitch until piece measures approx. 20-21-22-23-23-24 cm from armhole. Switch to circular needles size 3 mm, work rib (= knit 1/purl 1) while AT THE SAME TIME increasing 18-18-20-24-26-28 stitches evenly on 1st round = 210-230-248-272-298-328 stitches. When rib measures 4-4-4-4-5-5 cm cast off. Top measures approx. 42-44-46-48-50-52 cm, measured furthest in towards neck. NECK EDGE: Use circular needle size 3 mm and colour rose water. Begin from right side at one shoulder line and pick up approx. 94 to 118 stitches around the neck inside 1 stitch. Work 3 rounds in stocking stitch. Switch to colour navy blue and work 1 round in stocking stitch. Switch to circular needle size 4 mm and cast off by knitting somewhat loosely. FLOUNCE: Pick up stitches around the armhole for flounces. The flounce is worked back and forth with short rows before working in the round - read KNITTING TIP and work as follows: Place piece flat and insert 1 marker at the top of armhole = mid on top shoulder (NOTE! Mid on top shoulder is not same place as stitches were picked up for front piece but approx. 4 cm down on front piece). Pick up stitches around armhole inside 3 stitches, use circular needle size 3 mm, begin in the middle of the new stitches cast on under sleeve - pick up 86-92-96-102-106-112 stitches - adjust to pick up same number of stitches on each side of marker along armhole. Insert 1 marker thread mid under armhole (= beginning of round). Switch to circular needle size 4 mm. Now work stocking stitch back and forth with short rows over sleeve cap to form the flounce, round begins mid under armhole, turn and work 1st row from wrong side as follows: ROW 1 (= wrong side): Purl until 4-4-6-6-8-8 stitches remain on row before marker thread, turn piece – remember KNITTING TIP. ROW 2 (= right side): Knit 12, work A.1 9-10-10-11-11-12 times, knit until 4-4-6-6-8-8 stitches remain on row before marker thread, turn piece. ROW 3 (= wrong side): Work A.1 (i.e. purl from wrong side) until 10-10-12-12-14-14 stitches remain on row before marker thread, turn piece. ROW 4 (= right side): Knit 6, work A.1 9-10-10-11-11-12 times, knit until 10-10-12-12-14-14 stitches remain on row before marker thread, turn piece. ROW 5 (= wrong side): Work A.1 (i.e. purl from wrong side) until 16-16-18-18-20-20 stitches remain until beginning of round, turn piece. ROW 6 (= right side): Work A.1 9-10-10-11-11-12 times (16-16-18-18-20-20 stitches remain on row before marker thread), turn piece. ROW 7 (= wrong side): Work A.1 (i.e. purl from wrong side) the entire row (= mid under armhole). When the short rows have been worked, there are 113-122-126-135-139-148 stitches on needle. Then work in the round from right side, switch to colour navy blue and work 1 round in stocking stitch. Cast off with PICOT - read explanation above, in colour navy blue. |
|||||||
Diagram explanations |
|||||||
|
|||||||
 |
|||||||
 |
|||||||
Have you finished this pattern?Tag your pictures with #dropspattern #sailorfrilltop or submit them to the #dropsfan gallery. Do you need help with this pattern?You'll find 28 tutorial videos, a Comments/Questions area and more by visiting the pattern on garnstudio.com. © 1982-2026 DROPS Design A/S. We reserve all rights. This document, including all its sub-sections, has copyrights. Read more about what you can do with our patterns at the bottom of each pattern on our site. |
|||||||


With over 40 years in knitting and crochet design, DROPS Design offers one of the most extensive collections of free patterns on the internet - translated to 17 languages. As of today we count 324 catalogues and 12290 patterns translated into English (UK/cm).
We work hard to bring you the best knitting and crochet have to offer, inspiration and advice as well as great quality yarns at incredible prices! Would you like to use our patterns for other than personal use? You can read what you are allowed to do in the Copyright text at the bottom of all our patterns. Happy crafting!
Post a comment to pattern DROPS 259-11
We would love to hear what you have to say about this pattern!
If you want to leave a question, please make sure you select the correct category in the form below, to speed up the answering process. Required fields are marked *.