
Popular categories
Looking for a yarn?


Comments / Questions (15)
![]() Kaitlyn wrote:
Kaitlyn wrote:
Hello! Can I please see a picture of the full back of the sweater, to make sure I’m reading the pattern correctly?
02.02.2026 - 22:46DROPS Design answered:
Dear Kaitlyn, we don't have more pictures than the one you can see right now, but check tabs Videos & Lessons to read more about the construction of such a jumper. Happy knitting!
27.02.2026 - 17:17
![]() Louise wrote:
Louise wrote:
Hallo, kan het worden aangepast? Zie: mijn vorige opmerking! Heel hartelijk bedankt, toedels, Louise.
29.12.2025 - 15:57
![]() Louise wrote:
Louise wrote:
Hai, een error in het patroon bij TIP VOOR HET MEERDEREN-2: MEERDER 1 STEEK RICHTING LINKS: ... neem de draad op vanaf de voorkant... Moet zijn: ... neem de draad op vanaf de ACHTERKANT!!! ... Ik kreeg de hele tijd gaatjes totdat ik het van de achterkant op nam en toen was het goed... Toedels en een fijne dag, Louise.
29.09.2025 - 17:29
![]() Marlena wrote:
Marlena wrote:
Brak wyjaśnienia jak zamykać oczka na rękawach. There is no explanation how to close the stiches on sleeves.
23.02.2025 - 18:33DROPS Design answered:
Witaj Marleno, zgadza się. Zostanie to uzupełnione. Dziękujemy za informację i pozdrawiamy!
24.02.2025 - 17:13
![]() Susana Santos wrote:
Susana Santos wrote:
Ola! Obrigada antes de mais pelos modelos lindos!! tenho uma duvida nas carreiras encurtadas. Terminei e vou agora puxar dos ombros para fazer a manga e estou completamente baralhada nas carreiras encurtadas Começam a partir do meio do ombro certo? no tamalho L sao 8 pontos para cada lado mas depois perdi-me no como fazer as carreiras encurtadas e no virar qual é o video explicativo? muito grata
07.01.2025 - 12:43DROPS Design answered:
Bom dia! Muito obrigado pelas suas palavras! Pessoalmente, acho este modelo lindo. Sim, as carreiras encurtadas começam a meio do ombro. Aqui tem o link directo para o tutotial das carreiras encurtadas alemãs: https://www.garnstudio.com/video.php?id=1794&lang=pt Bons tricôs! Bom Ano!!
08.01.2025 - 11:33
![]() Susana Santos wrote:
Susana Santos wrote:
Quando diz “COSTAS & FRENTE: Montar 2-3-3-4-4-5 malhas, depois continuar A.1 por cima das 85-91-97-103-113-121 malhas da frente (incluindo as 2 malhas na cor trigo de cada lado), montar 4-6-6-8-8-10 malhas (lado, meio sob a manga), continuar A.1 por cima das 85-91-97-103-113-121 malhas das costas, montar 2-3-3-4-4-5 malhas (lado, meio sob a manga) = 178-194-206-222-242-262 malhas.” quer dizer fazer montar as malhas e continuar a tricotar as restantes de forma seguida ? Obrigada
01.12.2024 - 01:35DROPS Design answered:
Bom dia, Sim, porque se vai unir as diferentes partes da camisola numa só peça. Bons tricôs!
02.12.2024 - 10:11
![]() Louise wrote:
Louise wrote:
Maat M , rugpand :”en brei de eerste 17 steken zodat patroon symmetrisch wordt “ ik snap die 17 niet? Begonnen bij pijl maat M dus
20.10.2024 - 08:36DROPS Design answered:
Dag Louise,
A.1 wordt zo gepositioneerd op het achterpand dat de bloemvormen mooi in het midden komen. Daarom brei je eerst een aantal steken van het laatste stuk van A.1, dan brei je een aantal volledige herhalingen van A.1 en tot slot brei je de eerst steken van A.1.
20.10.2024 - 18:38
![]() Madelaine wrote:
Madelaine wrote:
Passionflower pullover
09.08.2024 - 19:20
![]() Dominique wrote:
Dominique wrote:
Très joli modèle, intemporel. merci de bien vouloir indiquer dans vos modèles à motifs si ceux-ci sont symétriques ou pas, je suis gauchère ! (d'ailleurs peut-être que vous pourriez, dans vos FAQ/ Videos/Explications, rajouter des conseils de lecture pour gauchère pour la réalisation de motifs non symétriques). Merci pour tous ces jolis modèles.
09.08.2024 - 16:44
![]() Nikole wrote:
Nikole wrote:
Zuckerwatte (Cotton Candy)
09.08.2024 - 10:25
|
|||||||
Bright Rose#brightrosesweater |
|||||||
 |
 |
||||||
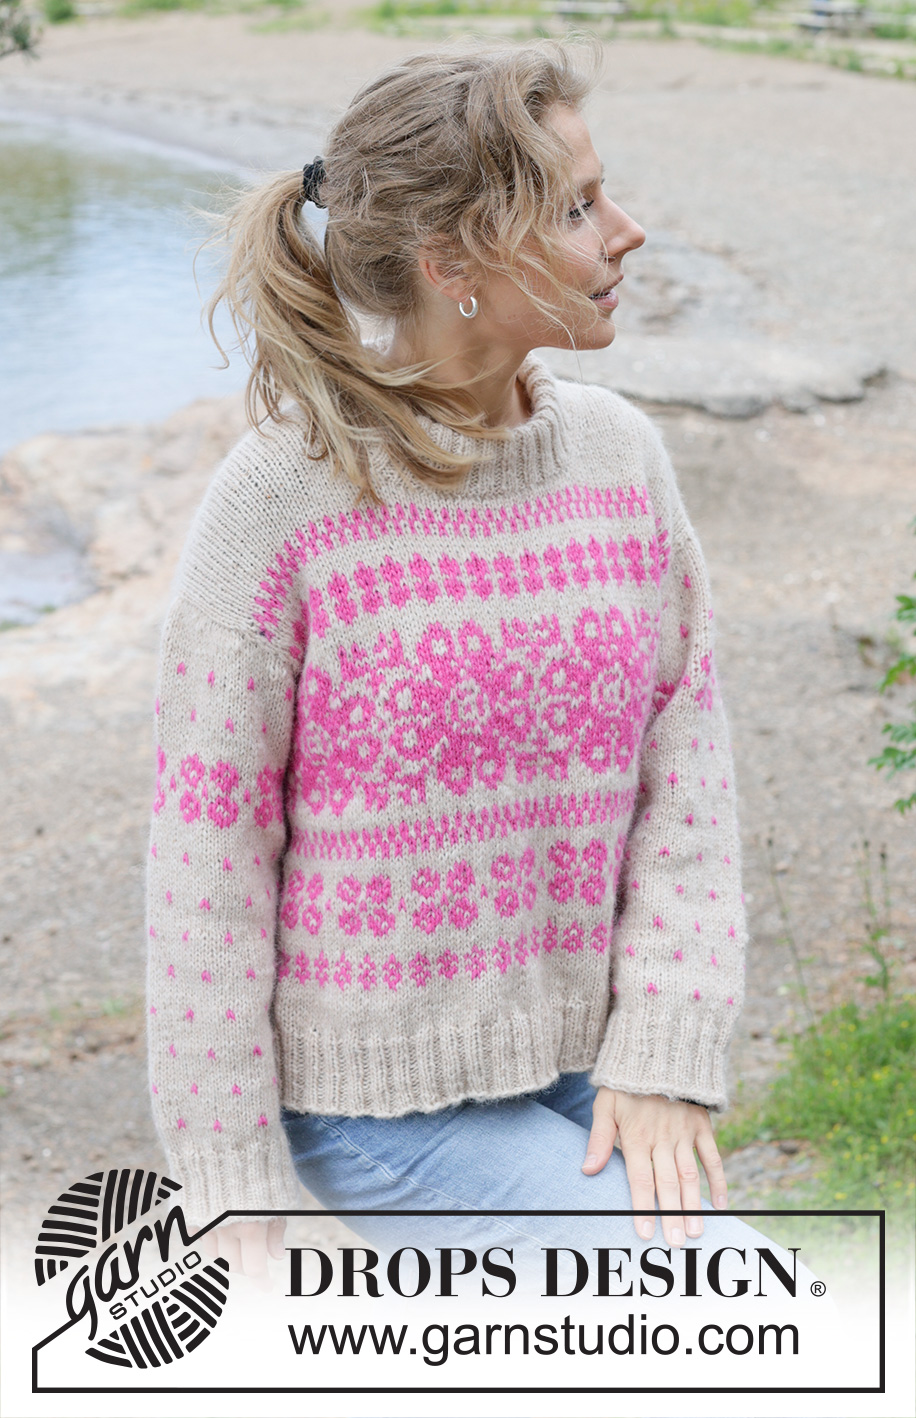
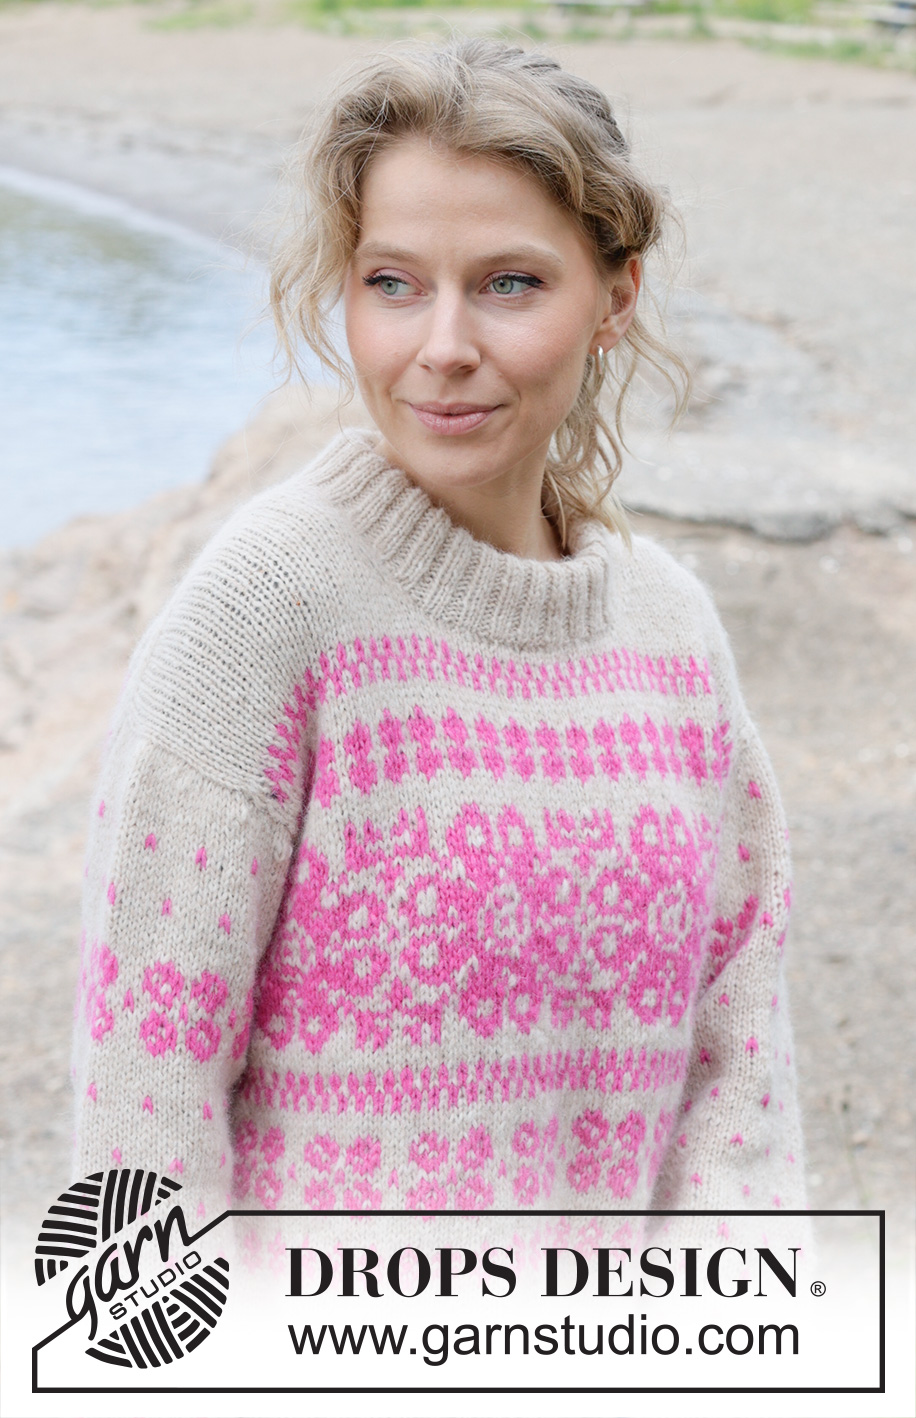
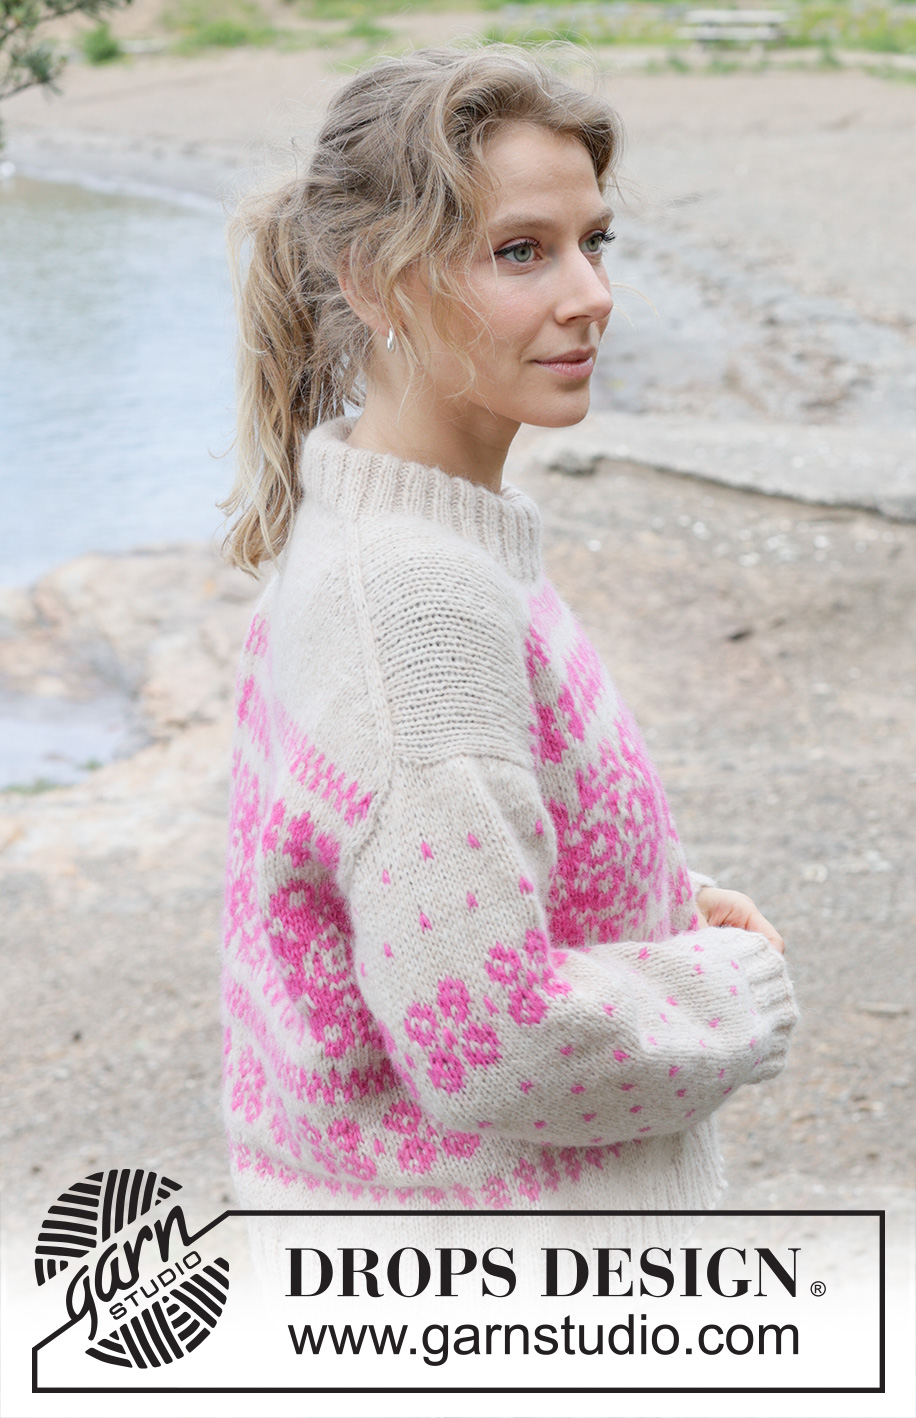
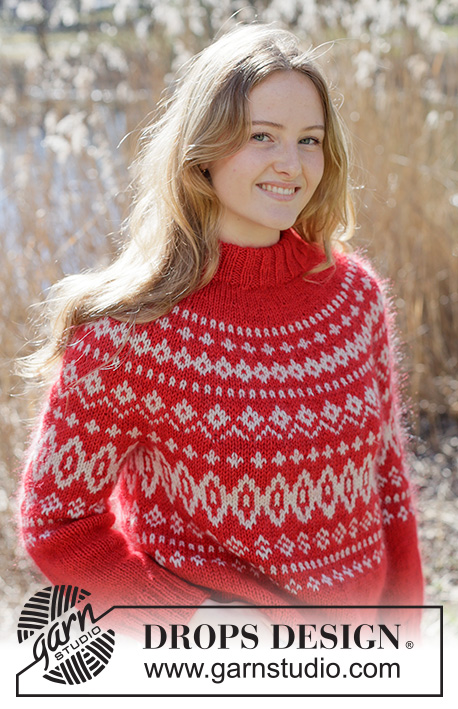
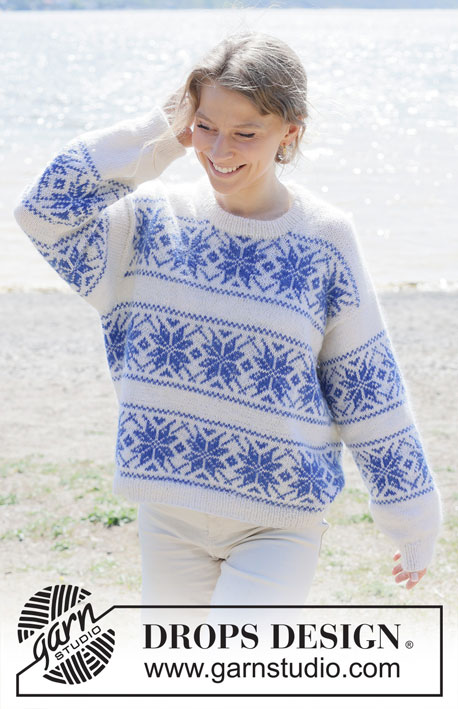
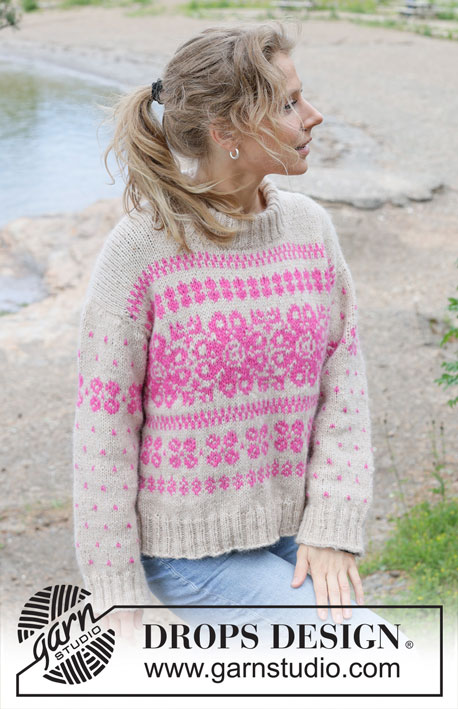
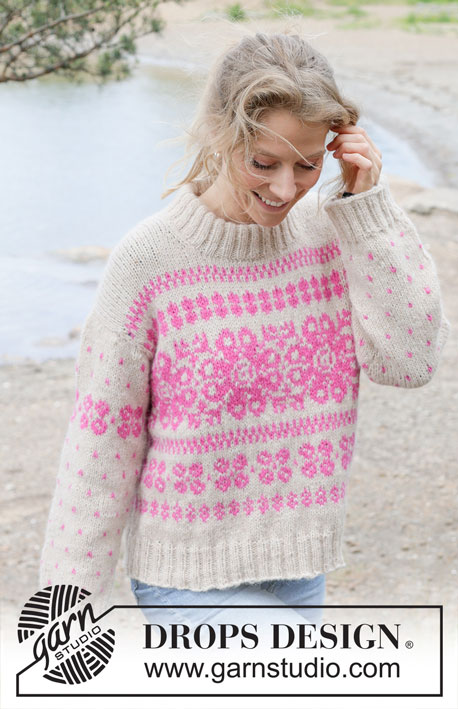
Knitted jumper in DROPS Air. The piece is worked top down with European/diagonal shoulders, Nordic pattern and double neck. Sizes S - XXXL.
DROPS 255-10 |
|||||||
|
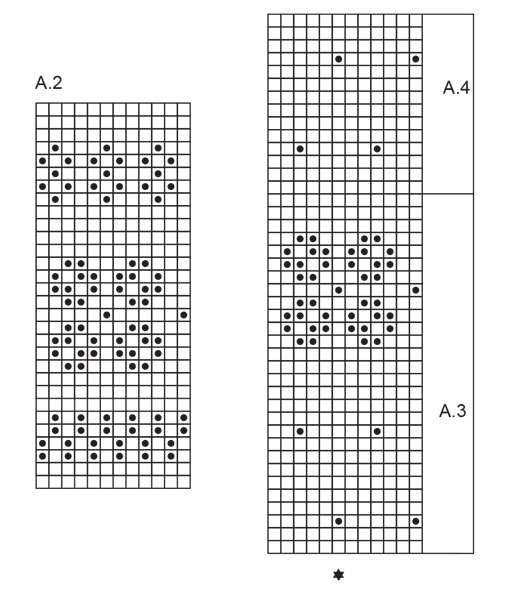
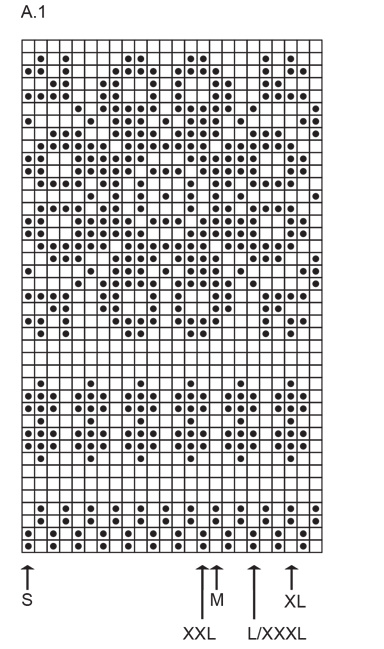
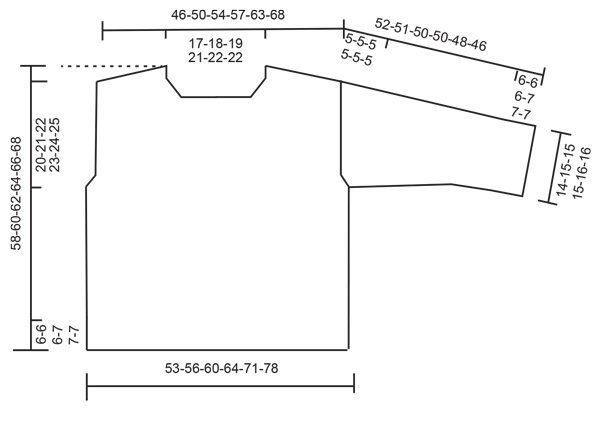
------------------------------------------------------- EXPLANATIONS FOR THE PATTERN: ------------------------------------------------------- PATTERN: See diagrams A.1 to A.4. To avoid the knitting tension losing its elasticity when working colour-pattern, it is important that the strands at the back are not tight. Use a size larger needle when working pattern if the piece becomes tight. INCREASE TIP-1: INCREASE 1 STITCH TOWARDS THE LEFT - from RIGHT SIDE: Use left needle to pick up yarn between 2 stitches from row below, pick up yarn from the front and knit in the stitch loop that is on the back of the needle. INCREASE 1 STITCH TOWARDS THE RIGHT - from RIGHT SIDE: Use left needle to pick up yarn between 2 stitches from row below, pick up yarn from the back and knit in the stitch loop that is on the front side of the needle. . INCREASE TIP-2: INCREASE 1 STITCH TOWARDS THE RIGHT - from WRONG SIDE: Use left needle to pick up yarn between 2 stitches from row below, pick up yarn from the back and purl in the stitch loop that is on the front side of the needle. INCREASE 1 STITCH TOWARDS THE LEFT - from WRONG SIDE: Use left needle to pick up yarn between 2 stitches from row below, pick up yarn from the front and purl in the stitch loop that is on the back side of the needle. KNITTING TIP: When working short rows, there will be a small hole after each turn. This hole can be closed by tightening the strand or using the technique German Short Rows as follows: Slip the first stitch purl-wise, take the strand over the right needle and tighten well from the back (2 loops on the needle). These loops are worked together on the next row. DECREASE TIP (for sleeves): Decrease 1 stitch on each side of the marker-stitch as follows: Work until there are 2 stitches left before the marker-stitch, knit 2 together, knit the marker-stitch, slip 1 stitch knit-wise, knit 1 and pass the slipped stitch over the knitted stitch (2 stitches decreased). ------------------------------------------------------- START THE PIECE HERE: ------------------------------------------------------- JUMPER – SHORT OVERVIEW OF THE PIECE: The pattern uses both long and short needles; start with the length which fits the number of stitches and change when necessary. The piece is started back and forth, casting on stitches at the back of the neck and working the back piece top down, while increasing stitches on each side for the shoulders which become slightly diagonal. The back piece is then worked as far as the armholes and set aside. The front piece is worked in 2 sections, knitting up stitches first along 1 back shoulder and increasing for the neckline. This is repeated on the other shoulder, the 2 front sections are joined when the neckline is finished and worked until the armholes are finished. The front and back pieces are joined on the same circular needle and the body worked in the round Stitches are knitted up around the armholes for the sleeves, which are started back and forth for the sleeve cap then finished in the round. Stitches are knitted up around the neckline and the neck worked in the round, then folded double to the inside. BACK PIECE: The piece is worked back and forth. Cast on 31-33-35-37-39-39 stitches with circular needle size 5 mm and colour wheat DROPS Air. ROW 1 (wrong side): Purl. ROW 2 (right side): Read INCREASE TIP-1. Knit 3, increase 1 stitch towards the left, knit until there are 3 stitches left, increase 1 stitch towards the right, knit 3. ROW 3 (wrong side): Read INCREASE TIP-2. Purl 3, increase 1 stitch towards the right, purl until there are 3 stitches left, increase 1 stitch towards the left, purl 3. AFTER ROW 3: Work ROWS 2 and 3 a total of 12-13-14-15-17-19 times (24-26-28-30-34-38 rows worked). There are = 79-85-91-97-107-115 stitches. Insert 1 marker outermost on one side. The piece is now measured from here! Work 4 rows without increasing. Remember to maintain the knitting tension. Continue as follows: 2 stocking stitches with colour wheat, see start-arrow for your size and work the last 1-16-19-22-15-19 stitches in A.1, work A.1 across the next 72-48-48-48-72-72 stitches, work the first 2-17-20-23-16-20 stitches in A.1 (so the pattern is symmetrical) and 2 stocking stitches with colour wheat. Continue this pattern until the piece measures 11-12-13-14-14-15 cm from the marker. Now increase for the armholes. INCREASE FOR ARMHOLES: ROW 1 (right side): Remember INCREASE TIP-1. Knit 2, increase 1 stitch towards the left, work A.1 until there are 2 stitches left, increase 1 stitch towards the right, knit 2. ROW 2 (wrong side): Purl and work A.1, with the increased stitches worked into A.1. Work ROWS 1 and 2 a total of 3 times = 85-91-97-103-113-121 stitches. Continue working until the piece measures 14-15-16-17-17-18 cm. Continue the pattern with 2 stitches in colour wheat on each side, measured along the armhole from the marker, finishing after a row from the wrong side – note down which row this is in the pattern. Cut the strand, place the stitches on a stitch holder and work the left front piece. LEFT FRONT PIECE: Find the left back shoulder as follows: Lay the back piece flat, right side up, with the stitch holder towards you; left side of piece = left shoulder. Start from the right side by the neck with colour wheat and knit up 1 stitch in each worked row on the left back shoulder (inside the outermost stitch) to the shoulder = 24-26-28-30-34-38 stitches. All measurements on the front piece are taken from this knitted-up row. Work stocking stitch (first row from wrong side). When the piece measures 8 cm, increase for the neck as follows: ROW 1 (right side): Remember INCREASE TIP-1. Knit 3, increase 1 stitch towards the left, work to end of row. ROW 2 (wrong side): Purl. Work ROWS 1 and 2 a total of 4 times (8 worked rows) = 28-30-32-34-38-42 stitches (last row from the wrong side). Cut the strand, place the stitches on a stitch holder and work the right front piece. RIGHT FRONT PIECE: Start from the right side, outermost on the right back shoulder with colour wheat and knit up 1 stitch in each worked row along the shoulder (inside the outermost stitch) to the neckline = 24-26-28-30-34-38 stitches. All measurements on the front piece are taken from this knitted-up row. Work stocking stitch (first row from wrong side). When the piece measures 8 cm, increase for the neck as follows: ROW 1 (right side): Remember INCREASE TIP-1. Work until there are 3 stitches left on the row, increase 1 stitch towards the right, knit 3. ROW 2 (wrong side): Purl. Work ROWS 1 and 2 a total of 4 times (8 worked rows) = 28-30-32-34-38-42 stitches (last row from the wrong side). Now join the 2 front pieces. FRONT PIECE: From the right side and with colour wheat, work the 28-30-32-34-38-42 stitches on the right front piece, cast on 23-25-27-29-31-31 stitches for the neckline, work the 28-30-32-34-38-42 stitches on the left front piece = 79-85-91-97-107-115 stitches. Continue with stocking stitch and colour wheat until the piece measures 14-14-14-14-16-16 cm from the knitted-up row. Work as follows from the right side: 2 stitches with colour wheat, see start-arrow for your size and work the last 1-16-19-22-15-19 stitches in A.1, work A.1 across the next 72-48-48-48-72-72 stitches, work the first 2-17-20-23-16-20 stitches in A.1 (so the pattern is symmetrical), work 2 stitches with colour wheat. Continue working until the piece measures 23-24-25-26-28-29 cm, Now increase for the armholes. INCREASE FOR ARMHOLES: ROW 1 (right side): Remember INCREASE TIP-1. Knit 2, increase 1 stitch towards the left, work A.1 until there are 2 stitches left, increase 1 stitch towards the right, knit 2. ROW 2 (wrong side): Purl and work A.1, with the increased stitches worked into A.1. Work ROWS 1 and 2 a total of 3 times = 85-91-97-103-113-121 stitches. Continue working until the piece measures 26-27-28-29-31-32 cm. Continue the pattern with 2 stitches in colour wheat on each side, measured along the armhole from the marker, finishing after a row from the wrong side (the same row as on the back piece). Now join the front and back pieces. Cut the strand. BODY: Cast on 2-3-3-4-4-5 new stitches, then continue A.1 across the 85-91-97-103-113-121 stitches on the front piece (including the 2 stitches in colour wheat on each side), cast on 4-6-6-8-8-10 stitches (in side mid-under sleeve), continue A.1 across the 85-91-97-103-113-121 stitches on the back piece, cast on 2-3-3-4-4-5 stitches (in side mid-under sleeve) = 178-194-206-222-242-262 stitches. Continue A.1 in the round across all stitches. NOTE! The pattern will not fit under the sleeves, so work the pattern as far as it will go. Work until A.1 is completed in height - on the last round in A.1, adjust the stitch count to 180-192-204-216-240-264 stitches. Continue with A.2, which now fits into the round. When A.2 is finished, continue with stocking stitch and colour wheat. Work until the front piece measures 55-57-59-60-62-64 cm from the knitted-up row. Change to circular needle size 3.5 mm. Work rib with colour wheat (knit 2, purl 2), AT THE SAME TIME increase 32-32-36-40-44-48 stitches evenly on the first round = 212-224-240-256-284-312 stitches. When the rib measures 6-6-6-7-7-7 cm, cast off. The front piece measures approx. 61-63-65-67-69-71 cm from the knitted-up row and is 3 cm longer than the finished length as the knitted-up row is not on the shoulder but slightly down the back piece. The jumper measures approx. 58-60-62-64-66-68 cm. SLEEVES: The sleeve is worked top down. Lay the piece flat and insert 1 marker at the top of the armhole (NOTE! This is not in the knitted-up row on the front piece but approx. 6-7 cm down the front piece). Use circular needle size 3.5 mm and colour wheat. Start in the middle of the cast-on stitches under the sleeve, knit up 70-74-78-84-88-94 stitches around the armhole, with equal numbers of stitches on both sides of the marker. Change to circular needle size 5 mm. Work stocking stitch back and forth with short rows for the sleeve cap, starting mid-under the sleeve as follows: ROW 1 (right side): Knit to 8-8-8-9-9-9 stitches past the marker-stitch on top of the armhole, turn – read KNITTING TIP. ROW 2 (wrong side): Purl to 8-8-8-9-9-9 stitches past the marker-stitch, turn. ROW 3 (right side): Knit to 4-4-4-5-5-5 stitches past the previous turn, turn. ROW 4 (wrong side): Purl to 4-4-4-5-5-5 stitches past the previous turn, turn. Repeat ROWS 3 and 4 until you have turned a total of 10-10-10-10-12-12 times (5-5-5-5-6-6 times on each side, with the last row from the wrong side). AFTER THE LAST TURN: Knit back to the beginning of the round (mid-under sleeve). Now work stocking stitch and pattern in the round as well as decreasing under the sleeve. Read the next 2 sections before continuing. PATTERN: Remember to decrease as described below. After the sleeve cap, work A.3 in the round – the pattern will not fit under the sleeve, count out from the marker on the shoulder to determine where to start the pattern under the sleeve – the marker-stitch on the shoulder should match the mid-stitch in A.3. When A.3 is finished in height, continue with A.4, making sure to finish with a round of colour wheat before the rib. DECREASES: Read DECREASE TIP. When the sleeve measures 1 cm from the join, decrease 2 stitches every 2nd round 2-3-3-4-4-5 times, then every 3-3-2½-2½-2½-1½ cm 9-9-10-12-13-14 times = 48-50-52-52-54-56 stitches Continue working until the sleeve measures 46-45-44-43-41-39 cm from the shoulder. Change to double pointed needles size 3.5 mm. Work rib (knit 2, purl 2), AT THE SAME TIME increase 8-10-8-12-10-12 stitches evenly on round 1 = 56-60-60-64-64-68 stitches. When the rib measures 6-6-6-7-7-7 cm, cast off. The sleeve measures approx. 52-51-50-50-48-46 cm from top of shoulder. NECK: Use circular needle size 3.5 mm and colour wheat. Start from the right side on one shoulder-line and knit up 92 to 124 stitches inside 1 stitch – the stitch count should be divisible by 4. Work rib in the round (knit 2, purl 2) for 11-11-11-13-13-13 cm. Change to circular needle size 5 mm and cast off a little loosely. Fold the neck double to the inside and fasten down with a couple of stitches by each shoulder. |
|||||||
Diagram explanations |
|||||||
|
|||||||
 |
|||||||
 |
|||||||
 |
|||||||
Have you finished this pattern?Tag your pictures with #dropspattern #brightrosesweater or submit them to the #dropsfan gallery. Do you need help with this pattern?You'll find 34 tutorial videos, a Comments/Questions area and more by visiting the pattern on garnstudio.com. © 1982-2026 DROPS Design A/S. We reserve all rights. This document, including all its sub-sections, has copyrights. Read more about what you can do with our patterns at the bottom of each pattern on our site. |
|||||||


With over 40 years in knitting and crochet design, DROPS Design offers one of the most extensive collections of free patterns on the internet - translated to 17 languages. As of today we count 325 catalogues and 12298 patterns translated into English (UK/cm).
We work hard to bring you the best knitting and crochet have to offer, inspiration and advice as well as great quality yarns at incredible prices! Would you like to use our patterns for other than personal use? You can read what you are allowed to do in the Copyright text at the bottom of all our patterns. Happy crafting!
Post a comment to pattern DROPS 255-10
We would love to hear what you have to say about this pattern!
If you want to leave a question, please make sure you select the correct category in the form below, to speed up the answering process. Required fields are marked *.