
Popular categories
Looking for a yarn?


Comments / Questions (20)
![]() Anne Mette wrote:
Anne Mette wrote:
Hej, Er der også en snoning på ryggen?
28.02.2026 - 11:37DROPS Design answered:
Hei Anne Mette. Nei, bare foran. mvh DROPS Design
03.03.2026 - 13:30
![]() Conni wrote:
Conni wrote:
Guten Tag, wieso soll ich ab der Raglanaufteilung ab Runde zwei aufpassen, die Umschläge rechts verschränkt zu stricken? Im Muster A2 werden gar keine Umschläge ausgeführt. Was ist also gemeint? Vielen Dank im Voraus Conni
18.02.2026 - 12:36DROPS Design answered:
Liebe Conni, es geht dabei um die Raglanzunahmen. Die stricken Sie ja jeweils beidseitig jeder Raglanmasche, es wird mit je 1 Umschlag wie unter RAGLANZUNAHMEN beschrieben zugenommen. Dort ist auch beschrieben, wie Sie die Umschläge in der nächsten Runde stricken, es entstehen dann keine Löcher. Viel Spaß beim Stricken!
18.02.2026 - 13:27
![]() Dora Luz Quintero wrote:
Dora Luz Quintero wrote:
Por favor pueden responder a la pregunta que les hice?
11.12.2025 - 01:05DROPS Design answered:
Hola Dora Luz, el remate con i-cord se trabaja alrededor de la parte inferior del cuerpo y de la manga. En el cuello no se trabaja i-cord, sino que se tiene una orilla enrollada de 3 vueltas en punto jersey (puedes ver la explicación en el texto).
14.12.2025 - 20:54
![]() Dora Luz Quintero wrote:
Dora Luz Quintero wrote:
Hola quisiera saber si el remate Í cord del cuello ¿se hace ya al final, cómo terminado,? Es decir tejo en aguja circular después de haber montado los puntos y voy de arriba a abajo el suéter. Al final vuelvo a montar lis puntos del cuello y hago el remate Í cord?
08.12.2025 - 20:36DROPS Design answered:
Hola Dora Luz, el remate con i-cord se trabaja alrededor de la parte inferior del cuerpo y de la manga. En el cuello no se trabaja i-cord, sino que se tiene una orilla enrollada de 3 vueltas en punto jersey (puedes ver la explicación en el texto).
14.12.2025 - 20:54
![]() Monica wrote:
Monica wrote:
Salve, mi dispiace ma il modello non è chiaro soprattutto nella descrizione degli aumenti dello sprone e del motivo, tutto molto confuso. Ho già portato a termine con successo altri modelli. Peccato, non lo consiglio!
24.03.2025 - 22:58
![]() Suzanne wrote:
Suzanne wrote:
Mon fil du début du tour est bien placé à 20 m du dernier marqueur. Donc, il y a un marqueur en début de tour. Vs dites que je dois faire une m end et ensuite le fil marqueur? C’est de là mon erreur, mais j’ai bien vérifié que tous les marqueurs sont bien placés. Dois-je déplacer le marqueur du début d’une maille? Merci encore
03.02.2025 - 17:44DROPS Design answered:
Bonjour Suzanne, vous ne déplacez pas votre marqueur, mais les augmentations du raglan se font 1 maille après le marqueur et/ou 1 maille avant le marqueur = on va augmenter pour le raglan de chaque côté de ces 2 mailles des raglans; quand vous augmentez 8 m par tour, vous aurez à chaque marqueur: 1 augmentation, 2 m end avec le marqueur entre les 2, 1 augmentation, le nombre de mailles entre ces 2 m va augmenter. Bon tricot!
04.02.2025 - 08:51
![]() Suzanne wrote:
Suzanne wrote:
En fait tout n’est pas clair encore pour 1er tour. Après marqueur de début: 1 m end, 1 aug pour raglan, 18 m end, 1 aug, fil marqueur, 1 aug, et là je devrais tricoter 4m end en aug de 2 mailles, mais il me reste déjà 6 m avant la torsade, voilà mon problème. Merci. Si vs pouviez me dire m par m pour le 1er tour, j’aimerais bien.
03.02.2025 - 15:14DROPS Design answered:
Bonjour Suzanne, pas exactement, vous aurez ceci: début du tour, 1 m end, (fil marqueur), augm. raglan, manche = 18 m, augm. raglan, 1 m end, (fil marqueur), 1 m end, augm. raglan, 4 m end, 17 m A.2, 4 m end, augm. raglan, 1 m end, (fil marqueur), 1 m end, augm. raglan, manche = 18 m, augm. raglan, 1 m end, (fil marqueur), 1 m end, augm. raglan, 18 m (dos), augm. raglan, 1 m end = 1+18+1+1+4+17+4+1+1+18+1+1+18+1=87 m (en M, L et XL) + les 8 augm du raglan . Vous aurez ainsi au tour suivant: 1+20+2+(5+17+5)+2+20+2+20+1 après les 8 augmentations du 1er raglan. Bon tricot!
03.02.2025 - 15:54
![]() Suzanne wrote:
Suzanne wrote:
En fait si vs pouviez me dire exactement le tour 1 en commençant après le marqueur du début du tour, je pourrais mieux comprendre dans vos mots, merci beaucoup. suzanne , j ai fait plusieurs pull circulaires mais pas de torsades… J!ai 78 ans… Merci merci
03.02.2025 - 05:32DROPS Design answered:
Bonjour Suzanne, lisez les réponses précédentes et indiquez-nous si désormais tout est clair ou pas. Bonne continuation!
03.02.2025 - 10:23
![]() Suzanne wrote:
Suzanne wrote:
Svp oubliez dernière question, Au 1er tour avant de tricoter les 4 m en aug de 2 m à int régulier j’ai 6 m sur mon aiguille et non 4 avant le A2? Merci bien
02.02.2025 - 19:00DROPS Design answered:
Bonjour Suzanne, ne comptez pas les 2 mailles des raglans, vous devez ainsi avoir pour le devant: fil marqueur, 1 m end, (augmentation raglan), 4 m end, 17 m A.2, 4 m end, (augmentation raglan), 1m end, fil marqueur. Bon tricot!
03.02.2025 - 10:01
![]() Suzanne wrote:
Suzanne wrote:
Au 1er tour 4 m end en aug de 2 m (pour 6m?) mais après les 18 m manche et ces 6 m il me reste 3 m avant d'arriver à la première m envers du A2. Merci de m’aider encore.
01.02.2025 - 19:41DROPS Design answered:
Bonjour Suzanne, vérifiez bien votre nombre de mailles, et si vous avez bien augmenté dans A.1 c comme indiqué auparavant; vous allez aussi augmenter avant/après les 2 mailles des raglans - vous devez toujours avoir 2 mailles avant/après les raglans. N'hésitez pas à nous indiquer la taille que vous tricotez, ce peut-être plus simple de reprendre le décompte de ce 1er tour avec vous dans la bonne taille. Bon tricot!
03.02.2025 - 08:45
|
||||||||||||||||||||||
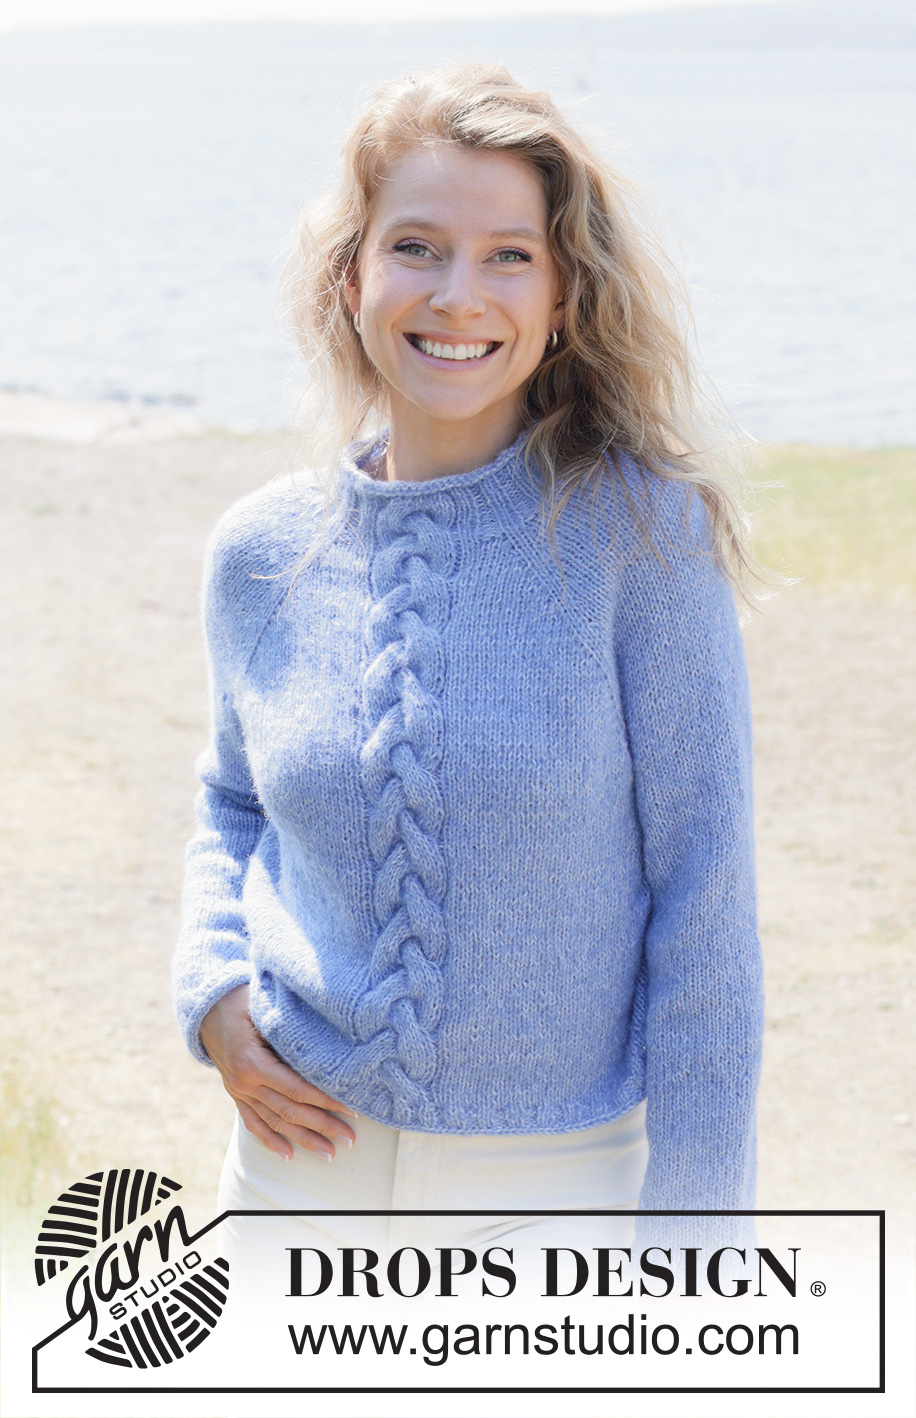
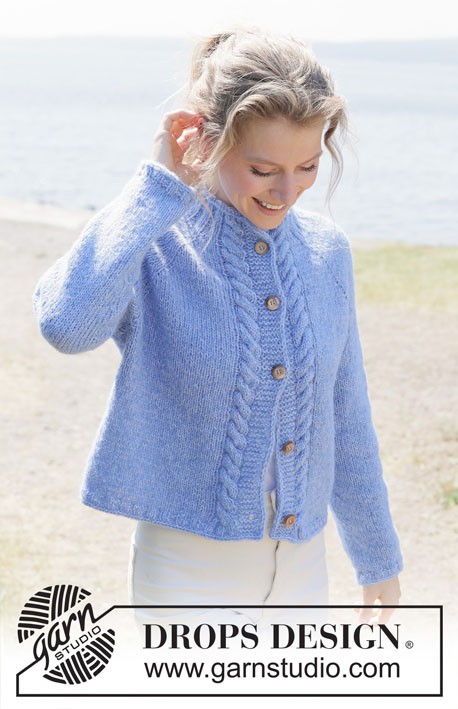
Skyfall Road#skyfallroadsweater |
||||||||||||||||||||||
 |
 |
|||||||||||||||||||||
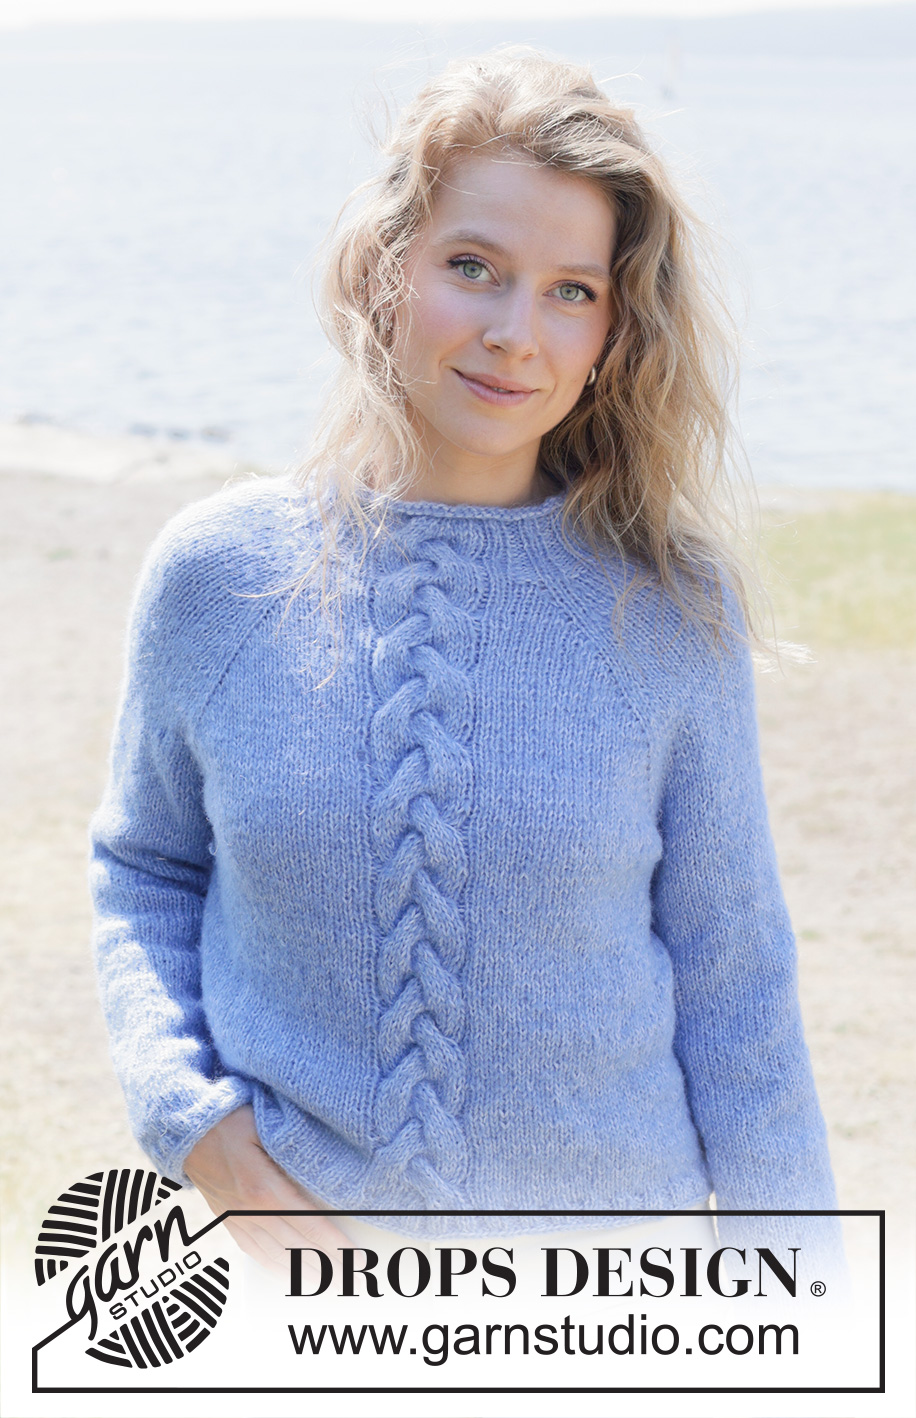
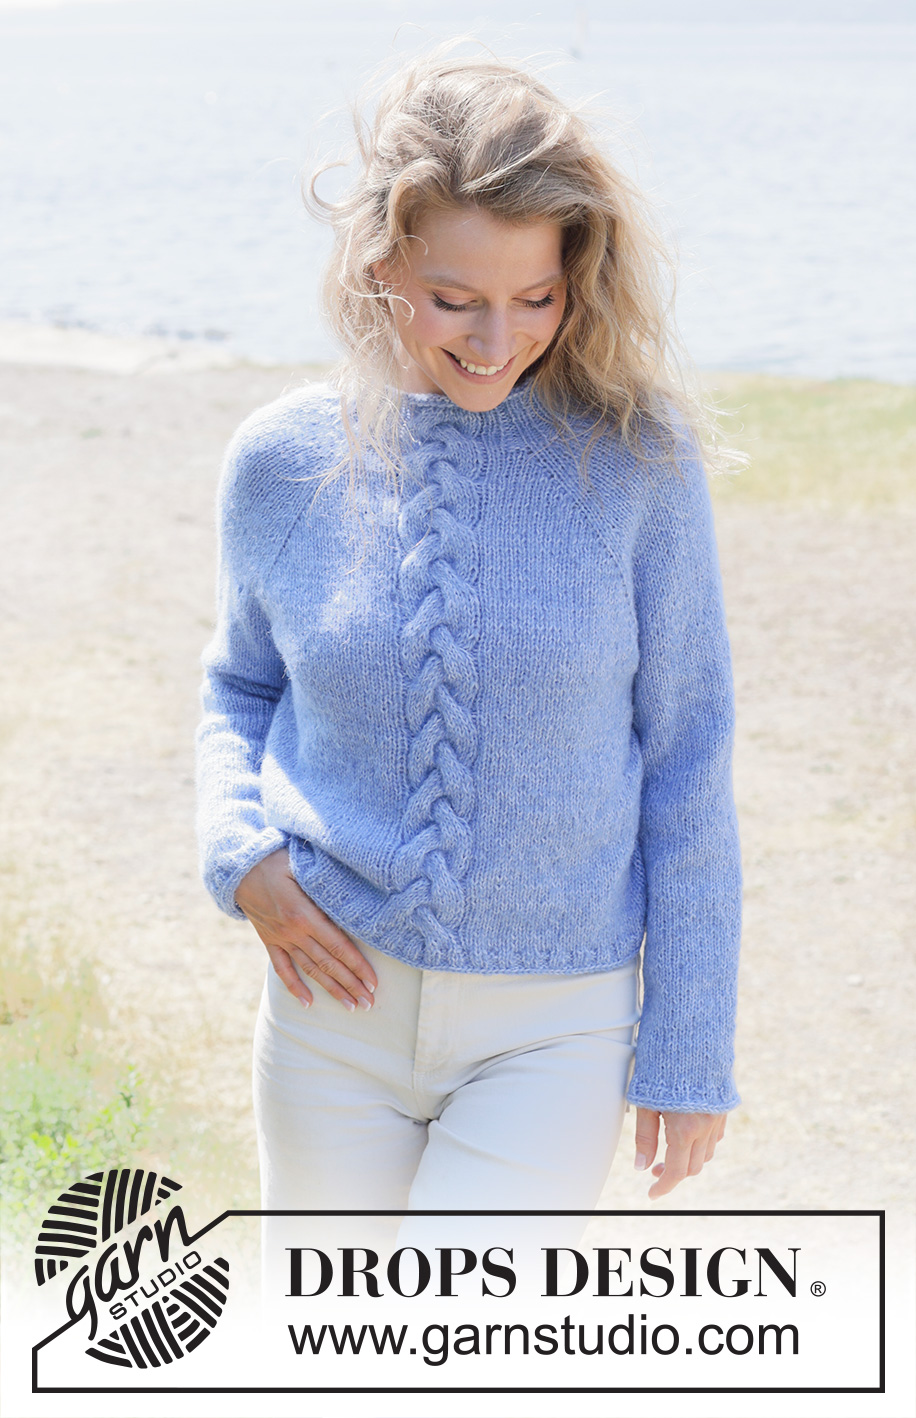
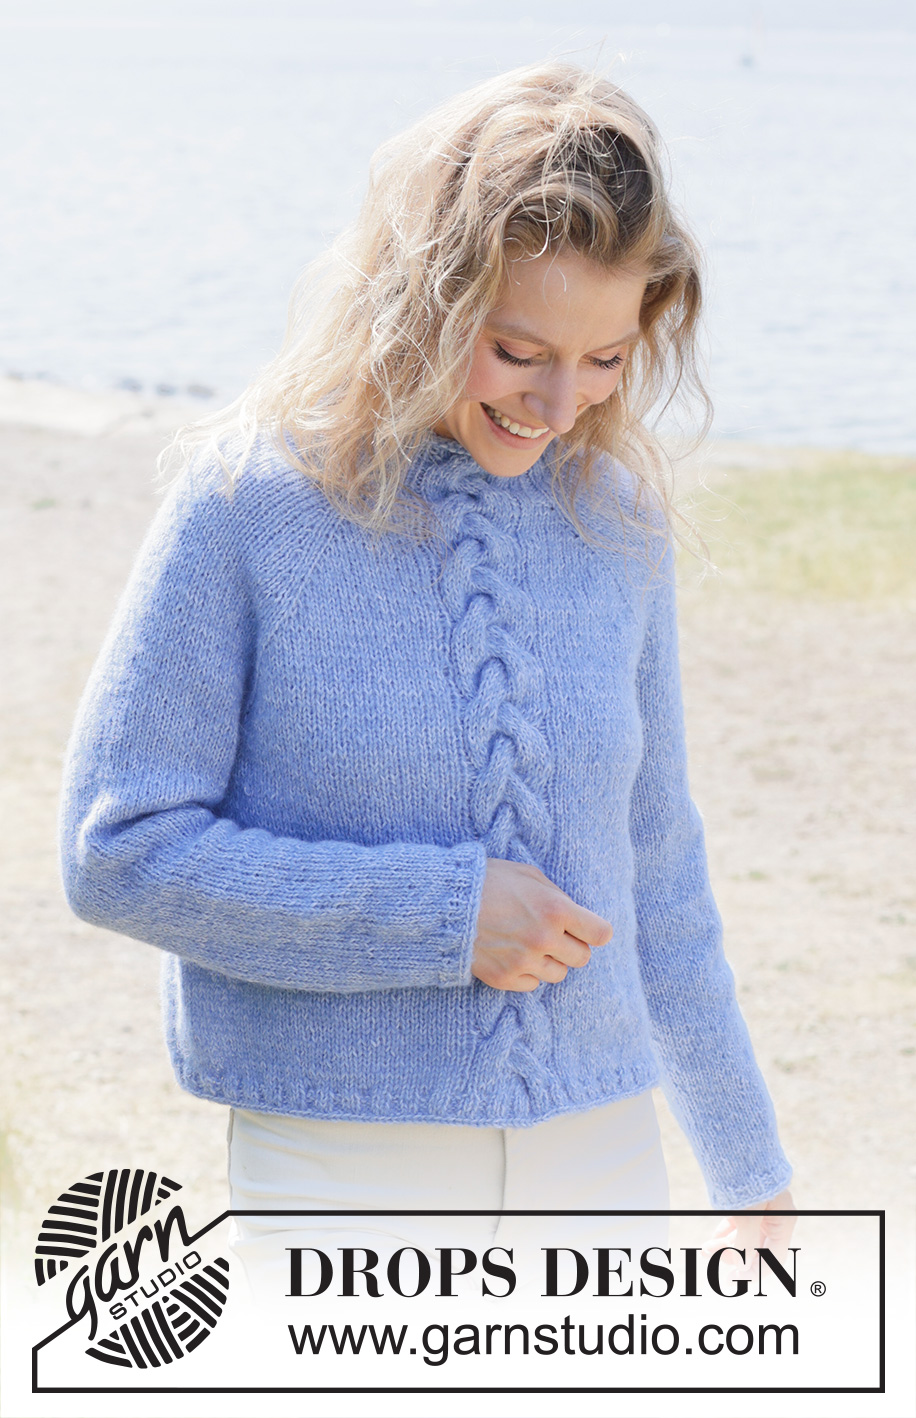
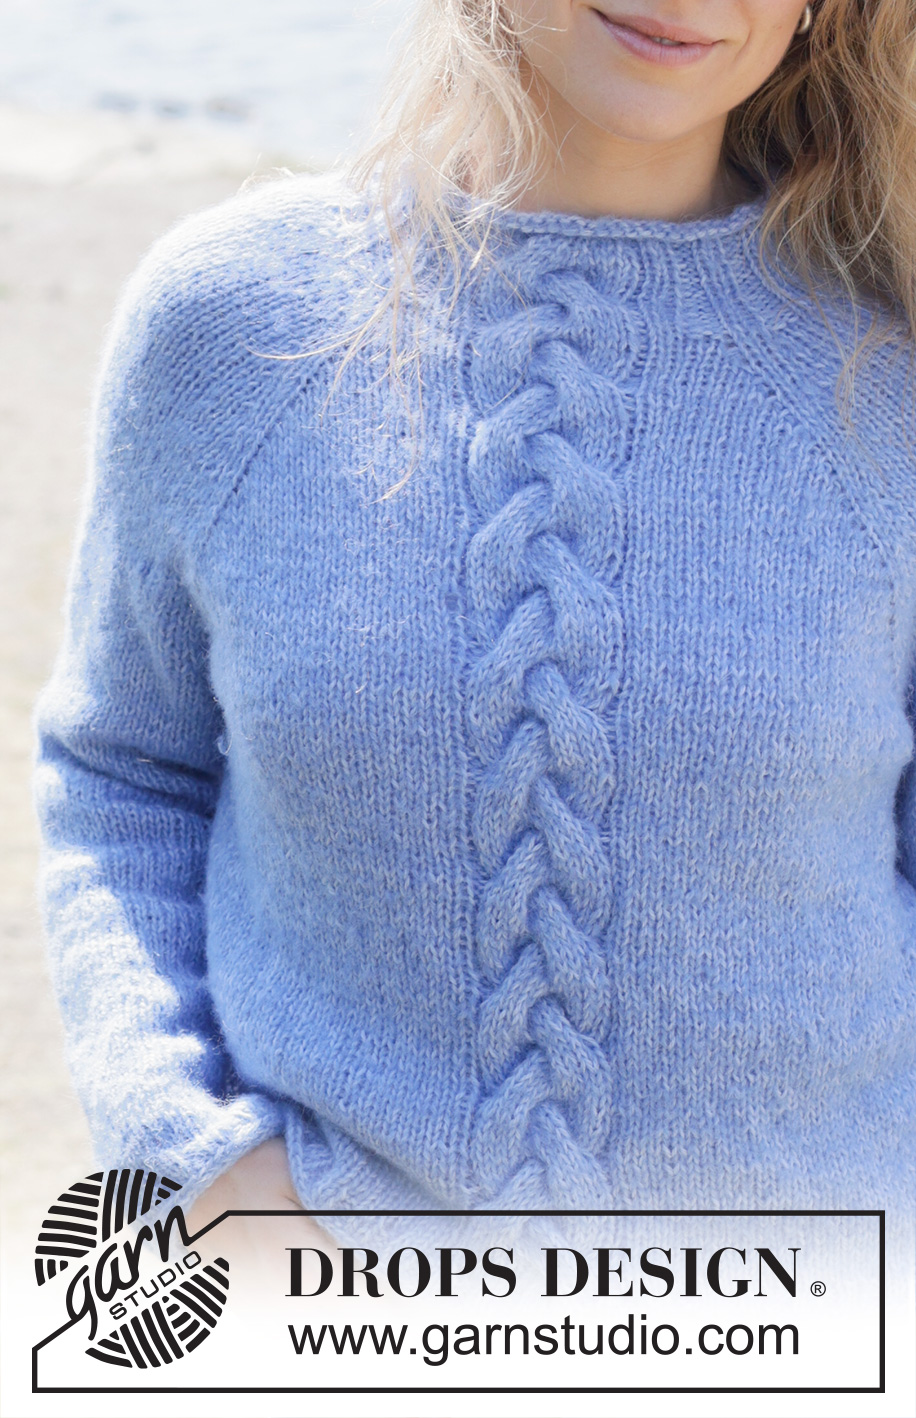
Knitted jumper in DROPS Brushed Alpaca Silk and DROPS Alpaca. The piece is worked top down with raglan, cables and rolled neckline. Sizes S - XXXL.
DROPS 254-10 |
||||||||||||||||||||||
|
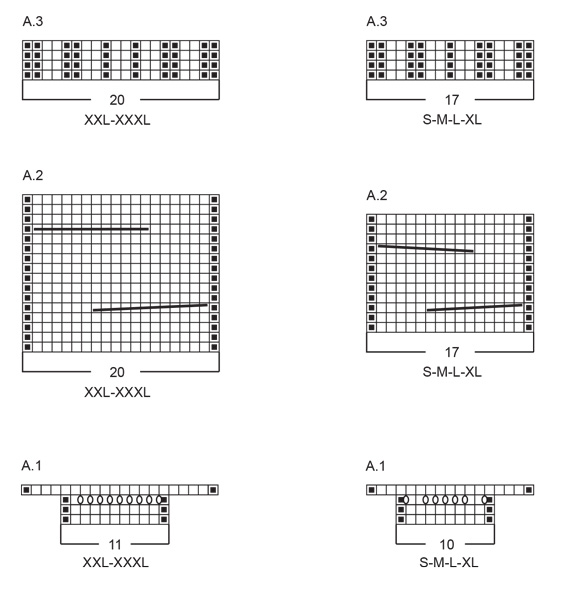
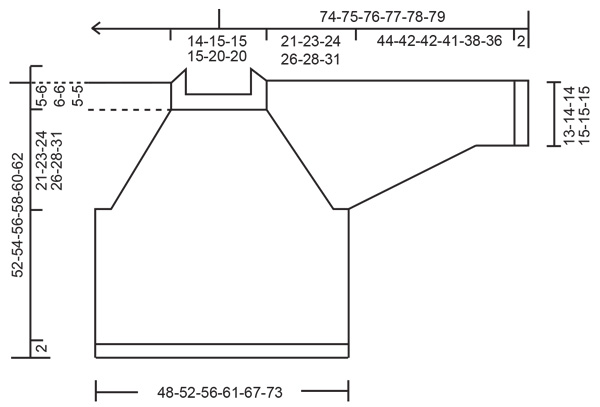
------------------------------------------------------- EXPLANATIONS FOR THE PATTERN: ------------------------------------------------------- PATTERN: See diagrams A.1 to A.3. Choose diagram for your size. RAGLAN: INCREASE ONE STITCH TOWARDS THE RIGHT BEFORE MARKER-THREAD: Make 1 yarn over the right needle by taking the strand from the back and in front of the needle. On the next round knit the front loop of the yarn over. Then work the new stitch in stocking stitch. INCREASE ONE STITCH TOWARDS THE LEFT AFTER MARKER-THREAD: Make 1 yarn over the right needle by taking the strand in front of the needle and backwards. On the next round knit the back loop of the yarn over. Then work the new stitch in stocking stitch. DECREASE TIP: Decrease 1 stitch on each side of the marker-thread as follows: Work until there are 3 stitches left before the marker-thread, knit 2 together, knit 2 (marker-thread sits between these 2 stitches), slip 1 stitch knit-wise, knit 1 and pass the slipped stitch over the knitted stitch (2 stitches decreased). I-CORD CAST-OFF: After the last stitch on the round has been worked: Cast on 3 stitches on the right needle from the right side, slip these stitches onto the left needle with the working strand inside the 3 stitches (when worked the strand tightens the piece into a small tube). ROW 1 (right side): Knit 2, knit 2 twisted together. ROW 2 (right side): Slip the 3 stitches from the right needle onto the left needle, knit 2, knit 2 twisted together. Repeat ROW 2 until there are 3 stitches left on the right needle. Slip these 3 stitches from the right needle onto the left needle. Cast off. Sew a small stitch to join the beginning and end of the I-cord. ------------------------------------------------------- START THE PIECE HERE: ------------------------------------------------------- JUMPER – SHORT OVERVIEW OF THE PIECE: The pattern uses both long and short needles; start with the length which fits the number of stitches and change when necessary. The neck and yoke are worked in the round with circular needle, top down and from the right back shoulder. When the yoke is finished, it is divided for the body and sleeves and the body continued in the round, while the sleeves wait. The sleeves are worked top down, in the round. If there is a «0» in your chosen size, skip the information and go straight to the next instruction. NECK: Cast on 72-80-80-80-89-89 stitches with circular needle size 5.5 mm, 1 strand DROPS Brushed Alpaca Silk and 1 strand DROPS Alpaca (2 strands). Change to circular needle size 4.5 mm. Work 3 rounds of stocking stitch (= rolled edge). Work the next round as follows: * Knit 1, purl 2, knit 1 *, work from *-* a total of 5-6-6-6-6-6 times, knit 1, work PATTERN A.1 – read description above, * knit 2, purl 2 *, work from *-* until there is 1 stitch left on the round, knit 1. Continue this rib until A.1 is finished in height – NOTE: After round 3 there are 79-87-87-87-98-98 stitches on the needle. Continue the rib but now with A.2 across the stitches in A.1. Work until the neck measures 6-6-6-6-7-7 cm. The round begins on the back right shoulder. Insert 1 marker after the first 26-30-30-30-32-32 stitches (approx. mid-front), the piece is measured from here. YOKE: Insert 4 marker-threads without working the stitches, each thread inserted between 2 stitches - these 2 stitches are the raglan-stitches and are worked in stocking stitch (you increase for raglan on each side of these 2 raglan-stitches). Insert 1 marker-thread at the beginning of the round, count 16-20-20-20-16-16 stitches (= sleeve), insert 1 marker-thread before the next stitch, count 27-27-27-27-38-38 stitches (= front piece), insert 1 marker-thread before the next stitch, count 16-20-20-20-16-16 stitches (= sleeve), insert 1 marker-thread before the next stitch. There are 20-20-20-20-28-28 stitches left after the last marker-thread (= back piece). Now work PATTERN and increase for RAGLAN – read descriptions above, as follows: ROUND 1: Change to circular needle size 5.5 mm. Knit 1 (raglan-stitch), increase for RAGLAN – read description above, knit 14-18-18-18-14-14 (sleeve), increase for raglan on each side of the raglan-stitches (marker-thread sits between the 2 raglan-stitches), knit 4-4-4-4-8-8 and increase 1-1-2-3-0-1 stitches evenly over these stitches, continue A.2 over the next 17-17-17-17-20-20 stitches, knit 4-4-4-4-8-8 and increase 1-1-2-3-0-1 stitches evenly over these stitches, increase for raglan on each side of the raglan-stitches, knit 14-18-18-18-14-14 (sleeve), increase for raglan on each side of the raglan-stitches, knit 18-18-18-18-26-26 and increase 2-2-4-6-0-2 stitches evenly over these stitches, increase for raglan before the last raglan-stitch, knit this stitch = 91-99-103-107-106-110 stitches. ROUND 2: Continue with stocking stitch and A.2 (remember to work the yarn overs as described under RAGLAN). ROUND 3: Continue with stocking stitch and A.2 and increase for raglan on each side of the raglan-stitches (= 8 increased stitches). Work ROUNDS 2 and 3 a total of 6-2-5-7-9-8 times (12-4-10-14-18-16 rounds worked) = 139-115-143-163-178-174 stitches. Remember to maintain the knitting tension. Now increase as follows: ROUND 1: Continue with stocking stitch and A.2 (remember to work the yarn overs as described under RAGLAN). ROUND 2: Continue with stocking stitch and A.2 and increase for raglan on each side of the raglan-stitches (= 8 increased stitches). ROUND 3: Continue with stocking stitch and A.2 (remember to work the yarn overs as described under RAGLAN). ROUND 4: Continue with stocking stitch and A.2 and increase for raglan AFTER marker-threads 2 and 4 and BEFORE marker-threads 3 and 1 (= 4 increased stitches). Work ROUNDS 1 to 4 a total of 7-10-9-9-9-11 times (28-40-36-36-36-44 rounds worked). Work ROUND 1 one more time. All increases for raglan are now finished (a total of 21-23-24-26-28-31 times on the front and back pieces and 14-13-15-17-19-20 times on the sleeves) = 223-235-251-271-286-306 stitches. The yoke measures approx. 21-23-24-26-28-31 cm from the marker mid-front. Now divide for the body and sleeves. DIVIDE FOR BODY AND SLEEVES: Knit 1 (this stitch belongs to the back piece), place the next 42-44-48-52-52-54 stitches on a thread for the sleeve, cast on 6-8-10-12-14-16 stitches (in side mid-under sleeve), work 73-77-81-87-96-104 stitches as before (= front piece), place the next 42-44-48-52-52-54 stitches on a thread for the sleeve, cast on 6-8-10-12-14-16 stitches (in side mid-under sleeve), work the last 65-69-73-79-85-93 stitches (= back piece). The body and sleeves are finished separately. BODY: = 151-163-175-191-210-230 stitches. Insert 1 marker in the middle of the 6-8-10-12-14-16 cast-on stitches under one sleeve. Work to the marker; the round now begins here. Continue with stocking stitch and A.2 in the round until the piece measures 45-46-48-50-53-55 cm from the marker mid-front – make sure you have worked at least 3 rounds after the last cable. Change to circular needle size 4.5 mm. Work rib (knit 2, purl 2), AT THE SAME TIME increase 20-20-24-24-28-28 stitches evenly on the first round – adjust the increases so the rib begins and ends with knit 2 on each side of A.2 mid-front and work A.3 across A.2 = 171-183-199-215-238-258 stitches. When the rib measures 2 cm, work I-CORD CAST-OFF – read description above. The jumper measures approx. 47-48-50-52-55-57 cm from the marker mid-front and 52-54-56-58-60-62 cm from the shoulder. SLEEVES: Place the 42-44-48-52-52-54 sleeve-stitches from the thread on one side of the piece on circular needle size 5.5 mm and knit up 1 stitch in each of the 6-8-10-12-14-16 stitches cast on under the sleeve = 48-52-58-64-66-70 stitches. Insert a marker-thread in the middle of the 6-8-10-12-14-16 stitches under the sleeve. Start at the marker-thread and work stocking stitch in the round. When the sleeve measures 4-4-4-3-3-2 cm, decrease 2 stitches under the sleeve – read DECREASE TIP. Decrease like this every 10-7-4-3-3-2½ cm a total of 4-5-8-10-10-12 times = 40-42-42-44-46-46 stitches. Continue working until the sleeve measures 44-42-42-41-38-36 cm from the division. Change to double pointed needles size 4.5 mm. Work rib (knit 2, purl 2), AT THE SAME TIME increase 4-6-6-4-6-6 stitches evenly on the first round = 44-48-48-48-52-52 stitches. When the rib measures 2 cm, work I-CORD CAST-OFF. The sleeve measures approx. 46-44-44-43-40-38 cm. |
||||||||||||||||||||||
Diagram explanations |
||||||||||||||||||||||
|
||||||||||||||||||||||
 |
||||||||||||||||||||||
 |
||||||||||||||||||||||
Have you finished this pattern?Tag your pictures with #dropspattern #skyfallroadsweater or submit them to the #dropsfan gallery. Do you need help with this pattern?You'll find 26 tutorial videos, a Comments/Questions area and more by visiting the pattern on garnstudio.com. © 1982-2026 DROPS Design A/S. We reserve all rights. This document, including all its sub-sections, has copyrights. Read more about what you can do with our patterns at the bottom of each pattern on our site. |
||||||||||||||||||||||


With over 40 years in knitting and crochet design, DROPS Design offers one of the most extensive collections of free patterns on the internet - translated to 17 languages. As of today we count 324 catalogues and 12290 patterns translated into English (UK/cm).
We work hard to bring you the best knitting and crochet have to offer, inspiration and advice as well as great quality yarns at incredible prices! Would you like to use our patterns for other than personal use? You can read what you are allowed to do in the Copyright text at the bottom of all our patterns. Happy crafting!
Post a comment to pattern DROPS 254-10
We would love to hear what you have to say about this pattern!
If you want to leave a question, please make sure you select the correct category in the form below, to speed up the answering process. Required fields are marked *.