
Popular categories
Looking for a yarn?


Comments / Questions (6)
![]() Nadine wrote:
Nadine wrote:
Serait-il possible d'avoir les explications de ce modèle avec des aiguilles simples et en commençant par le bas?
11.02.2026 - 11:52
![]() Linda wrote:
Linda wrote:
De masker man slog op under ærmet, som man ikke skal strikke op. Hvordan gør man lige der. Forstår ikke beskrivelsen af det. Ville ønske der var en video så man kunne se det
10.10.2025 - 23:05DROPS Design answered:
Hei Linda. Følg beskrivelsen i oppskriften, da blir det 6-8 masker det ikke strikkes under ermet. Så strikkes det frem og tilbake i 2 cm for å forme en ermtopp, så legges det opp nye masker under ermet og det strikke rundt. Du får nå et "hull" midt under ermet og når ermet er ferdig strikket, sys dette hullet sammen. Ta en titt på videoen: Hvordan strikkes masker op til et ærme med slids til ærmegab, er ikke samme type plagg, men det samme "hullet" under ermet. Gå til: Instruktionsvideoer - Strikke - Tips & Tricks - Saml -/Strik masker op - Hvordan strikkes masker op til et ærme med slids til ærmegab. mvh DROPS Design
20.10.2025 - 14:02
![]() Hanneke wrote:
Hanneke wrote:
Nog nooit heb ik een werk zo vaak moeten uithalen en opnieuw beginnen. Als je uit de 'korte samenvatting van het werk' al geen wijs kunt, dan trek er maar een paar dagen voor uit. Aantal naalden en aantal cm, voor en achter, buitenkant en binnenkant, links en rechts, alles wordt door elkaar heen geschud. Geen idee waar al die meerderingen in het begin voor dienen. Staat niet op de werktekening. Je komt verkeerd uit met de lengte als je aan het lijf begint. Kortom, een uitdaging !
25.09.2025 - 15:29
![]() Nicole Lejeune wrote:
Nicole Lejeune wrote:
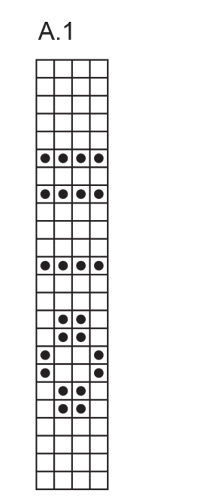
Pour le dos on augmente jusqu’à obtenir 52 mailles. On tricote ensuite 4 rangs sans augmentation. On déplace les marqueurs et on continue ensuite pendant 3 cm. Ensuite on applique A1. Si je comprends il y a 4 rangs + 3 cm ?? Merci pour la réponse Nicole
10.11.2024 - 19:15DROPS Design answered:
Bonjour Mme Lejeune, on place les marqueurs 4 rangs après la dernière augmentation = on relèvera ensuite les mailles des devants le long de ces rangs; placez vos marqueurs: les emmanchures commencent ici, vous tricotez 3 cm puis vous commencez à tricoter A.1. Les 4 rangs sont avant le marqueur et les 3 cm après le marqueur. Bon tricot!
11.11.2024 - 09:45
![]() Tessie Stokholm wrote:
Tessie Stokholm wrote:
Kan det være rigtig at ærmegabet skal være 7cm længere på forstykket end på ryggen? Og hvorfor tager man 28m ud inden rib kant forneden på kroppen?
07.10.2024 - 06:37DROPS Design answered:
Hej Tessie, når du strikker europæisk skulder, så kommer selve skulderkanten et stykke ned på ryggen. Se gerne de videoer vi har lavet, så du forstår hvordan du skal finde midten på skulderen :)
16.10.2024 - 12:07
![]() Kristin Syversen wrote:
Kristin Syversen wrote:
Jeg strikker Little Lily Sweater 5-6 år i Drops Air mix. Holder på med bakstykket. Jeg har økt til 56 masker og strikket 4 pinner over alle maskene. Har flyttet markørene helt ut i siden og strikket glattstrikk 4cm fra markørene. Da står det at jeg skal begynne på mønster A1. Går ut i fra at jeg skal begynne nederst. Det betyr 4 pinner glattstrikk før mønsterstrikk. Stemmer dette, eller skal jeg begynne direkte på mønsteret? Synes ikke dette kommer klart fram.
14.09.2024 - 16:45DROPS Design answered:
Hei Kristin, Du begynner nederst på diagrammet og fra høyre til venstre fra retten og venstre til høyre fra vrangen. Og, ja, mønsteret begynner med 4 pinner glattstrikk. God fornøyelse!
16.09.2024 - 07:01
|
||||||||||||||||
Little Lily Sweater#littlelilysweater |
||||||||||||||||
 |
 |
|||||||||||||||
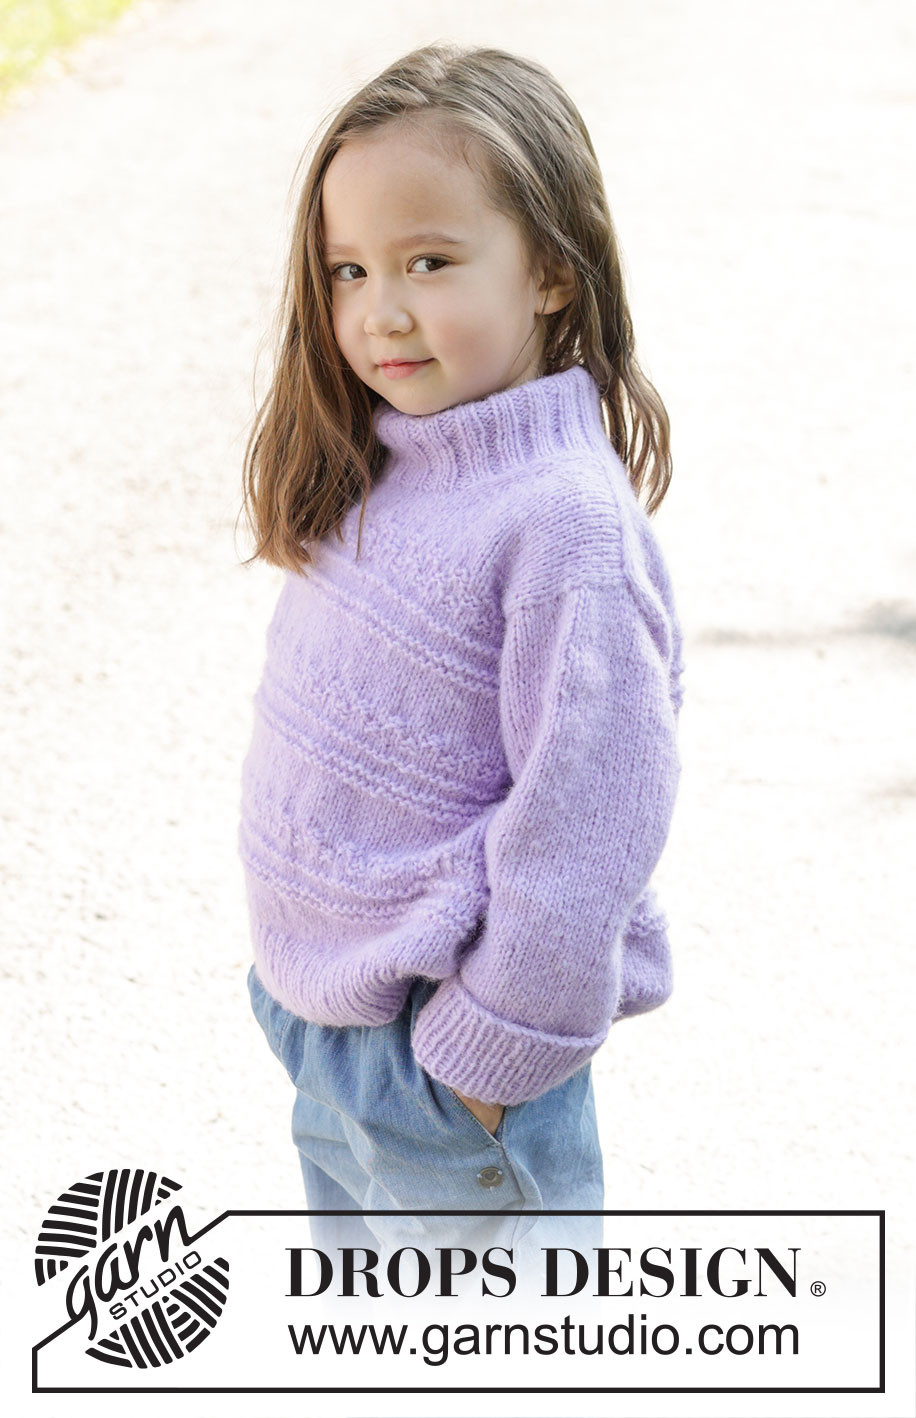
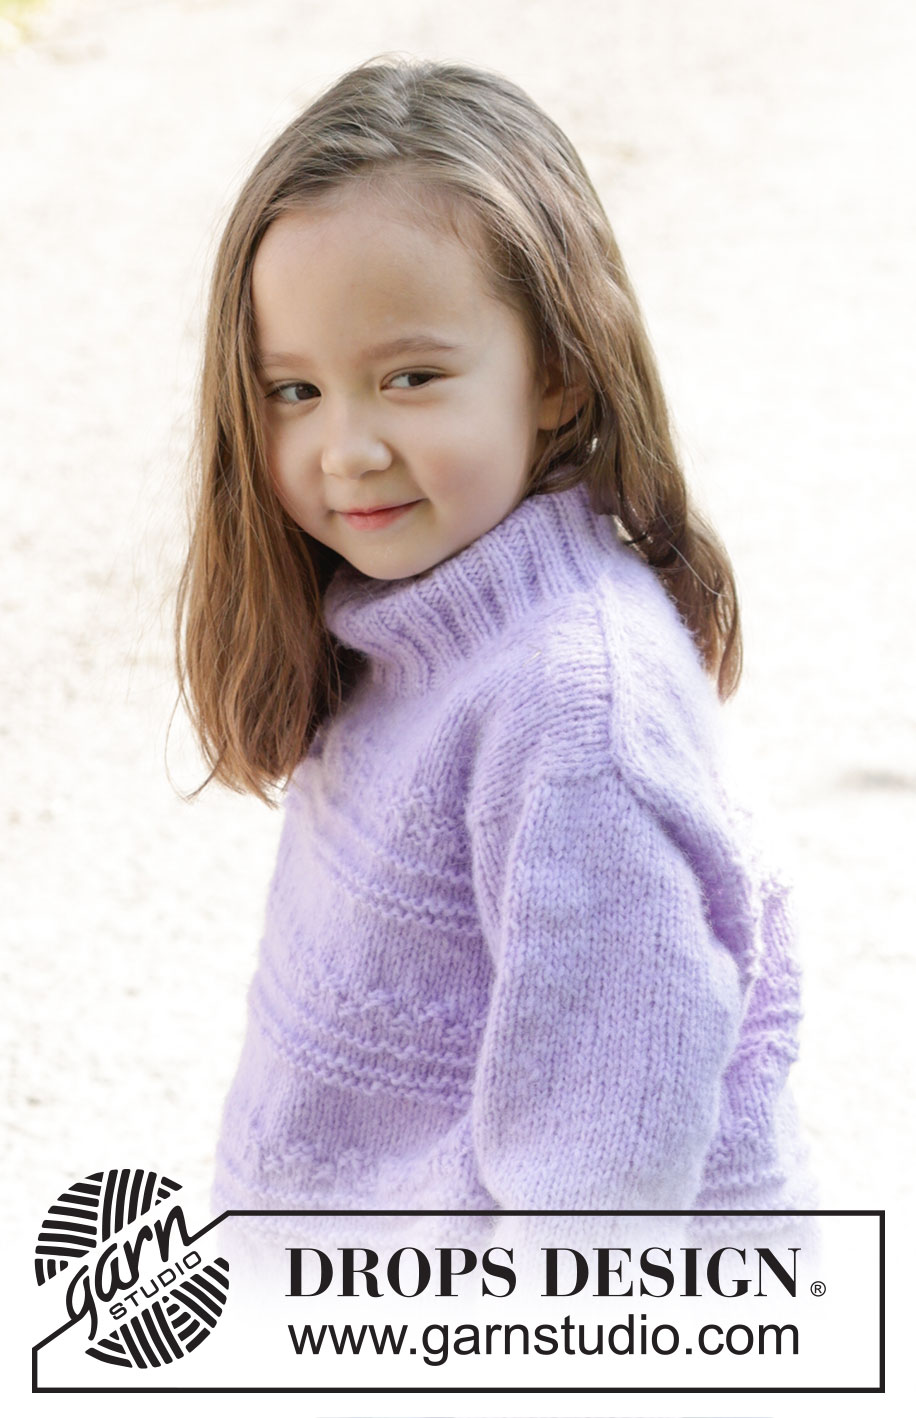
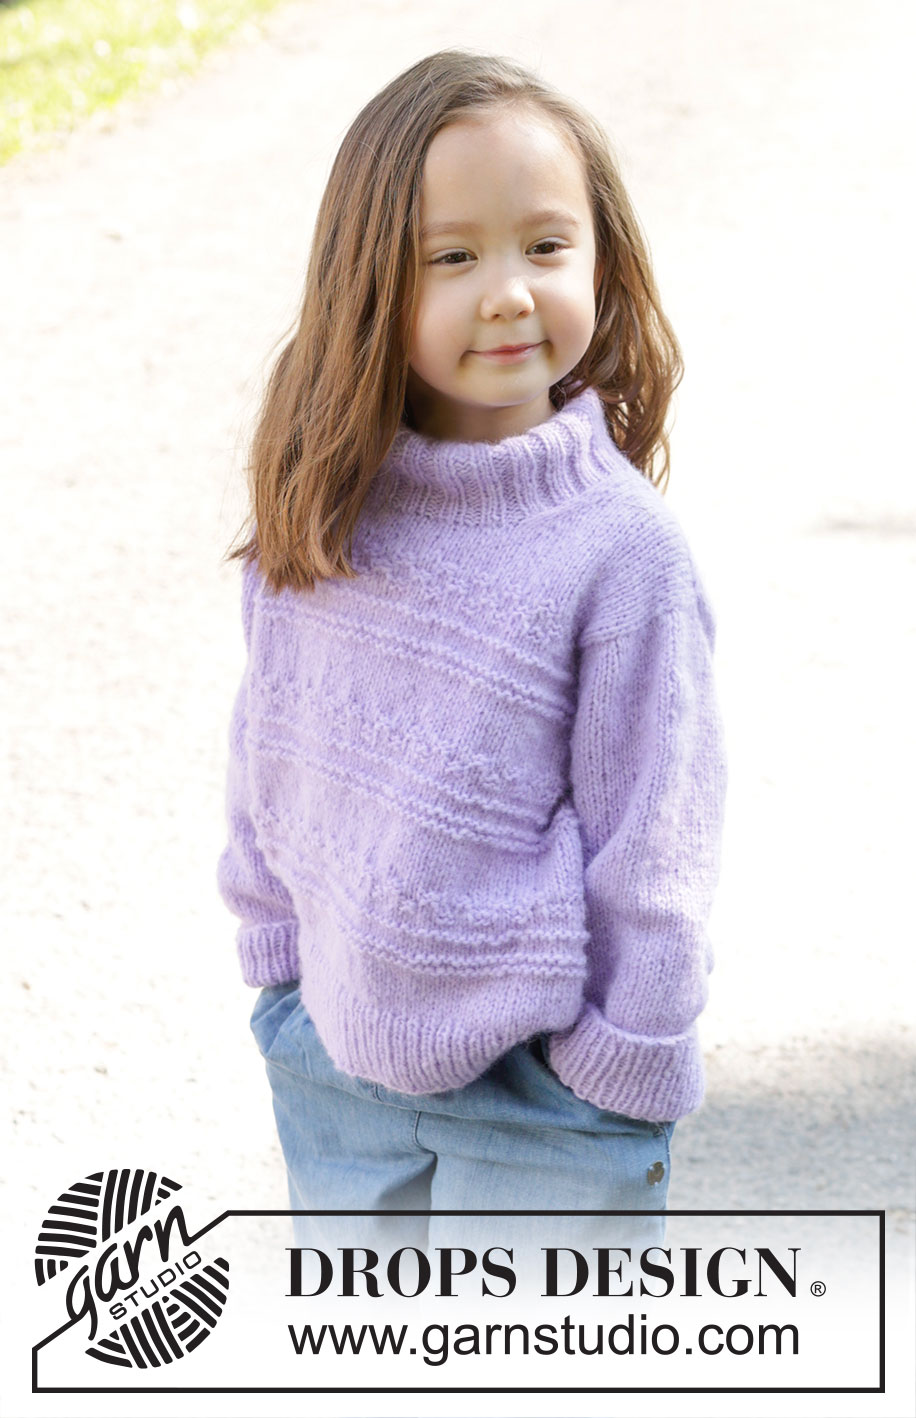
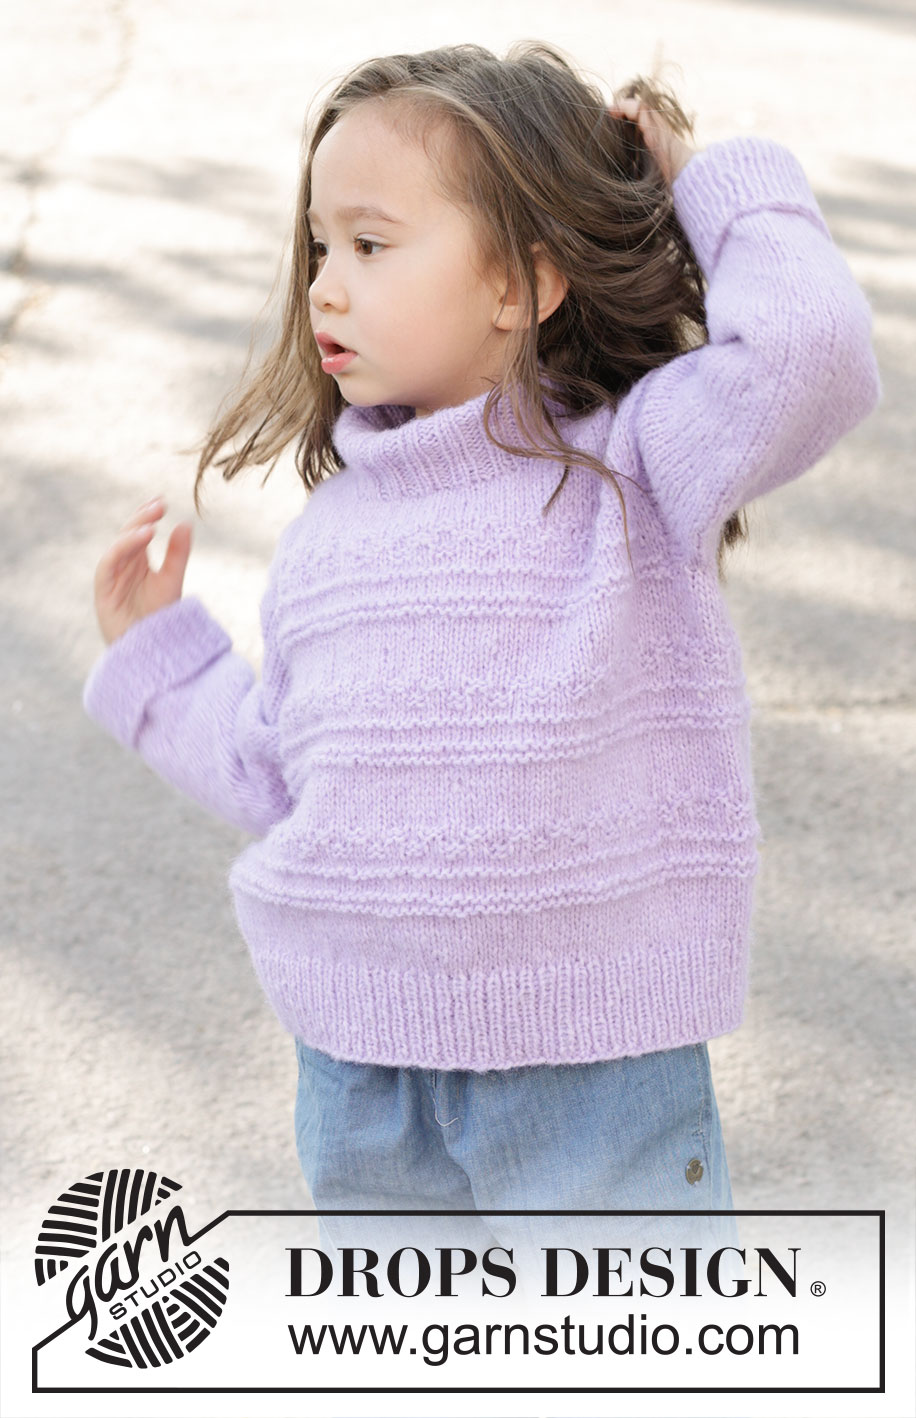
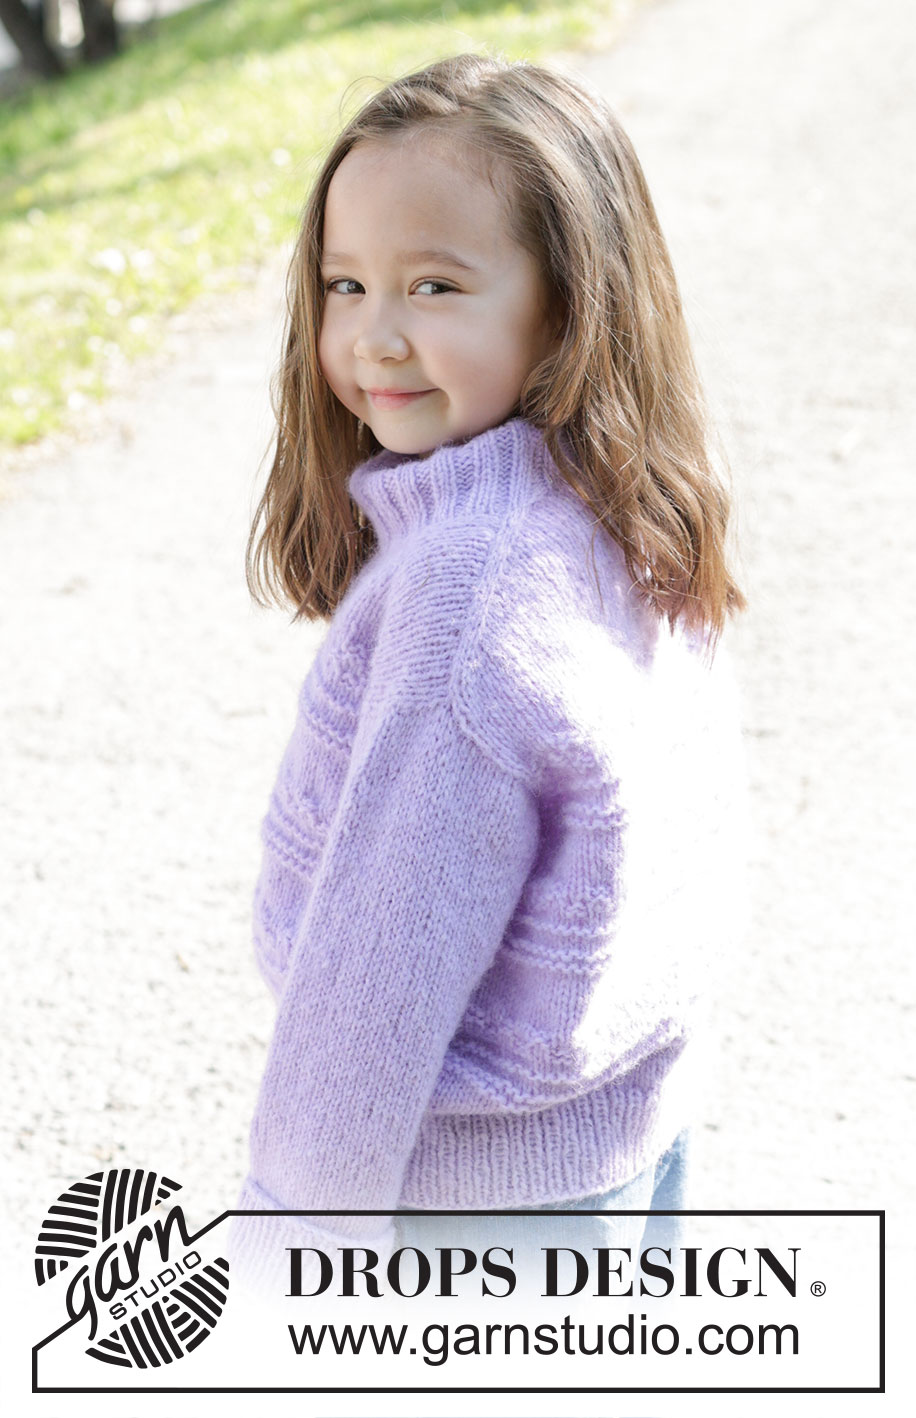
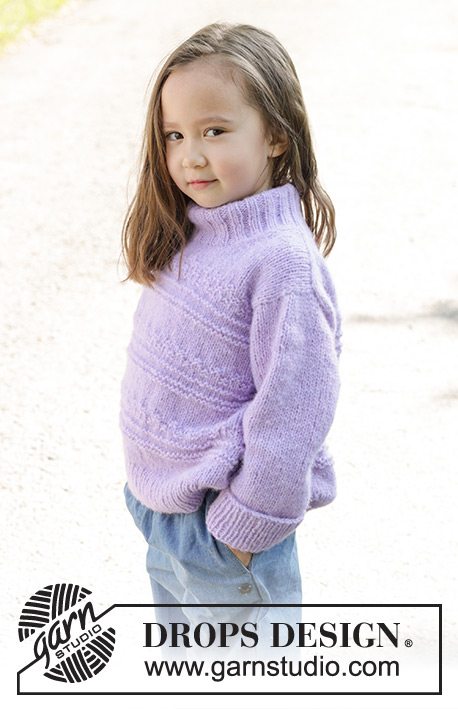
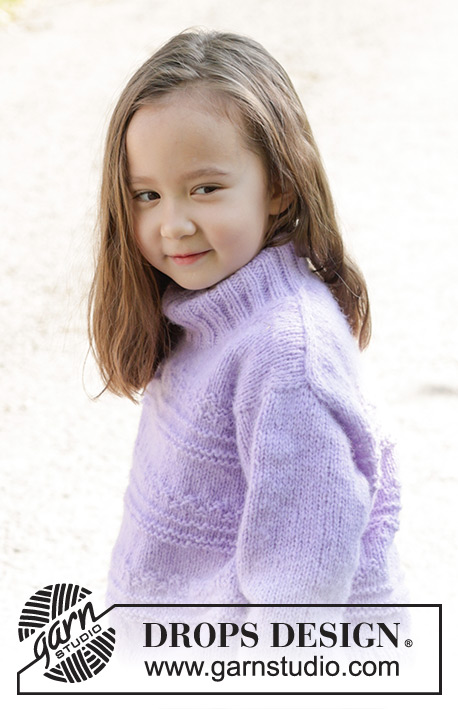
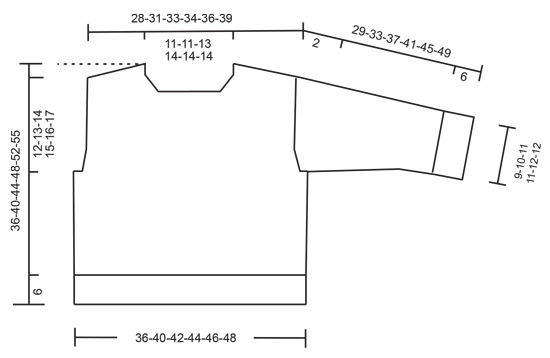
Knitted jumper for children in DROPS Air. The piece is worked top down with European/diagonal shoulders, relief-pattern and double neck. Sizes 2 – 12 years.
DROPS Children 48-8 |
||||||||||||||||
|
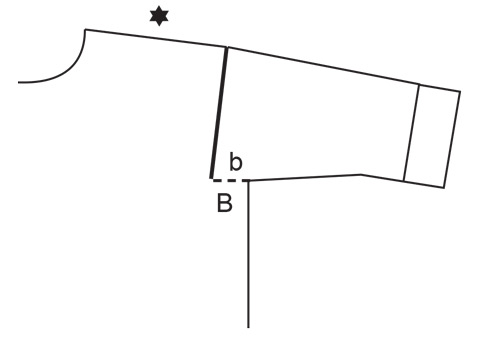
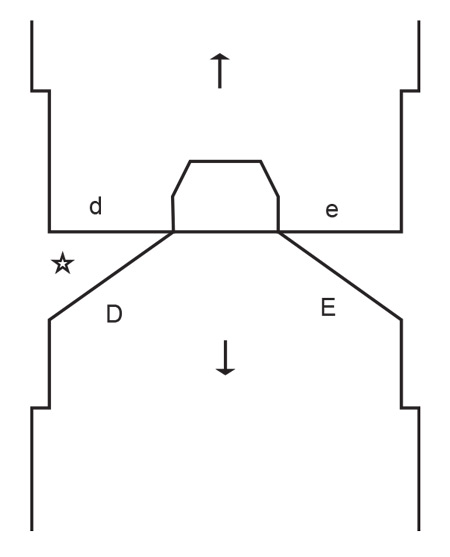
------------------------------------------------------- EXPLANATIONS FOR THE PATTERN: ------------------------------------------------------- PATTERN: See diagram A.1. The diagram shows all rows in the pattern, seen from the right side. INCREASE TIP FROM THE RIGHT SIDE: Increase towards the left AFTER MARKER: Use left needle to pick up yarn between 2 stitches from row below, pick up yarn from the front and knit in the stitch loop that is on the back of the needle. Increase towards the right BEFORE MARKER: Use left needle to pick up yarn between 2 stitches from row below, pick up yarn from the back and knit in the stitch loop that is on the front side of the needle. INCREASE TIP FROM THE WRONG SIDE: Increase towards the right AFTER MARKER: Use left needle to pick up yarn between 2 stitches from row below, pick up yarn from the back and purl in the stitch loop that is on the front side of the needle. Increase towards the left BEFORE MARKER: Use left needle to pick up yarn between 2 stitches from row below, pick up yarn from the front and purl in the stitch loop that is on the back side of the needle. DECREASE TIP (for sleeves): Decrease 1 stitch on either side of the marker-thread as follows: Work until there are 3 stitches left before the marker-thread, knit 2 together, knit 2 (marker-thread sits between these 2 stitches), slip 1 stitch knit-wise, knit 1 and pass the slipped stitch over the knitted stitch. ------------------------------------------------------- START THE PIECE HERE: ------------------------------------------------------- JUMPER – SHORT OVERVIEW OF THE PIECE: The back piece is worked back and forth, top down, until the armholes are finished. Stitches are knitted up along each back shoulder for the front shoulders, increased for the neckline and the front piece is then worked top down until the armholes are finished. The front and back pieces are joined and the body worked in the round. Stitches are knitted up around the armholes for the sleeves, which are started back and forth, then finished in the round. The double neck is worked in the round and folded double to finish. BACK PIECE: Cast on 20-20-24-26-26-26 stitches with circular needle size 5 mm and DROPS Air. Purl 1 row from the wrong side. Insert 1 marker inside the 3 outermost stitches on each side of the piece. Keep the markers inside these 3 stitches on each row onwards. Work stocking stitch back and forth. AT THE SAME TIME, increase AFTER the marker at the beginning of the row and BEFORE the marker at the end of the row – read INCREASE TIP FROM RIGHT SIDE. On the next row (wrong side) increase in the same way – read INCREASE TIP FROM WRONG SIDE. Continue increasing, from both the right and wrong side a total of 14-16-16-16-18-20 times. After the last increase there are 48-52-56-58-62-66 stitches. Work 4 rows without increasing. Move the markers outermost on each side. The piece is now measured from here REMEMBER TO MAINTAIN THE KNITTING TENSION! When the piece measures 3-3-4-5-5-6 cm, continue with pattern as follows: 4-4-4-3-3-3 stocking stitches, work A.1 until there are 4-4-4-3-3-3 stitches left, 4-4-4-3-3-3 stocking stitches. Continue this pattern back and forth until the piece measures 5-5-6-7-8-8 cm from the markers on the armholes. Increase 1 stitch on each side, inside the 3 stitches – remember INCREASE TIP FROM RIGHT SIDE. Increase like this every 2nd row (each row from the right side) a total of 4 times = 56-60-64-66-70-74 stitches; the new stitches are worked into A.1. Continue working until the piece measures 9-9-10-11-12-12 cm, from the markers. Cut the strand, place the stitches on a stitch holder and work the front piece. FRONT PIECE: Start with the left shoulder (when the garment is worn). Knit up 14-16-16-16-18-20 stitches, inside the outermost stitch along the left shoulder on back piece (knit up stitches evenly distributed working from the neck to the marker in the side, see D in sketch). Work stocking stitch back and forth for 4 cm. Increase stitches towards the neck at the beginning of each row from the right side (after the 3 outermost stitches) - remember INCREASE TIP FROM RIGHT SIDE. Increase 1 stitch a total of 4 times = 18-20-20-20-22-24 stitches. Work 1 row from the wrong side. Cut the strand, place the stitches on a stitch holder and work the right shoulder. Knit up 14-16-16-16-18-20 stitches, inside the outermost stitch, along the right back shoulder, from the shoulder to the neck (see E in sketch). Work stocking stitch back and forth for 4 cm. Increase stitches towards the neck at the end of each row from the right side (before the 3 outermost stitches) - remember INCREASE TIP FROM RIGHT SIDE. Increase 1 stitch a total of 4 times = 18-20-20-20-22-24 stitches. Work 1 row from the wrong side On the next row (right side) work as follows: Work stocking stitch across the 18-20-20-20-22-24 stitches on the right front piece, cast on 12-12-16-18-18-18 stitches for the neckline, stocking stitch across the 18-20-20-20-22-24 stitches from the left front piece = 48-52-56-58-62-66 stitches. Continue with stocking stitch back and forth until the front piece measures 9-11-12-13-14-15 cm, then continue as follows with pattern: 4-4-4-3-3-3 stocking stitches, work A.1 until there are 4-4-4-3-3-3 stitches left, 4-4-4-3-3-3 stocking stitches. Continue this pattern back and forth until the piece measures 11-13-14-15-16-18 cm measured along the armholes. Now increase 1 stitch inside the 3 stitches on both sides – remember INCREASE TIP FROM RIGHT SIDE. Increase like this every 2nd row (each row from the right side) a total of 4 times = 56-60-64-66-70-74 stitches; the new stitches are worked into A.1. Continue working until the piece measures 15-17-18-19-20-22 cm, finishing on the same row as the back piece. Now join the front and back pieces for the body. BODY: Work pattern as before across the 56-60-64-66-70-74 stitches from the front piece, cast on 6-8-8-8-8-8 stitches (= side), work pattern as before across the 56-60-64-66-70-74 stitches from the back piece, cast on 6-8-8-8-8-8 stitches = 124-136-144-148-156-164 stitches. Work A.1 in the round until the piece measures 30-34-38-42-46-49 cm from the top of the shoulder on the front piece. Knit 1 round and increase 20-24-24-28-28-28 stitches evenly spaced = 144-160-168-176-184-192 stitches. Change to circular needle size 3.5 mm. Work rib (knit 1, purl 1) for 6 cm. Cast off slightly loosely. The jumper measures approx. 36-40-44-48-52-55 cm from the top of the shoulder on the front piece. LEFT SLEEVE: Use circular needle size 5 mm. Knit up from the right side 26-28-28-32-34-34 stitches from the bottom of the left armhole to the shoulder, up the front piece, and 16-16-18-18-20-22 stitches from the shoulder to the bottom of the armhole, down the back piece = 42-44-46-50-54-56 stitches. NOTE! Do not knit up stitches across the 6-8-8-8-8-8 cast-on stitches under the sleeve; the sleeve is first worked back and forth, then in the round and sewn together at the bottom of the armhole to finish for a better fit. Work stocking stitch back and forth for 2 cm. Now join the sleeve using short circular needle/double pointed needles size 5 mm. Insert 1 marker-thread at the beginning of the round (mid-under sleeve). Allow the marker-thread to follow your work onwards. Start at the marker-thread and continue stocking stitch in the round until the sleeve measures 4 cm from the knitted-up stitches. Now decrease 2 stitches under the sleeve – read DECREASE TIP. Decrease like this every 3-4-5-5-4½-5 cm a total of 5-5-5-6-7-7 times = 32-34-36-38-40-42 stitches. Continue working until the sleeve measures 23-27-31-35-39-43 cm from the knitted-up stitches. There is approx. 6 cm left to finished length. Try the jumper on and work to desired length before the rib. Knit 1 round and increase 8-6-8-6-8-6 stitches evenly spaced = 40-40-44-44-48-48 stitches. Change to double pointed needles size 3.5 mm. Work rib (knit 1, purl 1) for 6 cm. Cast off slightly loosely. The sleeve measures approx. 29-33-37-41-45-49 cm. RIGHT SLEEVE: Work in the same way as the left sleeve but, when knitting up stitches, knit up 16-16-18-18-20-22 stitches from the bottom of the armhole up the back piece to the shoulder, then 26-28-28-32-34-34 stitches from the shoulder and down the front piece. DOUBLE NECK: Start on one shoulder-line and knit up from the right side, inside 1 outermost stitch, 68 to 80 stitches around the neckline, using short circular needle size 3.5 mm. The stitch number should be divisible by 4. Work rib in the round (knit 2, purl 2) for 12 cm. Cast off slightly loosely. Fold the neck double to the inside and fasten with a couple of stitches. ASSEMBLY: Sew the bottom of the armholes together – see sketch. |
||||||||||||||||
Diagram explanations |
||||||||||||||||
|
||||||||||||||||
 |
||||||||||||||||
 |
||||||||||||||||
 |
||||||||||||||||
 |
||||||||||||||||
Have you finished this pattern?Tag your pictures with #dropspattern #littlelilysweater or submit them to the #dropsfan gallery. Do you need help with this pattern?You'll find 32 tutorial videos, a Comments/Questions area and more by visiting the pattern on garnstudio.com. © 1982-2026 DROPS Design A/S. We reserve all rights. This document, including all its sub-sections, has copyrights. Read more about what you can do with our patterns at the bottom of each pattern on our site. |
||||||||||||||||


With over 40 years in knitting and crochet design, DROPS Design offers one of the most extensive collections of free patterns on the internet - translated to 17 languages. As of today we count 325 catalogues and 12298 patterns translated into English (UK/cm).
We work hard to bring you the best knitting and crochet have to offer, inspiration and advice as well as great quality yarns at incredible prices! Would you like to use our patterns for other than personal use? You can read what you are allowed to do in the Copyright text at the bottom of all our patterns. Happy crafting!
Post a comment to pattern DROPS Children 48-8
We would love to hear what you have to say about this pattern!
If you want to leave a question, please make sure you select the correct category in the form below, to speed up the answering process. Required fields are marked *.