
Popular categories
Looking for a yarn?


Comments / Questions (15)
![]() Marieka wrote:
Marieka wrote:
Kann der Pullover auch mit Safran gestrickt werden.
12.05.2026 - 20:46DROPS Design answered:
Liebe Marieka, sicher da beide Garne der selben Garngruppe gehören, benutzen Sie den Garnumrechner um die passende Garnmenge kalkulieren zu lassen - und wie immer soll Maschenprobe stimmen. Viel Spaß beim Stricken!
13.05.2026 - 08:47
![]() Sara wrote:
Sara wrote:
Hej! Jag har stickat denna 2 gånger nu och "ränderna lutar/blir sneda. Har provat att öka mindre maskor fast fler ggr och det hjälpte inte Vad gör jag för fel??
03.07.2025 - 11:23DROPS Design answered:
Hej Sara, det er svært at svare på hvad du gør fejl... prøv at se videoen igen, hvis du følger den så bliver striberne lige :)
03.07.2025 - 12:14
![]() Agnese wrote:
Agnese wrote:
Salve, non mi è chiaro come fare la diminuzione per le maniche. Si fa al giro 3 del motivo, ovvero mentre lavoro il giro col grigio. Tuttavia, prima del segnapunti, giustamente, si lavora ancora col filo grigio ma al di là di esso inizia il nuovo giro che dovrei invece lavorare col filo blu. Quindi devo fare la diminuzione prima del segnapunti col grigio e poi oltre il segnapunti col blu? Come gestisco i gettati? Non mi torna…. Grazie mille!
15.03.2025 - 15:39
![]() Agnese wrote:
Agnese wrote:
Perché è necessario tagliare il filo e iniziare sotto alla manica per proseguire il corpo dopo aver messo in sospeso i punti per le maniche? Io sto facendo la taglia 12/18 mesi e l’ alternanza tra le righe grigio perla e nebbia di mare continua ad essere corretta se proseguo la lavorazione in tondo del corpo senza tagliare il filo. Grazie mille
09.02.2025 - 12:38DROPS Design answered:
Buonasera Agnese, il filo si taglia perchè si inizia a lavorare nella 5° maglia avviata sotto la manica. Buon lavoro!
13.02.2025 - 22:49
![]() Agnese wrote:
Agnese wrote:
Credo che ci sia un errore nel modello per la taglia 12/18 mesi. Al momento della divisione del lavoro per il corpo e le maniche non torna il conto dei punti. Credo si debbano lavorare 33 maglie, sospenderne 49, avviarne 7, lavorare 65 maglie, sospenderne 49, avviarne 7 e poi lavorare le rimanenti 32 maglie (e non 33 come dicono le spiegazioni). Totale 228 maglie. Sbaglio io? Grazie
09.02.2025 - 12:29DROPS Design answered:
Buonasera Agnese, abbiamo corretto il numero di maglie per la divisione del lavoro: grazie per la segnalazione. Buon lavoro!
13.02.2025 - 22:43
![]() Susan Andersen wrote:
Susan Andersen wrote:
Hejsa, til min forståelse. Er det rigtigt forstået, at diagram 1A starter en maske efter omgangs start. Og næste omgang starter ved omgangs start med anden række i diagrammet 1A mvh Susan
04.02.2025 - 14:26
![]() Ingrid wrote:
Ingrid wrote:
Jeg har forsøkt å strikke denne to ganger nå, men mønsteret ser ut til å bli vridd. Og det påvirker ermehull og plassering av raglan-«stripa». Det ser rett ut på pinnen, men idet jeg tar den av så er det åpenbart skeivt. Maskeantall er riktig, plassering av utgangspunktet til raglan er riktig, og jeg forstår helpatent-strikking. Hva gjør jeg feil?
30.10.2024 - 09:36DROPS Design answered:
Hej Ingrid, vi har svært ved at regne ud hvor det bliver fejl... Hvis du kigger på 3. billede med kun genseren, så ser du tydeligt i hvilken maske du skal tage ud til raglan... Det kan være at du kan sammenligne og se om du kan have forskudt masken at tage ud i?
31.10.2024 - 10:09
![]() Marie Heglum Kirkedam wrote:
Marie Heglum Kirkedam wrote:
Hei! Er halskanten stor nok til at den går over hodet på babyen? Den ser så liten ut når jeg strikker den. Har forsøkt å legge opp veldig løst, men er likevel redd for at den ikke skal gå over hodet!
06.10.2024 - 17:15DROPS Design answered:
Hej Marie, det skal den være...., du kan se på kommentarerne at der er mange som har strikket den og ingen har kommenteret at halsen er for lille når du strikker i DROPS Alpaca ifølge opskriften :)
16.10.2024 - 11:12
![]() Gunnel Berglind wrote:
Gunnel Berglind wrote:
Hej igen! Du kan glömma min tidigare fråga om raglan och ökningen. Det gick äntligen upp ett ljus och jag har det klart för mej nu.
23.09.2024 - 03:02
![]() Gunnel Berglind wrote:
Gunnel Berglind wrote:
Jag har så svart att förstå ökningen med 4m för raglan. Letade efter nå'n video men kunde inte hitta någon som gjorde mej klokare. Vad t.ex. betyder sticka. Jag har repat upp så manga gånger nu så jag börjar tröttna. Snälla! Kan jag få en UTFÖRLIG förklaring på hur det görs. Gärna illustrerat :)
22.09.2024 - 21:34DROPS Design answered:
Hei Gunnel. Så bra at du fant ut av det selv :) Se gjerne på videoen: Hur man ökar 4 maskor stickade med 2 färger i helpatent i en maska och ett omslag mvh DROPS Design
23.09.2024 - 14:21
|
|||||||||||||||||||
Harbour Highlights#harbourhighlightssweater |
|||||||||||||||||||
 |
 |
||||||||||||||||||
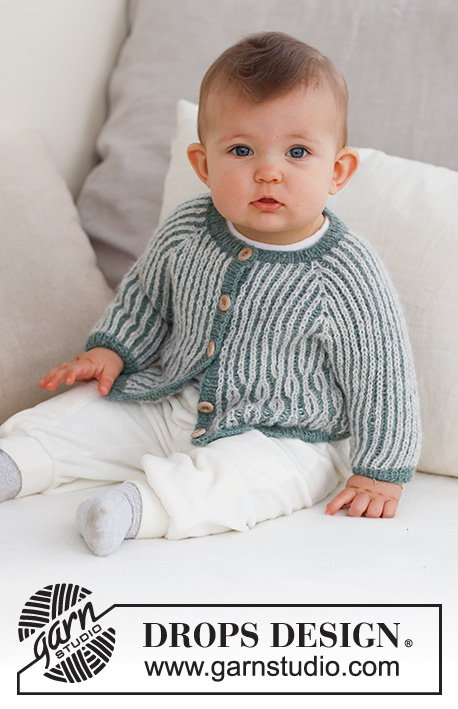
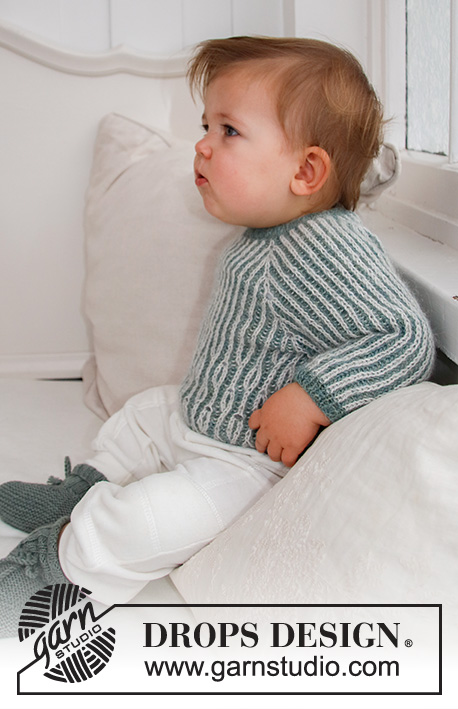
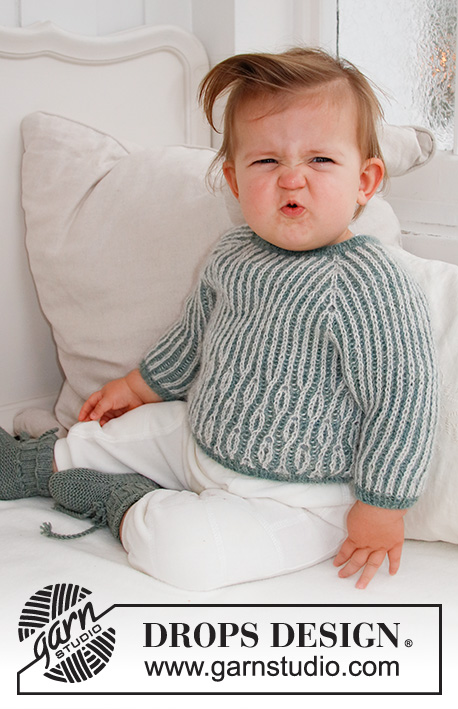
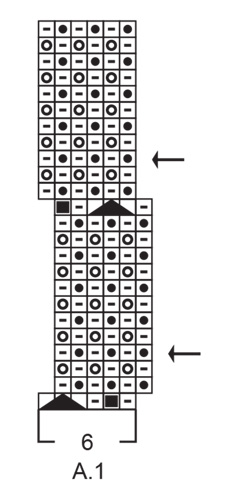
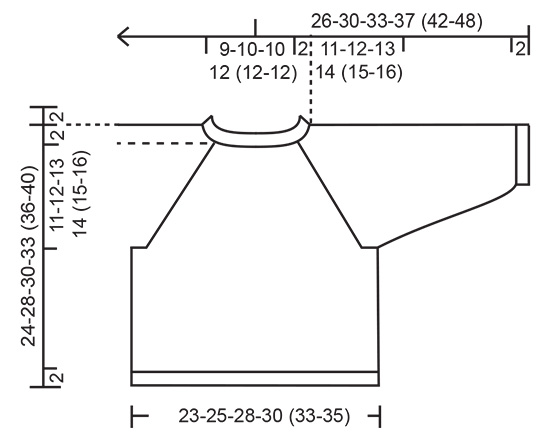
Knitted jumper for babies and children in DROPS Alpaca. The piece is worked top down with raglan and 2-coloured English rib. Sizes 0 – 4 years.
DROPS Baby 43-19 |
|||||||||||||||||||
|
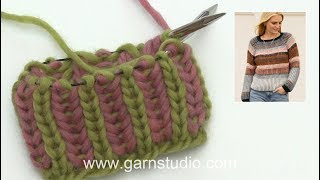
------------------------------------------------------- EXPLANATIONS FOR THE PATTERN: ------------------------------------------------------- PATTERN: See diagram A.1. 2-COLOURED ENGLISH RIB: ROUND 1 (with colour light pearl grey): * Make 1 yarn over, slip 1 stitch as if to purl, knit 1 *, repeat from *-* to end of round. ROUND 2 (with colour sea fog): * Purl together the yarn over and slipped stitch, make 1 yarn over, slip 1 stitch as if to purl *, repeat from *-* to end of round. ROUND 3 (with colour light pearl grey): * Make 1 yarn over, slip 1 stitch as if to purl, knit together the yarn over and slipped stitch *, repeat from *-* to end of round. (Be aware that the last yarn over does not look like a yarn over on the needle, but the strand with colour light pearl grey is on the right side. Take the strand to the wrong side,making a yarn over). Repeat rounds 2 and 3 onwards. RAGLAN: Increase 4 stitches in the knitted marker-stitch, in each transition between the body and sleeves as described below (= 16 stitches increased on the round). Work 5 stitches in the stitch and yarn over as follows: * Knit together the stitch and yarn over but do not slip them from the needle, make 1 yarn over the right needle *, work from *-* a total of 2 times, knit the stitch and yarn over together 1 more time and slip them from the needle = 5 stitches (4 stitches increased). On the next round work the increased stitches into the pattern; no yarn overs in the increases so work the stitches without yarn overs. The marker remains in the middle of these 5 stitches onwards. DECREASE TIP (sleeves): All decreases are worked on round 3 in the 2-coloured English rib. Decrease as follows: Work until there are 4-4-4-4 (3-4) stitches left before the marker-stitch, knit together the next 3 stitches (+ their respective yarn overs), make 1 yarn over, slip 1 stitch as if to purl, knit twisted together the next 3 stitches (+ their respective yarn overs) (= 4 stitches decreased). ------------------------------------------------------- START THE PIECE HERE: ------------------------------------------------------- JUMPER – SHORT OVERVIEW OF THE PIECE: The neck and yoke are worked in the round with circular needle, from mid back and top down. The yoke is divided for body and sleeves and the body is continued in the round with circular needle. The sleeves are worked with double pointed needles. NECK: Cast on 68-72-74-84 (84-84) stitches with double pointed needles size 2.5 mm and colour sea fog DROPS Alpaca. Knit 1 round. Work 5-5-5-7 (7-7) rounds of rib (knit 1, purl 1). Insert 1 marker at the beginning of the round (mid-back). Work 2 rounds of stocking stitch, increasing 12-12-6-0 (0-0) stitches evenly spaced on the first round = 80-84-80-84 (84-84) stitches. The yoke is measured from the marker on the neck. YOKE: Insert 4 markers in the piece, without working the stitches (these markers are used when increasing to raglan). Count 13-13-13-13 (13-13) stitches, insert marker in the next stitch, count 13 stitches, insert marker in the next stitch, count 25-27-25-27 (27-27) stitches, insert marker in the next stitch, count 13 stitches, insert marker in the next stitch. There are 12-14-12-14 (14-14) stitches left after the last marker. Start with colour light pearl grey and work 2-COLOURED ENGLISH RIB – read description above. REMEMBER THE KNITTING TENSION! AT THE SAME TIME the first time you work round 3 in the pattern, begin to increase to RAGLAN in each marker-stitch – read description above. Increase to raglan every 8th-8th-8th-6th (6th-6th) round a total of 6-7-8-9 (10-11) times. After the last increase there are 176-196-208-228 (244-260) stitches. Continue working without further increases until the piece measures 11-12-13-14 (15-16) cm from the marker on the neck – finish after round 3 in the pattern. On the next round (round 2 in the pattern) divide for the body and sleeves as follows: Work the first 25-27-30-32 (35-38) stitches, place the next 39-43-45-49 (51-53) stitches on a thread for the sleeve, cast on 5-5-7-7 (7-7) stitches (in side under sleeve), work the next 49-55-59-65 (71-77) stitches, place the next 39-43-45-49 (51-53) stitches on a thread for the sleeve, cast on 5-5-7-7 (7-7) stitches (in side under sleeve), work the last 24-28-29-33 (36-39) stitches. Cut the strand. The body and sleeves are finished separately. The piece is now measured from here! BODY: = 108-120-132-144 (156-168) stitches. Start the round in the 4th-4th-5th-5th (4th-5th) cast-on stitch under one sleeve. Continue with 2-coloured English rib in the round (start on round 3 in the pattern). Remember the cast-on stitches under the sleeves do not have yarn overs on the first round. AT THE SAME TIME when the piece measures 1-4-5-2 (6-9) cm from the division – adjust so the next round is round 3 in the pattern, work A.1 18-20-22-24 (26-28) times on the round. Continue this pattern, i.e. the 2-coloured English rib continues as before, but you increase and decrease every 12th round as shown in diagram A.1. Continue A.1 until the piece measures 9-12-13-15 (17-20) cm from the division – finish after a round with an arrow in A.1. Continue with colour sea fog. Knit 1 round where all yarn overs are knitted together with their respective stitches = 108-120-132-144 (156-168) stitches. Knit 1 round where you increase 24-26-28-28 (32-32) stitches evenly spaced = 132-146-160-172 (188-200) stitches. Work rib (knit 1, purl 1) for 2 cm. Cast off a little loosely with knit over knit and purl over purl. The jumper measures approx. 24-28-30-33 (36-40) cm from the shoulder down. SLEEVES: Place the 39-43-45-49 (51-53) stitches from the thread on the one side of the piece on double pointed needles size 2.5 mm and knit up 1 stitch in each of the 5-5-7-7 (7-7) cast-on stitches under the sleeve = 44-48-52-56 (58-60) stitches. Insert 1 marker in the 3rd-3rd-4th-4th (4th-4th) knitted-up stitch under the sleeve. Work 2-coloured English rib in the round (start on round 3 in the pattern and remember the knitted-up stitches under the sleeve do not have yarn overs on the first round). When the sleeve measures 3 cm, start to decrease under the sleeve – read DECREASE TIP. Decrease like this every 3-3-3-3 (6-6) cm a total of 1-2-2-3 (3-3) times = 40-40-44-44 (46-48) stitches. Work until the sleeve measures 7-10-12-13 (18-22) cm – finish after a round with colour sea fog and continue with this colour. Knit 1 round where all yarn overs are knitted together with their respective stitches = 40-40-44-44 (46-48) stitches. Knit 1 round where you increase 2-2-2-2 (4-4) stitches evenly spaced = 42-42-46-46 (50-52) stitches. Work rib (knit 1, purl 1) for 2 cm. Cast off a little loosely with knit over knit and purl over purl. The sleeve measures approx. 9-12-14-15 (20-24) cm. Work the other sleeve in the same way. |
|||||||||||||||||||
Diagram explanations |
|||||||||||||||||||
|
|||||||||||||||||||
 |
|||||||||||||||||||
 |
|||||||||||||||||||
Have you finished this pattern?Tag your pictures with #dropspattern #harbourhighlightssweater or submit them to the #dropsfan gallery. Do you need help with this pattern?You'll find 25 tutorial videos, a Comments/Questions area and more by visiting the pattern on garnstudio.com. © 1982-2026 DROPS Design A/S. We reserve all rights. This document, including all its sub-sections, has copyrights. Read more about what you can do with our patterns at the bottom of each pattern on our site. |
|||||||||||||||||||


With over 40 years in knitting and crochet design, DROPS Design offers one of the most extensive collections of free patterns on the internet - translated to 17 languages. As of today we count 325 catalogues and 12298 patterns translated into English (UK/cm).
We work hard to bring you the best knitting and crochet have to offer, inspiration and advice as well as great quality yarns at incredible prices! Would you like to use our patterns for other than personal use? You can read what you are allowed to do in the Copyright text at the bottom of all our patterns. Happy crafting!
Post a comment to pattern DROPS Baby 43-19
We would love to hear what you have to say about this pattern!
If you want to leave a question, please make sure you select the correct category in the form below, to speed up the answering process. Required fields are marked *.