
Popular categories
Looking for a yarn?


|
||||||||||||||||
Harbour Highlights Cardigan |
||||||||||||||||
 |
 |
|||||||||||||||
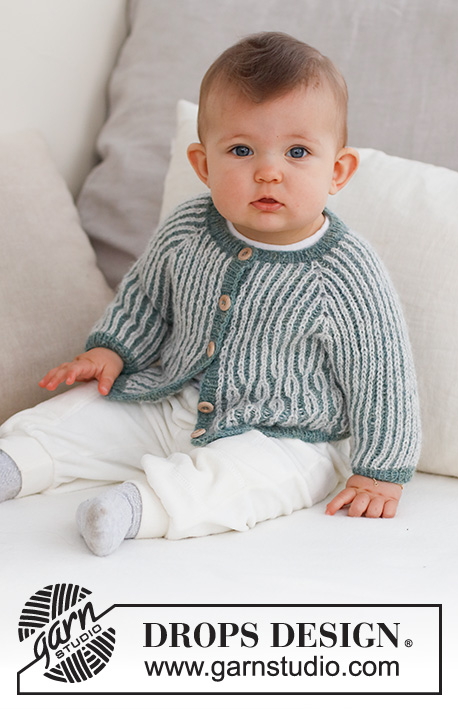
Knitted jacket for babies and children in DROPS Alpaca. The piece is worked top down with raglan and 2-coloured English rib. Sizes 0 – 4 years.
DROPS Baby 43-18 |
||||||||||||||||
|
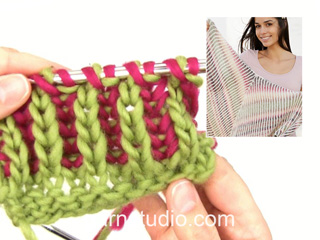
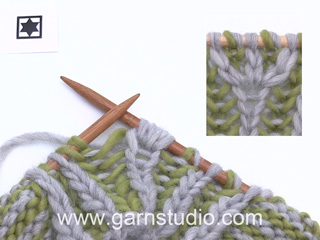
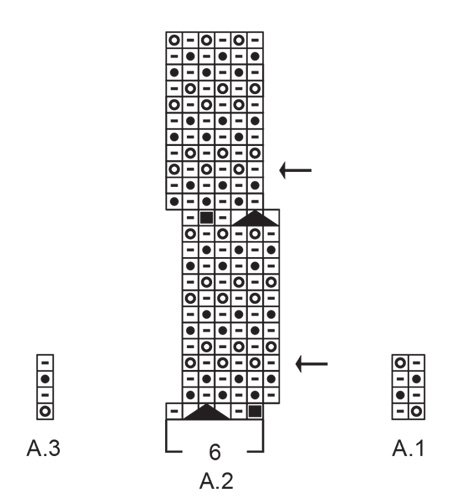
------------------------------------------------------- EXPLANATIONS FOR THE PATTERN: ------------------------------------------------------- RIDGE/GARTER STITCH (worked back and forth): Knit all rows. 1 ridge = knit 2 rows. PATTERN: See diagrams A.1 to A.3. The diagrams show all rows in the pattern from the right side. NOTE: The stitches are worked as described in the symbol explanations irrespective of whether you are working from the right or wrong side, but when you work from the wrong side you read the diagram from left to right. KNITTING TIP: If you are in doubt about which colour to use on the next row, you can see the colour of the previous row by the edge stitches. 2-COLOURED ENGLISH RIB (back and forth): ROW 1 (wrong side with colour light pearl grey): Knit 1, * 1 yarn over, slip 1 stitch as if to purl, knit 1 *, work from *-* until there are 2 stitches left, 1 yarn over, slip 1 stitch as if to purl, knit 1. Turn ROW 2 (right side with colour light pearl grey): Knit 1, * knit the yarn over and slipped stitch together, 1 yarn over, slip 1 stitch as if to purl *, work from *-* until there are 2 stitches left , knit together the yarn over and slipped stitch and knit 1. Push the stitches back to the beginning of the circular needle (without turning), and work from the right side again. ROW 3 (right side with colour sea fog): Knit 1, * 1 yarn over, slip 1 stitch as if to purl, purl together the yarn over and slipped stitch *, work from *-* until there are 2 stitches left, 1 yarn over, slip 1 stitch as if to purl, knit 1. Turn. ROW 4 (wrong side with colour light pearl grey): Knit 1, * purl together the yarn over and slipped stitch, 1 yarn over, slip 1 stitch as if to purl, work from *-* until there are 2 stitches left, purl together the yarn over and slipped stitch, knit 1. Push the stitches back to the beginning of the circular needle (without turning), and work from the wrong side again. ROW 5 (wrong side with colour sea fog): Knit 1, * 1 yarn over, slip 1 stitch as if to purl, knit together the yarn over and slipped stitch *, work from *-* until there are 2 stitches left, 1 yarn over, slip 1 stitch as if to purl, knit 1. Repeat rows 2-5 onwards. 2-COLOURED ENGLISH RIB (in the round - sleeves): ROUND 1 (with colour light pearl grey): * Purl together the yarn over and slipped stitch, 1 yarn over, slip 1 stitch as if to purl *, work from *-* to the end of the round. ROUND 2 (with colour sea fog): * 1 yarn over, slip 1 stitch as if to purl, knit together the yarn over and slipped stitch *, work from *-* to the end of the round (be aware that the last yarn over does not look like a yarn over, but the strand of colour light pearl grey is at the front, take the strand to the back making a yarn over). Repeat rounds 1 and 2. RAGLAN (= 16 stitches increased on the round): In each transition between the body and sleeves increase 4 stitches in the marker-stitch, as follows: * Knit together the yarn over and marker-stitch, but do not slip them off the left needle, make 1 yarn over *, work from *-* 2 more times = 5 stitches (4 stitches increased). On the next row work the stitches into the pattern, but there are no yarn overs in the increases so work the stitches without yarn overs. The marker remains in the middle of the 5 stitches DECREASE TIP (sleeves): All decreases are worked on round 1 in A.1. Work until there are 2 stitches left before the marker-stitch, knit together the next 3 stitches (+ their yarn overs), 1 yarn over, slip 1 stitch as if to purl, knit twisted together the next 3 stitches (+ their yarn overs) (= 4 stitches decreased). ------------------------------------------------------- START THE PIECE HERE: ------------------------------------------------------- JACKET – SHORT OVERVIEW OF THE PIECE: The neck and yoke are worked back and forth with circular needle, top down. The yoke is divided for the body and sleeves and the body continued back and forth on circular needle. The sleeves are worked in the round with double pointed needles. The bands are worked to finish. NECK: Cast on 81-85-85-95 (97-99) stitches with circular needle size 2.5 mm and colour sea fog DROPS Alpaca. Purl 1 row from the wrong side. Work the next row from the right side as follows: 1 stitch in GARTER STITCH – read description above, * knit 1, purl 1 *, work from *-* until there are 2 stitches left, knit 1 and 1 stitch in garter stitch. When you have worked 2-2-2-4 (4-4) rows of rib, work 1 buttonhole at the end of the row from the right side when there are 5 stitches left as follows: Cast off 2 stitches, purl 1, knit 1 and 1 stitch in garter stitch. On the next row cast on 2 stitches over the cast-off stitches. When you have worked 5-5-5-7 (7-7) rows of rib, insert 1 marker at the beginning of the row. Work the next row from the wrong side as follows: Cast off the first 6 stitches, purl 69-73-73-83 (85-87) and decrease 0-0-4-0 (2-4) stitches evenly over these stitches, knit the last 6 stitches, turn. Cast off the first 6 stitches and knit to the end of the row = 69-73-69-83 (83-83) stitches. The yoke is measured from the marker on the neck. YOKE: Insert 4 markers, without working the stitches, which are used when increasing to raglan. Count 9-11-9-13 (13-13) stitches, insert 1 marker in the next stitch, count 13 stitches, insert 1 marker in the next stitch, count 21-21-21-27 (27-27) stitches, insert 1 marker in the next stitch, count 13 stitches, insert 1 marker in the next stitch. There are 9-11-9-13 (13-13) stitches left after the last marker. Start from the wrong side with colour light pearl grey and work 2-COLOURED ENGLISH RIB – read description above. Read KNITTING TIP and REMEMBER THE KNITTING TENSION! AT THE SAME TIME, on the next row (right side) increase to RAGLAN in each marker-stitch – read description above. Increase like this every 4th row 0-0-2-2 (2-3) times then every 8th row 7-8 (7-7-8-8) times. After the last increase there are 181-201-213-227 (243-259) stitches. Continue working without further increases until the piece measures 11-12-13-14 (15-16) cm from the marker on the neck – finish after row 4 in the pattern. Divide for the body and sleeves on the next row from the wrong side (= row 5 in the pattern): Work the first 26-28-31-33 (35-38) stitches, place the next 39-43-45-49 (51-53) stitches on a thread for the sleeve, cast on 5-5-7-7 (7-7) stitches (in side under sleeve), work 51-59-61-63 (71-77) stitches, place the next 39-43-45-49 (51-53) stitches on a thread for the sleeve, cast on 5-5-7-7 (7-7) stitches (in side under sleeve), work the last 26-28-31-33 (35-38) stitches. The body and sleeves are finished separately. The body is measured from here! BODY: = 113-125-137-143 (155-167) stitches. Start from the right side and row 2 in the 2-coloured English rib and continue back and forth with 1 edge stitch in garter stitch on each side (the stitches cast on under the sleeves do not have yarn overs on the first row). AT THE SAME TIME when the piece measures 1-4-5-4 (6-9) cm from the division and the next row is row 2 in the pattern, work as follows from the right side: 1 stitch in garter stitch, A.1, work A.2 18-20-22-23 (25-27) times, A.3, 1 stitch in garter stitch. Continue this pattern back and forth; i.e. the 2-coloured English rib is continued, but on every 12th row (worked from the right side with colour light pearl grey), increase and decrease as shown in A.3. Continue A.1 to A.3 until the body measures 9-12-13-15 (17-20) cm from the division – finish after a row with an arrow in A.3. Continue with colour sea fog. Knit 1 row from the right side where all yarn overs are knitted together with their stitches = 113-125-137-143 (155-167) stitches. Purl 1 row from the wrong side with 1 edge stitch in garter stitch on each side and increase 20-26-26-26 (30-30) stitches evenly spaced = 133-151-163-169 (185-197) stitches. Work the next row from the right side as follows: 1 garter stitch, * knit 1, purl 1 *, work from *-* until there are 2 stitches left, knit 1 and 1 garter stitch. Continue this rib for 2 cm. Cast off a little loosely with knit over knit and purl over purl. The jacket measures approx. 24-28-30-33 (36-40) cm from the shoulder down. SLEEVES: Place the 39-43-45-49 (51-53) stitches from the thread on the one side of the piece on double pointed needles size 2.5 mm and knit up 1 stitch in each of the 5-5-7-7 (7-7) cast-on stitches under the sleeve = 44-48-52-56 (58-60) stitches. Insert 1 marker in the 3rd-3rd-5th-5th (5th-5th) knitted-up stitch under the sleeve. Work 2-COLOURED ENGLISH RIB in the round (make sure you continue the pattern from the yoke and remember the knitted-up stitches under the sleeve do not have yarn overs on the first round). When the sleeve measures 3 cm, start to decrease under the sleeve – read DECREASE TIP. Decrease like this every 3-3-3-3 (6-6) cm a total of 1-2-2-3 (3-3) times = 40-40-44-44 (46-48) stitches. Work until the sleeve measures 7-10-12-13 (18-22) cm – finish after a round with colour sea fog and continue with this colour. Knit 1 round where all yarn overs are knitted together with their respective stitches = 40-40-44-44 (46-48) stitches. Knit 1 round where you increase 2-2-2-2 (4-4) stitches evenly spaced = 42-42-46-46 (50-52) stitches. Work rib (knit 1, purl 1) for 2 cm. Cast off a little loosely with knit over knit and purl over purl. The sleeve measures approx. 9-12-14-15 (20-24) cm. Work the other sleeve in the same way. RIGHT BAND: Start from the right side at the bottom of the right front piece, using circular needle size 2.5 mm and colour sea fog, and knit up 61-71-77-85 (93-105) stitches inside the 1 edge stitch as far as the cast-off stitches on the neck. The number of stitches should be divisible by 2 + 1. Work the next row from the wrong side as follows: 1 garter stitch, * purl 1, knit 1 *, work from *-* until there are 2 stitches left, purl 1, 1 garter stitch. Continue this rib for 1 cm. Now work 4-4-4-4 (5-5) buttonholes evenly spaced on the band. The bottom buttonhole is 1½ to 2 cm from the bottom edge. The top buttonhole has already been worked on the neck. The other 3-3-3-3 (4-4) buttonholes a spaced evenly between these 2. 1 buttonhole = cast off 2 stitches, cast on 2 stitches over the cast-off stitches on the next row. Work until the band measures 1½ to 2 cm. Cast off a little loosely with knit over knit and purl over purl. LEFT BAND: Start from the right side at the top of the left front piece where stitches were cast off, using circular needle size 2.5 mm and colour sea fog and knit up the same number of stitches as on the right front piece. Work rib in the same way for 1½ to 2 cm. Cast off a little loosely with knit over knit and purl over purl. ASSEMBLY: Sew the buttons onto the left band. |
||||||||||||||||
Diagram explanations |
||||||||||||||||
|
||||||||||||||||
|
||||||||||||||||

|
||||||||||||||||
|
Have you made this or any other of our designs? Tag your pictures in social media with #dropsdesign so we can see them! Do you need help with this pattern?You'll find tutorial videos, a Comments/Questions area and more by visiting the pattern on garnstudio.com. © 1982-2024 DROPS Design A/S. We reserve all rights. This document, including all its sub-sections, has copyrights. Read more about what you can do with our patterns at the bottom of each pattern on our site. |
||||||||||||||||


With over 40 years in knitting and crochet design, DROPS Design offers one of the most extensive collections of free patterns on the internet - translated to 17 languages. As of today we count 304 catalogues and 11422 patterns - 11422 of which are translated into English (UK/cm).
We work hard to bring you the best knitting and crochet have to offer, inspiration and advice as well as great quality yarns at incredible prices! Would you like to use our patterns for other than personal use? You can read what you are allowed to do in the Copyright text at the bottom of all our patterns. Happy crafting!
Comments / Questions (11)
Hej, jeg tænkte om det var muligt at lave opskriften om til falsk patent for på den måde at spare på garnet? Jeg tænker ikke at en cardigan behøver mønster på indersiden.
09.06.2023 - 12:39DROPS Design answered:
Hej Sara, du kan gøre hvad du vil ;) Men for at få de rigtige mål (som du finder i måleskitsen nederst i opskriften) skal du sørg for at holde samme strikkefasthed som står i opskriften :)
09.06.2023 - 14:10Doing smallest size. When working sleeves in the round, each round is worked in a different color, and the reference point for changing the yarn is under the arm, where 5 stitches were cast on. The decreases should be centered around the 3rd cast on stitch. The four stitch decrease will span 7 stitches, making the yarn change fall within this range. How does one deal with that? Thanks
29.04.2023 - 03:11DROPS Design answered:
Se quiser obter uma resposta em inglês, por favor seleccione outra bandeira para uma resposta mais rápida por parte de nossa equipa. Obrigado pela compreensão.
15.05.2023 - 10:03Jag förstår inte hur jag kan öka stil 3 mån vart åttonde varv åtta ggr och samtidigt hålla mig inom mindre än 12 cm före delning av ok i fram- och bakstycke. Brödet inte ökas t ex vart fjärde varv?
05.01.2023 - 02:09DROPS Design answered:
Hei Eva. Når du strikker patent blir 2 pinner 1 "vanlig" pinne. Slik at når det står at det skal økes på hver 8. pinne blir det ca hver 4. pinne, som du selv mener er riktig. mvh DROPS Design
06.01.2023 - 12:55Hola! No entiendo como trabajar los 5 puntos de raglan una vez hechos los aumentos. En el video que recomiendan solo se muestra como realizar los aumentos, no como trabajar estos puntos en la siguiente hilera. Se trabajan todos del reves sin seguir las indicaciones del patrón? Gracias
31.10.2022 - 15:25DROPS Design answered:
Hola Eva, como se explica en el apartado RAGLÁN, se trabajan los puntos aumentados en el patrón en punto inglés, pero como no hay hebras en los aumentos se trabajan los puntos sin las hebras.
06.11.2022 - 23:54Hello, is it possible, that in the explanation of the 2-color engl. rib after Row 5 the word TURN is missing? Thank you and all the best! Katja from Ljubljana
09.07.2022 - 09:13DROPS Design answered:
Dear Katja, yes, you should turn after row 5. Happy knitting!
09.07.2022 - 18:40Kiedy chce rozpoczac scieg angielski w te i z powrotem jestem na lewej stronie (nitka z prawej strony lewego druta) nie wiem jak mam zaczac przerabiac RZAD 1 innym kolorem ? Jesli zacznę z prawej to wtedy nie moge wykonac RZAD 2 i 3 (obie nitki z tej samej strony) jesli zacznę z lewej to nie jestem na odpowiedniej stronie robotki.
28.06.2022 - 22:01DROPS Design answered:
Witaj Beato, pod wzorem zobacz video ' Jak na drutach wykonać dwukolorowy ścieg angielski'. Pozdrawiamy!
29.06.2022 - 14:01I cannot work out how to incorporate the raglan increases into the pattern. Please advise how I work the increased stitches in rows 3-5 of the English Rib. Are yarn overs ever put into these stitches? If not, what do I do where the pattern requires me to knit the slipped stitch and yarn over together? This is in the back and forth English Rib in the yoke. Thank you.
23.06.2022 - 10:55DROPS Design answered:
Dear Mrs Lamont, this video shows how to increase 4 stitches in English rib (2-colours), and how to work the new stitches on next row. Hope it will help you to understand how to increase at each raglan and how to work the new stitches afterwards. These yarn overs are worked as increases, so that on next row you will work them either K or P but not "together with the yarn over" since there isn't any; but the video should help you. Happy knitting!
23.06.2022 - 13:05Ich habe die Halsblende in der kleinsten Größe gestrickt und versuche gerade, die Maschenmarkierer einzubringen. Allerdings bleiben mir nach 9, 13, 21 und 13 Maschenmarkierer noch 13 Maschen, nicht 9 Maschen übrig. Vielen Dank für Ihre Hilfe.
10.06.2022 - 17:39I diagram A2 kan jeg ikke forstå hvordan der både tages ind og ud. Efter der er taget to måske ud (sort felt), slås om og løftes eb maske af (streg( og så strikkes omslag og maske sammen (trekant) som før i helpatent. Hvornår tages der ind?
13.05.2022 - 16:36DROPS Design answered:
Hei Dikte. Her var det feil i den danske teksten (stod samme tekst som til ikonet over, er nå fikset). Du minker/tages inn når du strikker den sorte "trekanten" som er tegnet over 3 masker. Diagramteksten: = tag 2 masker ind således: Strik de næste 3 masker (+ omslagene som hører til maskerne) ret sammen (= 2 masker taget ind). mvh DROPS Design
16.05.2022 - 08:07Leider stimmt die Mengenangabe nicht, für 3/4 Jahre benötigt man 150 g ja je Farbe. Musste nachbestellen, war sehr ärgerlich . 2 mal Porto. Mit freundlichen Grüßen Bettina
11.05.2022 - 13:12