
Popular categories
Looking for a yarn?


Comments / Questions (49)
![]() Micky wrote:
Micky wrote:
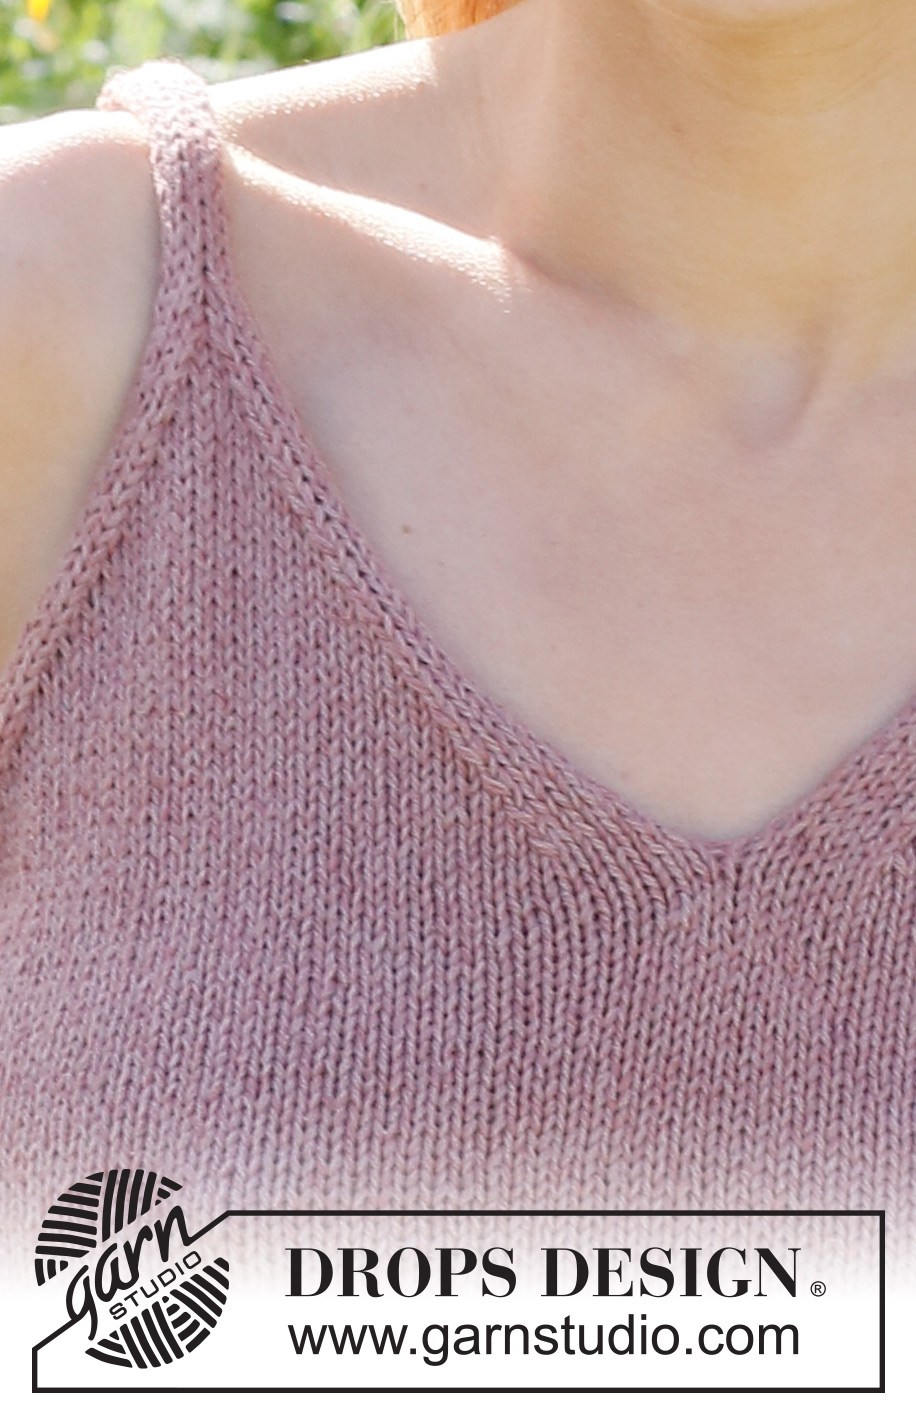
Hallo, meine Frage bin gestern ist beantwortet worden, hilft mir aber leider nicht weiter: wie stricke ich am V-Ausschnitt die letzte Masche in der Rückreihe, damit sich ein schöner and ergibt?
28.06.2023 - 11:31DROPS Design answered:
Liebe Micky, alle Maschen (auch die Randmaschen) werden glatt rechts gestrickt = rechtes bei den Hin-Reihen und links bei den Rückreihen. Viel Spaß beim stricken!
28.06.2023 - 12:14
![]() Micky wrote:
Micky wrote:
Wird die Krausrippe (also die Randmasche auch in Rückreihen rechts stricken) auch beim V-Ausschnitt beibehalten? Auf dem Foto sieht der Rand nämlich nicht nach diesen Knötchen aus.
27.06.2023 - 13:40DROPS Design answered:
Liebe Micky, es sind keine Ranmasche mehr nach Halsausschnitt, nur 5 Maschen glatt rechts für den Hals und die Armlöcher - siehe ABNAHMETIPP:. Viel Spaß beim stricken!
27.06.2023 - 13:49
![]() Monique Meijer wrote:
Monique Meijer wrote:
Hoi,ik heb de panden klaar maar snap niet hoe ze aan elkaar worden gezet. Het lijkt dat er open ruimte zit tussen de panden hoe doe je dit?
17.06.2023 - 19:11DROPS Design answered:
Dag Monique,
De zijnaden hebben inderdaad een split, dus je naait de onderste 5 cm niet dicht, deze laat je open.
18.06.2023 - 11:50
![]() Micky wrote:
Micky wrote:
Hallo, welche Größe trägt das Model? Ich wüsste gerne, ob das Top mit Positive Ease oder Negative Ease gestrickt ist, daher wäre es hilfreich, die Größe am Model zu wissen.
17.06.2023 - 11:47DROPS Design answered:
Liebe Micky, unsere Modellen tragen meistens S oder M, um die genaue Größe zu wählen, messen Sie eine ähnliche Kleidung, die Sie gerne tragen und vergleichen Sie diese mit den Maßen in der Skizze, so finden Sie die beste passende Größe und können Sie dann für eine negative oder positive Ease - hier lesen Sie mehr; Viel Spaß beim stricken!
19.06.2023 - 08:21
![]() Rosy wrote:
Rosy wrote:
Buongiorno, nella vostra spiegazione non specificate quante maglie vanno diminuite, es. Una o due? "Diminuire per il collo all’inizio di ogni ferro dal diritto del lavoro 15-17-18-19-21 volte. Allo stesso tempo, diminuire per lo scalfo alla fine di ogni 4 ferri 4 volte, poi ogni 2 ferri 7-9-10-11-13 volte. Alla fine di tutte le diminuzioni ci sono 10-10-10-12-12 maglie sulla spalla."prego di correggere, e se potete eliminare il mio commento precedente errato nella sezione comment grazie
25.05.2023 - 15:28DROPS Design answered:
Buonasera Rosy, per quanto riguarda le diminuzioni deve seguire quanto riportato nel suggerimento per le diminuzioni. Buon lavoro!
28.05.2023 - 21:06
![]() Rosy wrote:
Rosy wrote:
Diminuire per il collo all’inizio di ogni ferro dal diritto del lavoro 15-17-18-19-21 volte. Allo stesso tempo, diminuire per lo scalfo alla fine di ogni 4 ferri 4 volte, poi ogni 2 ferri 7-9-10-11-13 volte. Alla fine di tutte le diminuzioni ci sono 10-10-10-12-12 maglie sulla spalla.
25.05.2023 - 00:30DROPS Design answered:
Buonasera Rosy, abbiamo risposto alla sua domanda successiva: deve seguire il SUGGERIMENTO PER LE DIMINUZIONI. Buon lavoro!
28.05.2023 - 21:08
![]() Rose wrote:
Rose wrote:
Also, how would the decreases work if I am knitting in the round until the v neck?And the cast offs? For the beginning ow decreases, would I still knit 5? OR only 4, as there is one edge garter stitch? I'm sorry to bother you, Thank you.
16.05.2023 - 09:51DROPS Design answered:
Dear Rose, you can work in the round from the cast on edge towards the first cast off for armhole, then you will have to finish each piece separately back and forth, ie including both armhole + V-neck decreases, ie just work as explained in the pattern. Happy knitting!
16.05.2023 - 14:11
![]() Rose wrote:
Rose wrote:
Hi, great pattern, but if I wanted to change it to be in the round until the armholes could I do that. I have trouble understanding how to work it in the round until the armholes if I wanted to (minimal assembly.) I am knitting the smallest size. How many stitches fo I cast on? Would appreiate some help. Thanks!
13.05.2023 - 02:00DROPS Design answered:
Dear Rose, you'd need to remove the garter stitches (that is, 1 stitch on each side for each piece). Therefore, you would cast on 78x2 = 156 stitches. Happy knitting!
14.05.2023 - 18:42
![]() Lisa wrote:
Lisa wrote:
Hi! I'm not sure I understand the decreasing for the arm and neck. If starting on the right side, every fourth needle would be on the wrong side? But decreasing only happens on the right side. Or do you mean every fourth time you are on the right side? Either way is it correct you finish decreasing at the beginning but continue a few rows decreasing at the end?
24.04.2023 - 11:09
![]() Zuzanna wrote:
Zuzanna wrote:
Witam, ja mam natomiast pytanie co do szelek. Informacja ze wzoru to „ […] oczek na szelkę/ramiączko. Przerabiać aż długość robótki wynosi ok. 44-46-48-50-52-54 cm od rzędu nabierania oczek. Zamykać oczka na prawo. ”. W jaki sposób przerabiać ramiączka? Dżersejem czy na okrągło? :)
20.03.2023 - 13:16DROPS Design answered:
Witaj Zuzanno, oczka ramiączek przerabiasz dżersejem w tę i z powrotem z 1 oczkiem brzegowym ściegiem francuskim z każdej strony. Ten topik już mam i jest jednym z moich ulubionych :) Pozdrawiam!
20.03.2023 - 14:11
|
|
About Spring#aboutspringtop |
|
 |
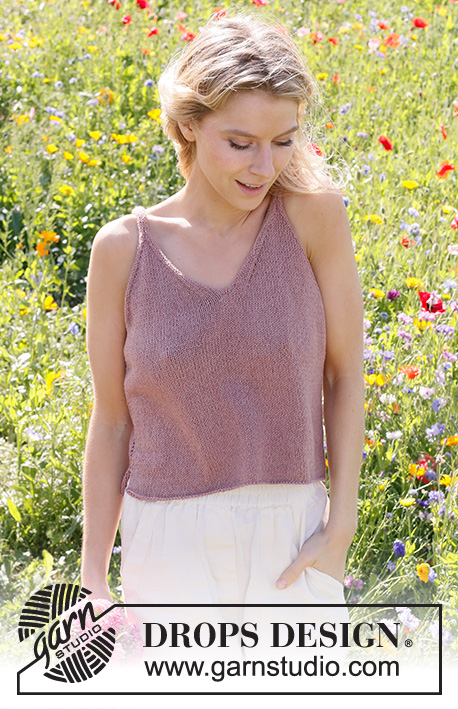 |
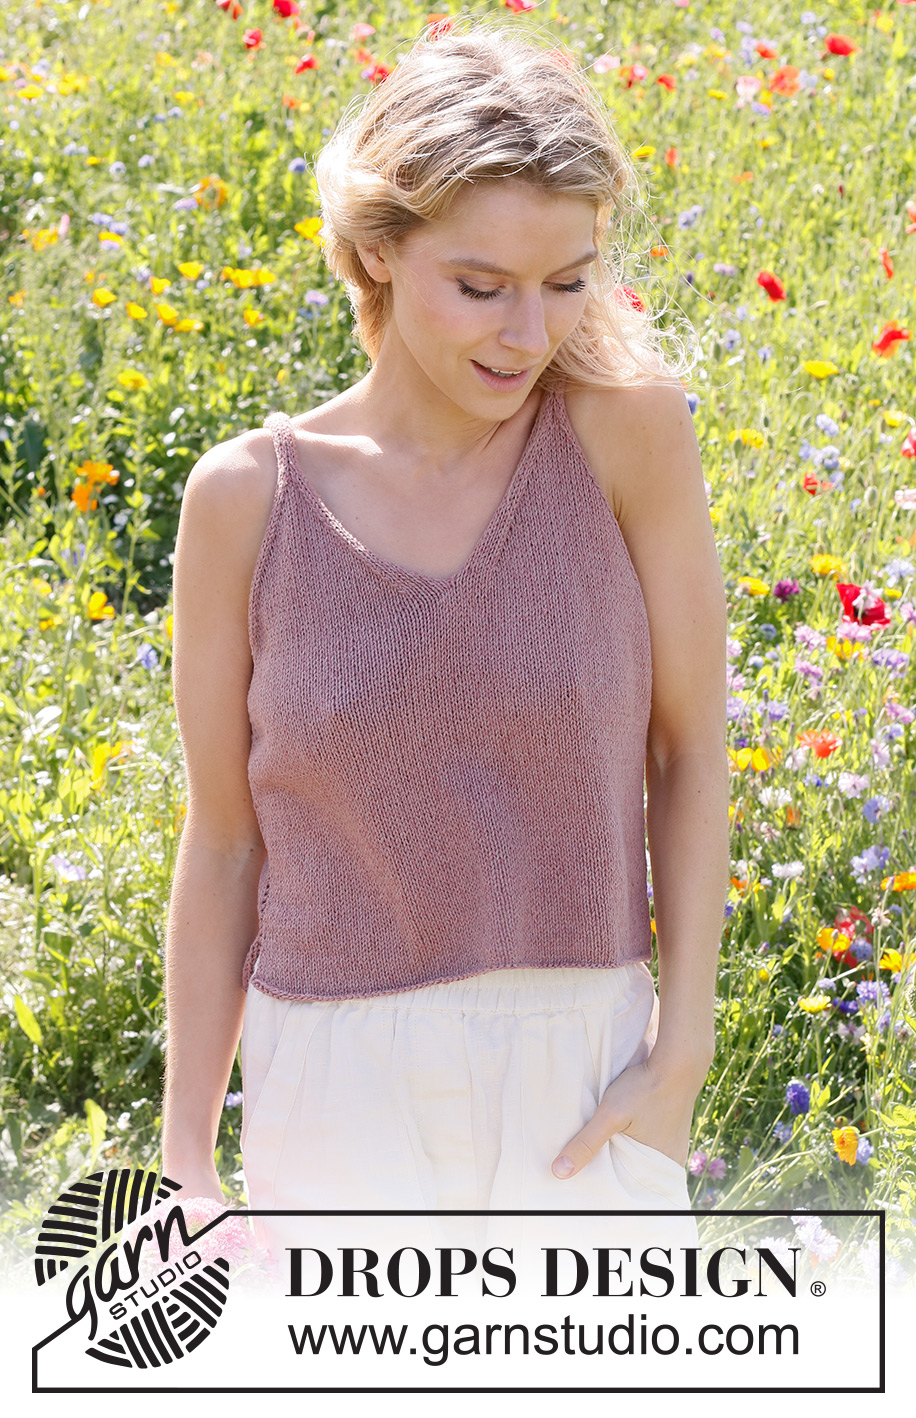
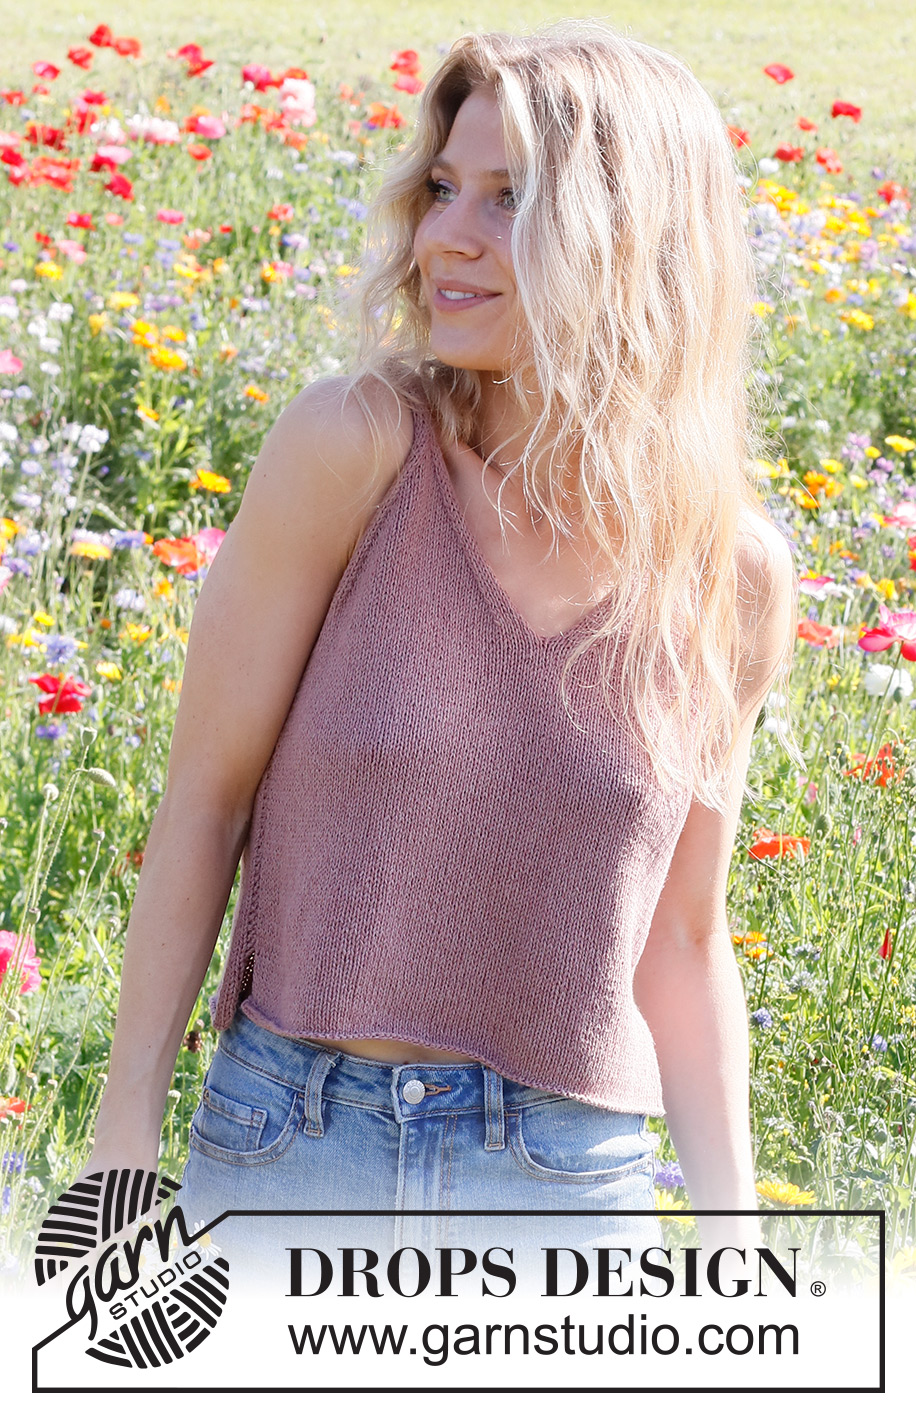
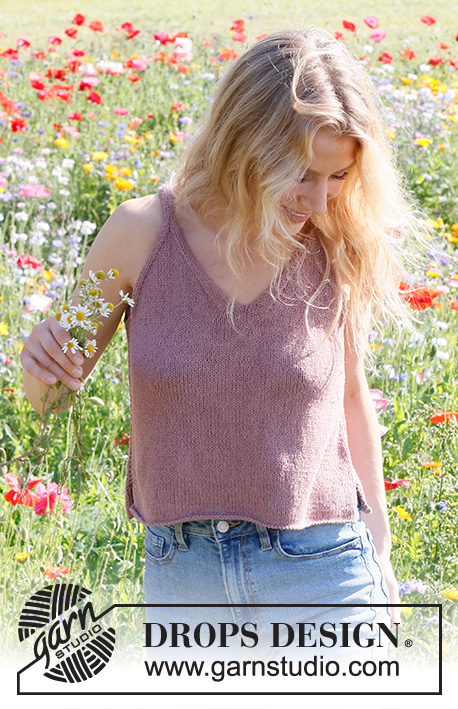
Knitted top in DROPS Belle. The piece is worked bottom up with V-neck. Sizes XS - XXL.
DROPS 231-26 |
|
|
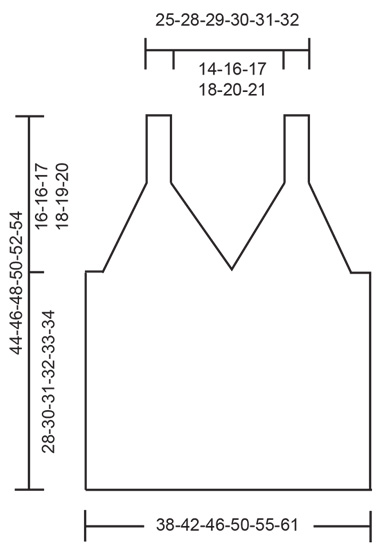
------------------------------------------------------- EXPLANATIONS FOR THE PATTERN: ------------------------------------------------------- RIDGE/GARTER STITCH (worked back and forth): Knit all rows. 1 ridge = knit 2 rows. DECREASE TIP: All decreases are worked from the right side! DECREASE 1 STITCH AT THE BEGINNING OF THE ROW: Knit 5, slip 1 stitch as if to knit, knit 1 and pass the slipped stitch over. DECREASE 1 STITCH AT THE END OF THE ROW: Work until there are 7 stitches left, knit 2 together, knit 5. ------------------------------------------------------- START THE PIECE HERE: ------------------------------------------------------- TOP: The front and back pieces are the same, worked separately back and forth with circular needle, bottom up. BACK PIECE: Cast on 80-88-96-104-116-128 stitches with circular needle size 4 mm and DROPS Belle. Work stocking stitch back and forth with 1 edge stitch in GARTER STITCH on each side – read description above. Work until the piece measures 28-30-31-32-33-34 cm from the cast-on edge and the next row is from the right side. REMEMBER THE KNITTING TENSION! Cast off 4-4-6-6-8-8 stitches at the beginning of the next 2 rows for the armholes = 72-80-84-92-100-112 stitches. Insert 1 marker, THE PIECE IS NOW MEASURED FROM HERE! Now divide for the neck as follows: Work the first 36-40-42-46-50-56 stitches and place these stitches on a thread (part-2). Work the next 36-40-42-46-50-56 stitches (part-1). PART-1: = 36-40-42-46-50-56 stitches. On the next row from the right side start to decrease for the neck and armhole at the same time as follows in the different sizes– read DECREASE TIP: SIZES XS - S - M - L - XL: Decrease for the neck at the beginning of each row from the right side 15-17-18-19-21 times. At the same time, decrease for the armhole at the end of every 4th row 4 times, then every 2nd row 7-9-10-11-13 times. When all the decreases are finished there are 10-10-10-12-12 stitches on the shoulder. SIZE: XXL: Decrease at both the beginning and end of each row from the right side (for both the neck and the armhole) 22 times. When all the decreases are finished there are 12 stitches on the shoulder. ALL SIZES: = 10-10-10-12-12-12 stitches for the strap. Work until the piece measures approx. 44-46-48-50-52-54 cm from the cast on edge. Cast off with knit. PART-2: Place the 36-40-42-46-50-56 stitches from the thread back on circular needle size 4 mm. Purl 1 row from the wrong side. Remember DECREASE TIP! Now start to decrease for the neck and armhole as follows in the different sizes: SIZES XS - S - M - L - XL: Decrease for the neck at the end of each row from the right side 15-17-18-19-21 times. At the same time, decrease for the armhole at the beginning of every 4th row 4 times, then every 2nd row 7-9-10-11-13 times. When all the decreases are finished there are 10-10-10-12-12 stitches on the shoulder. SIZE: XXL: Decrease at both the beginning and end of each row from the right side (for both the neck and the armhole) 22 times. When all the decreases are finished there are 12 stitches on the shoulder. ALL SIZES: = 10-10-10-12-12-12 stitches for the strap. Work until the piece measures approx. 44-46-48-50-52-54 cm from the cast on edge. Cast off with knit. FRONT PIECE: Cast on and work in the same way as the back piece. ASSEMBLY: Sew the straps together, sewing in the outermost loop of the outermost stitch. Sew the side seams together, in the outermost loop of the garter stitches - leave 5 cm at the bottom for a split. |
|
 |
|
Have you finished this pattern?Tag your pictures with #dropspattern #aboutspringtop or submit them to the #dropsfan gallery. Do you need help with this pattern?You'll find 19 tutorial videos, a Comments/Questions area and more by visiting the pattern on garnstudio.com. © 1982-2026 DROPS Design A/S. We reserve all rights. This document, including all its sub-sections, has copyrights. Read more about what you can do with our patterns at the bottom of each pattern on our site. |
|


With over 40 years in knitting and crochet design, DROPS Design offers one of the most extensive collections of free patterns on the internet - translated to 17 languages. As of today we count 324 catalogues and 12290 patterns translated into English (UK/cm).
We work hard to bring you the best knitting and crochet have to offer, inspiration and advice as well as great quality yarns at incredible prices! Would you like to use our patterns for other than personal use? You can read what you are allowed to do in the Copyright text at the bottom of all our patterns. Happy crafting!
Post a comment to pattern DROPS 231-26
We would love to hear what you have to say about this pattern!
If you want to leave a question, please make sure you select the correct category in the form below, to speed up the answering process. Required fields are marked *.