
Popular categories
Looking for a yarn?


Comments / Questions (17)
![]() Jocelyne wrote:
Jocelyne wrote:
Bonsoir Concernant le montage des mailles, je suis perdue. 1° A quel moment dois je monter mes mailles :a 10 cm ou plus tard? 2° Les manches se tricotent-elles bien en A1? 3° Monter les manches, c'est les rajouter aux mailles de mon aiguille? Merci d'avance pour votre aide, j'aimerai tant réussir ce modèle, c'est mon 1er un peu compliqué Cordialement
16.10.2025 - 20:59DROPS Design answered:
Bonjour Jocelyne, on monte effectivement les mailles des manches à 10 cm; on tricote ensuite les mailles des manches avec A.1 et A.2/A.4 comme indiqué au moment de monter les mailles des manches autrement dit, à la transition entre ls manches et le devant / le dos. On diminue ensuite pour le raglan à un rythme différent pour le dos, les devants et les manches: toujours tous les 2 rangs pour les manches mais d'abord tous les 4 rangs puis tous les 2 rangs pour le dos et les devants. Bon tricot! Bon tricot!
17.10.2025 - 07:58
![]() Jean Yarde wrote:
Jean Yarde wrote:
Need help with the collar please. On collar, what happens to 4 of 12 stitches when knitting ridge with 8?
19.02.2025 - 22:11DROPS Design answered:
See below :)
20.02.2025 - 14:35
![]() Jean Yarde wrote:
Jean Yarde wrote:
I am working on the Drops Design pattern 226-32. I am on the right collar and have made the 2 ridges over the 12 stitches. The next step says to work another ridge using 8 stitches. Not sure what I do with extra 4 stitches with that ridge. Then I repeat 2 ridges with 12 stitches, 1 ridge with 8? Thank you for your help!
19.02.2025 - 22:08DROPS Design answered:
Dear Mrs Yarde, you will now work short rows so that the outermost side of collar will be longer than the innermost side (which will be sewn later towards neck on back piece). So work first 4 rows (2 ridgdes) over the first 12 sts, then work 2 rows (1 ridge) over the first 8 sts only leaving the 4 stitches unworked and repeat these 6 rows until you reach the required length. Happy knitting!
20.02.2025 - 14:35
![]() Jean Yarde wrote:
Jean Yarde wrote:
I am trying to knit Drops pattern 226-32. I am confused by decreases on front and back of jacket. Where does the decrease go in the row? Should it be in the middle or end? Also how do I keep the established pattern as result of decrease?
08.02.2025 - 23:51DROPS Design answered:
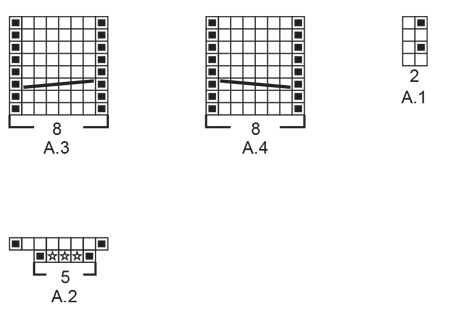
Dear Jean, the decreases are worked before and after the charts A.3 and A.4. You should have: right front piece stitches, A.3, right sleeve stitches, A.4, back piece stitches, A.3, left sleeve stitches, A.4, left front piece. When decreasing for the front piece, decrease after the first A.4 and before the 2nd A.3. When decreasing for the front pieces, decrease before the first A.3 and after the last A.4. When decreasing for the sleeve decrease after both A.3 repeats and before both A.4 repeats. It won't affect charts A.3 and A.4 and since A.1 is a 2-stitch pattern, the decreases won't displace the pattern, just interrupt it earlier. Happy knitting!
10.02.2025 - 00:48
![]() Fischer Annie wrote:
Fischer Annie wrote:
Bonjour, comment monte t - on les mailles des manches du modèle 226/32 après avoir tricoté les 5 premières mailles du diagramme A2 et rabattre la maille du marqueur . Merci d avance , bonne soirée .
20.01.2025 - 18:54DROPS Design answered:
Bonjour Mme Fischer, montez les mailles de la manche entre le devant droit et le dos puis entre le dos et le devant gauche comme dans cette vidéo ou dans cette leçon. Bon tricot!
21.01.2025 - 09:41
![]() ANNIE Curon wrote:
ANNIE Curon wrote:
Bonjour ne n arrise pas a comprendre le diagramme A1 du modèle 226/32. Pourriez vous me dire si cela est correct pour mon échantillon :10 points end .Puis 1 env 1 end 1 env 1 end encore 6 fois. Puis mes 10 points a l endroit et de nouveau 1 env 1end .MERCI D AVANCE .
14.01.2025 - 20:32DROPS Design answered:
Bonjour Mme Curon, en commençant sur l'endroit, tricotez A.1 ainsi: Rang 1(endroit) tout à l'endroit. Rang 2 (envers) (sur un nombre de mailles pair) (1 m env, 1 m end), répétez de (à). Répétez ces 2 rangs. Vous allez avoir ainsi une alternance 1 m point mousse (1ère maille de A.1) et 1 maille jersey (2ème maille de A.1). Bon tricot!
15.01.2025 - 08:47
![]() Anita Murray wrote:
Anita Murray wrote:
For the sleeve decrease - do I do that at the same time as the front and back raglan decreases? I assume so, but I wanted to make sure! Thank you!
14.09.2024 - 23:44DROPS Design answered:
Dear Anita, yes, the decreases for the body and the sleeves are done at the same time. Happy Crafting!
15.09.2024 - 03:03
![]() Delhon Pascale wrote:
Delhon Pascale wrote:
Bonjour madame Je réalise le pull en tailleL Je ne comprends au niveau des marqueurs car pour le dos il me faut 57 mailles Mais mettre un marqueur à la 30 32 34 36 42 ème maille et la je n ai plus mes 57 mailles pour le dos Merci pour votre réponse Cordiement
28.08.2024 - 19:21DROPS Design answered:
Bonjour Mme Delhon, vous devez placer les marqueurs à 36 mailes du bord de chaque côté, vous avez ainsi: 36 m pour le devant droit, 1er marqueur, 57 m pour le dos, 2ème marqueur et 36 mailles pour le devant gauche (36+57+36=129). Bon tricot!
29.08.2024 - 09:55
![]() Anne-Claude Sarrasin wrote:
Anne-Claude Sarrasin wrote:
Je ne comprends pas comment faire le col *2 côtes mousse au-dessus des 12 mailles , 1 côte mousse au-dessus des 8 premières mailles seulement* Je travaille sur mes 12 mailles de bord et sur 8 mailles rabattues ?
16.06.2024 - 19:43DROPS Design answered:
Bonjour Mme Sarrasin, vous allez tricoter les 12 mailles qui restent après avoir rabattu les mailles de l'épaule et tricotez des rangs raccourcis en commençant sur l'endroit (col droit)/sur l'envers (col gauche): vous tricotez les 12 mailles pendant 4 rangs (= 2 côtes mousse), puis tricotez seulement les 8 premières mailles sur l'endroit (col droit)/ sur l'envers (col gauche), tournez et tricotez ces 8 m de nouveau. Répétez ces 6 rangs tout du long jusqu'à la hauteur indiquée. Bon tricot!
17.06.2024 - 09:00
![]() Gunn Wenche Bergmann wrote:
Gunn Wenche Bergmann wrote:
Lurer på fellingen til ermene. Flettene og raglanfellingen er grei, men finner ikke ut av hvordan det felles på ermene. I beskrivelsen står det raglanfellig+felling ermer.
29.04.2024 - 15:54DROPS Design answered:
Hej Gunn, det er raglanfellingen vi beskriver og den gøres forskelligt på ryg og forstykker og ærmer :)
02.05.2024 - 13:51
|
||||||||||||||||
Angelina#angelinajacket |
||||||||||||||||
 |
 |
|||||||||||||||
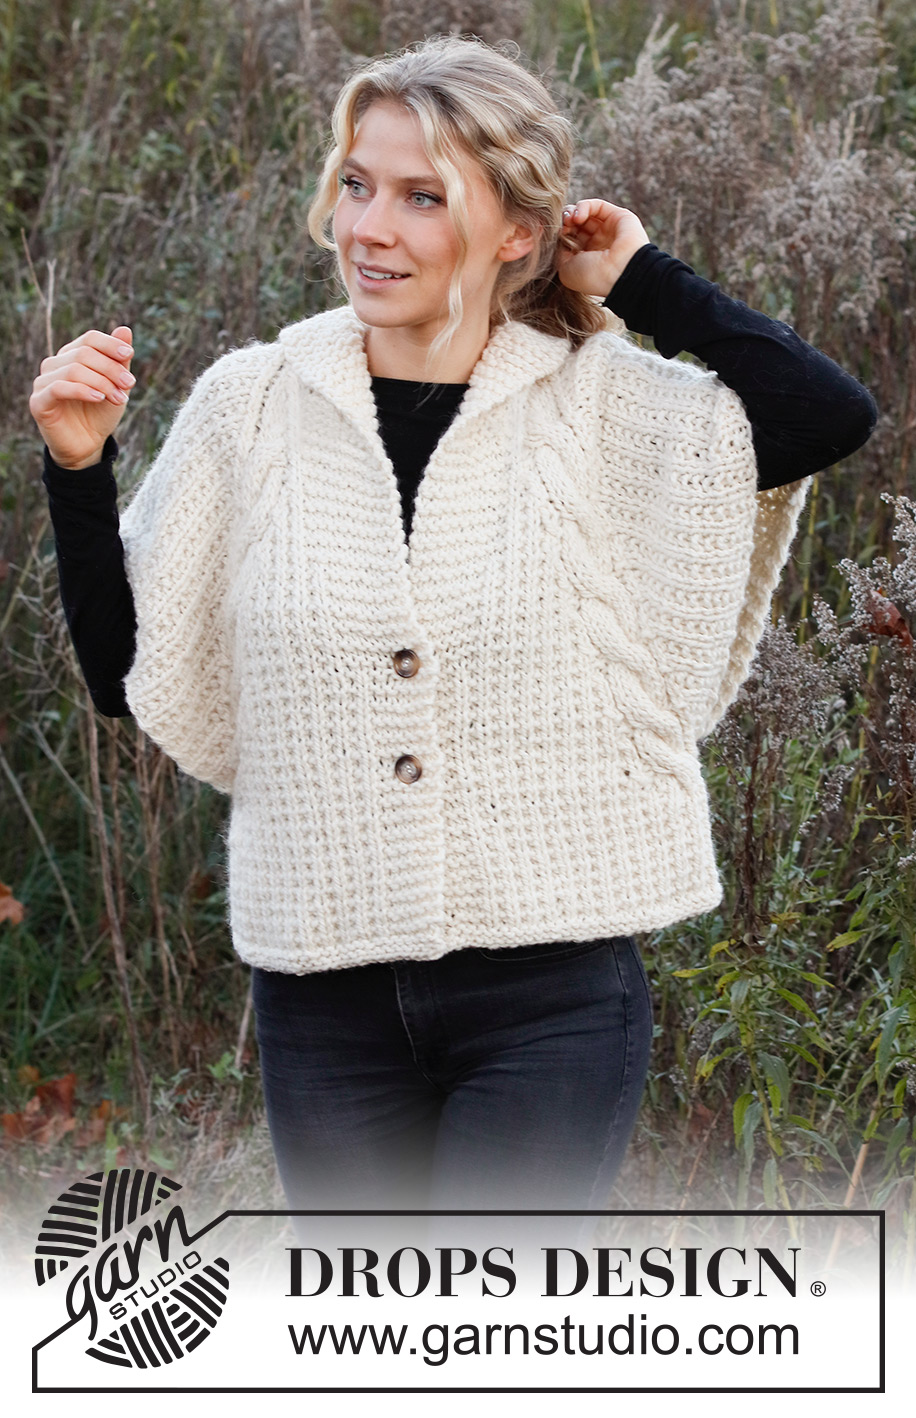
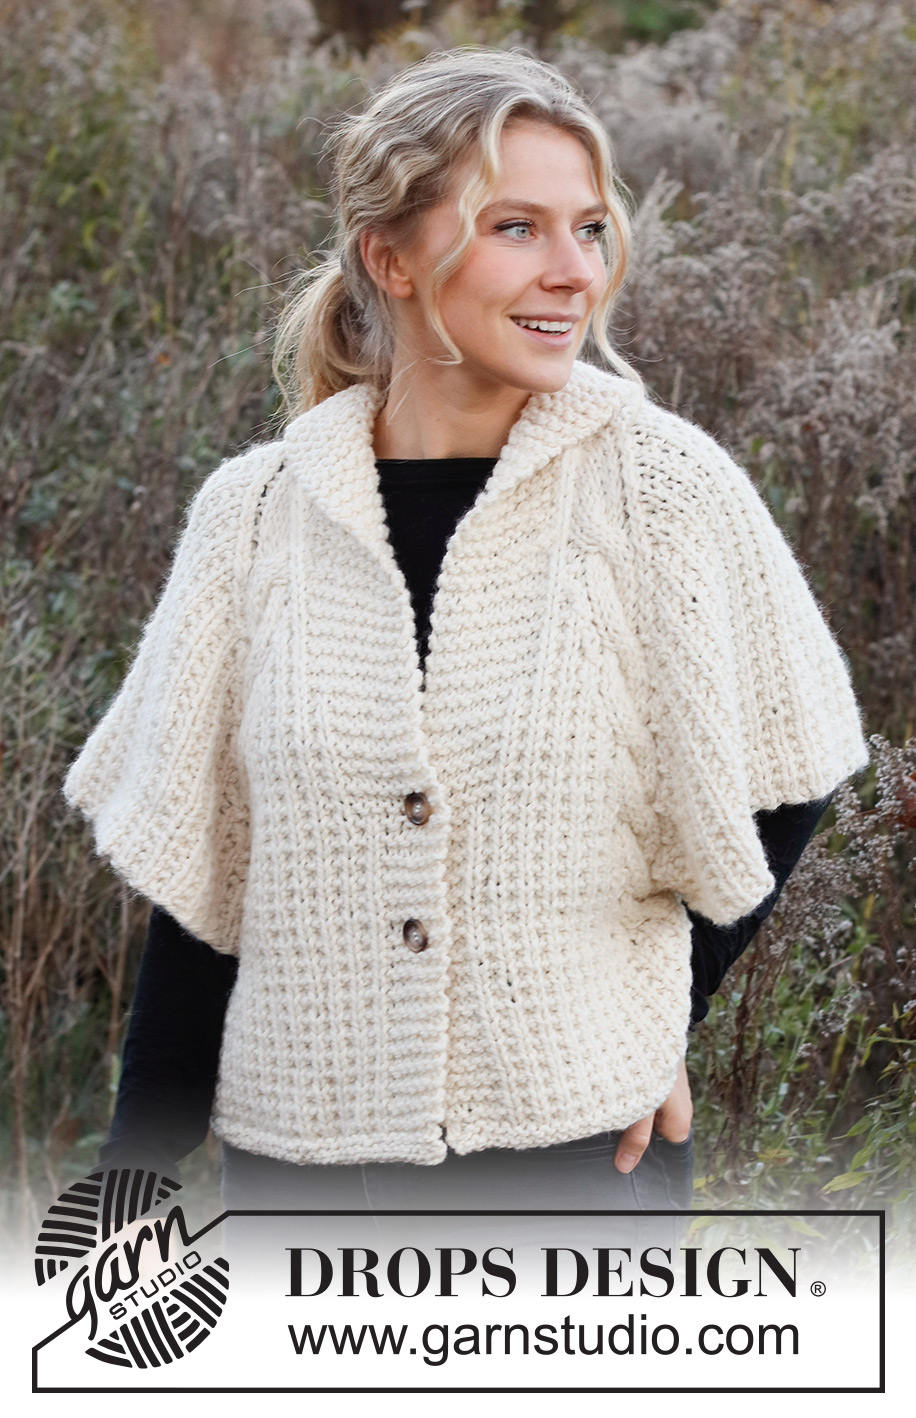
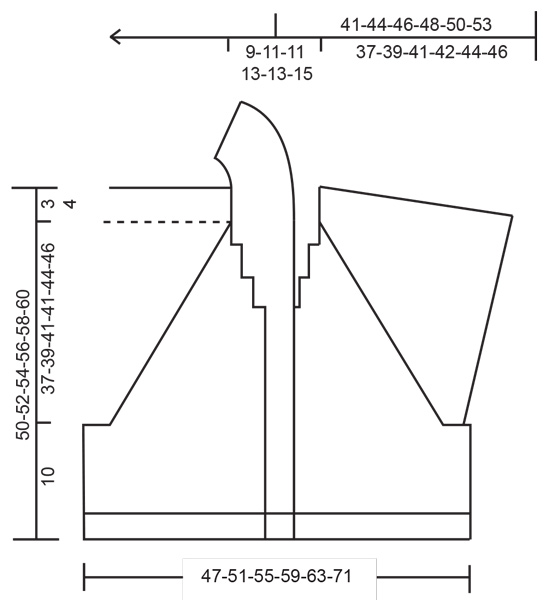
Knitted jacket in DROPS Andes. The piece is worked with textured pattern, cables and raglan. Sizes XS - XXL.
DROPS 226-32 |
||||||||||||||||
|
------------------------------------------------------- EXPLANATIONS FOR THE PATTERN: ------------------------------------------------------- RIDGE/GARTER STITCH (worked back and forth): Knit all rows. 1 ridge = knit 2 rows. PATTERN: See diagrams A.1 to A.4. The diagrams show all rows in the pattern from the right side. DECREASE TIP (evenly spaced): To work out how to decrease evenly, count the total number of stitches to be decreased over (e.g. 49 stitches) and divide by the number of decreases to be made (e.g. 21) = 2.3. In this example decrease by knitting together alternately each 1st and 2nd stitch and each 2nd and 3rd stitch (approx.). RAGLAN: All decreases are worked from the right side! DECREASE AS FOLLOWS BEFORE A.3/A.4: Work until there are 2 stitches left before A.3/A.4, knit 2 together. DECREASE AS FOLLOWS AFTER A.3/A.4: Slip 1 stitch as if to knit, knit 1 and pass the slipped stitch over the knitted stitch. BUTTONHOLES: Work the buttonholes on the right band. 1 BUTTONHOLE = knit together the third and fourth stitches from the edge and make 1 yarn over. On the next row (wrong side) knit the yarn over to leave a hole. ------------------------------------------------------- START THE PIECE HERE: ------------------------------------------------------- JACKET – SHORT OVERVIEW OF THE PIECE. The body is worked back and forth with circular needle, from mid front and bottom up as far as the armholes. Stitches are cast on for the sleeves and the yoke is continued back and forth with circular needle from mid-front at the same time as you decrease to raglan. The collar is finished after the raglan is completed and sewn to the neckline at the back. BODY: Cast on 105-113-121-129-137-153 stitches (including 6 band stitches on each side towards mid-front) with circular needle size 8 mm and DROPS Andes. Work 1 RIDGE back and forth over all stitches – read description above. Change to circular needle size 9 mm and work as follows from the right side: 6 band stitches in garter stitch, work A.1 until there are 7 stitches left, work the first stitch in A.1 (so the pattern is symmetrical) and finish with 6 band stitches in garter stitch. Insert 1 marker in the 30th-32nd-34th-36th-38th-42nd stitch in from each side = sides. There are 45-49-53-57-61-69 stitches between the marker-stitches on the back piece and the marker-stitches are now knitted from the right side and purled from the wrong side. Allow the markers to follow your work onwards. When the piece measures 10 cm, cast on stitches for the sleeves as described below; approx. 40-42-44-46-48-50 cm left to finished length, you can work to your desired length before casting on stitches for the sleeves. The next row is worked as follows from the right side: 6 band stitches in garter stitch, continue A.1 over the next 18-20-22-24-26-30 stitches on the right front piece, work A.2 over the next 5 stitches, cast off the marker-stitch, cast on 57-59-63-65-69-71 new stitches (= sleeve), work A.2 over the next 5 stitches, continue A.1 over the next 35-39-43-47-51-59 stitches on the back piece, work A.2 over the next 5 stitches, cast off the marker-stitch, cast on 57-59-63-65-69-71 new stitches (= sleeve), work A.2 over the next 5 stitches, continue A.1 over the next 18-20-22-24-26-30 stitches on the left front piece and 6 band stitches in garter stitch = 229-241-257-269-285-305 stitches. Work back from the wrong side. OVERVIEW OF THE NEXT SECTION: You now start to decrease to RAGLAN – read description above. AT THE SAME TIME as you work cables, the buttonholes and the bands are later worked over more stitches as described below. Read PATTERN, RAGLAN, BUTTONHOLES and BANDS/COLLAR before continuing. PATTERN: On the next row (right side) start the cables in each transition between the front/back pieces and the sleeves. Work A.3 over A.2 between the right front piece and right sleeve (when the garment is worn) and between the back piece and left sleeve, work A.4 over A.2 between the right sleeve and the back piece and between the left sleeve and the left front piece. Repeat A.3 and A.4 in height. RAGLAN: AT THE SAME TIME on the same row from the right side as you start A.3 and A.4, decrease to raglan, but be aware that the decreases are different on the front/back pieces and on the sleeves. Decrease as described below. BACK PIECE: Decrease every 4th row (every 2nd row from the right side) a total of 13-12-12-10-10-7 times and then every 2nd row (each row from the right side) a total of 1-4-6-10-12-19 times. FRONT PIECES: Decrease every 4th row a total of 12-12-12-10-10-7 times and then every 2nd row a total of 0-2-4-8-10-17 times (i.e. 2 times less than on the back piece). SLEEVES: Decrease every 2nd row a total of 26-27-29-29-31-32 times. BUTTONHOLES: When the piece measures 15 cm and 25 cm, work the buttonholes on the right band – read description above. BANDS/COLLAR: When the piece measures 25 cm, work the bands over 2 more stitches on each side (8 band stitches in garter stitch instead of 6). Repeat this increase every 8-8-9-9-10-10 cm a total of 3 times in height = 12 band stitches in garter stitch on each side. These 12 stitches are now the collar. NECKLINE: When the raglan decreases are finished there are 73-73-73-77-77-77 stitches on the needle. The next row is worked as follows from the right side: Work the 12 garter stitches as before, knit the next 49-49-49-53-53-53 stitches and decrease 21-17-17-13-13-9 stitches evenly over these 49-49-49-53-53-53 stitches– read DECREASE TIP, work 12 garter stitches as before. Turn, work the 12 garter stitches and place them on a thread for the collar, cast off the next 28-32-32-40-40-44 stitches for the neck and work 12 garter stitches as before. Continue the collar as described below. RIGHT COLLAR: Change to circular needle size 8 mm. * Work 2 ridges back and forth over the 12 stitches, work 1 ridge back and forth over the first 8 stitches towards mid front *, work from *-* until the collar measures approx. 9-10-10-12-12-14 cm where it is shortest (on the inside) – measure the collar to match the neckline to mid-back. The collar should be stretched slightly when sewn onto the neckline. Cast off with knit from the right side. LEFT COLLAR: Place the 12 stitches from the thread on circular needle size 8 mm. Knit 1 row from the right side. * Work 2 ridges back and forth over the 12 stitches, work 1 ridge back and forth over the first 8 stitches towards mid front *, work from *-* until the collar measures approx. 9-10-10-12-12-14 cm where it is shortest (on the inside) – adjust to match the right collar. Knit 1 row from the wrong side and cast off with knit from the right side. ASSEMBLY: Sew the collar together mid-back inside the cast-off edge – make sure the seam is on the wrong side when the collar is turned down. Sew the collar to the neckline. Sew the buttons onto the left band. |
||||||||||||||||
Diagram explanations |
||||||||||||||||
|
||||||||||||||||
 |
||||||||||||||||
 |
||||||||||||||||
Have you finished this pattern?Tag your pictures with #dropspattern #angelinajacket or submit them to the #dropsfan gallery. Do you need help with this pattern?You'll find 21 tutorial videos, a Comments/Questions area and more by visiting the pattern on garnstudio.com. © 1982-2026 DROPS Design A/S. We reserve all rights. This document, including all its sub-sections, has copyrights. Read more about what you can do with our patterns at the bottom of each pattern on our site. |
||||||||||||||||


With over 40 years in knitting and crochet design, DROPS Design offers one of the most extensive collections of free patterns on the internet - translated to 17 languages. As of today we count 325 catalogues and 12298 patterns translated into English (UK/cm).
We work hard to bring you the best knitting and crochet have to offer, inspiration and advice as well as great quality yarns at incredible prices! Would you like to use our patterns for other than personal use? You can read what you are allowed to do in the Copyright text at the bottom of all our patterns. Happy crafting!
Post a comment to pattern DROPS 226-32
We would love to hear what you have to say about this pattern!
If you want to leave a question, please make sure you select the correct category in the form below, to speed up the answering process. Required fields are marked *.