
Popular categories
Looking for a yarn?


Comments / Questions (72)
![]() Agnès wrote:
Agnès wrote:
Bonjour, J'ai envoyé le lien (à 2 reprises) de mon pull terminé. Sera t-il visible bientôt ? Merci
26.05.2025 - 10:24DROPS Design answered:
Bonjour Agnès, pouvez-vous le renvoyer encore une fois en veillant à bien respecter les consignes - retrouvez plus d'infos ici. Merci d'avance.
27.05.2025 - 14:46
![]() Agnès wrote:
Agnès wrote:
Bonjour, j'arrive à la fin du pull qui est très réussi (merci pour le modèle) mais j'ai plusieurs questions : Pourquoi le dos n'est-il pas plus haut que le devant ? Je pensais faire quelques rangs supplémentaires au niveau du dos, qu'en pensez-vous ? Pour le col double, que signifie "un jeté à la fin d'une section maille envers sur deux". Merci par avance
13.04.2025 - 23:47DROPS Design answered:
Bonjour Agnès, choix de styliste, l'encolure devant et dos sont ici identiques; comme c'est souvent le cas dans ce type de pull raglan ou encolure ronde, vous pouvez ajouter des rangs raccourcis si vous préférez avoir une échancrure devant. Pour les augmentations du col doublé, augmentez ainsi: (1 m end, 1 m env, augmentez 1 m, 1 m end, 1 m env), répétez de (à) tout le tour. Vous avez ainsi augmenté 1 m env dans 1 section en mailles envers des côtes sur 2 et tricotez ensuite (1 m end, 2 m env, 1 m end, 1 m env) tout le tour. Bon tricot!
22.04.2025 - 08:44
![]() Mona Johansson wrote:
Mona Johansson wrote:
Jag önskar få beskrivningen till modell ai372 . Tack
01.02.2025 - 18:28DROPS Design answered:
Hej Mona. Du kan skriva ut den helt gratis här direkt på denna sidan. Mvh DROPS Design
04.02.2025 - 15:35
![]() Bente wrote:
Bente wrote:
Når man laver udtagninger ved ærmer vil man komme til at bryde mønstret. Da mønstret skiftevis er ret, vrang, ret, vrang, vil en udtagning omkring den ene maske bryde mønstret meget (f.eks. ret, vrang, udtagning, ret, udtagning, vrang), og jeg kan ikke komme frem til den måde hvorpå det bliver mindst synligt. Har i et forslag? Netop hvordan man får mønstret til at passe er ikke givet i opskriften.
29.12.2024 - 11:51DROPS Design answered:
Hei Bente. Mønstret vil ikke stemme før man har et maskeantall som går opp i A.1, derfor står det under ØKETIPS at de nye maskene strikkes fortløpende inn i mønster A.1. mvh DROPS Design
06.01.2025 - 14:05
![]() Janie Iona Keddie wrote:
Janie Iona Keddie wrote:
I can't see the measurements for the different sizes. Not sure what size to make for my son. Can you help? Thanks Janie
23.12.2024 - 12:38DROPS Design answered:
Dear Janie, the measurements are in cm in the size chart at the bottom of the pattern. You can find how to interpret these here: https://www.garnstudio.com/lesson.php?id=24&cid=19. Happy knitting!
29.12.2024 - 19:46
![]() Cathy Fatoux wrote:
Cathy Fatoux wrote:
Bonjour, les grilles du point fantaisie se lisent de gauche à droite ou de droite à gauche ? Merci beaucoup
16.12.2024 - 14:11DROPS Design answered:
Bonjour Mme Fatoux, les diagrammes se lisent de bas en haut, et comme on les tricote en rond, on va les lire tous les rangs de droite à gauche (toujours sur l'endroit). Retrouvez ici plus d'infos sur les diagrammes. Bon tricot!
17.12.2024 - 09:28
![]() SYLVIE LEFRANCOIS wrote:
SYLVIE LEFRANCOIS wrote:
Bonjour. Pourriez-vous m'expliquer la partie de l'empiècement : Diminuer 6 mailles dans les torsades du devant + 3 mailles dans celle de la première manche + 6 mailles celles du dos et 3 mailles dans celle de l'autre manche = 118-118-118-126-126-134 mailles. Et comment mesurer cette partie ? Merci beaucoup.
06.12.2024 - 16:12DROPS Design answered:
Bonjour Mme Lefrançois, pour conserver la bonne largeur, on va diminuer dans les torsades, juste avant de tricoter le col, pour ce faire, diminuez (en tricotant par ex ensemble 2 par 2 à l'endroit les mailles des torsades): 6 m dans chacune des torsades du devant et du dos + 3 m dans chacune des manches= vous diminuez ainsi au total 2 x 6 m + 2 x 3 m soit 18 m au total, et il doit ainsi vous rester après ce tour 118, 126 ou 134 m selon la taille. Tricotez ensuite encore 1 tour en répartissant 30-38 diminutions, posez le pull à plat comme s'il était porté et mesurez à partir de l'épaule jusqu'en bas (montage) -cf schéma. Bon tricot!
09.12.2024 - 07:38
![]() Daphne wrote:
Daphne wrote:
Hi! May I know what size needles were used for the knitting tension on this pattern?
26.11.2024 - 21:20DROPS Design answered:
Hi Daphne, The knitting tension is measured with size 5 mm needles. Happy crafting!
27.11.2024 - 06:54
![]() Helle Storgaard Jensen wrote:
Helle Storgaard Jensen wrote:
Hej, jeg vil gerne strikke for- og bagstykke 20 cm længere end i opskriften. Hvor meget mere garn skal jeg bestille. Bh Helle
31.10.2024 - 22:07DROPS Design answered:
Hej Helle, da skal du nok bruge 2 nøgler mere :)
01.11.2024 - 12:01
![]() Molly Dugan wrote:
Molly Dugan wrote:
I made this sweater for my dad and he absolutely adores it! Thanks so much to the DROPS Design team!
21.10.2024 - 17:16
|
||||||||||||||||
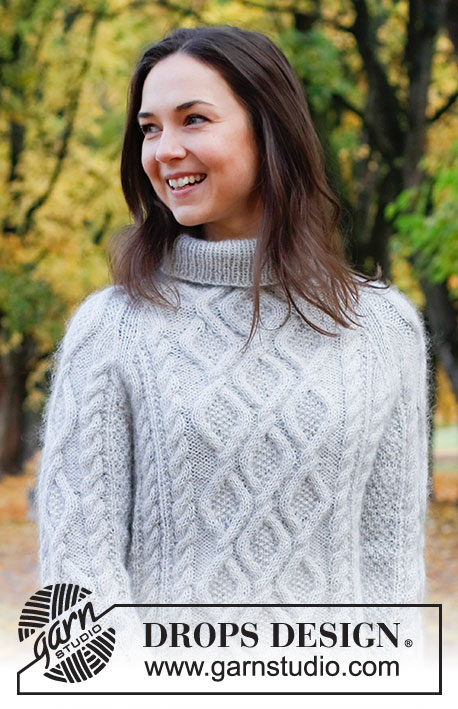
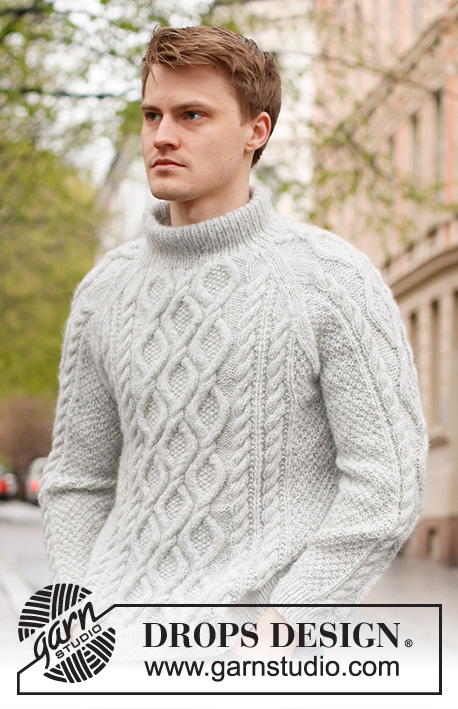
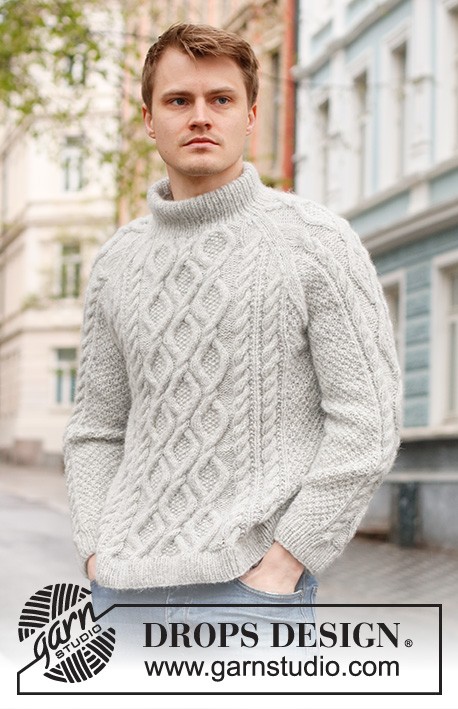
Stone Cables#stonecablessweater |
||||||||||||||||
 |
 |
|||||||||||||||
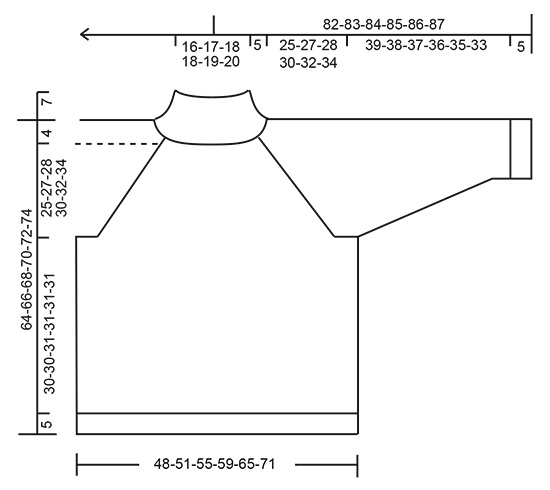
Knitted jumper for men in DROPS Air. The piece is worked with raglan, cables and double neck. Sizes S - XXXL.
DROPS 224-4 |
||||||||||||||||
|
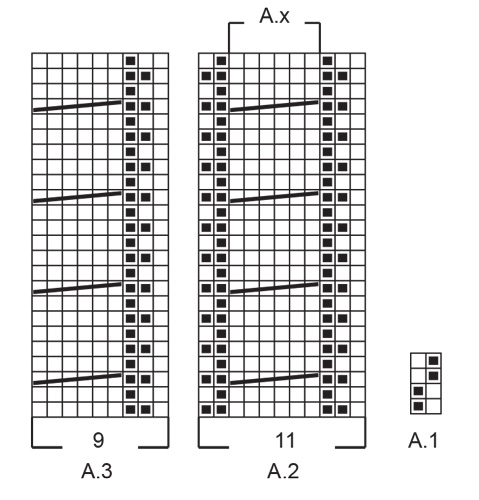
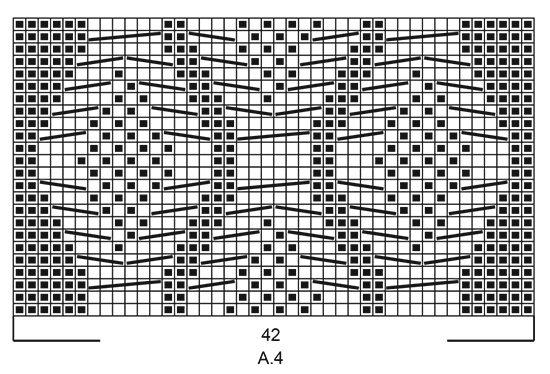
------------------------------------------------------- EXPLANATIONS FOR THE PATTERN: ------------------------------------------------------- PATTERN: See diagrams A.1 to A.7. DECREASE/INCREASE TIP (evenly spaced): To work out how to decrease/increase evenly, count the total number of stitches on needle (e.g. 224 stitches), and divide by number of decreases/increases to be made (e.g. 20) = 11.2. In this example, decrease by knitting together approx. each 10th and 11th stitch. When increasing, make 1 yarn over after approx. each 11th stitch. On the next round work the yarn overs twisted to avoid holes. RAGLAN: Decrease to raglan on each side of the marker thread in each transition between body and sleeves as follows: Work until there are 3 stitches left before the marker thread, knit 2 together, knit 2 (marker thread sits between these 2 stitches), slip 1 stitch as if to knit, knit 1 and pass the slipped stitch over the knitted stitch (8 stitches decreased on each decrease-round). NOTE! When you no longer have room for a complete cable towards the raglan-line, work those stitches in stocking stitch. INCREASE TIP (for sleeves): Increase 1 stitch on each side of the marker-stitch as follows: Work to the marker-stitch, make 1 yarn over, knit 1 (marker-stitch), 1 yarn over. On the next round knit the yarn overs twisted to avoid holes. Then work the new stitches into A.1. KNITTING TIP: When casting off for the armholes on the body and sleeves, adjust to do this on the same row in pattern A.x on body and sleeve (single cables). So that all the of these cables can be work on the same round in the diagram as you continue onwards. ------------------------------------------------------- START THE PIECE HERE: ------------------------------------------------------- JUMPER – SHORT OVERVIEW OF THE PIECE: The body is worked in the round, bottom up as far as the armholes. The sleeves are worked in the round with double pointed needles/short circular needle, bottom up. The sleeves are placed on the same circular needle as the body, and the yoke is finished in the round. The double neck is worked to finish. BODY: Cast on 224-232-250-264-292-314 stitches with circular needle size 4 mm and DROPS Air. Work rib in the round (knit 1, purl 1) for 5 cm. Change to circular needle size 5 mm and knit 1 round where you decrease 20-20-22-24-24-26 stitches evenly spaced – read DECREASE/INCREASE TIP = 204-212-228-240-268-288 stitches. Continue according to the diagrams as follows: * Work A.1 over 20-24-32-38-30-40 stitches, A.2 over 11-11-11-11-22-22 stitches (= 1-1-1-1-2-2 repeats of 11 stitches), A.3 (= 9 stitches), A.4 (= 42 stitches), A.5 (= 9 stitches), A.6 over 11-11-11-11-22-22 stitches (= 1-1-1-1-2-2 repeats of 11 stitches) *, work from *-* a total of 2 times. Insert a marker in the middle of both sections of A.1 (10-12-16-19-15-20 stitches of A.1 on each side). REMEMBER THE KNITTING TENSION! Continue the pattern until the piece measures 35-35-36-36-36-36 cm from the cast-on edge – read KNITTING TIP! On the next round cast off 3-3-4-4-5-5 stitches for the armholes on each side of both markers (6-6-8-8-10-10 stitches for each armhole). There are 96-100-106-112-124-134 stitches on the front piece and back pieces. Lay the piece to one side and work the sleeves. SLEEVES: Cast on 48-48-50-50-52-54 stitches with double pointed needles size 4 mm and DROPS Air. Work rib in the round (knit 1, purl 1) for 5 cm. Change to double pointed needles size 5 mm and knit 1 round where you increase 6-6-6-8-8-8 stitches evenly spaced - remember DECREASE/INCREASE TIP = 54-54-56-58-60-62 stitches. Insert 1 marker in the first stitch on the round; used when increasing under the sleeve. Continue according to the diagrams as follows: Work A.1 over 9-9-10-11-12-13 stitches, A.3 (= 9 stitches), A.7 (= 18 stitches), A.5 (= 9 stitches) and A.1 over the last 9-9-10-11-12-13 stitches. When the sleeve measures 8 cm from the cast-on edge increase 1 stitch on each side of the marker-stitch – read INCREASE TIP in explanations above. Repeat this increase every 6½-4½-3-3-2½-2 cm a total of 6-8-11-11-13-15 times = 66-70-78-80-86-92 stitches. Continue working until the sleeve measures 44-43-42-41-40-38 cm from the cast-on edge (shorter measurements in larger sizes due to wider neck and longer yoke). There is approx. 25-27-28-30-32-34 cm left before the neck; try the jumper on and work to desired length - remember KNITTING TIP! Cast off 6-6-8-8-10-10 stitches mid-under the sleeve = 60-64-70-72-76-82 stitches. Lay the piece to one side and work the other sleeve in the same way but insert the marker under the sleeve in the last stitch on the round. YOKE: Place the sleeves on the same needle as the body, where stitches were cast off for the armholes = 312-328-352-368-400-432 stitches. Insert 1 marker thread in each transition between body and sleeves (= 4 marker threads). The 2 stitches on each side of all the marker threads are worked in stocking stitch; the other stitches are worked as before. Continue the pattern for 4-4-2-4-2-1 cm. Now continue the pattern and begin to decrease for RAGLAN – read description above. Decrease like this every 2nd round a total of 22-24-27-28-32-35 times. When all the decreases are finished there are 136-136-136-144-144-152 stitches and the yoke measures approx. 24-26-27-29-31-33 cm from where the body and sleeves were joined. On the next round continue the pattern but knit the cable-stitches and decrease stitches evenly as follows: Decrease a total of 6 stitches over the cables on the front piece and 3 stitches over the first sleeve, 6 stitches over the cables on the back piece and 3 stitches over the cables on the other sleeve = 118-118-118-126-126-134 stitches. Knit 1 round and decrease 36-32-30-38-34-38 stitches evenly on the round = 82-86-88-88-92-96 stitches. The jumper measures approx. 64-66-68-70-72-74 cm from the shoulder. DOUBLE NECK: Change to short circular needle size 4 mm and work rib (knit 1, purl 1) for 12 cm. On the next round increase stitches to avoid the neck being tight when folded double as follows: Make 1 yarn over after every second purled stitch = 102-107-110-110-115-120 stitches. Purl the yarn overs twisted on the next round to avoid holes. Continue with knit over knit and purl over purl until the neck measures 14 cm. Loosely cast off with knit over knit and purl over purl. ASSEMBLY: Sew together the openings under the sleeves. Fold the neck double to the inside and sew down. To avoid the neck being tight and rolling outwards, it is important that the seam is elastic |
||||||||||||||||
Diagram explanations |
||||||||||||||||
|
||||||||||||||||
 |
||||||||||||||||
 |
||||||||||||||||
 |
||||||||||||||||
 |
||||||||||||||||
Have you finished this pattern?Tag your pictures with #dropspattern #stonecablessweater or submit them to the #dropsfan gallery. Do you need help with this pattern?You'll find 27 tutorial videos, a Comments/Questions area and more by visiting the pattern on garnstudio.com. © 1982-2026 DROPS Design A/S. We reserve all rights. This document, including all its sub-sections, has copyrights. Read more about what you can do with our patterns at the bottom of each pattern on our site. |
||||||||||||||||


With over 40 years in knitting and crochet design, DROPS Design offers one of the most extensive collections of free patterns on the internet - translated to 17 languages. As of today we count 325 catalogues and 12298 patterns translated into English (UK/cm).
We work hard to bring you the best knitting and crochet have to offer, inspiration and advice as well as great quality yarns at incredible prices! Would you like to use our patterns for other than personal use? You can read what you are allowed to do in the Copyright text at the bottom of all our patterns. Happy crafting!
Post a comment to pattern DROPS 224-4
We would love to hear what you have to say about this pattern!
If you want to leave a question, please make sure you select the correct category in the form below, to speed up the answering process. Required fields are marked *.