
Popular categories
Looking for a yarn?


Comments / Questions (72)
![]() Michelle wrote:
Michelle wrote:
Hallo liebes Drops-Team, Ich habe eine Frage zu der Diagramm-Erläuterung. Ihr schreibt: 1 M auf die Zopfnadel hinter Arbeit legen, 3 Maschen rechts, 1 M links von der Zopfnadel. Dann, 3 Maschen auf die Zopfnadel vor die Arbeit legen, 1 Masche links, 3 Maschen rechts von der Zopfnadel. Ist das tatsächlich so? Gem. Dem Diagramm würde ich verstehen das in beiden Fällen 3 M auf die Zopfnadel müssen. Über eine Rückmeldung würde ich mich sehr freuen. VG Michelle
15.04.2026 - 22:01DROPS Design answered:
Liebe Michelle, im beiden Fällen werden die 3 Maschen vor der Arbeit liegen, aber im ersten Fall wird sich der Zopf nach rechts neigen und beim 2. Fall wird sich nach links neigen -den Unterschied können Sie in diesem Video schauen. Viel Spaß beim Stricken!
16.04.2026 - 09:04
![]() Mette wrote:
Mette wrote:
Jeg prøver igen: Kan jeg strikke nogle ekstra omgange med mønstret, hvis der ikke er 27 cm fra samling til de 136 masker i en str M ?Der mangler et par centimeter. Kan jeg lægge nogle venderækker ind på ryggen, så den forlænges i forhold til forstykke? Hvis ja, hvornår skal jeg gøre dette
20.03.2026 - 10:48DROPS Design answered:
Hej Mette, hvis du vil strikke vendepinde, så skal de strikkes lige før halsen :)
08.04.2026 - 13:56
![]() Mette wrote:
Mette wrote:
Kan jeg strikke nogle ekstra omgange med mønstret, hvis der ikke er 27 cm fra samling til de 136 masker i en str M ?Der mangler et par centimeter. Kan jeg lægge nogle venderækker ind på ryggen, så den forlænges i forhold til forstykke? Hvis ja, hvornår skal jeg gøre dette?
14.03.2026 - 09:27DROPS Design answered:
Hei Mette. Om du har nok garn kan du strikke noen cm extra, evnt vendepinne på ryggen, men da må det avpasses med mønstret. Design avd. har dessverre ikke mulighet til å omskrive en allerede publisert oppskrift, men ta en titt på lignende gensere / ca samme maskeantallet før halsen, som har vendepinde og tilpass. mvh DROPS Design
07.04.2026 - 13:19
![]() Lauren wrote:
Lauren wrote:
I see this pattern is the same in the front and back and that some people have issues with it riding up. If I was to add german short rows on the back where should they be added?
11.03.2026 - 17:20DROPS Design answered:
Hi Lauren, If you wish to work an elevation at the back of the neck, with German short rows, these are worked after the neck is finished and before working the yoke. Regards, Drops Team.
12.03.2026 - 06:05
![]() Nina wrote:
Nina wrote:
Hei Takk for svar så jeg skrev feil. Det skulle være 122 cm i overvidde. Tror at 120 cm ville være passe for min samboer, men jeg strikke litt stramt så derfor velger jeg litt større str. Men xl som blir 130 cm blir nok litt stort selv om jeg strikke fast. Samt at L som du sier er 118 vil bli for lite pga min strikkefasthet, desverre. Genseren er jo nydelig . Mvh Nina
23.02.2026 - 10:35DROPS Design answered:
Hei Nina. Ja, det er en veldig flott genser. Om du har en genser din samboer liker godt fra før, prøv å sammenligne den med målene på denne gensers målskisse. Kanskje en av str. vil passe. Husk at Air er et luft og lett garn, så selv om den blir stram med 120 cm i overvidde, så vil plagget strekker og former seg noe. mvh DROPS Design
23.02.2026 - 19:35
![]() Nina wrote:
Nina wrote:
Hei. Jeg ønsker og strikke den slik at den blir ca 22cm i overvidde, hvordan gjør jeg det ? Av målene som står der må jeg velge enten 118 cm eller 130 cm.n Mvh Nina
20.02.2026 - 17:56DROPS Design answered:
Hei Nina. Mener du 122 cm? Målene 118 og 130 / str. XL/XXL er regnet ut i forhold til at blant annet at mønstret / fellingene skal bli riktig. Design avd. har dessverre ikke mulighet til å regne ut en ny str. i tillegg til de 6 som allerede er publisert. mvh DROPS Design
23.02.2026 - 08:08
![]() Shamsu Sivani wrote:
Shamsu Sivani wrote:
I love the pattern
07.02.2026 - 12:10
![]() Heleen Boonstra wrote:
Heleen Boonstra wrote:
Klopt het dat het telpatroon van rechts naar links moet worden gelezen?
19.01.2026 - 10:20DROPS Design answered:
Dag Heleen,
Klopt, je leest het patroon van rechts naar links en van onder naar boven. Als je heen en weer breit, brei je de oneven naalden aan de goede kant en de even naalden aan de verkeerde kant. De even naalden lees je dan terug van links naar rechts.
21.01.2026 - 18:09
![]() Helen wrote:
Helen wrote:
I would like to use this yarn for an Aran sweater similar to the one in the pattern. But I don't know how to work to a chart so will use a different Aran pattern - will it translate easily regarding quantities?
09.11.2025 - 20:11DROPS Design answered:
Hi Helen, If you use a different pattern with the same yarn in both patterns, you should be be able to use the quantities stated in the new pattern. We always recommend that you work a swatch before starting a project, to check you knitting tension. Regards, Drops Team.
10.11.2025 - 06:50
![]() Marianne Van Buren wrote:
Marianne Van Buren wrote:
Ik ben dit model aan het breien een hele mooie trui. Alleen de voorhals is te hoog. Hoe kan ik deze lager maken op een rondbreinaald
27.09.2025 - 17:08DROPS Design answered:
Hi Marianne, try to make it shorter, not 14 cm in hight, but 9. Happy knitting!
27.09.2025 - 21:32
|
||||||||||||||||
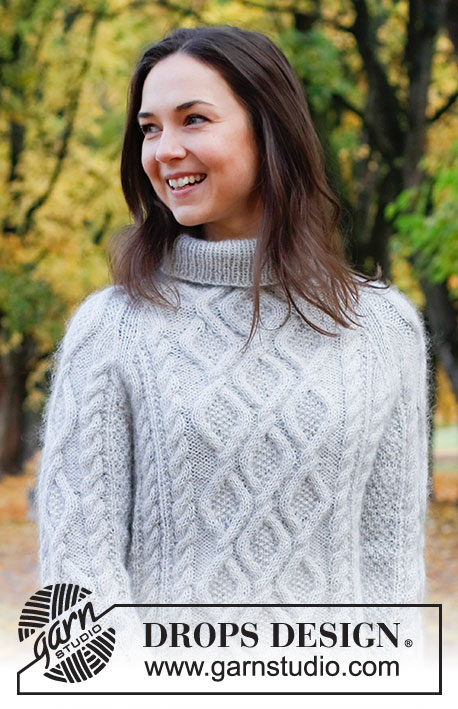
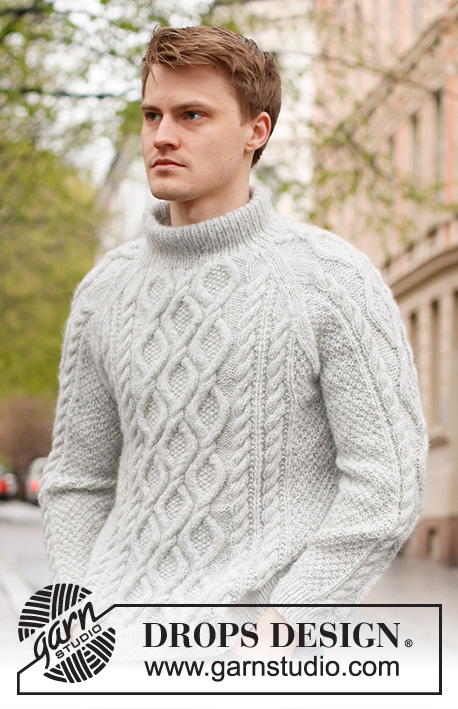
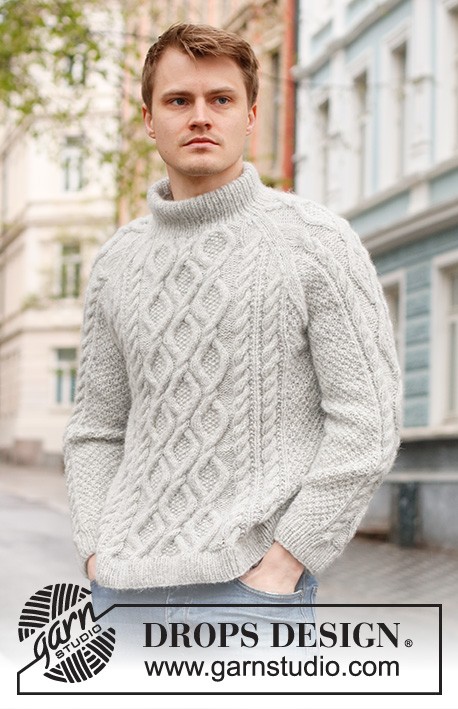
Stone Cables#stonecablessweater |
||||||||||||||||
 |
 |
|||||||||||||||
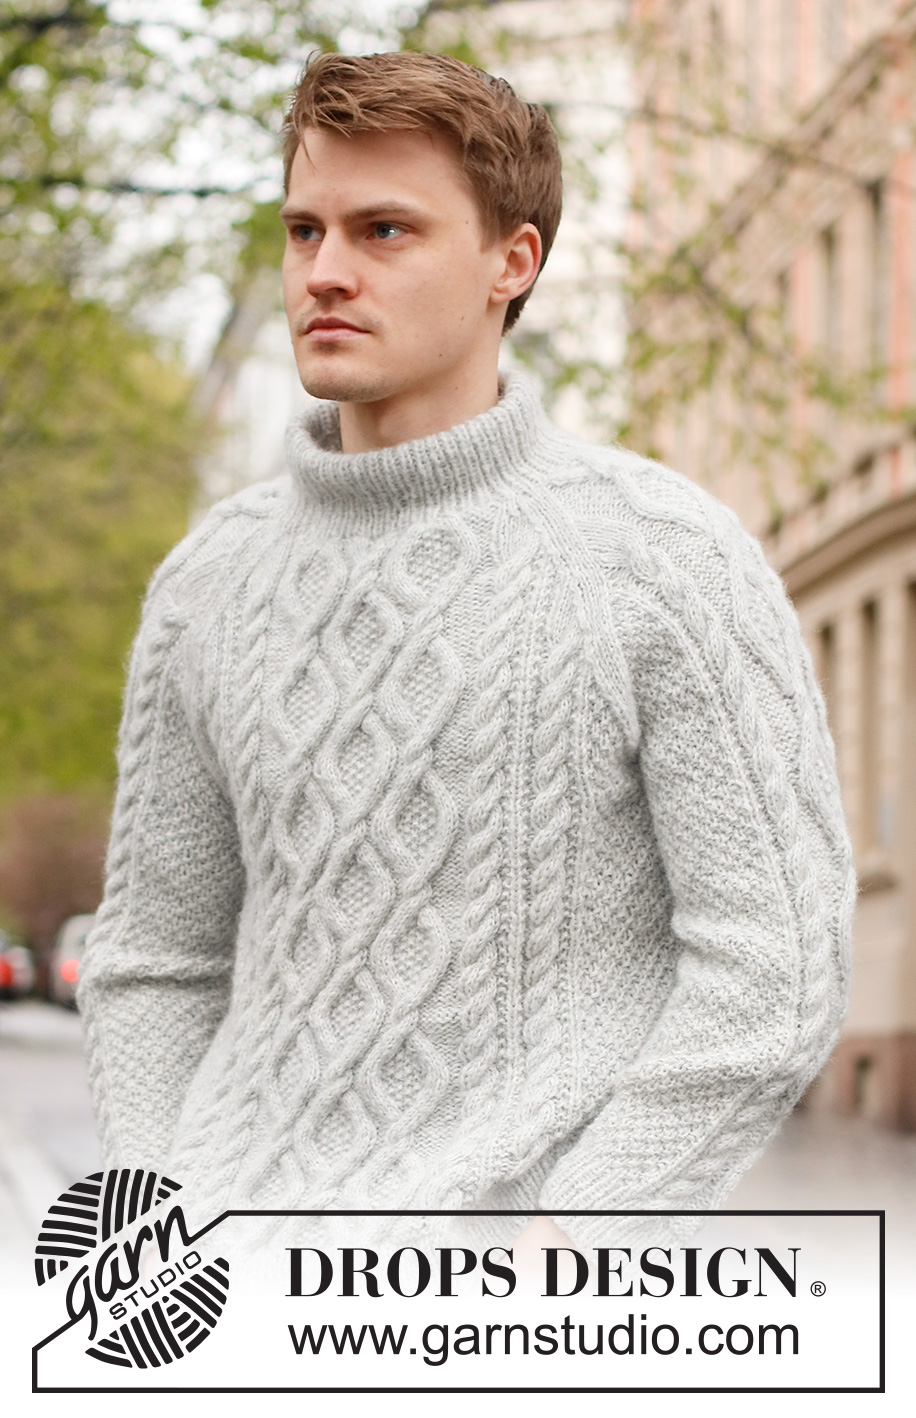
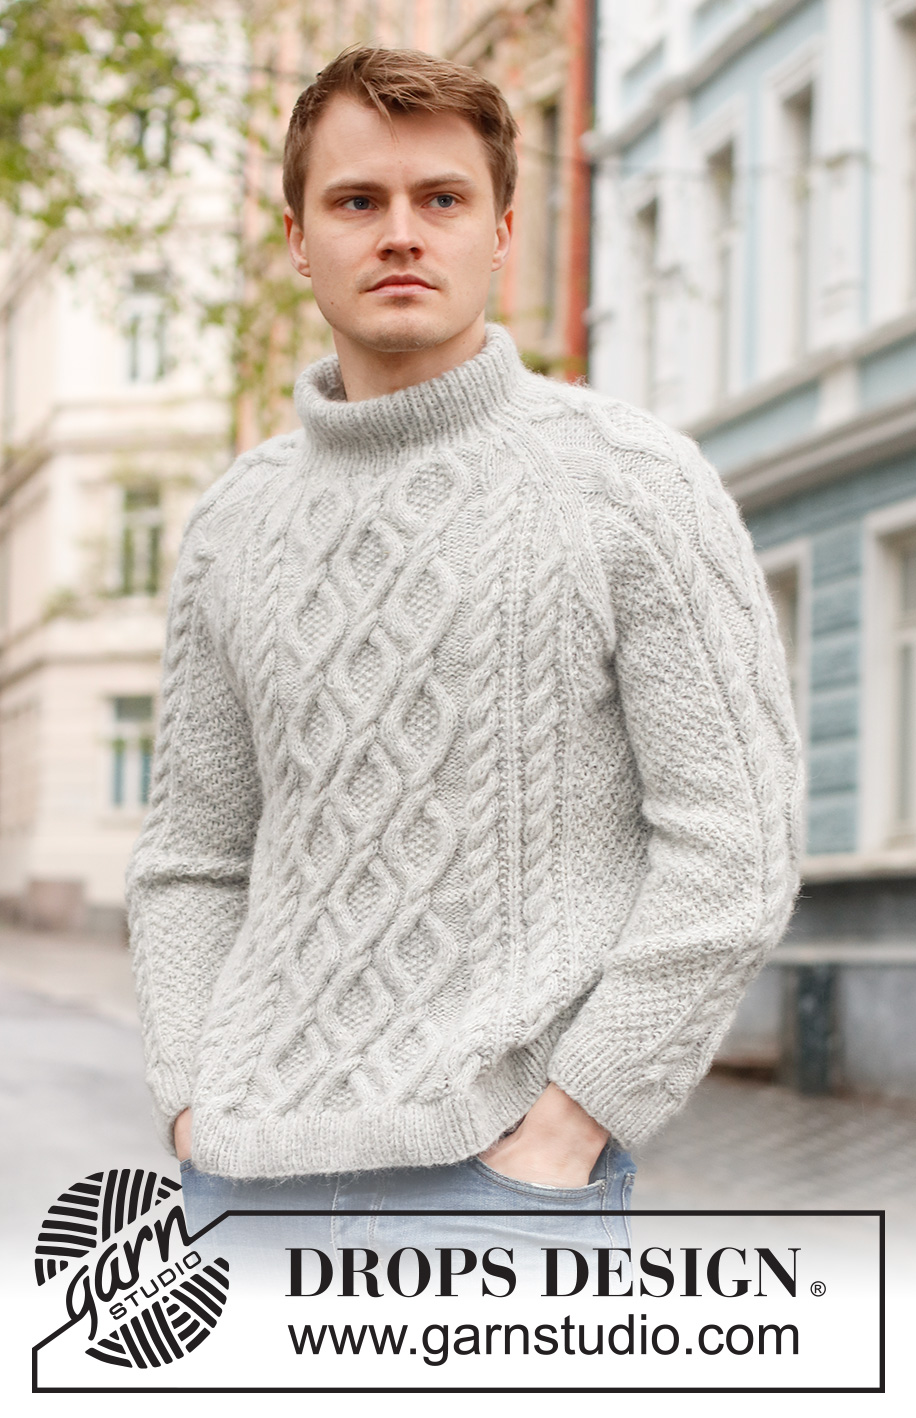
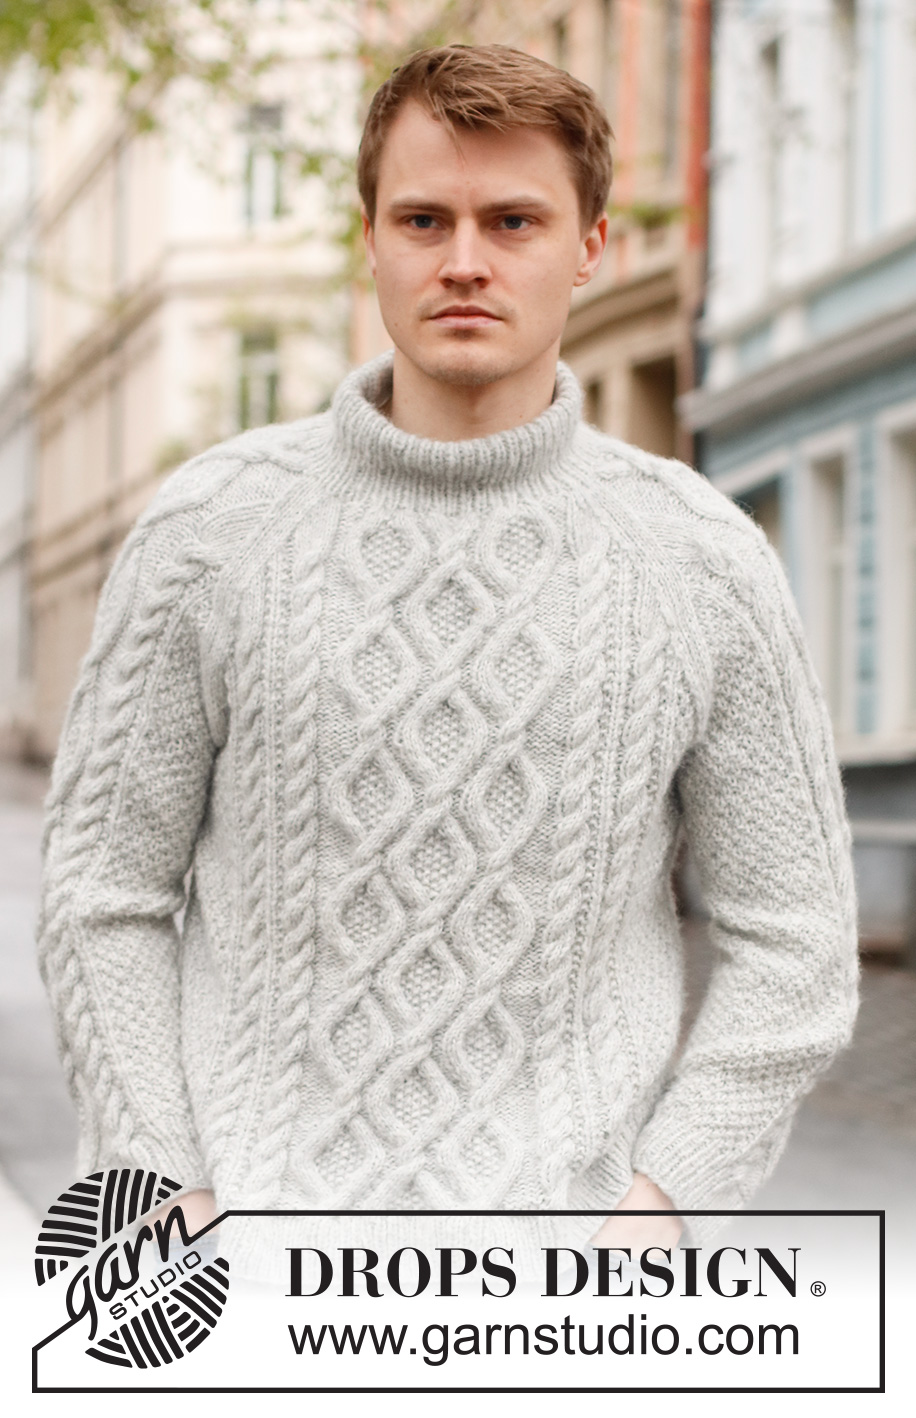
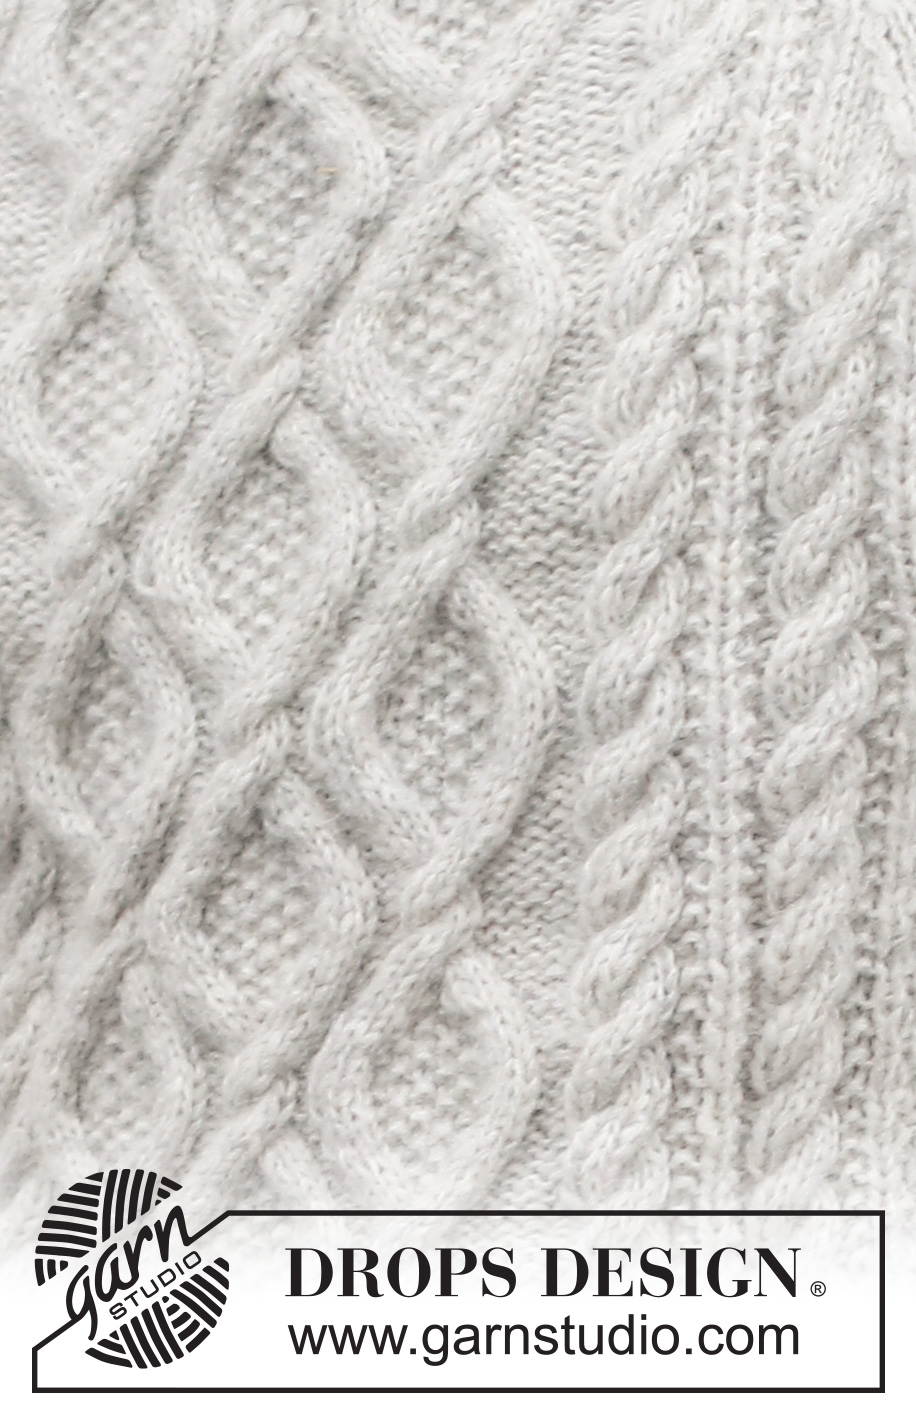
Knitted jumper for men in DROPS Air. The piece is worked with raglan, cables and double neck. Sizes S - XXXL.
DROPS 224-4 |
||||||||||||||||
|
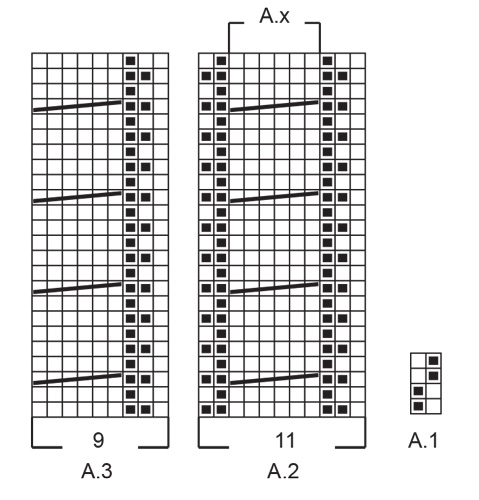
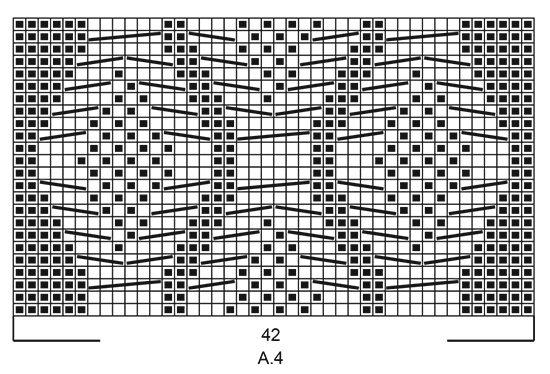
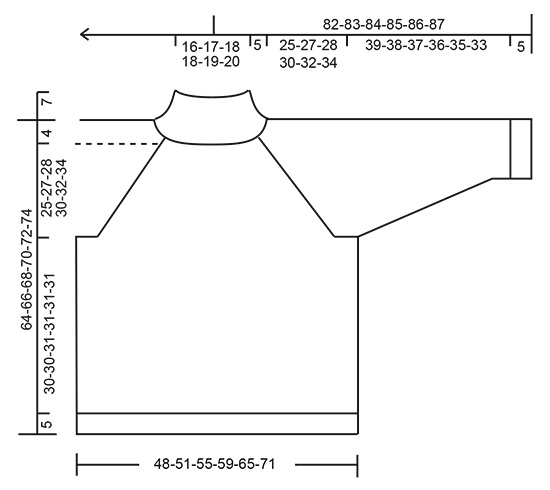
------------------------------------------------------- EXPLANATIONS FOR THE PATTERN: ------------------------------------------------------- PATTERN: See diagrams A.1 to A.7. DECREASE/INCREASE TIP (evenly spaced): To work out how to decrease/increase evenly, count the total number of stitches on needle (e.g. 224 stitches), and divide by number of decreases/increases to be made (e.g. 20) = 11.2. In this example, decrease by knitting together approx. each 10th and 11th stitch. When increasing, make 1 yarn over after approx. each 11th stitch. On the next round work the yarn overs twisted to avoid holes. RAGLAN: Decrease to raglan on each side of the marker thread in each transition between body and sleeves as follows: Work until there are 3 stitches left before the marker thread, knit 2 together, knit 2 (marker thread sits between these 2 stitches), slip 1 stitch as if to knit, knit 1 and pass the slipped stitch over the knitted stitch (8 stitches decreased on each decrease-round). NOTE! When you no longer have room for a complete cable towards the raglan-line, work those stitches in stocking stitch. INCREASE TIP (for sleeves): Increase 1 stitch on each side of the marker-stitch as follows: Work to the marker-stitch, make 1 yarn over, knit 1 (marker-stitch), 1 yarn over. On the next round knit the yarn overs twisted to avoid holes. Then work the new stitches into A.1. KNITTING TIP: When casting off for the armholes on the body and sleeves, adjust to do this on the same row in pattern A.x on body and sleeve (single cables). So that all the of these cables can be work on the same round in the diagram as you continue onwards. ------------------------------------------------------- START THE PIECE HERE: ------------------------------------------------------- JUMPER – SHORT OVERVIEW OF THE PIECE: The body is worked in the round, bottom up as far as the armholes. The sleeves are worked in the round with double pointed needles/short circular needle, bottom up. The sleeves are placed on the same circular needle as the body, and the yoke is finished in the round. The double neck is worked to finish. BODY: Cast on 224-232-250-264-292-314 stitches with circular needle size 4 mm and DROPS Air. Work rib in the round (knit 1, purl 1) for 5 cm. Change to circular needle size 5 mm and knit 1 round where you decrease 20-20-22-24-24-26 stitches evenly spaced – read DECREASE/INCREASE TIP = 204-212-228-240-268-288 stitches. Continue according to the diagrams as follows: * Work A.1 over 20-24-32-38-30-40 stitches, A.2 over 11-11-11-11-22-22 stitches (= 1-1-1-1-2-2 repeats of 11 stitches), A.3 (= 9 stitches), A.4 (= 42 stitches), A.5 (= 9 stitches), A.6 over 11-11-11-11-22-22 stitches (= 1-1-1-1-2-2 repeats of 11 stitches) *, work from *-* a total of 2 times. Insert a marker in the middle of both sections of A.1 (10-12-16-19-15-20 stitches of A.1 on each side). REMEMBER THE KNITTING TENSION! Continue the pattern until the piece measures 35-35-36-36-36-36 cm from the cast-on edge – read KNITTING TIP! On the next round cast off 3-3-4-4-5-5 stitches for the armholes on each side of both markers (6-6-8-8-10-10 stitches for each armhole). There are 96-100-106-112-124-134 stitches on the front piece and back pieces. Lay the piece to one side and work the sleeves. SLEEVES: Cast on 48-48-50-50-52-54 stitches with double pointed needles size 4 mm and DROPS Air. Work rib in the round (knit 1, purl 1) for 5 cm. Change to double pointed needles size 5 mm and knit 1 round where you increase 6-6-6-8-8-8 stitches evenly spaced - remember DECREASE/INCREASE TIP = 54-54-56-58-60-62 stitches. Insert 1 marker in the first stitch on the round; used when increasing under the sleeve. Continue according to the diagrams as follows: Work A.1 over 9-9-10-11-12-13 stitches, A.3 (= 9 stitches), A.7 (= 18 stitches), A.5 (= 9 stitches) and A.1 over the last 9-9-10-11-12-13 stitches. When the sleeve measures 8 cm from the cast-on edge increase 1 stitch on each side of the marker-stitch – read INCREASE TIP in explanations above. Repeat this increase every 6½-4½-3-3-2½-2 cm a total of 6-8-11-11-13-15 times = 66-70-78-80-86-92 stitches. Continue working until the sleeve measures 44-43-42-41-40-38 cm from the cast-on edge (shorter measurements in larger sizes due to wider neck and longer yoke). There is approx. 25-27-28-30-32-34 cm left before the neck; try the jumper on and work to desired length - remember KNITTING TIP! Cast off 6-6-8-8-10-10 stitches mid-under the sleeve = 60-64-70-72-76-82 stitches. Lay the piece to one side and work the other sleeve in the same way but insert the marker under the sleeve in the last stitch on the round. YOKE: Place the sleeves on the same needle as the body, where stitches were cast off for the armholes = 312-328-352-368-400-432 stitches. Insert 1 marker thread in each transition between body and sleeves (= 4 marker threads). The 2 stitches on each side of all the marker threads are worked in stocking stitch; the other stitches are worked as before. Continue the pattern for 4-4-2-4-2-1 cm. Now continue the pattern and begin to decrease for RAGLAN – read description above. Decrease like this every 2nd round a total of 22-24-27-28-32-35 times. When all the decreases are finished there are 136-136-136-144-144-152 stitches and the yoke measures approx. 24-26-27-29-31-33 cm from where the body and sleeves were joined. On the next round continue the pattern but knit the cable-stitches and decrease stitches evenly as follows: Decrease a total of 6 stitches over the cables on the front piece and 3 stitches over the first sleeve, 6 stitches over the cables on the back piece and 3 stitches over the cables on the other sleeve = 118-118-118-126-126-134 stitches. Knit 1 round and decrease 36-32-30-38-34-38 stitches evenly on the round = 82-86-88-88-92-96 stitches. The jumper measures approx. 64-66-68-70-72-74 cm from the shoulder. DOUBLE NECK: Change to short circular needle size 4 mm and work rib (knit 1, purl 1) for 12 cm. On the next round increase stitches to avoid the neck being tight when folded double as follows: Make 1 yarn over after every second purled stitch = 102-107-110-110-115-120 stitches. Purl the yarn overs twisted on the next round to avoid holes. Continue with knit over knit and purl over purl until the neck measures 14 cm. Loosely cast off with knit over knit and purl over purl. ASSEMBLY: Sew together the openings under the sleeves. Fold the neck double to the inside and sew down. To avoid the neck being tight and rolling outwards, it is important that the seam is elastic |
||||||||||||||||
Diagram explanations |
||||||||||||||||
|
||||||||||||||||
 |
||||||||||||||||
 |
||||||||||||||||
 |
||||||||||||||||
 |
||||||||||||||||
Have you finished this pattern?Tag your pictures with #dropspattern #stonecablessweater or submit them to the #dropsfan gallery. Do you need help with this pattern?You'll find 27 tutorial videos, a Comments/Questions area and more by visiting the pattern on garnstudio.com. © 1982-2026 DROPS Design A/S. We reserve all rights. This document, including all its sub-sections, has copyrights. Read more about what you can do with our patterns at the bottom of each pattern on our site. |
||||||||||||||||


With over 40 years in knitting and crochet design, DROPS Design offers one of the most extensive collections of free patterns on the internet - translated to 17 languages. As of today we count 325 catalogues and 12298 patterns translated into English (UK/cm).
We work hard to bring you the best knitting and crochet have to offer, inspiration and advice as well as great quality yarns at incredible prices! Would you like to use our patterns for other than personal use? You can read what you are allowed to do in the Copyright text at the bottom of all our patterns. Happy crafting!
Post a comment to pattern DROPS 224-4
We would love to hear what you have to say about this pattern!
If you want to leave a question, please make sure you select the correct category in the form below, to speed up the answering process. Required fields are marked *.