
Popular categories
Looking for a yarn?


Comments / Questions (7)
![]() Mercedes Cuadra wrote:
Mercedes Cuadra wrote:
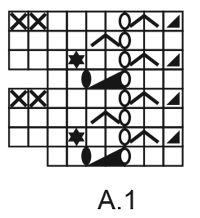
Thanks, this is my first knitting with a diagram. Now I understand well. Another thing that confuses me is if the "knit" symbol in the diagram means the same thing for the right side and the wrong side. The instruction says "knit from the right side, knit from the wrong side". In other words, you don't do a purl on the wrong side, on this 9 stitches. Is that correct? Cheers, Mercedes
20.07.2023 - 22:00DROPS Design answered:
Hi Mercedes, there is 1 purl, second yarn over is purled. Happy knitting!
20.07.2023 - 22:27
![]() Mercedes Cuadra wrote:
Mercedes Cuadra wrote:
Hello, my question is about how to knit the wrong side of diagram A1. The pattern says that diagram A1 shows all rows from the right side. So, for example, in row 1, how should I knit those 9 stitches from the wrong side? Thank you. Mercedes
20.07.2023 - 17:27DROPS Design answered:
Hi Mercedes, 1st row (on the right side; read the diagram from right to left): knit 3, yarn over, purl 2 together, between 2 stitches make 2 yarn overs, knit 2. 2nd row (on the wrong side; read the diagram from left to right): knit 2, knit 1 in the first yarn over, purl 1 in the 2nd yarn over, knit 2, yarn over, knit 2 twisted together, knit 1 twisted. More about how to read knitting diagrams you will find HERE. Happy knitting!
20.07.2023 - 19:42
![]() Mercedes Cuadra wrote:
Mercedes Cuadra wrote:
Hello, thank you for your previous answer. I am a beginner in knitting, so I appreciate your help with another question, When I finish the first row I have 86 stitches in total, I understand that there are 9, A1 stitches, (instead of 7), 76 stockinette and 1 garter. I understand that I am going to knit these 9 stitches like this: 3 garter stitch, 1 purl (2nd YO), and 5 garter stitches. Let me know is that's right. Have a nice day. Mercedes
19.07.2023 - 19:37DROPS Design answered:
Dear Mercedes, the first row is correct. Now we work as follows: knit 3, purl 1 in the 2nd yo, knit 2, 1 yarn over, knit 2 stitches twisted together and knit 1 stitch twisted. Now work over the stockinette stitches and the garter stitch as before. Happy knitting!
20.07.2023 - 12:18
![]() Mercedes Cuadra wrote:
Mercedes Cuadra wrote:
Hi, its a pleasure to greet you! Thank you for your help. 1. When you say that I have to do 76 stockinette stitches on the first row, do you mean knit 76 stitches on the right side, and make purl stitches (84) on the back or 2nd row? 2. The diagram shows 7 stitches on the first row and 9 stitches on the next 3 rows. Does this mean that every four rows on the RS, I am going to repeat those stitches after knitting 76 or 74 stitches? Thank you again. Mercedes
09.07.2023 - 22:10DROPS Design answered:
Hi Mercedes, Yes, stockinette is knitted on the right side and purled on the wrong side. You work 1 garter stitch at the beginning of the row, stockinette over the middle 76 stitches and A.1 over the last 7 stitches on the right side. This will be reversed from the wrong side, with A.1 first, then 76 stockinette (purl) and finish with 1 garter stitch. Happy knitting!
10.07.2023 - 07:41
![]() Cornelia wrote:
Cornelia wrote:
Hallo.Kann ein Fehler in der Strickschrift sein?In der 4.Reihe (Hinreihe) nach den zwei M rechts abketten ist es nicht möglich 4 M rechts zu Stricken, es ist eine zu viel angegeben. Zum abketten von 2 M am Rundenbeginn benötigt man 3 M nicht zwei. Zählt man das Muster kommt man auf 8 nicht auf 7 LG
12.05.2022 - 08:01DROPS Design answered:
Liebe Cornelia, ja richtig, bei der 4. Reihe (= Rückreihe), ketten Sie 2 Maschen ab, dann stricken Sie insgesamt 4 Maschen links, aber die erste ist schon auf der Nadel nach der Abketten, so stricken Sie nur 3 Maschen links (es sind 4 glatt rechte Maschen auf der rechten Nadel). Viel Spaß beim stricken!
12.05.2022 - 09:16
![]() Agnes wrote:
Agnes wrote:
Hej Skulle ni vilja lägga upp en video på hur man stickar diagrammet. Får ingen rätsida på det
14.12.2021 - 09:20
![]() Hannelore Goormans wrote:
Hannelore Goormans wrote:
Wie kann ich eine Anleitung per PDF runter laden
16.07.2021 - 10:26DROPS Design answered:
Liebe Frau Goormans, unsere Anleitungen können nur ausgedruckt werden, aber wenn Sie eine virtuelle Drucker wählen, dann können Sie als .PDF speichern. Viel Spaß beim stricken!
16.07.2021 - 11:42
|
|||||||||||||||||||||||||
Warm Delights#warmdelightsbag |
|||||||||||||||||||||||||
 |
 |
||||||||||||||||||||||||
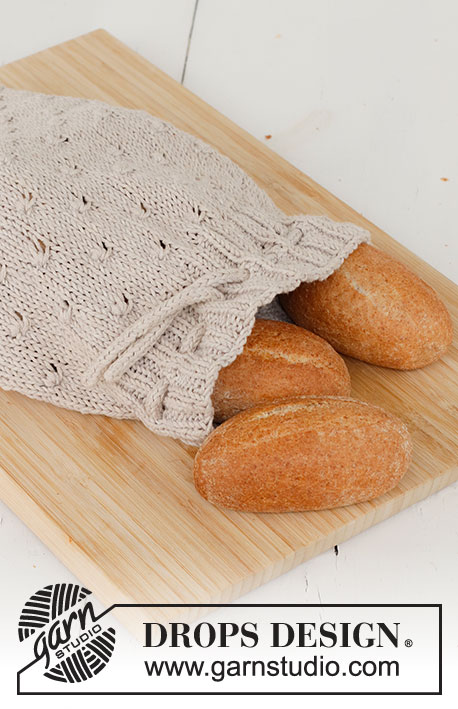
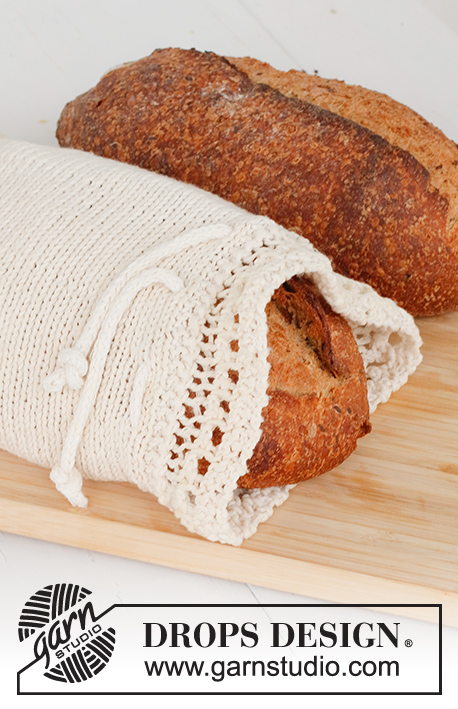
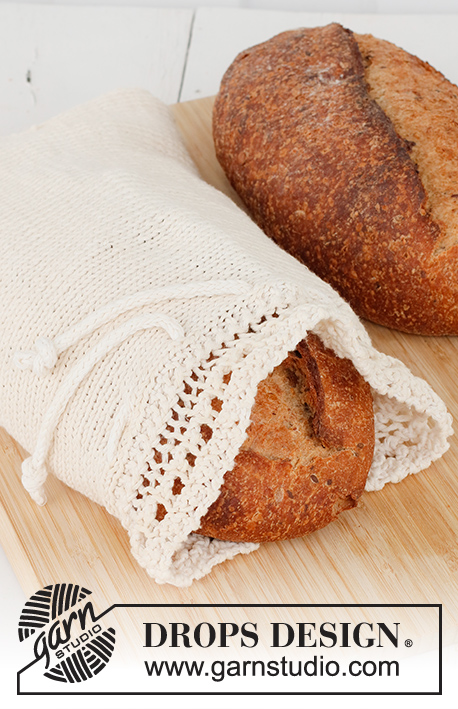
Knitted bread bag with flounces in DROPS Cotton Light.
DROPS 221-53 |
|||||||||||||||||||||||||
|
------------------------------------------------------- EXPLANATIONS FOR THE PATTERN: ------------------------------------------------------- RIDGE/GARTER STITCH (worked back and forth): Knit all rows. 1 ridge = knit 2 rows. PATTERN: See diagram A.1. The diagram shows all the rows in the pattern from the right side. ------------------------------------------------------- START THE PIECE HERE: ------------------------------------------------------- BREAD BAG – SHORT OVERVIEW OF THE PIECE: The bread bag is worked sideways, back and forth on the needle and is sewn together along the side and bottom. BREAD BAG: Cast on 84 stitches with needle size 4.5 mm and DROPS Cotton Light. Work 2 RIDGES over all stitches – read description above. Insert a marker – THE PIECE IS MEASURED FROM HERE. The next row is worked as follows from the right side: 1 edge stitch in garter stitch, 76 stitches in stocking stitch and A.1 over 7 stitches. REMEMBER THE KNITTING TENSION! Continue with pattern A.1 on one side, stocking stitch and garter stitch on the other side until the piece measures approx. 48 cm from the marker – adjust to finish after row 4 or 8 in A.1. Work 2 ridges over all stitches. Loosely cast off, cut the strand. TIES: Work back and forth with circular needle. Cast on 3 stitches with circular needle size 3.5 mm and DROPS Cotton Light. Knit 3 * do not turn but push the stitches back to the other end of the needle, take the strand behind the stitches, tighten and knit the stitches from the right side again *, work from *-* until the tie measures approx. 60 cm, cast off and fasten the strand. ASSEMBLY: Fold the piece double so the flounces are towards each other; this is the opening of the bag. Sew the cast-off edge to the cast-on edge in the outermost loop of the outermost stitch. Fold the piece so the side seam lies are in the middle on the piece. Sew the bottom together, inside the 1 edge stitch. The tie is threaded in and out of the piece, through the stitches in stocking stitch a few cm below pattern A.1 – see photo. Tie a knot in each end of the tie. |
|||||||||||||||||||||||||
Diagram explanations |
|||||||||||||||||||||||||
|
|||||||||||||||||||||||||
 |
|||||||||||||||||||||||||
Have you finished this pattern?Tag your pictures with #dropspattern #warmdelightsbag or submit them to the #dropsfan gallery. Do you need help with this pattern?You'll find 18 tutorial videos, a Comments/Questions area and more by visiting the pattern on garnstudio.com. © 1982-2026 DROPS Design A/S. We reserve all rights. This document, including all its sub-sections, has copyrights. Read more about what you can do with our patterns at the bottom of each pattern on our site. |
|||||||||||||||||||||||||


With over 40 years in knitting and crochet design, DROPS Design offers one of the most extensive collections of free patterns on the internet - translated to 17 languages. As of today we count 324 catalogues and 12290 patterns translated into English (UK/cm).
We work hard to bring you the best knitting and crochet have to offer, inspiration and advice as well as great quality yarns at incredible prices! Would you like to use our patterns for other than personal use? You can read what you are allowed to do in the Copyright text at the bottom of all our patterns. Happy crafting!
Post a comment to pattern DROPS 221-53
We would love to hear what you have to say about this pattern!
If you want to leave a question, please make sure you select the correct category in the form below, to speed up the answering process. Required fields are marked *.