
Popular categories
Looking for a yarn?


Comments / Questions (43)
![]() Linda Douglas wrote:
Linda Douglas wrote:
When you divide for the armholes, you only say decrease at the END of the left front but not at the start of the left back. And the same for the decreases on the back at the armholes on the right side. The number of stitches is wrong for the fronts and back body. there are no decreases on the right front armhole. This means that the front left should now be 45 minus 6=39sts for the small size why are there still 45 sts on the front if we have decreased 6 at the armhole?
06.07.2021 - 07:33DROPS Design answered:
Dear Mrs Douglas, number of stitches is correct for both front pieces (in S: 2 sts cast off for armhole + 15 sts decreased for V-neck and 6 sts for front bandege/collar = 22 sts for shoulder) - and on back piece: 2 sts cast off on each side (4 sts in total) + 38 sts cast off for neck (= 36 middle sts + 1 stitch on each side) = 22 sts for shoulder). Can this help?
06.07.2021 - 09:15
![]() Izabela wrote:
Izabela wrote:
Witam. Ja również mam problem ze wzorem w rozmiarze M od momentu zmiany drutów na rozmiar 4 ( po lewej stronie robótki ) Wzór z diagramów wydaje się nie pokrywać z tym co jest przerobione na drutach. W tym rzędzie diagramy A3 i A4 mają być przerabiane naprzemiennie czy tak jak w poprzednim rzędzie ? Coś mi się tutaj nie zgadza :(
20.06.2021 - 23:46DROPS Design answered:
Witaj Izo, jak odczytywać schematy w robótce na drutach znajdziesz TUTAJ. Zobacz część jak jest przerabiana robótka w tę i z powrotem (jak w tym sweterku) oraz jak przerabiamy różne schematy w tym samym rzędzie, jeden po drugim. Znajdziesz tam info jak postępować, gdy pracujesz na lewej stronie robótki. Powodzenia!
21.06.2021 - 15:45
![]() Helen Salmons wrote:
Helen Salmons wrote:
The instructions for the band on the body don’t quite read right-I couldn’t work out for the life of me what they meant. When I did the sleeves the instructions do seem to miss a chunk. The decreases do not result in the amount that should remain on the needle after. I also had to double the decreases (I.e. instead of casting off 2 st 3 times at the beginning of each row, cast of 2st 6 times, plus two extra 3st dec) for the edge of the sleeve to only just fit the armholes.
14.06.2021 - 11:56DROPS Design answered:
Dear Mrs Salmons, we are sorry for these, but still not sure what you mean here. Did you see this lesson about diagrams? Feel free to bring your work to your DROPS store, or send them a picture per mail to ask for individual assistance - maybe you could also ask other knitters in our DROPS Workshop? Hope this could help.
14.06.2021 - 16:43
![]() Helen Salmons wrote:
Helen Salmons wrote:
Hi! Please can you revisit this? There seem to be two big issues with this pattern (and I’ve made many of yours and I’m certain there’s incorrect instructions). The first area is the band soon after cast on-the mathematics and instructions conflict with each other. The on the sleeves the maths do not add up at all. There seems to be a significant amount of stitches missing-should there be something else before “at the same time”?
12.06.2021 - 21:41DROPS Design answered:
Dear Mrs Salmons, I'm not sure to understand what you mean here, how can the band confilt with each other? the stitches on band sts are included in the total number of sts to cast on, this means you don't have to cast on more sts - which size are you working on, where do you exactly have issues, do not hesitate to tell us more so that we can check and help. Thank you!
14.06.2021 - 08:46
![]() Krystyna wrote:
Krystyna wrote:
Witam Mam pytanie czy przerabiając wzór A3 od początku nad prawym oczkiem przerabiam lewe a nad lewym prawe . Tak odczytuję ten schemat.
08.06.2021 - 12:12DROPS Design answered:
Witaj Krysiu, zaczynasz od prawego dolnego rogu i w pierwszym rzędzie schematu A.3 przerabiasz oczko lewe, prawe, lewe, prawe, itd. Jak odczytywać schematy w robótce na drutach znajdziesz w kursie DROPS TUTAJ. Pozdrawiamy!
08.06.2021 - 16:27
![]() Tina Lorenzen wrote:
Tina Lorenzen wrote:
Hvad betyder A4 over A6 ? Det er en meget svær opskrift synes jeg.
02.06.2021 - 08:48DROPS Design answered:
Hej Tina, du strikker diagrammerne over hinanden ifølge opskriften. Hvis du skriver hvilken størrelse, hvor mange masker du har og hvor du er i opskriften, så kan vi prøve at hjælpe dig :)
02.06.2021 - 12:24
![]() Elke wrote:
Elke wrote:
Hallo, wordt de bies echt volgens A1 en A3 gebreid (rechts-averechts afwisselend)? Op foto lijken deze biezen in tricotsteek gebreid? Vriendelijke groeten, elke
28.05.2021 - 10:41
![]() Hanhnguyen wrote:
Hanhnguyen wrote:
Tôi đan side L thì cộng lại 7+40+8+7+8+88+8+7+8+40+7 = 228 không phải 243 sts. Và khi đan đoạn A3 với 40 sts (5 lần cho mỗi lần 8 sts ) thì lại chỉ giảm có 6 sts nhỉ, tương tự đoạn dưới cũng vậy 88 sts mà giảm 12 sts. Bạn có thể giải thích giúp tôi kỹ được không. Cám ơn bạn.
22.05.2021 - 14:24
![]() Tina Dahllöw wrote:
Tina Dahllöw wrote:
Hej! Om jag förstår rätt ska jag sticka från tätsidan när jag börjar från pilen i A3 Frågan är om pilen börjar vid ett rät eller ett evigt varv? Vänligen Tina
16.05.2021 - 08:13DROPS Design answered:
Hej Tina, ja du starter ved pilen fra retsiden. God fornøjelse!
17.05.2021 - 13:23
![]() Susanne wrote:
Susanne wrote:
Hallo ik brei maat S maar A1 sluit niet aan op A3. Ik eindig mijn voorbiessteken met1 averecht. Wanneer ik A3 start met 1averecht sluit het niet meer mooi aan op de boordsteek en dat is toch juist de bedoeling van minderen in patroon? Zodat het kabel/ajourpatroon daar straks ook weer precies op aansluit? Als ik het brei zoals jullie adviseren ziet die rij er heel rommelig uit...zie ik iets over het hoofd?
14.05.2021 - 12:29DROPS Design answered:
Dag Susanne,
Je breit eerst A.1 over de eerste 7 steken en dan herhaal je steeds A.3 over de volgende 32 steken, dus 4 herhalingen van 8 steken. De laatste steek van A.1 is een averechte steek aan de goede kant Dan ga je verder met A.3 en je begint inderdaad ook met een averechte steek. Het klopt dat het dan niet meer aansluit met de boordsteek, maar dat maakt niet uit. Ik heb ingezoomd op de afbeelding bekeken en daar is dat ook zo.
16.05.2021 - 11:57
|
||||||||||||||||||||||
Coral Gables Cardigan#coralgablescardigan |
||||||||||||||||||||||
 |
 |
|||||||||||||||||||||
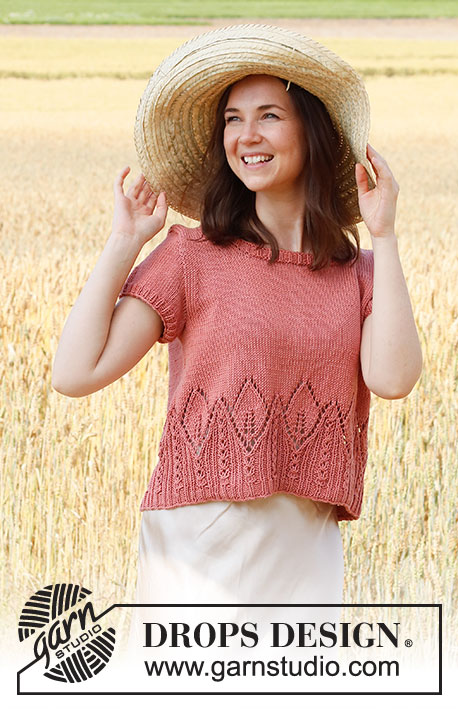
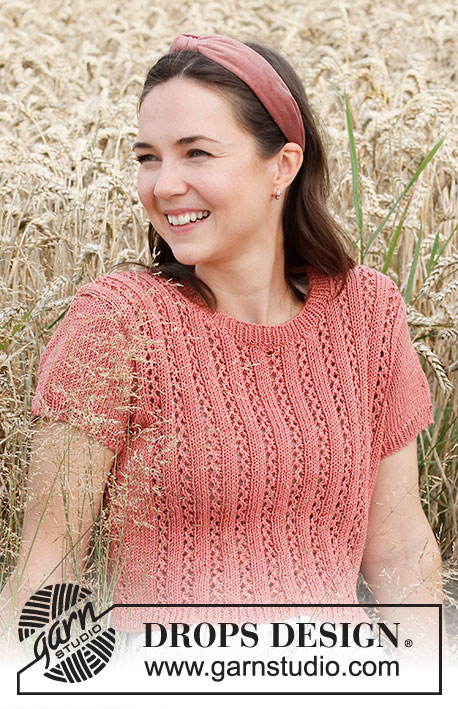
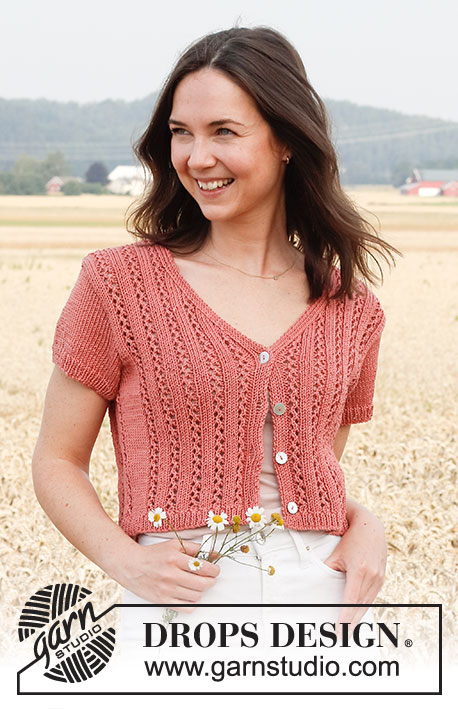
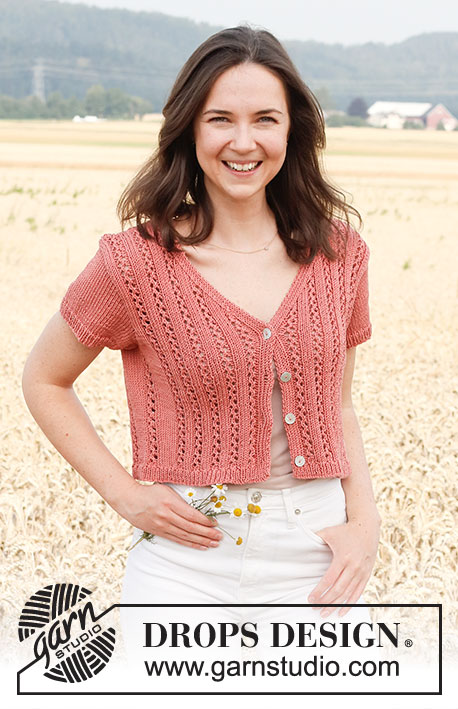
Knitted jacket in DROPS Muskat. The piece is worked with lace pattern, V-neck and short sleeves. Sizes S - XXXL.
DROPS 220-28 |
||||||||||||||||||||||
|
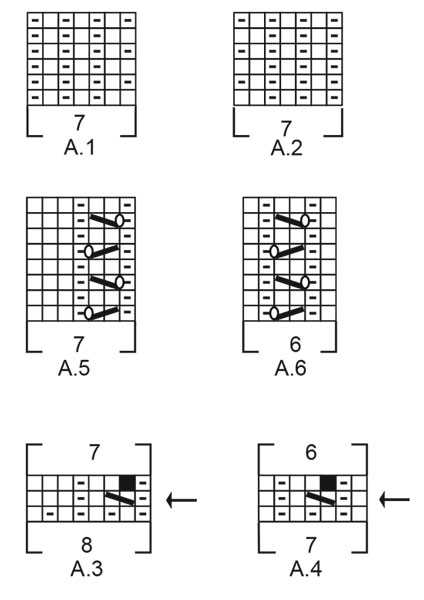
------------------------------------------------------- EXPLANATIONS FOR THE PATTERN: ------------------------------------------------------- PATTERN: See diagrams A.1 to A.6. The diagrams show all rows in the pattern from the right side. INCREASE TIP: Work as far as A.6, make 1 yarn over, work A.6, make 1 yarn over. On the next row work the yarn overs twisted to avoid holes. Then work the new stitches in stocking stitch. BUTTONHOLES: Work the buttonholes on the right band. 1 BUTTONHOLE = Knit together the third and fourth stitches from the edge and make 1 yarn over. On the next row knit the yarn over to leave a hole. Work the buttonholes when the piece measures: S: 2, 9, 16 and 23 cm. M: 3, 10, 17 and 24 cm. L: 2, 10, 17 and 25 cm. XL: 3, 11, 18 and 26 cm. XXL: 3, 11, 17 and 25 cm. XXXL: 2, 11, 19 and 28 cm. ------------------------------------------------------- START THE PIECE HERE: ------------------------------------------------------- JACKET – SHORT OVERVIEW OF THE PIECE. The body is worked back and forth with circular needle, as far as the armholes. Then the front and back pieces are finished separately. The sleeves are worked in the round with double pointed needles/short circular needle as far as the armhole, then the sleeve cap is finished back and forth. The sections are sewn together to finish. BODY: Cast on 195-227-243-259-291-323 stitches (including 7 band stitches on each side) with circular needle size 3 mm and Muskat. Purl 1 row (= wrong side). Then work rib as follows: A.1 over the first 7 stitches (= band), * knit 1, purl 1 *, work from *-* until there are 8 stitches left, knit 1 and work A.2 over the last 7 stitches (= band). Continue back and forth like this for 2 cm – adjust so the next row is from the right side – remember the BUTTONHOLES on the right band – read description above. The next row is worked as follows (start on the rows with arrows in A.3 and A.4): Work A.1 over the first 7 stitches, A.3 over the next 32-40-40-40-40-48 stitches (= 4-5-5-5-5-6 repeats of 8 stitches), work the first 5 stitches in A.3 (= 5-6-6-6-6-7 stitches decreased), stocking stitch over the next 2-6-8-12-20-22 stitches and decrease 0-2-3-2-3-3 stitches evenly over these stitches, A.4 over the next 7 stitches (= 1 stitch decreased), stocking stitch over the next 2-6-8-12-20-22 stitches and decrease 0-2-3-2-3-3 stitches evenly over these stitches, A.3 over the next 80-80-88-88-88-96 stitches, work the first 5 stitches in A.3 (= 11-11-12-12-12-13 stitches decreased), stocking stitch over the next 2-6-8-12-20-22 stitches and decrease 0-2-3-2-3-3 stitches evenly over these stitches, A.4 over the next 7 stitches (= 1 stitch decreased), stocking stitch over the next 2-6-8-12-20-22 stitches and decrease 0-2-3-2-3-3 stitches evenly over these stitches, A.3 over the next 32-40-40-40-40-48 stitches, work the first 5 stitches in A.3 (= 5-6-6-6-6-7 stitches decreased) and A.2 over the last 7 stitches = 172-194-205-225-253-282 stitches. Change to circular needle size 4 mm. Work 1 row back from wrong side as follows: Work last row in diagram A.3 and A.4, work A.1 and A.2 as before over the 7 band stitches in each side towards mid front and purl the remaining stitches on row. Now work pattern as follows: Work A.1, A.5 over the next 28-35-35-35-35-42 stitches, work the first 4 stitches in A.5, stocking stitch over the next 2-4-5-10-17-19 stitches, A.6 over A.4, stocking stitch over the next 2-4-5-10-17-19 stitches, A.5 over the next 70-70-77-77-77-84 stitches, work the first 4 stitches in A.5, stocking stitch over the next 2-4-5-10-17-19 stitches, A.6 over A.4, stocking stitch over the next 2-4-5-10-17-19 stitches, A.5 over the next 28-35-35-35-35-42 stitches, work the first 4 stitches in A.5 and finish with A.2. Continue back and forth like this. REMEMBER THE KNITTING TENSION! When the piece measures 4-5-5-5-5-5 cm, increase 1 stitch on each side of A.6 – read INCREASE TIP. Increase like this every 5-5-5-5-5½-6 cm a total of 4-4-4-4-4-4 times = 188-210-221-241-269-298 stitches. When the piece measures 22-23-24-25-26-27 cm, cast off for the armholes on the next row from the wrong side as follows: Work the first 45-53-53-57-63-71 stitches (= left front piece), cast off 6-8-10-12-14-16 stitches, work the next 86-88-95-103-115-124 stitches (= back piece), cast off 6-8-10-12-14-16 stitches, work the next 45-53-53-57-63-71 stitches (= right front piece). The front and back pieces are finished separately. RIGHT FRONT PIECE: = 45-53-53-57-63-71 stitches. Continue the pattern and cast off for the armhole, AT THE SAME TIME as you decrease for the V-neck as follows: ARMHOLE: At the beginning of each row from the armhole cast off as follows: 2 stitches 1-1-1-2-5-5 times then 1 stitch 0-1-1-3-3-4 times. V-NECK: AT THE SAME TIME when the piece measures 1 cm from the division, decrease for the neck from the right side as follows: Work the first 5 stitches, slip 1 stitch as if to knit, knit 1 and pass the slipped stitch over the knitted stitch (= 1 stitch decreased). Decrease like this every 2nd row (each row from the right side) a total of 15-22-21-21-21-28 times. When there is not enough room to work the yarn over and decrease in the lace pattern, work these stitches in stocking stitch until the decreases for the neck are finished. When all the decreases for the armhole and neck are finished, there are 28-28-29-29-29-29 stitches on the shoulder. Continue working until the piece measures 41-43-45-47-49-51 cm – adjust so the next row is from the wrong side. Cast off the first 22-22-23-23-23-23 stitches, continue back and forth over the band stitches until the band measures 12-12-14-14-14-15 cm from where you cast off on the shoulder. Cast off. LEFT FRONT PIECE: = 45-53-53-57-63-71 stitches. Continue the pattern and cast off for the armhole, AT THE SAME TIME as you decrease for the V-neck as follows: ARMHOLE: At the beginning of each row from the armhole cast off as follows: 2 stitches 1-1-1-2-5-5 times. then 1 stitch 0-1-1-3-3-4 times. V-NECK: AT THE SAME TIME when the piece measures 1 cm from the division, decrease for the neck from the right side as follows: Work until there are 7 stitches left on the row, knit 2 together (= 1 stitch decreased) and work to end of row. Decrease like this every 2nd row (each row from the right side) a total of 15-22-21-21-21-28 times. When there is not enough room to work the yarn over and decrease in the lace pattern, work these stitches in stocking stitch until the decreases for the neck are finished. When all the decreases for the armhole and neck are finished, there are 28-28-29-29-29-29 stitches on the shoulder. Continue working until the piece measures 41-43-45-47-49-51 cm – adjust so the next row is from the right side. Cast off the first 22-22-23-23-23-23 stitches, continue back and forth over the band stitches until the band measures 12-12-14-14-14-15 cm from where you cast off on the shoulder. Cast off. BACK PIECE: = 86-88-95-103-115-124 stitches. Continue the pattern back and forth, AT THE SAME TIME cast off for the armholes on each side at the beginning of each row as follows: 2 stitches 1-1-1-2-5-5 times, then 1 stitch 0-1-1-3-3-4 times on both sides = 82-82-89-89-89-96 stitches. When the back piece measures 17-18-19-20-21-22 cm from the bottom of the armhole (the piece measures approx. 39-41-43-45-47-49 cm from the cast-on edge), cast off the middle 36-36-41-41-41-48 stitches for the neck and each shoulder is finished separately. Then cast off 1 stitch on the next row from the neck = 22-22-23-23-23-23 stitches on the shoulder. Continue working until the piece measures 41-43-45-47-49-49 cm. Cast off. Work the other shoulder in the same way. SLEEVES: Cast on 66-70-74-80-84-90 stitches with double pointed needles size 3 mm and Muskat. Knit 1 round, then work rib (knit 1, purl 1) in the round for 2 cm. Knit 1 round where you increase 6 stitches evenly spaced in all sizes = 72-76-80-86-90-96 stitches. Change to double pointed needles size 4 mm, and work in stocking stitch. When the sleeve measures 6-6-5-5-5-5 cm, cast off 6-8-10-12-14-16 stitches mid-under the sleeve = 66-68-70-74-76-80 stitches. Then work the sleeve cap back and forth, AT THE SAME TIME as casting stitches off at the beginning of each row as follows: 2 stitches 3-3-3-3-2-2 times, 1 stitch 2-3-5-8-14-14 times, 2 stitches 4-4-3-2-1-1 times and 4-3-3-4-3-3 stitches 1 time on each side = 26-28-30-30-30-34 stitches. Cast off. The sleeve measures approx. 13-14-14-15-18-18 cm. Work the other sleeve in the same way. ASSEMBLY: Sew the shoulder seams. Sew the sleeves into the body. Sew the buttons onto the left band. Sew the bands together inside the cast-off edge and then sew the bands to the back of the neck. |
||||||||||||||||||||||
Diagram explanations |
||||||||||||||||||||||
|
||||||||||||||||||||||
 |
||||||||||||||||||||||
 |
||||||||||||||||||||||
Have you finished this pattern?Tag your pictures with #dropspattern #coralgablescardigan or submit them to the #dropsfan gallery. Do you need help with this pattern?You'll find 23 tutorial videos, a Comments/Questions area and more by visiting the pattern on garnstudio.com. © 1982-2026 DROPS Design A/S. We reserve all rights. This document, including all its sub-sections, has copyrights. Read more about what you can do with our patterns at the bottom of each pattern on our site. |
||||||||||||||||||||||


With over 40 years in knitting and crochet design, DROPS Design offers one of the most extensive collections of free patterns on the internet - translated to 17 languages. As of today we count 324 catalogues and 12239 patterns translated into English (UK/cm).
We work hard to bring you the best knitting and crochet have to offer, inspiration and advice as well as great quality yarns at incredible prices! Would you like to use our patterns for other than personal use? You can read what you are allowed to do in the Copyright text at the bottom of all our patterns. Happy crafting!
Post a comment to pattern DROPS 220-28
We would love to hear what you have to say about this pattern!
If you want to leave a question, please make sure you select the correct category in the form below, to speed up the answering process. Required fields are marked *.