
Popular categories
Looking for a yarn?


Comments / Questions (17)
![]() Hanne Hansen wrote:
Hanne Hansen wrote:
Hej når man påbegynder både ind/udt skal man så først måle de 11 derfra eller hvordan for det er jo allerede 11 cm, når man skal starte på begge del??
27.08.2021 - 21:32DROPS Design answered:
Hei Hanne. Under Luen har vi lagt til: Sett et merke - arbeidet måles nå herfra! Takk for at du gjorde oss oppmerksom på at dette manglet. mvh DROPS design
07.09.2021 - 10:24
![]() Adrienn wrote:
Adrienn wrote:
Kedves DROPS Csapat! Nem ertem ez a mondat pontosan mit jelent a tanacs a szaporitashoz resznel: A köv sorban (= FO) az új szemeket a mackókötésbe illesztve kötjük, de az új szemeket rh-sok nélkül kötjük. Pontosan hogyan kell kotni a 5 szemet? Mindet siman? Koszonom! Udvozlettel: Adrienn.
19.04.2021 - 14:01DROPS Design answered:
Kedves Adrienn, a szemeket a mackókötésnek megfelelően simán, vagy fordítottan kell kötni, de az első sorban még nem lesznek hozzájuk tartozó ráhajtások, azok nélkül kötjük le őket. Sikeres kézimunkázást!
19.04.2021 - 18:06
![]() Louvelna wrote:
Louvelna wrote:
Bonjour, Je ne comprends pas le point de côtes anglaises... (J'en suis à l'échantillon 😑) On a un nombre paire de maille et pourtant le point que vous expliquez j'obtiens un nombre impair 🤔 Pourriez vous m'expliquer ? Merci.
27.02.2021 - 16:34DROPS Design answered:
Bonjour Louvelna, les côtes anglaises comme expliqué dans le texte se tricotent sur un nombre impair de mailles - ainsi le début et la fin du rang sont identiques. Cette vidéo montre comment tricoter ce type de côtes anglaises et devrait pouvoir vous aider. Attention, les jetés qui se font par-dessus les mailles glissées ne comptent pas comme des mailles. Bon tricot!
01.03.2021 - 08:23
![]() Bettina Jensen wrote:
Bettina Jensen wrote:
Skal der bruges rundpind til hagesmæk, eller kan man bruge to pinde i stedet?
20.01.2021 - 14:33DROPS Design answered:
Hej Bettina, du må gerne strikke den på jumperpinde :)
20.01.2021 - 16:21
![]() Kerstin Bartel wrote:
Kerstin Bartel wrote:
Ich blicke bei der Mütze nicht durch...warum muss ich Maschen abnehmen? Macht doch keinen Sinn, wenn ich die Anzahl der zugenommenen Maschen gleich wieder abnehmen muss...wie soll die Mütze dann jemals mehr als 29 Maschen kriegen??? Wir sitzen hier zu 2. und haben ein mega Fragezeichen überm Kopp....
11.09.2020 - 19:20DROPS Design answered:
Liebe Frau Bartel, nach der 1. Zunahme haben Sie 29 Maschen, dann stricken Sie die Zunahmen weiter (= 4 Zunahmen x 3 Markierungsfäden = 12 Maschen) noch 6-7-8-9-10 Mal (= insgesamt 7-8-9-10-11 x )= nach allen Zunahmen haben Sie 101-113-125 (137-149) Maschen. Erst dann stricken Sie Abnahmen gleichzeitig zu den Zunahmen, und so bleibt die Maschenanzahl gleich. Viel Spaß beim stricken!
14.09.2020 - 08:10
![]() Simone wrote:
Simone wrote:
Liebes Drops-Team, das Set ist wunderschön geworden. Vielen Dank für die tolle Anleitung. Eine Frage: kann man die Mütze theoretisch auch rund stricken?
15.07.2020 - 11:47DROPS Design answered:
Liebe Simone, danke für Ihre Rückmeldung - die Mütze können Sie sicher in Runden stricken, aber dann sollte die Anleitung angepasst werden. Viel Spaß beim stricken!
15.07.2020 - 12:46
![]() Simone wrote:
Simone wrote:
Liebes Drops Team, bedeutet das dann, dass ich immer in der Rückreihe nach einer Zunahme mehrere Maschen einfach rechts abstricken muss, da ich die zugenommen Maschen ja einarbeiten soll. In der Anleitung zum Vollpatent soll man eigentlich abwechselnd mit und ohne Umschlag stricken.
03.07.2020 - 15:12DROPS Design answered:
Liebe Simone, bei den Rückreihen nach den Zunahmen werden die neuen Maschen im Vollpatent gestrickt - aber ohne die Maschen zusammen mit ihrem Umschlag stricken, denn diese Maschen noch keinen Umschlag haben - dieses Video zeigt, wie man mehrere Maschen bei den Hinreihen zunimmt und bei den Rückreihen strickt. Viel Spaß beim stricken!
03.07.2020 - 15:28
|
|
Baby Plum#babyplumset |
|
 |
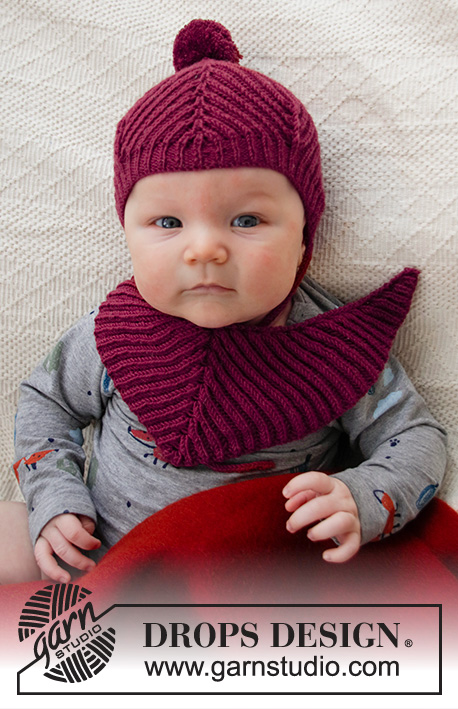 |
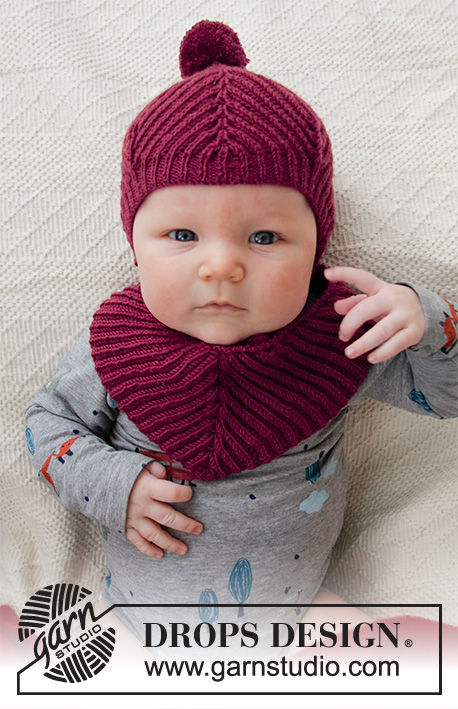
Knitted hat and bib for babies, with English rib in DROPS BabyMerino. Sizes 1 month – 4 years.
DROPS Baby 36-7 |
|
|
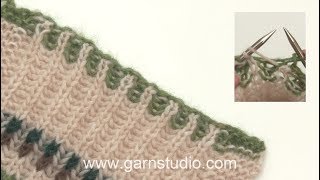
------------------------------------------------------- EXPLANATIONS FOR THE PATTERN: ------------------------------------------------------- RIDGE/GARTER STITCH (worked back and forth): Knit all rows. 1 ridge in height = Knit 2 rows. ENGLISH RIB- for bib: ROW 1 (= wrong side): Work 1 stitch in garter stitch, * 1 yarn over, slip 1 stitch as if to purl, knit together the yarn over and slipped stitch *, work from *-* until there are 2 stitches left, 1 yarn over, slip 1 stitch as if to purl, 1 stitch in garter stitch. ROW 2 (= right side): Work 1 stitch in garter stitch, * knit together the yarn over and slipped stitch, 1 yarn over, slip 1 stitch as if to purl *, work from *-* until there is 1 yarn over and 2 stitches left, knit together the yarn over and slipped stitch, 1 stitch in garter stitch. Repeat rows 1 and 2 onwards. INCREASE TIP-1: Work 3 stitches in the stitch and yarn over with marker thread as follows: Knit together the yarn over and slipped stitch, but do not slip them from the needle, make 1 yarn over the right needle and knit together the stitch and yarn over 1 more time, then slip the knitted stitch and yarn over you have worked in off the left needle = 3 stitches (= 2 stitches increased). On the next row (= wrong side) work the new stitches into the English rib, but the stitches are worked without yarn overs. INCREASE TIP-2: Work 5 stitches in the stitch and yarn over with marker thread as follows: Knit together the yarn over and slipped stitch, but do not slip them from the needle, * make 1 yarn over the right needle and knit together the stitch and yarn over 1 more time without slipping them from the left needle *, work from *-* a total of 2 times, then slip the knitted stitch and yarn over you have worked in off the left needle = 5 stitches (= 4 stitches increased). On the next row (= wrong side) work the new stitches into the English rib, but the stitches are worked without yarn overs. ENGLISH RIB – for hat. ROW 1 (= wrong side): Work 1 stitch in garter stitch, * knit 1, make 1 yarn over, slip 1 stitch as if to purl *, work from *-* until there are 2 stitches left, finish with knit 1 and 1 stitch in garter stitch ROW 2 (= right side): Work 1 stitch in garter stitch, * 1 yarn over, slip 1 stitch as if to purl, knit together the yarn over and slipped stitch *, work from *-* until there are 2 stitches left, finish with 1 yarn over, slip 1 stitch as if to purl, 1 stitch in garter stitch. ROW 3 (= wrong side): Work 1 stitch in garter stitch, * knit together the yarn over and slipped stitch, 1 yarn over, slip 1 stitch as if to purl,* work from *-* until there is 1 yarn over and 2 stitches left, knit together the yarn over and slipped stitch, 1 stitch in garter stitch. Repeat rows 2 and 3 onwards. DECREASE TIP: At marker thread 1 decrease as follows: Knit 3 together (yarn overs not counted as stitches, so 2 stitches decreased). At marker thread 7 decrease as follows: Slip 1 stitch, knit the next 2 stitches together, pass the slipped stitch over (yarn overs not counted as stitches, so 2 stitches decreased). At marker threads 3 and 5 decrease as follows: Work together 5 stitches and 3 yarn overs (= a total of 8 stitches) as follows: Slip the first 3 stitches and 2 yarn overs onto the right needle as if to knit together, knit together the next 2 stitches and 1 yarn over, pass the 5 slipped stitches (including yarn overs) from the right needle over the knitted together stitches (4 stitches decreased) ------------------------------------------------------- START THE PIECE HERE: ------------------------------------------------------- BIB – SHORT OVERVIEW OF THE PIECE: The piece is worked back and forth with circular needle, top down. The piece is worked with English rib and stitches are increased on each side and in the middle. BIB: Cast on 7 stitches with circular needle size 2.5 mm and Baby Merino. The first row is worked from the wrong side as follows: 1 edge stitch in garter stitch, 1 yarn over, slip 1 stitch as if to purl, knit 1, 1 yarn over, slip 1 stitch as if to purl, knit 1, 1 yarn over, slip 1 stitch as if to purl, 1 edge stitch in garter stitch. Turn the piece and insert 3 marker threads in the piece as follows (= from the right side): Marker thread 1 in the 2nd stitch, marker thread 2 in the 4th stitch and marker thread 3 in the 6th stitch. Work as follows – from the right side: 1 edge stitch in garter stitch, increase 2 stitches in the next stitch and yarn over – read INCREASE TIP-1, 1 yarn over, slip 1 stitch as if to purl, increase 4 stitches in the next stitch and yarn over – read INCREASE TIP -2, 1 yarn over, slip 1 stitch as if to purl, increase 2 stitches in the next stitch and yarn over – read INCREASE TIP -1, finish with 1 edge stitch in garter stitch = 15 stitches on the needle. After the increase the marker threads are moved; marker thread 1 is inserted in the first English rib stitch on the row (after the edge stitch), marker thread 2 is inserted in the middle stitch (middle of the 5 stitches worked in 1 stitch) and marker thread 3 is inserted in the last English rib stitch (before the edge stitch). On the next row (= wrong side) work ENGLISH RIB – read description above. The increased stitches are worked without yarn overs on the first row. Continue with English rib and increase in the sides every 4th row (marker threads 1 and 3) and every 8th row in the middle (marker thread 2). Move the marker threads after each increase, so you always increase in the middle stitch and in the stitch inside each edge stitch. When the piece measures 10-12 cm (or desired length), cast off. Fasten a button at one end of the bib (the button is buttoned through the first English rib stitch at the other end). ------------------------------------------------------- HAT – SHORT OVERVIEW OF THE PIECE: The piece is worked back and forth with circular needle, top down. HAT: Cast on 17 stitches in all sizes with circular needle size 2.5 mm and Baby Merino. Work the first row in ENGLISH RIB – read description above. Turn the piece and insert 7 marker threads as follows (without working the stitches): Marker thread 1 in the 3rd stitch, marker thread 2 in the 5th stitch, marker thread 3 in the 7th stitch, marker thread 4 in the 9th stitch, marker thread 5 in the 11th stitch, marker thread 6 in the 13th stitch, marker thread 7 in the 15th stitch. You increase in marker threads 2, 4 and 6 and, later, decrease in marker threads 1, 3, 5 and 7. Work row 2 in English rib, AT THE SAME TIME increase 4 stitches at marker threads 2, 4 and 6 – read INCREASE TIP-2 = 29 stitches. After the increases, move the marker threads to the middle of the 5 stitches worked in 1 stitch. Continue with English rib AT THE SAME TIME as you increase at these 3 marker threads. Increase every 8th row a total of 7-8-9-10-11 times = 101-113-125 (137-149) stitches. Continue with English rib but now decrease as well as increase stitches. Decrease 2 stitches at marker threads 1 and 7 and decrease 4 stitches at marker threads 3 and 5– read DECREASE TIP. Decrease and increase every 8th row; the number of stitches remains the same (decrease 12 stitches and increase 12 stitches). Continue with English rib and increases and decreases until the piece measures approx. 12-13-14 (16-17) cm, or to desired length (there is 2 cm left). Work the next row from the right side as follows: 1 edge stitch in garter stitch, * purl 1, knit together the yarn over and slipped stitch *, work from *-* until there is 1 stitch left, 1 edge stitch in garter stitch. Continue with rib (knit 1, purl 1) for 2 cm. Cast off with knit over knit and purl over purl. ASSEMBLY: Thread a strand of yarn and pull it through the cast on edge, tighten together and fasten. Sew the hat together mid-back, inside the 1 edge stitch on each side. TIES: Cast on 4 stitches with needle size 2.5 mm and Baby Merino. Work as follows: * Knit 1, take the strand to the front (towards you), slip 1 stitch as if to purl, take the strand to the back (away from you) *, work from *-* 1 more time and continue like this on all rows. This gives you a round tie. Cast off when the tie measures approx. 20-22-24 (26-28) cm. Work 1 more tie in the same way. Sew a tie to the bottom of each side of the hat. POM POM: Make a pom pom of approx. 4 cm in diameter and fasten to the top of the hat. |
|
Have you finished this pattern?Tag your pictures with #dropspattern #babyplumset or submit them to the #dropsfan gallery. Do you need help with this pattern?You'll find 15 tutorial videos, a Comments/Questions area and more by visiting the pattern on garnstudio.com. © 1982-2026 DROPS Design A/S. We reserve all rights. This document, including all its sub-sections, has copyrights. Read more about what you can do with our patterns at the bottom of each pattern on our site. |
|


With over 40 years in knitting and crochet design, DROPS Design offers one of the most extensive collections of free patterns on the internet - translated to 17 languages. As of today we count 324 catalogues and 12290 patterns translated into English (UK/cm). 12290
We work hard to bring you the best knitting and crochet have to offer, inspiration and advice as well as great quality yarns at incredible prices! Would you like to use our patterns for other than personal use? You can read what you are allowed to do in the Copyright text at the bottom of all our patterns. Happy crafting!
Post a comment to pattern DROPS Baby 36-7
We would love to hear what you have to say about this pattern!
If you want to leave a question, please make sure you select the correct category in the form below, to speed up the answering process. Required fields are marked *.