
Popular categories
Looking for a yarn?


Comments / Questions (31)
![]() Martha wrote:
Martha wrote:
Confused as to why increase so many stitches in body when you have knit to length of 29 cm. Size XL increase 48 stitches then switch to 3.5 mm and work rib. Why increase at this point? Thank you
11.09.2025 - 01:20DROPS Design answered:
Hi Martha, the rib edge is more elastic and will contract slightly compared to, for example, stocking stitch. By increasing before the rib edge, you avoid a visible difference in width between the rib edge and the rest of the body. Happy knitting!
12.09.2025 - 10:24
![]() Davina Williams wrote:
Davina Williams wrote:
I m starting the yoke with 108 stitches Size large The pattern A1 is a block of 8 stitches I am struggling to get to round 2 because it is an uneven repeat ie 108/8 =13.5 What am I doing wrong
09.05.2025 - 23:09DROPS Design answered:
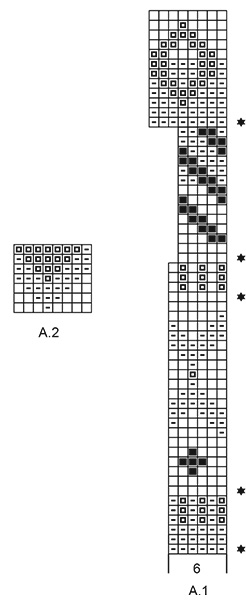
Dear Davina, A.1 is 6 stitches, as indicated in the lowermost row of the chart. Remember that the charts are read from right to left from the right side, since you are working in the round, and from the bottom up; you can read more about this here. As you increase stitches you will have more space for more repeats and, at the end, for the 8-stitch end of the chart. Happy knitting!
11.05.2025 - 00:52
![]() Caroline wrote:
Caroline wrote:
I'm working size M have done the pattern A1 and the increases at *5 i have 304 stitches, after A2 at 27 cm is says increase 12 stitches evenly = 356 stitches, 304 +12 are not 356, where should i have increased the extra stitches please?
09.10.2024 - 12:02DROPS Design answered:
Dear Caroline, in size M you get 304 sts this means enough stitches to work the 8 sts of A.2 a total of 38 times - in this paragraph, size M is the 1st size, this means you don't incrase - in size M, work stocking stitch if piece doesn't measure 24 cm then go to next section "all sizes" to divide yoke into body and sleeves. Happy knitting!
09.10.2024 - 15:38
![]() Beate Schößler wrote:
Beate Schößler wrote:
Ich stricke dieses Modell in Größe L und habe nach dem 5. Stern 328 Maschen auf der Nadel. Verstehe ich es richtig, dass ich noch 20 Maschen zunehmen muss, das wären dann aber nur 348 Maschen.
23.09.2024 - 11:35DROPS Design answered:
Liebe Frau Schößler, in L werden Sie nicht mehr zunehmen, Sie stricken bis die Arbeit 26 cm misst, aber es wird keine weitere Masche zugenommen. Viel Spaß beim Stricken!
23.09.2024 - 16:33
![]() Pia wrote:
Pia wrote:
Specificerer lige mit spørsmål ,da jeg ikke forstår det tidligere svar. Når jeg strikker oppefra og skal slutte af med en rib forneden, skriver i i opskriften, at man skal tage masker ud inden ribben strikkes.. Men så bliver ribben jo større end selve trøjen, selvom man går en pind ned, er det for at de næsten går lige ned i stedet for indad i ribben?
29.12.2022 - 00:49DROPS Design answered:
Hej Pia, ja det stemmer, ribben skal ikke trække arbejdet sammen, den skal gå lige ned :)
04.01.2023 - 12:19
![]() Pia wrote:
Pia wrote:
Hvorfor tager man masker ud før ribben i stedet for ind, som på de fleste andre opskrifter?
08.12.2022 - 18:15DROPS Design answered:
Hei Pia. For å få en penere overgang mellom vrangbord og bol, økes det masker etter vrangborden og byttes til større pinne nr. Tidligere, da gjerne oppskrifter fra 80-tallet, skulle vrangborden være stram og bolen vid. Dette har forandret seg. mvh DROPS Design
12.12.2022 - 11:16
![]() Gasparetto wrote:
Gasparetto wrote:
Bonjour J’ai fini le pull mais à l’usage il s’avère que le col devant est un peu haut et me gêne au niveau du cou. Y aurait il moyen de l’echancrer après coup? Merci
03.12.2022 - 17:25DROPS Design answered:
Bonjour Mme Gasparetto, vous pouvez peut-être défaire le col (en utilisant cette technique par ex; et en faisant plus de rangs raccourcis pour que l'encolure dos soit plus haute que l'encolure devant; n'hésitez pas à contacter votre magasin pour toute assistance personnalisée complémentaire. Bon tricot!
06.12.2022 - 08:52
![]() Maren wrote:
Maren wrote:
Liebes Drops Team, ich stricke diesen Pulli mit großer Freude. Nun möchte mein Mann diesen Pulli als Jacke haben. Habt ihr eine Anleitung oder könnt mir eine für eine Jacke empfehlen wo ich dieses Norweger Muster verwenden kann? Ich brauche ja vermutlich einen anderen Schnitt und Größe und dann soll ja noch das Muster passen. Vielen herzlichen Dank.
27.11.2022 - 19:35
![]() Bri wrote:
Bri wrote:
Bonjour, je viens de finir le corps et mes côtés se plient vers l’extérieur en remontant !!!! Est-ce normal ?
17.01.2022 - 11:03DROPS Design answered:
Bonjour Bri, ça arrive parfois, lavez simplement votre pull (respectez bien les consignes d'entretien) et faites le sécher bien à plat, avec des épingles si besoin, la bordure côtes devrait alors s'aplatir. Bon tricot!
17.01.2022 - 15:37
![]() May Isaac wrote:
May Isaac wrote:
Er det feil i oppskriten.?Stemmer ikke etter alle økningene, og en skal øke 20 masker i str, L.
10.01.2022 - 09:44
|
||||||||||||||||
Crisp Air Sweater#crispairsweater |
||||||||||||||||
 |
 |
|||||||||||||||
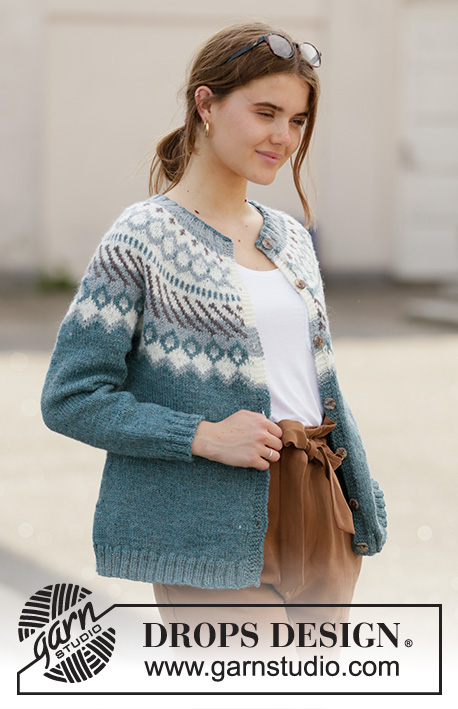
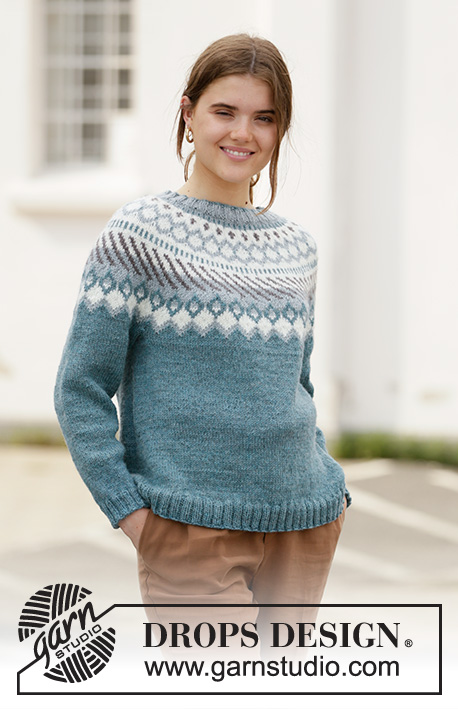
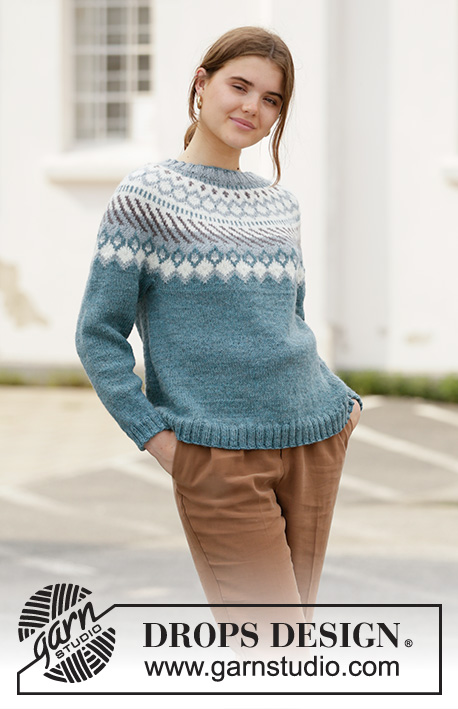
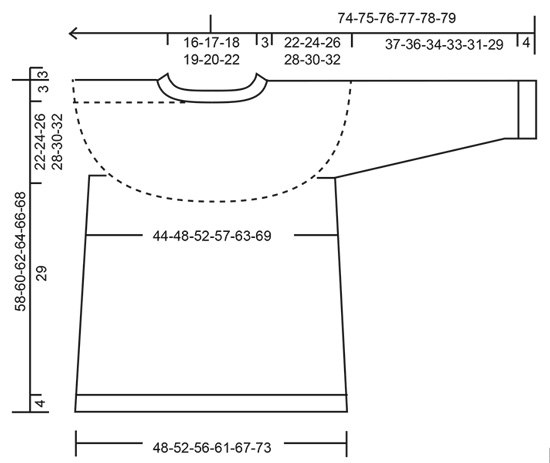
Knitted jumper with round yoke and Nordic pattern in DROPS Karisma. The piece is worked top down. Sizes S - XXXL.
DROPS 207-14 |
||||||||||||||||
|
------------------------------------------------------- EXPLANATIONS FOR THE PATTERN: ------------------------------------------------------- PATTERN: See diagrams A.1 and A.2. The diagrams show all rows in the pattern seen from the right side. ELEVATION (back of neck): So the jumper is slightly higher at the back of the neck when working a round yoke, you can work an elevation as described here. Skip this section if you do not want an elevation; the neck will then be the same front and back. Insert 1 marker at the beginning of the round = mid back. Start from the right side and knit 14-15-16-16-17-18 stitches past the marker, turn, tighten strand and purl 28-30-32-32-34-36 stitches back. Turn, tighten strand and knit 42-45-48-48-51-54 stitches, turn, tighten strand and purl 56-60-64-64-68-72 stitches back. Turn, tighten strand and knit back to mid back. Then work YOKE as described in the text. INCREASE TIP-1 (evenly spaced): To work out how to increase evenly, count the total number of stitches on the needle (e.g. 108 stitches) and divide by the number of increases to be made (e.g. 31) = 3.5. In this example, increase by making 1 yarn over after alternately each 3rd and 4th stitch. On the next round knit the yarn overs twisted to avoid holes. INCREASE TIP-2 (for sides of body): Work until there are 2 stitches left before the marker thread, make 1 yarn over, knit 4 (marker thread sits between these 4 stitches) make 1 yarn over (= 2 stitches increased at each marker thread; 4 stitches increased on round). On the next round knit the yarn overs twisted to avoid holes. Then work the new stitches in stocking stitch. DECREASE TIP (for sleeves): Decrease 1 stitch on each side of the marker thread as follows: Work until there are 3 stitches left before the marker thread, knit 2 together, knit 2 (marker thread sits between these 2 stitches), slip 1 stitch as if to knit, knit 1 and pass the slipped stitch over the knitted stitch. ------------------------------------------------------- START THE PIECE HERE: ------------------------------------------------------- JUMPER – SHORT OVERVIEW OF THE PIECE: The piece is worked in the round, top down. The sleeves are worked in the round with short circular needle/ double pointed needles. NECK: Cast on 100-104-108-112-116-124 stitches with circular needle size 3.5 mm and sea green. Knit 1 round. Change to light grey green and work rib (knit 2/ purl 2) for 3 cm. Insert a marker here. THE PIECE IS MEASURED FROM HERE. Change to circular needle size 4.5 mm. Now you can work an ELEVATION in the back of the neck – read description above. If you do not want an elevation go straight to YOKE. YOKE: Work pattern A.1, AT THE SAME TIME, on each round marked with a star increase as follows: STAR-1: Increase 26-28-30-32-34-38 stitches evenly spaced – read INCREASE TIP-1 = 126-132-138-144-150-162 stitches (there is now room for 21-22-23-24-25-27 repeats of A.1 with 6 stitches). REMEMBER THE KNITTING TENSION! STAR-2: Increase 42-42-48-48-48-48 stitches evenly spaced = 168-174-186-192-198-210 stitches (there is now room for 28-29-31-32-33-35 repeats of A.1 with 6 stitches). STAR-3: Increase 48-54-54-60-60-60 stitches evenly spaced = 216-228-240-252-258-270 stitches (there is now room for 36-38-40-42-43-45 repeats of A.1 with 6 stitches). STAR-4: Increase 29-42-45-48-52-60 stitches evenly spaced = 245-270-285-300-310-330 stitches (there is now room for 49-54-57-60-62-66 repeats of A.1 with 5 stitches). STAR-5: Increase 27-34-43-44-50-54 stitches evenly spaced = 272-304-328-344-360-384 stitches (there is now room for 34-38-41-43-45-48 repeats of A.1 with 8 stitches). When there is 1 round left in the diagram the piece measures approx. 22 cm from the marker. Continue as follows in the different sizes: In size S skip the next section and continue from All sizes – below. Sizes M, L, XL, XXL and XXXL: Continue with pattern A.2. When the diagram has been completed in height the piece measures approx. 24 cm from the marker. Size M is now finished (unless it is shorter than 24 cm, in which case continue with stocking stitch and sea green to this measurement). In sizes L, XL, XXL and XXXL continue with stocking stitch and sea green until the piece measures 26-28-30-32 cm from the marker, AT THE SAME TIME when the piece measures 25-27-29-31 cm (from the marker), increase 0-12-20-28 stitches evenly spaced = 328-356-380-412 stitches. All sizes: The last round on the yoke is worked as follows: Work the first 40-44-47-52-57-63 stitches (= half back piece), place the next 56-64-70-74-76-80 stitches on 1 thread for sleeve, cast on 8-8-10-10-12-12 new stitches on the needle (= in side under sleeve), work the next 80-88-94-104-114-126 stitches (= front piece), place the next 56-64-70-74-76-80 stitches on 1 thread for sleeve, cast on 8-8-10-10-12-12 new stitches on the needle (= in side under sleeve), work the remaining 40-44-47-52-57-63 stitches (= half back piece). The body and sleeves are finished separately. THE PIECE IS NOW MEASURED FROM HERE. BODY: There are 176-192-208-228-252-276 stitches on the body. Insert a marker thread in each side in the middle of the 8-8-10-10-12-12 stitches cast on under the sleeves (= 4-4-5-5-6-6 new stitches on each side of the threads). In size S continue as described below, in sizes M, L, XL, XXL and XXXL skip the next section and continue from all sizes below. Size S: Work pattern A.2 in the round over all stitches and until completed in 1 time in height. Then continue as described below. All sizes: Continue in the round with sea green and stocking stitch. When the piece measures 4 cm, increase 1 stitch on each side of both marker threads – read INCREASE TIP-2. Increase like this every 7 cm a total of 4 times = 192-208-224-244-268-292 stitches. When the piece measures 29 cm increase 36-40-44-48-52-56 stitches evenly spaced =228-248-268-292-320-348 stitches. Change to circular needle size 3.5 mm and work rib (= knit 2/ purl 2) for 4 cm. Cast off with knit over knit and purl over purl. Make sure the cast-off edge is not tight; increase a needle size when casting off, if this is a problem. The jumper measures approx. 58-60-62-64-66-68 cm from the shoulder down. SLEEVE: Place the 56-64-70-74-76-80 stitches from the thread on the one side of the piece on short circular needle/double pointed needles size 4.5 mm and knit up 1 stitch in each of the 8-8-10-10-12-12 stitches cast on under the sleeve = 64-72-80-84-88-92 stitches. In size S work pattern as described below; the other sizes are continued from section ALL SIZES below. Size S: Start the round before the 8 new stitches under the sleeve and work A.2 over each repeat of A.1 (from the yoke). When A.2 has been completed in height continue from ALL SIZES below. ALL SIZES: Insert a marker thread in the middle of the 8-8-10-10-12-12 new stitches (= 4-4-5-5-6-6 new stitches on each side of the thread). Work stocking stitch in the round with sea green. When the piece measures 4-4-4-3-3-3 cm, decrease 1 stitch on each side of the marker thread – read DECREASE TIP. Decrease like this every 3-2-1½-1½-1½-1 cm a total of 11-14-17-18-19-20 times = 42-44-46-48-50-52 stitches. When the sleeve measures 37-36-34-33-31-29 cm (shorter measurements in larger sizes due to longer yoke), increase 6-8-10-8-10-8 stitches evenly spaced = 48-52-56-56-60-60 stitches. Change to double pointed needles size 3.5 mm and work rib (= knit 2/ purl 2) for 4 cm. Cast off with knit over knit and purl over purl. Make sure the cast-off edge is not tight; increase a needle size when casting off, if this is a problem. The sleeve measures approx 41-40-38-37-35-33 cm. Work the other sleeve in the same way. |
||||||||||||||||
Diagram explanations |
||||||||||||||||
|
||||||||||||||||
 |
||||||||||||||||
 |
||||||||||||||||
Have you finished this pattern?Tag your pictures with #dropspattern #crispairsweater or submit them to the #dropsfan gallery. Do you need help with this pattern?You'll find 27 tutorial videos, a Comments/Questions area and more by visiting the pattern on garnstudio.com. © 1982-2026 DROPS Design A/S. We reserve all rights. This document, including all its sub-sections, has copyrights. Read more about what you can do with our patterns at the bottom of each pattern on our site. |
||||||||||||||||


With over 40 years in knitting and crochet design, DROPS Design offers one of the most extensive collections of free patterns on the internet - translated to 17 languages. As of today we count 324 catalogues and 12290 patterns translated into English (UK/cm). 12290
We work hard to bring you the best knitting and crochet have to offer, inspiration and advice as well as great quality yarns at incredible prices! Would you like to use our patterns for other than personal use? You can read what you are allowed to do in the Copyright text at the bottom of all our patterns. Happy crafting!
Post a comment to pattern DROPS 207-14
We would love to hear what you have to say about this pattern!
If you want to leave a question, please make sure you select the correct category in the form below, to speed up the answering process. Required fields are marked *.