
Popular categories
Looking for a yarn?


Comments / Questions (60)
![]() Crystal wrote:
Crystal wrote:
So do i just pick a spot and and just start the bows again? do i continue around to where i started? do i stop and then start againg or do a number of chains and turn the work going back the other way? how many bows should i have? sorry for all the questions im just not understanding and on a deadline as this is supposed to be a gift
29.07.2013 - 20:37
![]() Crystal wrote:
Crystal wrote:
On what bow do i start the back and forth, and how many bows do i do this on before i turn and go back the other way? also how do i turn to go back the other way? that is what i dont get.
27.07.2013 - 05:54DROPS Design answered:
Dear Crystal, the best thing is to start the sleeve at the point where you will have to continue back and forth, so that you will be sure to start back and forth at the right place. Happy crocheting!
29.07.2013 - 09:21
![]() Crystal wrote:
Crystal wrote:
I need more in depth info on how to work the sleeve and attach it to the body. i cant figure it out. what am i supposed to crochet back and forth on and how do i turn to make it correct. 13 bows is not enough to attach to the body
15.07.2013 - 22:01DROPS Design answered:
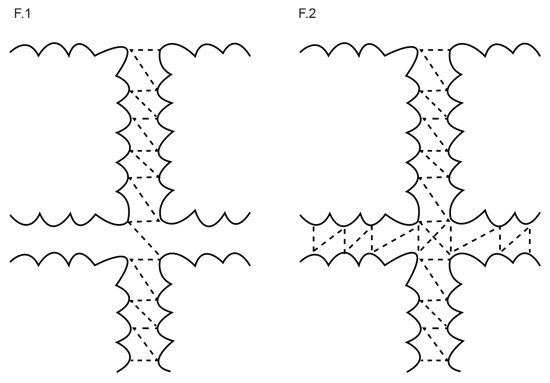
Dear Crystal, to create sleeve cap, you continue in rows when sleeve measures 46 cm [18-1/8"], and continue in rows until sleeve measures 52 cm [20.5"]. You will then have enough ch st bow with 13 + first/last ch st bow of each row worked back and forth - see fig. 1 to see how to crochet sleeve to armhole. Happy crocheting!
16.07.2013 - 10:09
![]() Crystal wrote:
Crystal wrote:
I get that part about having one square on the top of the hand and bottom of the hand. what does it mean when it says crochet back and forth? do we add the sleeve the same way we join the rest of the squares?
14.07.2013 - 02:03DROPS Design answered:
Dear Crystal, working back and forth means you will crochet the sleeve cap in rows. Sleeve is then joined to body the same way as you joined squares together. Happy crocheting!
15.07.2013 - 08:50
![]() Crystal wrote:
Crystal wrote:
Im trying to make the sleeve but am kinda of confused. the last part of the sleeve says "divide the work so that 1 square at the bottom of the sleeve is at the center of the hand and crochet back and forth." what do you mean by that? thanks so much for the help
13.07.2013 - 01:58DROPS Design answered:
Dear Crystal, when dividing sleeve for working cap, make sure you will have 1 square each side of the hand/arm (1 above, 1 below) when wearing sleeve. Happy crocheting!
13.07.2013 - 10:12
![]() Kelsey wrote:
Kelsey wrote:
This is such a beautiful pattern! I was getting ready to order the yarn and I was wondering how many skeins I need to purchase? Thanks!
01.07.2013 - 02:14DROPS Design answered:
Dear Mrs Kelsey, material required is indicated on the right side of the picture, ie, 800 g Muskat /50 g the ball Muskat = 16 balls DROPS Muskat. Happy crocheting!
01.07.2013 - 09:08
![]() T. wrote:
T. wrote:
I need help understanding round 4. When I start this round, I have only 8 bows. The sl st, ch1, sc at the beginning take the 1st bow. Then it * ch5, sc [in bow #2], ch5, 1 dc [in bow #3], ch10, 1dc [in bow #4] (corner), ch5, 1sc [in bow #5] *. Then I am supposed to repeat *-* a total of 3 times. But at this point, I've already used 5 of my 8 bows, how am I supposed to make it around a couple more times (not to mention the additional stuff at the end) ... what am I doing wrong?
11.06.2013 - 03:04DROPS Design answered:
Dear T., please check your round 3, you should have all around : *4 tr crocheted tog, ch6, dc, ch6* a total of 8 times so that you have 16 loops for round 4. Happy crocheting!
11.06.2013 - 08:59
![]() Sunshine_Melli wrote:
Sunshine_Melli wrote:
Ich finde den Cardigan total schön und versuche ihn nach zuarbeiten. Ich habe auch Probleme in der 4. Reihe. Dadurch, dass man die Blume wirklich nicht richtig erkennen kann, weiß ich nicht ob meine sehr komisch aussehende Blume richtig ist. "1 Kettm in der Mitte des Lm-Bogen"-welchen Lm-Bogen denn? Ich habe ja erstmal 4 D-Stb. Meint ihr den Lm-Bogen danach? Wie soll das gehen? Bin Anfängerin, vielleicht stelle ich mich auch zu doof an.
21.03.2013 - 16:23DROPS Design answered:
Liebe Melli, es ist immer der nächstfolgende Lm-Bogen (= 6 Lm in dieser Anleitung) gemeint. Wenn Sie Anfängerin sind, können Sie sich evtl. mit Hilfe der Videos ins Häkeln einarbeiten oder für weitere Tipps den Laden kontaktieren, in dem Sie die Wolle gekauft haben.
25.03.2013 - 09:24
![]() Kesvashy wrote:
Kesvashy wrote:
38074 46415
07.10.2012 - 13:00
![]() Mrose wrote:
Mrose wrote:
Bonjour merci m eclairer en suivant les explications pour le carre je n arrive pas a trouver 4 coins mais 5!!!!!
18.08.2012 - 13:00DROPS Design answered:
Bonjour Mrose, vous devez avoir un total de 8 arceaux au début pour avoir un carré. Bon crochet !
21.08.2012 - 10:07
|
|||||||||||||
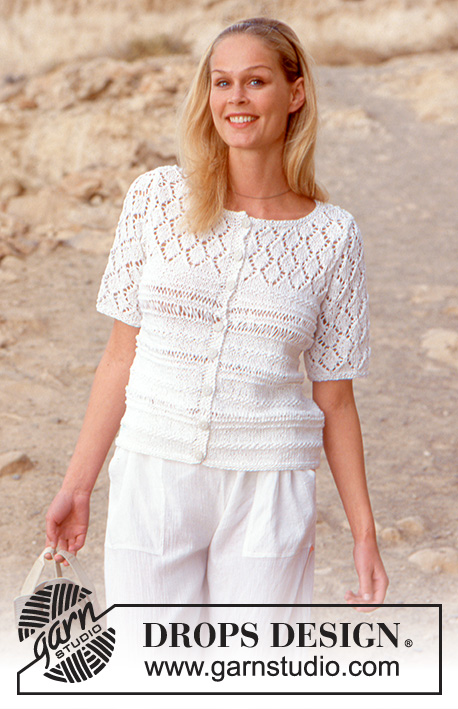
Garden Wedding Cardigan#gardenweddingcardigan |
|||||||||||||
|
|
|||||||||||||
Long DROPS jacket made with crochet squares in Muskat.
DROPS 65-9 |
|||||||||||||
|
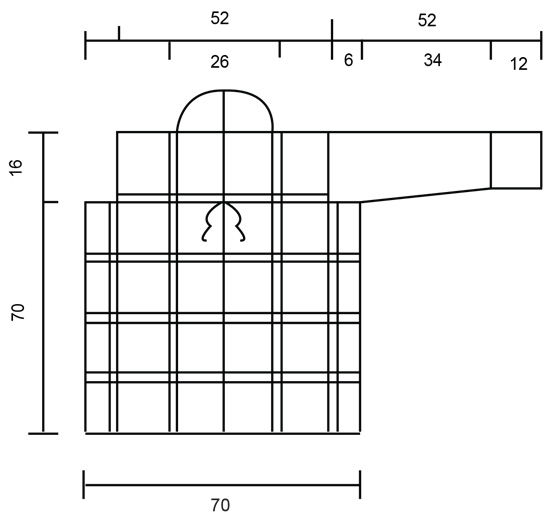
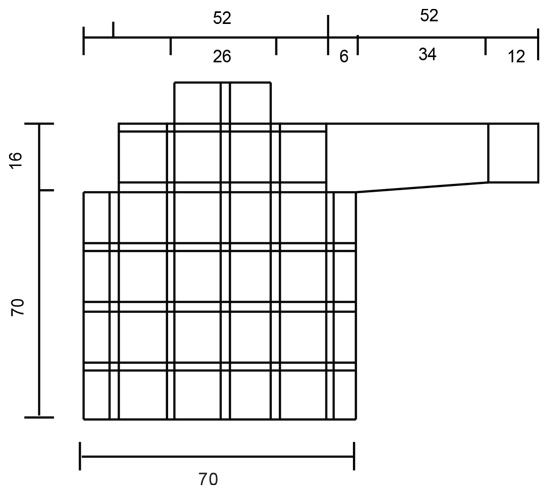
Crochet square: Cast on 8 chain stitches and form them to a ring with 1 slip stitch. Row 1: * 1 treble crochet (first treble crochet replaced by 3 chain stitches), 2 chain stitches *, repeat from *-* 8 times, finish with 1 slip stitch in første treble crochet. Row 2: * 4 treble crochets (first treble crochet replaced by 3 chain stitches), around chain-space, 2 chain stitches *, repeat from *-* 8 times, finish with 1 slip stitch in first treble crochet. Row 3: * 4 double treble crochets worked together (the first double treble crochets is replaced by 4 chain stitches) = wait with last yarn over and pull through in each double treble crochet until all double treble crochets are worked, make the yarn over and pull through all loops on hook (work 1 double treble crochet in each of the treble crochets from the previous row), 6 chain stitches, 1 treble crochet around the 2 chain stitches from previous row, 6 chain stitches, * repeat from *-* 8 times, finish with 1 slip stitch in first double treble crochet -group. Row 4: Work slip stitches to middle of chain-space, 1 chain stitch, 1 double crochet around chain-space, * 5 chain stitches, 1 double crochet around next chain-space, 5 chain stitches, 1 treble crochet around next chain-space, 10 chain stitches, 1 treble crochet around next chain-space (= corner), 5 chain stitches, 1 double crochet around next chain-space *, repeat from *-* a total of 3 times, then 5 chain stitches, 1 double crochet around next chain-space, 5 chain stitches, 1 treble crochet around next chain-space, 10 chain stitches, 1 treble crochet around next chain-space (= corner), 5 chain stitches, finish with 1 slip stitch in first double crochet. Row 5: Work slip stitches to middle of chain-space, 1 chain stitch, 1 double crochet around chain-space, * 5 chain stitches, 1 double crochet around next chain-space, 5 chain stitches, 1 double crochet around next chain-space, 8 chain stitches, 1 double crochet around the same chain-space approx. 1 cm further on (= corner), 5 chain stitches, 1 double crochet around next chain-space, 5 chain stitches, 1 double crochet around next chain-space *, repeat from *-* a total of 3 times, then 5 chain stitches, 1 double crochet around next chain-space, 5 chain stitches, 1 double crochet around next chain-space, 8 chain stitches, 1 double crochet around the same chain-space approx. 1 cm further on (= corner), 5 chain stitches, 1 double crochet around next chain-space, 5 chain stitches, finish with 1 slip stitch in first double crochet. -------------------------------------------------------------- Body: Work 50 squares. Now work the squares together in vertical lengths down according to Fig.1 The lengths are made up of the following numbers of squares - seen from mid front: Length 1: = 5 squares, length 2: = 5 squares, length 3: = 4 squares (= the side), length 4: = 5 squares, length 5: = 6 squares (mid back = between lengths 5 and 6), length 6: = 6 squares, length 7: = 5 squares, length 8: = 4 squares (= the side) length 9: = 5 squares, length 10: = 5 squares. Now work the lengths together horizontally see Fig.2. Work the shoulders together in the same way according to Fig.2 and then work the 2 squares from mid back together with the 2 first square lengths mid front = collar. Sleeve: Work 2 squares and form them into a ring by working according to Fig.1. The sleeve is continued upwards as follows: Row 1: 1 double crochet in first chain-space, * 5 chain stitches, 1 double crochet in next chain-space *, repeat from *-* around whole sleeve = 13 chain-spaces, fasten the last space with 1 slip stitch in first double crochet. Row 2: Work slip stitches to middle of first chain-space, work 1 double crochet around space, * 5 chain stitches, 1 double crochet in next chain-space *, repeat from *-*. Repeat row 2 upwards until sleeve measures 20 cm. Now increase each chain-space from 5 to 6 chain stitches. Continue in this way until sleeve measures 28 cm. Now increase every chain-space from 6 to 7 chain stitches. When sleeve measures 38 cm increase each chain-space from 7 to 8 chain stitches. When piece measures 46 cm continue working the piece back and forth from mid under sleeve - make sure the first square at bottom of sleeve is mid top of arm when the piece is divided. Finish when sleeve measures 52 cm. Assembly: Work the sleeve to the body according to Fig.1. Work with hook size 4 mm and Muskat around bottom of body: Row 1: * 1 double crochet, 1 chain stitch *, repeat from *-*. Row 2: * 1 double crochet around chain stitch from previous row, 1 chain stitch *, repeat from *-*. Along 1 square with working together, crochet approx. 18 double crochets. Assembly: Repeat the 2 crochet rows around the neckline and mid front of jacket. Work ties as follows: Crochet with hook size 4 mm and double yarn 2 chain stitch cords of approx. 50 cm each. Fasten 1 on each side of mid front at the top of the fourth square from bottom. |
|||||||||||||
Diagram explanations |
|||||||||||||
|
|||||||||||||
 |
|||||||||||||
 |
|||||||||||||
 |
|||||||||||||
Have you finished this pattern?Tag your pictures with #dropspattern #gardenweddingcardigan or submit them to the #dropsfan gallery. Do you need help with this pattern?You'll find 8 tutorial videos, a Comments/Questions area and more by visiting the pattern on garnstudio.com. © 1982-2026 DROPS Design A/S. We reserve all rights. This document, including all its sub-sections, has copyrights. Read more about what you can do with our patterns at the bottom of each pattern on our site. |
|||||||||||||


With over 40 years in knitting and crochet design, DROPS Design offers one of the most extensive collections of free patterns on the internet - translated to 17 languages. As of today we count 324 catalogues and 12291 patterns translated into English (UK/cm). 12291
We work hard to bring you the best knitting and crochet have to offer, inspiration and advice as well as great quality yarns at incredible prices! Would you like to use our patterns for other than personal use? You can read what you are allowed to do in the Copyright text at the bottom of all our patterns. Happy crafting!
Post a comment to pattern DROPS 65-9
We would love to hear what you have to say about this pattern!
If you want to leave a question, please make sure you select the correct category in the form below, to speed up the answering process. Required fields are marked *.