
Popular categories
Looking for a yarn?


Comments / Questions (84)
![]() Liliana wrote:
Liliana wrote:
Vorrei realizzare questo modello in Baby Alpaca Silk con ferri n.3, per ottenere un cardigan più fine ma caldo per la mezza stagione. Secondo Lei è possibile farlo seguendo le istruzioni descritte, ma invece della taglia a me necessaria la M, seguire la misura più grande, per esempio la XXL, visto che il filato è più sottile e quindi inevitabilmente aumenta il numero di maglie e il campione 10X10 sarà diverso. Mi piacerebbe sapere cosa ne pensa. Grazie
14.08.2017 - 13:18DROPS Design answered:
Buongiorno Liliana, il procedimento corretto sarebbe quello di fare il campione con il filato che intende utilizzare e riprogettare il modello in base al campione che ottiene. In alternativa potrebbe usare altri filati di lana del gruppo B, mantenendo in questo caso la tensione indicata: ad esempio Cotton Merino, che è adatto alla mezza stagione. Buon lavoro!
14.08.2017 - 13:56
![]() Brit Henriksen wrote:
Brit Henriksen wrote:
Jeg må overse noget, for jeg ender ikke med samme antal masker som der står i afsnittet: "Når A.4 er strikket færdig er der 207-235-263-291-319-375 m på p." Jeg har kun 272 masker, hvor jeg burde have 291 masker og har regnet efter igen og igen. Det kan kun lade sig gøre hvis der skal udtages 20 masker ialt på sidste udtagning i stedet for bare een iht diagram A.4C (18 rækker fra toppen). Har man glemt at påsætte tegnet for udtagning i løkken på de to andre diagrammer A.4A og A.4B?
24.07.2017 - 09:25DROPS Design answered:
Hej Brit, du har 211 m strikker diagrammerne A.4 20 gange i bredden (20 rapporter) og tager 4 m ud for hver rapport ifølge diagrammet = 80 udtagninger. 211+80=291m God fornøjelse!
11.08.2017 - 11:25Vicky wrote:
I'm trying to work the sleeve cap. "Work stocking st back ......measures approx. 9-9-10-10-11-13 cm). " I interpret this as cast on stitches on each side of EVERY row (plain & purl) but this doesn't match with the length (10cm) - am I supposed to cast on both sides of only plain (knit) rows & not cast on for purl rows? Thanks. (I'm knitting large).
29.03.2017 - 10:23DROPS Design answered:
Dear Vicky, in size L you will have to cast on new sts at the end of every row (both from RS and WS): 3 sts 2 times, 3 sts 6 times, 1 st 5 times and 3 sts 1 time = a total of 28 rows =10 cm if your tension is correct. Happy knitting!
29.03.2017 - 12:04
![]() Katja Juranek wrote:
Katja Juranek wrote:
Die Frage hat sich erledigt, ich hatte eine Rechenfehler in den Zunahmen. Entschuldigung
08.12.2016 - 19:42
![]() Katja Juranek wrote:
Katja Juranek wrote:
Ich stricke gerade die Ärmel zu der Jacke. Bei den Zunahmen stimmt etwas nicht. Ich schlage für Gr. M 25 M an und nehme insgesamt 32 M zu, dann komme ich aber nicht auf die 73 M. Könnten Sie da bitte mal nachsehen. Danke
08.12.2016 - 18:38DROPS Design answered:
Liebe Frau Jurenek, die Zunahmen müssen beidseitig gemacht werden: am Ende jeder R (Hin- bzw RückReihe) sollen Sie neue Maschen anschlagen: 3 M je 1 x (auf beiden Seite = + 6 M), 2 M je 8 x (= auf beiden Seiten = + 32 M), 1 M je 3 x (auf beiden Seiten = +6 M) und 2 M je 1 x (auf beiden Seiten = +4 M) = 25 + (6+32+6+4=48)= 73 M. Viel Spaß beim stricken!
09.12.2016 - 08:59
![]() Jacquelyn Smith wrote:
Jacquelyn Smith wrote:
This may sound like a silly question, but I've never made a garment before. My friends told me to measure 6" from the neckline instead of the shoulders on the back before changing charts. Now I'm on the right front measuring 6" but all I have to go off is the shoulders. Does that mean the front expands sooner, or do I need to measure the 6" from the shoulders on the back, not the neckline?
20.10.2016 - 05:40DROPS Design answered:
Dear Mrs Smith, measurements to work A.2 should be the same on back and front pieces - measure from shoulder - so that diagrams will be worked on same height on back and on front pieces. Happy knitting!
20.10.2016 - 12:33
![]() Donatella wrote:
Donatella wrote:
Si sono d accordo che non ci sono errori, i numeri sono giusti in teoria, in pratica no cercherò di farmi la modifica. Comunque vi ringrazio ancora e di nuovo mi scuso
17.08.2016 - 09:19DROPS Design answered:
Buongiorno Donatella, non si deve scusare, siamo qui apposta per aiutarla: al momento non ci sono altre segnalazioni particolari nei commenti né correzioni al modello; il numero di m corrisponde con la lavorazione, provi a controllare bene il n° di m sulle singole spalle prima dell'unione e di aver avviato il n° indicato di m. Ci riscriva se ha ancora dubbi. Buon lavoro!
17.08.2016 - 10:18
![]() Donatella wrote:
Donatella wrote:
Buongiorno, scusatemi se insisto ma mi sono sempre trovata bene con i vostri modelli, qui c'è un errore con questi numeri, ho provato e riprovato.quando aggiungo la spalla destra dopo aver avviato le 34 maglie il motivo non combaciare, mi trovo 4 maglie in più. O le tolgo,quindi avvio solo 30 maglie ,oppure ne aggiungo 5 e faccio un motivo in più. Solo che poi più avanti col lavoro non vorrei avere difficoltà con gli altri motivi. Vi ringrazio infinitamente di nuovo scusate per l invasione.
17.08.2016 - 07:20DROPS Design answered:
Buongiorno Donatella, non ci sono errori o correzioni nel testo. E' fondamentale che ci dica se quando unisce la spalla destra con la sinistra ha 84 m sul f come indicato per la taglia XL, 59 provenienti dalla spalla sinistra e 25 da quella destra, si ritrova con i conti fino a qui? Da qui in poi deve lavorare in questo modo: 2 m a m legaccio, 4 m a m rasata (= 6 m totali per cui le rimangono 78 m, a cui togliere le 6 lavorate nello stesso modo dall'altro lato), 72 m con A.1 (quindi 8 ripetizioni di A.1), 4 m a m rasata, 2 m a m legaccio (2 + 4 + 72 + 4 + 2 = 84 m). In ogni caso scriveremo alla casa madre per una verifica. Ci riscriva se ha ancora difficoltà. Buon lavoro!!
17.08.2016 - 07:34
![]() Donatella wrote:
Donatella wrote:
Sì esattamente, ma quando dopo aver unito la spalla destra inizio con il motivo mi restano 2 maglie e non 4
16.08.2016 - 18:11DROPS Design answered:
Buonasera Donatella, quando unisce la spalla destra con la sinistra dovrebbe avere 84 m sul f per la taglia XL. Dal ferro successivo deve lavorare in questo modo: 2 m a m legaccio, 4 m a m rasata, 72 m con A.1 (quindi 8 ripetizioni di A.1), 4 m a m rasata, 2 m a m legaccio. Deve proseguire in questo modo fino a quando il lavoro misura 15 cm. Ci riscriva se ha ancora difficoltà. Buon lavoro!!
16.08.2016 - 18:48
![]() Donatella wrote:
Donatella wrote:
Buongiorno, sto facendo questa bellissima maglia, ma non mi trovo con i punti. Nel dietro ho aggiunto i due punti laterali,poi ho avviato le 34 maglie ma quando eseguo il motivo me ne servono o31 o39. Eseguo la taglia xl. Grazie
16.08.2016 - 16:03DROPS Design answered:
Buongiorno Donatella, può indicarci meglio il punto in cui sta lavorando? Sta lavorando la spalla sinistra in cui vengono avviate 34 m per il collo? Si ritrova alla fine con 59 m sul ferro? Se ci spiega esattamente il problema possiamo aiutarla in modo più preciso. Buon lavoro!
16.08.2016 - 17:20
|
|||||||||||||||||||||||||
Mercy#mercycardigan |
|||||||||||||||||||||||||
|
|
|||||||||||||||||||||||||
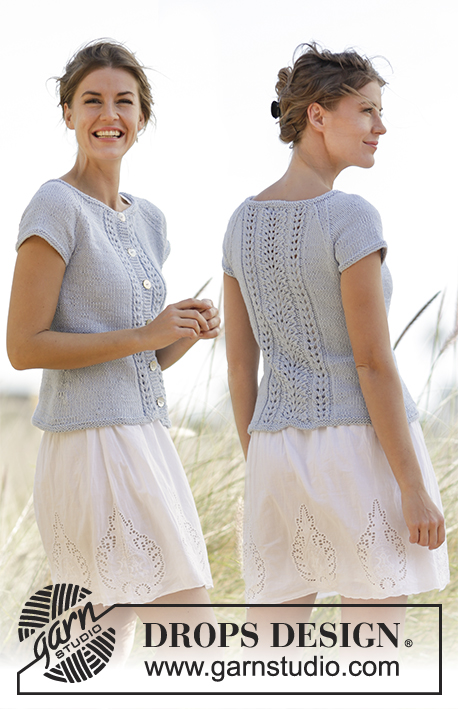
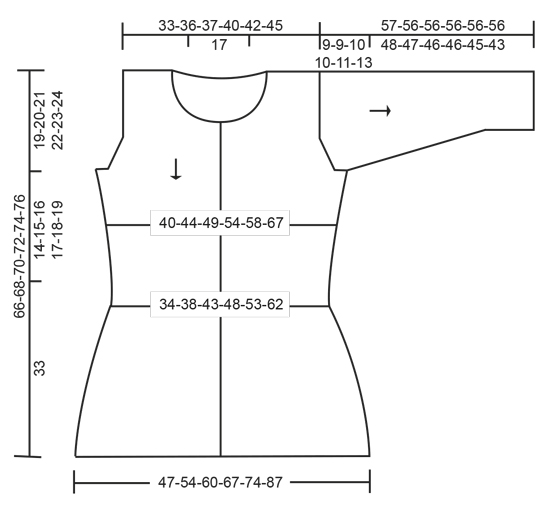
Knitted DROPS fitted jacket with leaf pattern, worked top down in “Cotton Light”. Size: S - XXXL.
DROPS 168-7 |
|||||||||||||||||||||||||
|
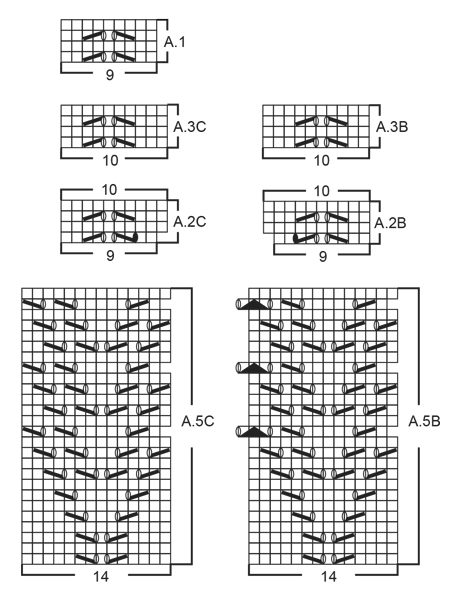
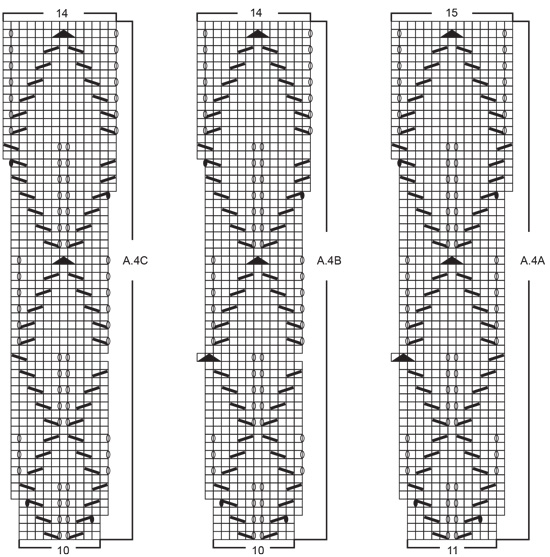
GARTER ST (back and forth): K all rows. 1 ridge = 2 rows K. GARTER ST (worked in the round): 1 ridge = 2 rounds. * K 1 round and P 1 round *, repeat from *-*. PATTERN: See diagrams A.1 to A.6. The diagrams show all rows in pattern seen from RS. INCREASE TIP (applies to inc for armhole on body): All inc are done from RS. Inc inside 2 edge sts in garter st by picking up yarn between 2 sts, slip yarn on needle and K yarn twisted to avoid hole (= 1 st inc). DECREASE TIP (applies to sides on body and mid under sleeve): All dec are done from RS! Dec 1 st on each side of marker as follows: Beg 2 sts before marker, K 2 tog, marker, slip 1 st as if to K, K 1, psso (= 2 sts dec). BUTTONHOLES: Dec for buttonholes on right band. 1 button hole = beg from WS on right front piece and K tog third and fourth st from edge and make 1 YO. Dec for first buttonhole on first row from WS after neck inc is done. Then dec the next 5-5-5-6-6-6 buttonholes every 7-7½-8-7-7½-8 cm downwards. ---------------------------------------------------------- JACKET: Worked top down, back and forth on circular needle. Beg with back piece, then work front pieces before slipping all parts tog and working in one piece until finished measurements. Work sleeves separately, top down. LEFT SHOULDER BACK (when garment is worn): Cast on 17-20-21-24-26-29 sts on circular needle size 3.5 mm with Cotton Light. K 1 row from WS and K 1 row from RS. Switch to circular needle size 4 mm, P from WS until 2 sts remain on row and finish with K 2 (= edge sts towards armhole). Work next row as follows from RS: 2 edge sts in GARTER ST – see explanation above (= edge sts against armhole), 6-0-1-4-6-0 sts stocking st, then work A.1 over the next 9-18-18-18-18-27 sts (= 1-2-2-2-2-3 repetitions of 9 sts). Continue pattern like this. When piece measures 2 cm, cast on 1 new st at the end of next row from RS. Work back from WS as before and then cast on 34 new sts for neck at the end of next row from RS = 52-55-56-59-61-64 sts on needle. Put piece aside and work right shoulder back. RIGHT SHOULDER BACK (when garment is worn): Cast on as on left shoulder back and K 1 row from WS and K 1 row from RS. Switch to circular needle size 4 mm, K the first 2 sts (= edge sts towards armhole) and P the rest of row. Work next row as follows from RS: Work A.1 over the first 9-18-18-18-18-27 sts (= 1-2-2-2-2-3 repetitions of 9 sts), work 6-0-1-4-6-0 stocking st and finish with 2 edge sts in garter st towards armhole. Continue pattern like this. When piece measures 2 cm, cast on 1 new st at the end of row from WS = 18-21-22-25-27-30 sts on needle. Work 1 row pattern back from RS. YOKE AT THE BACK: Slip sts from left and right shoulder on to same circular needle size 4 mm = 70-76-78-84-88-94 sts on needle. Continue pattern back and forth over all sts with 2 edge sts in garter st and 6-0-1-4-6-0 sts stocking st in each side. REMEMBER THE KNITTING TENSION. When piece measures 15-16-15-15-15-14 cm, work next row as follows from RS: 2 edge sts in garter st, 6-0-1-4-6-0 sts stocking st, work A.2A one time, work A.2B over the next 45-63-63-63-63-81 sts (= 5-7-7-7-7-9 repetitions of 9 sts), work 6-0-1-4-6-0 sts stocking st and finish with 2 edge sts in garter st. When A.2 has been worked one time vertically, there are 77-85-87-93-97-105 sts on needle. Continue with A.3A over A.2A and A.3B over A.2B the same way (there is now 1 st stocking st more between each eyelet row). AT THE SAME TIME when piece measures 17-18-17-17-17-16 cm, inc 1 st for armhole in each side – READ INCREASE TIP! Repeat inc every other row (i.e. every row from RS) 2-2-5-7-8-11 times in total – NOTE: Work inc sts in stocking st. On first row from RS after last inc cast on 2-2-3-3-5-7 new sts at the end of row for armhole. Repeat on next row from WS = 85-93-103-113-123-141 sts on needle. Put pieces aside and work front piece. RIGHT FRONT PIECE (when garment is worn): Cast on 17-20-21-24-26-29 sts on circular needle size 3.5 mm. K 1 row from WS and K 1 row from RS. Switch to circular needle size 4 mm, P from WS until 2 sts remain on row and finish with K 2 (= edge sts towards armhole). Work next row as follows from RS: 2 edge sts in GARTER ST – see explanation above (= edge sts against armhole), 6-0-1-4-6-0 sts stocking st, then work A.1 over the next 9-18-18-18-18-27 sts (= 1-2-2-2-2-3 repetitions of 9 sts). Continue pattern like this. When piece measures 5-5-5-7-7-7 cm, cast on new sts for neck at the end of every row from RS as follows: Cast on 1 st 4 times, 2 sts 3 times and 13 sts 1 time = 40-43-44-47-49-52 sts. Continue the pattern with 2 edge sts in garter st towards the armhole and 5 band sts in garter st towards mid front (there is now room for 3-4-4-4-4-5 repetitions of A.1). Remember BUTTONHOLES on band - see explanation above. When piece measures 15-16-15-15-15-14 cm, work next row as follows from RS: Work 2 edge sts in garter st, 6-0-1-4-6-0 sts stocking st, work A.2B over the next 27-36-36-36-36-45 sts (= 3-4-4-4-4-5 repetitions of 9 sts) and finish with 5 band sts in garter st towards mid front. When A.2B has been worked 1 time vertically, there are 43-47-48-51-53-57 sts on needle. Continue with A.3B over A.2B the same way (there is now 1 st stocking st more between each eyelet row). AT THE SAME TIME when piece measures 17-18-17-17-17-16 cm, inc 1 st for armhole in the side – READ INCREASE TIP! Repeat inc every other row (i.e. every row from RS) 2-2-5-7-8-11 times in total. On first row from WS after last inc cast on 2-2-3-3-5-7 new sts at the end of row for armhole = 47-51-56-61-66-75 sts on needle. Put the piece aside and work left front piece. LEFT FRONT PIECE (when garment is worn): Cast on as on right front piece. K 1 row from WS and K 1 row from RS. Switch to circular needle size 4 mm, K the first 2 sts (= edge sts towards armhole) and P the rest of row. Work next row as follows from RS: Work A.1 over the first 9-18-18-18-18-27 sts (= 1-2-2-2-2-3 repetitions of 9 sts), work 6-0-1-4-6-0 stocking st and finish with 2 edge sts in garter st towards armhole. Continue pattern like this and continue as on right front piece but cast on new sts for neck at the end of every row from WS (instead of every row from RS). Work pattern according to diagram A.2C (instead of A.2B) and continue pattern according to A.3C (instead of A.3B). Inc for armhole from RS and then cast on 2-2-3-3-5-7 new sts for armhole at the end of next row from RS. Work 1 row from WS as before. BODY: Now work all pieces tog from RS on circular needle size 4 mm as follows: Work sts from left front piece (= 47-51-56-61-66-75 sts), insert 1 marker, work sts from back piece (= 85-93-103-113-123-141 sts), insert 1 marker and work sts from right front piece (= 47-51-56-61-66-75 sts) = 179-195-215-235-255-291 sts on needle - NOW MEASURE FROM HERE! Continue back and forth with pattern according to diagram A.3 and stocking st as before and with 5 band sts in garter st in each side towards mid front. AT THE SAME TIME when piece measures 2 cm, dec 1 st on each side of both markers - READ DECREASE TIP (= 4 sts dec). Repeat dec in each side every 2-2-2½-2½-3-3½ cm 7-6-6-6-6-5 times in total = 151-171-191-211-231-271 sts. When piece measures 14-15-16-17-18-19 cm (entire piece measures approx. 33-35-37-39-41-43 cm from shoulder), remove the marker threads. Work next row as follows from RS: 5 band sts in garter st, work A.4A (= 11 sts), repeat A.4B over the next 120-140-160-180-200-240 sts (= 12-14-16-18-20-24 repetitions of 10 sts), work A.4C (= 10 sts) and finish with 5 band sts in garter st (sts worked in A.4 will now match with eyelets in A.3 on front and back piece). Continue pattern back and forth like this and inc as shown in diagram. When A.4 has been worked, there are 207-235-263-291-319-375 sts on needle. Work next row as follows from RS: 5 band sts in garter st, A.5A (= 15 sts), repeat A.5B over the next 168-196-224-252-280-336 sts (= 12-14-16-18-20-24 repetitions of 14 sts), work A.5C (= 14 sts) and finish with 5 band sts in garter st. When A.5 has been worked, piece measures approx. 65-67-69-71-73-75 cm from shoulder. Switch to circular needle size 3.5 mm and work 3 rows rib (= K 1 / P 1) with 5 band sts garter st and 1 K in each side towards mid front (seen from RS). Then loosely cast off sts with K over K and P over P. Jacket measures approx. 66-68-70-72-74-76 cm from shoulder. SLEEVE: Work sleeve cap back and forth on circular needle, then work sleeve in the round on double pointed needles until finished measurements. Cast on 23-25-27-31-33-37 sts on circular needle size 4 mm with Cotton Light. Insert 1 marker in the middle st on row. READ ALL OF THE FOLLOWING SECTION BEFORE CONTINUING: Work stocking st back and forth and cast on new sts for sleeve cap at the end of every row in each side as follows: Cast on 3 sts 1-1-2-5-4-3 times, 2 sts 7-8-6-1-1-0 times, 1 st 4-3-5-7-9-14 times and 2-2-3-3-5-7 sts 1 time = 69-73-79-85-89-97 sts on needle (piece measures approx. 9-9-10-10-11-13 cm). AT THE SAME TIME when piece measures 2 cm, work pattern according to diagram A.6 over the middle 17 sts (st with marker should match mid st in diagram – work the other sts in stocking st). When sleeve cap has been worked, switch to double pointed needles size 4 mm. Insert 1 marker thread at beg of round (= mid under sleeve) and continue in the round in stocking st and A.6 over the middle sts. When A.6 has been worked one time vertically, work A.1 over the middle 5 sts until finished measurements (continue the other sts in stocking st). AT THE SAME TIME when piece measures 12-12-13-13-14-16 cm, dec 2 sts mid under sleeve - READ DECREASE TIP. Repeat dec every 2½-2½-2-2-2-1½ cm 15-16-17-19-20-23 times in total = 39-41-45-47-49-51 sts. When sleeve measures 56-55-55-55-55-55 cm (NOTE: Shorter measurements in the larger sizes because of longer yoke) switch to double pointed needles size 3.5 mm. Work 2 ridges in GARTER ST in the round - see explanation above, and loosely cast off with K, sleeve measures approx 57-56-56-56-56-56 cm. Knit another sleeve the same way. ASSEMBLY: Sew shoulder seams inside cast-off edge. Place sleeve approx. ½ cm in under edge in garter st along armhole and fasten neatly so that edge in garter st shows. Repeat in the other side. NECK EDGE: Pick up from RS approx. 110 to 116 sts on circular needle size 3.5 mm with Cotton Light. K 1 row from WS, K 1 row from RS and K 1 row from WS before loosely casting off with K from RS. Sew the buttons on to the left band. |
|||||||||||||||||||||||||
Diagram explanations |
|||||||||||||||||||||||||
|
|||||||||||||||||||||||||
 |
|||||||||||||||||||||||||
 |
|||||||||||||||||||||||||
 |
|||||||||||||||||||||||||
 |
|||||||||||||||||||||||||
Have you finished this pattern?Tag your pictures with #dropspattern #mercycardigan or submit them to the #dropsfan gallery. Do you need help with this pattern?You'll find 28 tutorial videos, a Comments/Questions area and more by visiting the pattern on garnstudio.com. © 1982-2026 DROPS Design A/S. We reserve all rights. This document, including all its sub-sections, has copyrights. Read more about what you can do with our patterns at the bottom of each pattern on our site. |
|||||||||||||||||||||||||


With over 40 years in knitting and crochet design, DROPS Design offers one of the most extensive collections of free patterns on the internet - translated to 17 languages. As of today we count 324 catalogues and 12290 patterns translated into English (UK/cm). 12290
We work hard to bring you the best knitting and crochet have to offer, inspiration and advice as well as great quality yarns at incredible prices! Would you like to use our patterns for other than personal use? You can read what you are allowed to do in the Copyright text at the bottom of all our patterns. Happy crafting!
Post a comment to pattern DROPS 168-7
We would love to hear what you have to say about this pattern!
If you want to leave a question, please make sure you select the correct category in the form below, to speed up the answering process. Required fields are marked *.