
Popular categories
Looking for a yarn?


Comments / Questions (84)
![]() Houthoofd wrote:
Houthoofd wrote:
Dit vest wordt boven naar onder gebreid. Moeten de telpatronen dan ook van boven naar onder geïnterpreteerd worden?
21.01.2020 - 17:46DROPS Design answered:
Dag Houthoofd,
Nee, de telpatronen lees je altijd van onder naar boven. (Hier is dus al rekening mee gehouden). Bij de meest gestelde vragen kun je ook informatie vinden over hoe je telpatronen leest.
26.01.2020 - 14:50
![]() Amy Knowles wrote:
Amy Knowles wrote:
Almost done but the instructions for attaching the sleeves are not clear to me. It sounds like the garter st edge of the bodice is to be placed on top of the sleeve cap so that it is visible. If so, how do I stitch the seam so that it looks neat. Won’t these stitches be visible as well? None of the tutorials seem to apply. This sweater is going to look lovely on my future daughter-in-law.
05.12.2019 - 15:40DROPS Design answered:
Dear Amy, you are right, you put the sleeve under the body's garter stitch edge, and sew in a way that the ede is visible. You have to sew with small stitches and into the stitch that is inside the garter stitch at the armhole. It is best if the needle follows the yarn in the stitch. I hope this helps. We agree it is a lovely sweater. Please show us the finished piece either on Facebook group DROPS Workshop, or by tagging it with #dropsdesign . Happy Knitting!
06.12.2019 - 00:37
![]() Gurli-vang wrote:
Gurli-vang wrote:
Jeg har nu strikket ovenstående jakke, men der er fejl i den. 9 rapporter gange 7 er 63 masker plus de 12 der er kantmasker giver 74m og ikke 70 som der står i opskriften, regner i ikke efter. venlig hilsen Gurli Vang
11.07.2019 - 08:37DROPS Design answered:
Hei Gurli-vang. Hvor i oppskriften er du? og hvilken størrelse strikker du? Det eneste stedet det står du har 70 masker på pinnen, er for størrelse S på bærestykket bak. Men her skal du strikke 2 kantmasker rille, 6 masker glattstrikk, A.2A (=9 maker) totalt 1 gang, A.2B (=9 masker) totalt 5 ganger, 6 masker glattstrikk og 2 kantmasker = 2+6+9+45+6+2 = 70 masker. God fornøyelse
11.07.2019 - 12:02
![]() Carole Longhurst wrote:
Carole Longhurst wrote:
Pattern No cl-056 I had a problem with the sleeve cap, it was not clear that I needed to REPEAT the pattern. I did repeat it and I then ended up with the correct no of stitches and the correct length.I knitted this in 8 ply cotton and added silk. Id love to send you a photo of the finished garment if you\'d like to see it. The friend I knitted this for was delighted with the results.
27.01.2019 - 03:04Carole Longhurst wrote:
Its OK. I have resolved my problem. I'm used to knitting from the bottom up not top down! I was holding the needle the wrong way. Sorry for the inconvenience.
04.11.2018 - 01:54Carole Longhurst wrote:
I am knitting this pattern but have a problem with the instructions for the RIGHT FRONT PIECE. If after switching needle size I "P from WS until 2 st remain on row and finish with K2" it will be the Left side not the right side. The back starts with the Left side and then goes to the right but the buttonholes need to be on the RIGHT.
03.11.2018 - 02:12DROPS Design answered:
Dear Mrs Longhurst, this row is worked from WS, ie for right front piece beginning from the neck towards armhole = you finish this WS row with K2 towards armhole. Next row starts from RS from Armhole (= K2) and finishing by the neck. The K2 sts for armhole will be on the right side seen from RS (and on the left side seen from WS). Happy knitting!
05.11.2018 - 08:40
![]() Anne-Christine wrote:
Anne-Christine wrote:
Excusez-moi, je viens de comprendre!!!!!
14.07.2018 - 22:22
![]() Anne-Christine wrote:
Anne-Christine wrote:
Bonjour! Se pourrait-il que vous ayez inversé vos explications pour l'épaule dos gauche et l'épaule dos droite?
14.07.2018 - 18:00DROPS Design answered:
Bonjour Anne Christine, il n'y a pas d'inversion, on tricote de haut en bas, sur l'endroit, l'épaule gauche commence par le côté emmanchure et se termine par le côté encolure et l'épaule droite sur l'endroit commence par le côté encolure et se termine par le côté emmanchure. Bon tricot!
16.07.2018 - 08:32
![]() Sytske wrote:
Sytske wrote:
Vorig jaar het vest in Belle (zwart) gemaakt en nu brei ik het in Cotton light (druif). Kortom een prachtig vest wat mooi afkleed. Ik brei het wel met een V-hals, maar dat is persoonlijke voorkeur.
26.06.2018 - 22:50
![]() Maureen ORourke wrote:
Maureen ORourke wrote:
I made this with Drops Cotton Merino and it is a beautiful cardigan. I like is to much that I am making it again with another yarn.
11.12.2017 - 18:43
|
|||||||||||||||||||||||||
Mercy#mercycardigan |
|||||||||||||||||||||||||
|
|
|||||||||||||||||||||||||
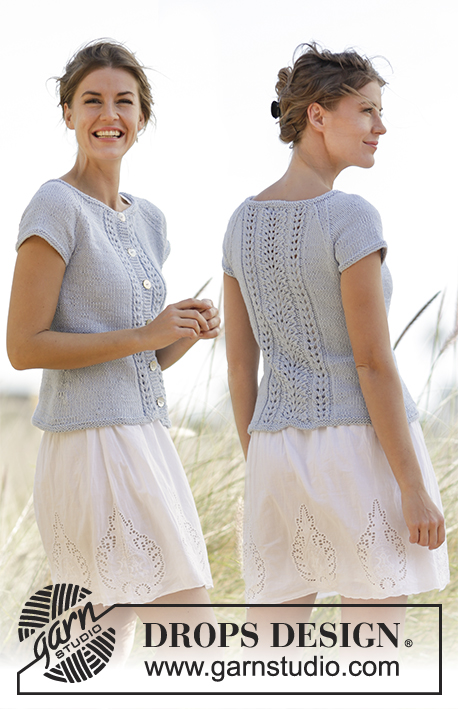
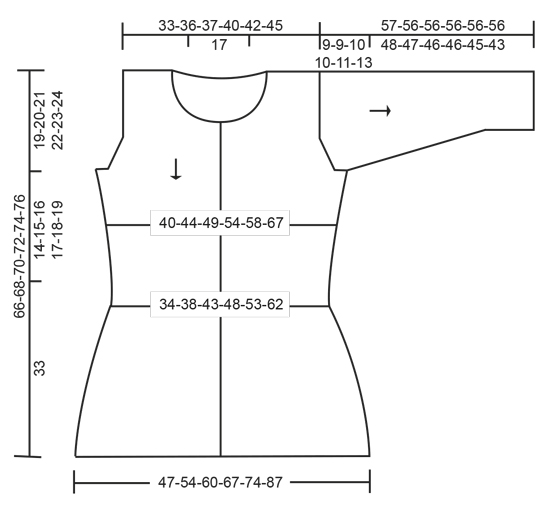
Knitted DROPS fitted jacket with leaf pattern, worked top down in “Cotton Light”. Size: S - XXXL.
DROPS 168-7 |
|||||||||||||||||||||||||
|
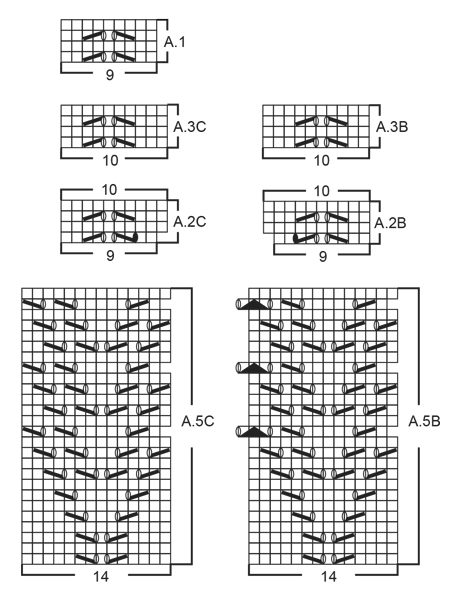
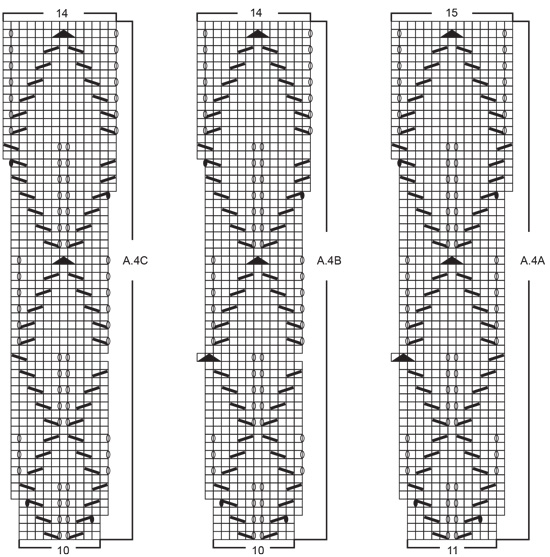
GARTER ST (back and forth): K all rows. 1 ridge = 2 rows K. GARTER ST (worked in the round): 1 ridge = 2 rounds. * K 1 round and P 1 round *, repeat from *-*. PATTERN: See diagrams A.1 to A.6. The diagrams show all rows in pattern seen from RS. INCREASE TIP (applies to inc for armhole on body): All inc are done from RS. Inc inside 2 edge sts in garter st by picking up yarn between 2 sts, slip yarn on needle and K yarn twisted to avoid hole (= 1 st inc). DECREASE TIP (applies to sides on body and mid under sleeve): All dec are done from RS! Dec 1 st on each side of marker as follows: Beg 2 sts before marker, K 2 tog, marker, slip 1 st as if to K, K 1, psso (= 2 sts dec). BUTTONHOLES: Dec for buttonholes on right band. 1 button hole = beg from WS on right front piece and K tog third and fourth st from edge and make 1 YO. Dec for first buttonhole on first row from WS after neck inc is done. Then dec the next 5-5-5-6-6-6 buttonholes every 7-7½-8-7-7½-8 cm downwards. ---------------------------------------------------------- JACKET: Worked top down, back and forth on circular needle. Beg with back piece, then work front pieces before slipping all parts tog and working in one piece until finished measurements. Work sleeves separately, top down. LEFT SHOULDER BACK (when garment is worn): Cast on 17-20-21-24-26-29 sts on circular needle size 3.5 mm with Cotton Light. K 1 row from WS and K 1 row from RS. Switch to circular needle size 4 mm, P from WS until 2 sts remain on row and finish with K 2 (= edge sts towards armhole). Work next row as follows from RS: 2 edge sts in GARTER ST – see explanation above (= edge sts against armhole), 6-0-1-4-6-0 sts stocking st, then work A.1 over the next 9-18-18-18-18-27 sts (= 1-2-2-2-2-3 repetitions of 9 sts). Continue pattern like this. When piece measures 2 cm, cast on 1 new st at the end of next row from RS. Work back from WS as before and then cast on 34 new sts for neck at the end of next row from RS = 52-55-56-59-61-64 sts on needle. Put piece aside and work right shoulder back. RIGHT SHOULDER BACK (when garment is worn): Cast on as on left shoulder back and K 1 row from WS and K 1 row from RS. Switch to circular needle size 4 mm, K the first 2 sts (= edge sts towards armhole) and P the rest of row. Work next row as follows from RS: Work A.1 over the first 9-18-18-18-18-27 sts (= 1-2-2-2-2-3 repetitions of 9 sts), work 6-0-1-4-6-0 stocking st and finish with 2 edge sts in garter st towards armhole. Continue pattern like this. When piece measures 2 cm, cast on 1 new st at the end of row from WS = 18-21-22-25-27-30 sts on needle. Work 1 row pattern back from RS. YOKE AT THE BACK: Slip sts from left and right shoulder on to same circular needle size 4 mm = 70-76-78-84-88-94 sts on needle. Continue pattern back and forth over all sts with 2 edge sts in garter st and 6-0-1-4-6-0 sts stocking st in each side. REMEMBER THE KNITTING TENSION. When piece measures 15-16-15-15-15-14 cm, work next row as follows from RS: 2 edge sts in garter st, 6-0-1-4-6-0 sts stocking st, work A.2A one time, work A.2B over the next 45-63-63-63-63-81 sts (= 5-7-7-7-7-9 repetitions of 9 sts), work 6-0-1-4-6-0 sts stocking st and finish with 2 edge sts in garter st. When A.2 has been worked one time vertically, there are 77-85-87-93-97-105 sts on needle. Continue with A.3A over A.2A and A.3B over A.2B the same way (there is now 1 st stocking st more between each eyelet row). AT THE SAME TIME when piece measures 17-18-17-17-17-16 cm, inc 1 st for armhole in each side – READ INCREASE TIP! Repeat inc every other row (i.e. every row from RS) 2-2-5-7-8-11 times in total – NOTE: Work inc sts in stocking st. On first row from RS after last inc cast on 2-2-3-3-5-7 new sts at the end of row for armhole. Repeat on next row from WS = 85-93-103-113-123-141 sts on needle. Put pieces aside and work front piece. RIGHT FRONT PIECE (when garment is worn): Cast on 17-20-21-24-26-29 sts on circular needle size 3.5 mm. K 1 row from WS and K 1 row from RS. Switch to circular needle size 4 mm, P from WS until 2 sts remain on row and finish with K 2 (= edge sts towards armhole). Work next row as follows from RS: 2 edge sts in GARTER ST – see explanation above (= edge sts against armhole), 6-0-1-4-6-0 sts stocking st, then work A.1 over the next 9-18-18-18-18-27 sts (= 1-2-2-2-2-3 repetitions of 9 sts). Continue pattern like this. When piece measures 5-5-5-7-7-7 cm, cast on new sts for neck at the end of every row from RS as follows: Cast on 1 st 4 times, 2 sts 3 times and 13 sts 1 time = 40-43-44-47-49-52 sts. Continue the pattern with 2 edge sts in garter st towards the armhole and 5 band sts in garter st towards mid front (there is now room for 3-4-4-4-4-5 repetitions of A.1). Remember BUTTONHOLES on band - see explanation above. When piece measures 15-16-15-15-15-14 cm, work next row as follows from RS: Work 2 edge sts in garter st, 6-0-1-4-6-0 sts stocking st, work A.2B over the next 27-36-36-36-36-45 sts (= 3-4-4-4-4-5 repetitions of 9 sts) and finish with 5 band sts in garter st towards mid front. When A.2B has been worked 1 time vertically, there are 43-47-48-51-53-57 sts on needle. Continue with A.3B over A.2B the same way (there is now 1 st stocking st more between each eyelet row). AT THE SAME TIME when piece measures 17-18-17-17-17-16 cm, inc 1 st for armhole in the side – READ INCREASE TIP! Repeat inc every other row (i.e. every row from RS) 2-2-5-7-8-11 times in total. On first row from WS after last inc cast on 2-2-3-3-5-7 new sts at the end of row for armhole = 47-51-56-61-66-75 sts on needle. Put the piece aside and work left front piece. LEFT FRONT PIECE (when garment is worn): Cast on as on right front piece. K 1 row from WS and K 1 row from RS. Switch to circular needle size 4 mm, K the first 2 sts (= edge sts towards armhole) and P the rest of row. Work next row as follows from RS: Work A.1 over the first 9-18-18-18-18-27 sts (= 1-2-2-2-2-3 repetitions of 9 sts), work 6-0-1-4-6-0 stocking st and finish with 2 edge sts in garter st towards armhole. Continue pattern like this and continue as on right front piece but cast on new sts for neck at the end of every row from WS (instead of every row from RS). Work pattern according to diagram A.2C (instead of A.2B) and continue pattern according to A.3C (instead of A.3B). Inc for armhole from RS and then cast on 2-2-3-3-5-7 new sts for armhole at the end of next row from RS. Work 1 row from WS as before. BODY: Now work all pieces tog from RS on circular needle size 4 mm as follows: Work sts from left front piece (= 47-51-56-61-66-75 sts), insert 1 marker, work sts from back piece (= 85-93-103-113-123-141 sts), insert 1 marker and work sts from right front piece (= 47-51-56-61-66-75 sts) = 179-195-215-235-255-291 sts on needle - NOW MEASURE FROM HERE! Continue back and forth with pattern according to diagram A.3 and stocking st as before and with 5 band sts in garter st in each side towards mid front. AT THE SAME TIME when piece measures 2 cm, dec 1 st on each side of both markers - READ DECREASE TIP (= 4 sts dec). Repeat dec in each side every 2-2-2½-2½-3-3½ cm 7-6-6-6-6-5 times in total = 151-171-191-211-231-271 sts. When piece measures 14-15-16-17-18-19 cm (entire piece measures approx. 33-35-37-39-41-43 cm from shoulder), remove the marker threads. Work next row as follows from RS: 5 band sts in garter st, work A.4A (= 11 sts), repeat A.4B over the next 120-140-160-180-200-240 sts (= 12-14-16-18-20-24 repetitions of 10 sts), work A.4C (= 10 sts) and finish with 5 band sts in garter st (sts worked in A.4 will now match with eyelets in A.3 on front and back piece). Continue pattern back and forth like this and inc as shown in diagram. When A.4 has been worked, there are 207-235-263-291-319-375 sts on needle. Work next row as follows from RS: 5 band sts in garter st, A.5A (= 15 sts), repeat A.5B over the next 168-196-224-252-280-336 sts (= 12-14-16-18-20-24 repetitions of 14 sts), work A.5C (= 14 sts) and finish with 5 band sts in garter st. When A.5 has been worked, piece measures approx. 65-67-69-71-73-75 cm from shoulder. Switch to circular needle size 3.5 mm and work 3 rows rib (= K 1 / P 1) with 5 band sts garter st and 1 K in each side towards mid front (seen from RS). Then loosely cast off sts with K over K and P over P. Jacket measures approx. 66-68-70-72-74-76 cm from shoulder. SLEEVE: Work sleeve cap back and forth on circular needle, then work sleeve in the round on double pointed needles until finished measurements. Cast on 23-25-27-31-33-37 sts on circular needle size 4 mm with Cotton Light. Insert 1 marker in the middle st on row. READ ALL OF THE FOLLOWING SECTION BEFORE CONTINUING: Work stocking st back and forth and cast on new sts for sleeve cap at the end of every row in each side as follows: Cast on 3 sts 1-1-2-5-4-3 times, 2 sts 7-8-6-1-1-0 times, 1 st 4-3-5-7-9-14 times and 2-2-3-3-5-7 sts 1 time = 69-73-79-85-89-97 sts on needle (piece measures approx. 9-9-10-10-11-13 cm). AT THE SAME TIME when piece measures 2 cm, work pattern according to diagram A.6 over the middle 17 sts (st with marker should match mid st in diagram – work the other sts in stocking st). When sleeve cap has been worked, switch to double pointed needles size 4 mm. Insert 1 marker thread at beg of round (= mid under sleeve) and continue in the round in stocking st and A.6 over the middle sts. When A.6 has been worked one time vertically, work A.1 over the middle 5 sts until finished measurements (continue the other sts in stocking st). AT THE SAME TIME when piece measures 12-12-13-13-14-16 cm, dec 2 sts mid under sleeve - READ DECREASE TIP. Repeat dec every 2½-2½-2-2-2-1½ cm 15-16-17-19-20-23 times in total = 39-41-45-47-49-51 sts. When sleeve measures 56-55-55-55-55-55 cm (NOTE: Shorter measurements in the larger sizes because of longer yoke) switch to double pointed needles size 3.5 mm. Work 2 ridges in GARTER ST in the round - see explanation above, and loosely cast off with K, sleeve measures approx 57-56-56-56-56-56 cm. Knit another sleeve the same way. ASSEMBLY: Sew shoulder seams inside cast-off edge. Place sleeve approx. ½ cm in under edge in garter st along armhole and fasten neatly so that edge in garter st shows. Repeat in the other side. NECK EDGE: Pick up from RS approx. 110 to 116 sts on circular needle size 3.5 mm with Cotton Light. K 1 row from WS, K 1 row from RS and K 1 row from WS before loosely casting off with K from RS. Sew the buttons on to the left band. |
|||||||||||||||||||||||||
Diagram explanations |
|||||||||||||||||||||||||
|
|||||||||||||||||||||||||
 |
|||||||||||||||||||||||||
 |
|||||||||||||||||||||||||
 |
|||||||||||||||||||||||||
 |
|||||||||||||||||||||||||
Have you finished this pattern?Tag your pictures with #dropspattern #mercycardigan or submit them to the #dropsfan gallery. Do you need help with this pattern?You'll find 28 tutorial videos, a Comments/Questions area and more by visiting the pattern on garnstudio.com. © 1982-2026 DROPS Design A/S. We reserve all rights. This document, including all its sub-sections, has copyrights. Read more about what you can do with our patterns at the bottom of each pattern on our site. |
|||||||||||||||||||||||||


With over 40 years in knitting and crochet design, DROPS Design offers one of the most extensive collections of free patterns on the internet - translated to 17 languages. As of today we count 324 catalogues and 12290 patterns translated into English (UK/cm). 12290
We work hard to bring you the best knitting and crochet have to offer, inspiration and advice as well as great quality yarns at incredible prices! Would you like to use our patterns for other than personal use? You can read what you are allowed to do in the Copyright text at the bottom of all our patterns. Happy crafting!
Post a comment to pattern DROPS 168-7
We would love to hear what you have to say about this pattern!
If you want to leave a question, please make sure you select the correct category in the form below, to speed up the answering process. Required fields are marked *.