
Popular categories
Looking for a yarn?


Comments / Questions (36)
![]() Hazel wrote:
Hazel wrote:
Im making a medium and the pattern says increase 3 dtr on each side of a.1, 1 time in total so ive taken this to mean the two front sections after the band and first a.1 and only to do this 1 time out of 4 dtr rows? Next it says increase 2 dtr on each side of a.1 four times in total. This section has 2 stitches so would first dtr row be 4 stitches then 6,8? Next you do another a.1 and then it is the back, do you add another 3 dtr increases here the follow the rest as usual?
22.01.2026 - 19:29DROPS Design answered:
Dear Hazel, I'm sorry I might misunderstand your question, but you will increase on either side of each A.1 at the raglans as explained under INCREASE TIP -1, hope it can help. Hpapy crocheting!
27.02.2026 - 14:29
![]() Isabel wrote:
Isabel wrote:
Hola! Alguien podria aclararme cómo seguir las instrucciones? Dios mío, es muy complicado de comprender. No entiendo a qué se refiere dentro de la pechera cuando habla de la manga o de los delanteros… Está bastante mal explicado.
16.01.2024 - 19:27DROPS Design answered:
Hola Isabel, puedes preguntarnos si tienes alguna duda en concreto. En el canesú/ la pechera, hace referencias a manga o delantero izquierdo para indicar cada sección a qué parte de la prenda se corresponde. Por ejemplo, en la fila por el LD explicada dice que empiezas trabajando los puntos de la cenefa, después trabajas los puntos más aumentos del delantero izquierdo, después los puntos para la manga izquierda, e.t.c. Los puntos después del término entre paréntesis se corresponden a la siguiente parte.
23.01.2024 - 00:00
![]() Aruna wrote:
Aruna wrote:
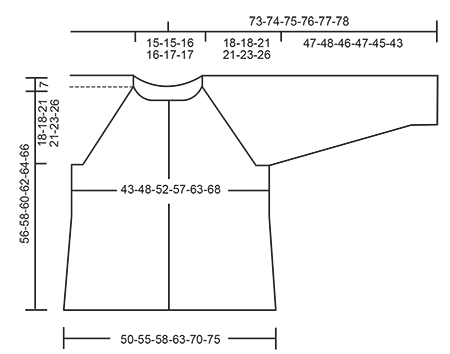
Hi there - I have a question regarding the pattern. When making the yoke, this section of the pattern says: "On first row in pattern-1 there are 90-98102-110-122-130 sc (includes A.1). Repeat pattern-1 and A.1 vertically until finished measurements. " What are the finished measurements? Also on the diagram there is a vertical measurement of 7 from the top till the dashed line. What does this represent? Thank you in advance.
12.04.2021 - 01:46DROPS Design answered:
Dear Aruna, "until finished measurements" means that from that time until you finihse the piece, for the remainder of the piece. On the schemantic drawing, the dotted line (of 7 cm) means the depth of the neckline. Happy Crafting!
12.04.2021 - 04:40
![]() Sine wrote:
Sine wrote:
Jeg har købt drops Air og vil hækle Priscilla cardigan. Men jeg ser i kommentarer og spg at mange har problemer med denne opskrift. Der nævnes noget om en rettelse i opskriften opdateret 5/10 2016, men hvor finder jeg det ? Jeg klikker på linket “se rettelse og video her” men linket leder ikke nogen steder hen. Hvad gør jeg så ? Hvordan finder jeg det når linket ikke virker ? kh Sine
28.01.2021 - 00:52DROPS Design answered:
Hej Sine, de rettelser der evt har været er skrevet ind i selve opskriften på nettet. Husk at vi også har lavet en video, så du tydeligt ser hvordan man starter :)
28.01.2021 - 15:37
![]() Claudia wrote:
Claudia wrote:
Hola! Tengo una duda. Los aumentos del raglan deben empezar a partir de terminar A1 una vez o 2 veces. O sea enseguida despues de la primera hilera de p.a.d o despues, no me quedo muy claro. Gracias de antemano!
21.01.2021 - 19:32DROPS Design answered:
Hola Claudia! Los aumentos del raglan deben empezar a partir de terminar A1 una vez. Buen trabajo!
25.01.2021 - 18:35
![]() Patricia wrote:
Patricia wrote:
La chaqueta está muy bonita pero creo que deberían revisar el patrón es muy confuso en la parte de los aumentos.
17.09.2020 - 16:25
![]() Esther wrote:
Esther wrote:
Hallo und vielen Dank für diese tolle Anleitung. Leider tue ich mich etwas schwer damit. Bei der ersten Raglanzunahme heißt es: „ je 3 D-Stb beidseitig von A.1 insgesamt 1 x, dann je 2 D-Stb beidseitig von A.1 insgesamt 3-4-4-5-5-5 x,....“. Mache ich das alles gleichzeitig vor jedem Herzen (Außer Blende)? Dann würde ich in XL ja 26 Maschen vor und nach jedem Herzen zunehmen....
21.01.2020 - 09:07DROPS Design answered:
Liebe Esther, dieses Video zeigt wie man zuerst 3 D-Stb zunimmt, dann wie man 2 D-Stb und 1 D-Stb zunimmt. Viel Spaß beim stricken!
21.01.2020 - 10:19
![]() Maria Teresa Barbati wrote:
Maria Teresa Barbati wrote:
Modello Priscilla Per quattro volte gli aumenti si intende su quattro righe di maglie alte doppie. Se cosi fosse non riesco ad avere 198 maglie per la taglia L ma bensì 212 a cui aggiungere ancora gli ultimi 10 aumenti Grazie per la risposta Maria Teresa Barbati
31.08.2019 - 18:12DROPS Design answered:
Buonasera Maria Teresa, gli aumenti vanno lavorati sulle righe a maglie alte doppie. Buon lavoro!
31.08.2019 - 21:23
![]() Tina wrote:
Tina wrote:
Hej. Mht. Knaphullet : Jeg forstår ikke, hvordan Knappen skal komme igennem fastmaskerækken? Mener I i stedet at der skal knappes gennem dobbeltstangmaskerne?
28.05.2019 - 14:27DROPS Design answered:
Hei Tina. Det stemmer at knappene skal gjennom fastmaskene, det kan hende du må presse dem gjennom første gangen. Dobbelstavene gir nok et for stort hull. Om du har problemer med å få dem gjennom kan du eventuelt prøve mindre knapper. God fornøyelse
29.05.2019 - 07:18Renée wrote:
Ik ben echt gek op jullie patronen maar ik vind jullie beschrijvingen niet te doen. In dit patroon is de beschrijving voor de raglan echt niet duidelijk. Er staat letterlijk: Meerder 3 dstk aan ELKE kant van A1. Er wordt nergens beschreven dat de 1e en de laatste A1 niet meetelt. Dit is het 2e patroon van Drops dat ik nu haak maar ook bij de eerste heb ik het haakwerk zó vaak uit moeten halen. Het kan, naar mijn bescheiden mening, veel eenvoudiger.
05.09.2018 - 01:44
|
|||||||||||||
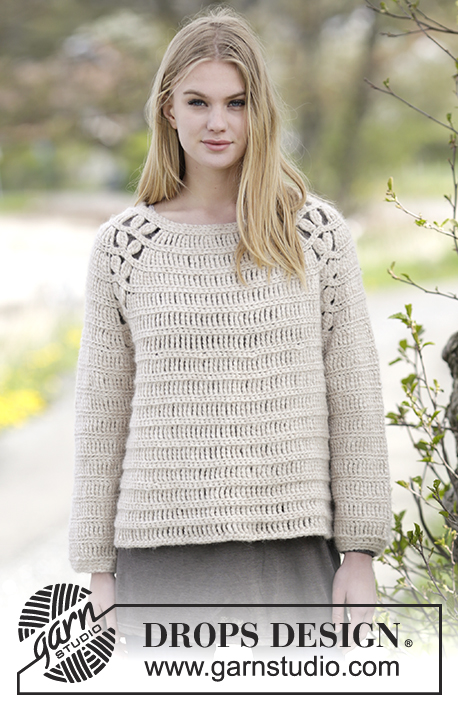
Priscilla Cardigan |
|||||||||||||
|
|
|||||||||||||
Crochet DROPS jacket with raglan and lace pattern in ”Air”. The piece is worked top down. Size: S - XXXL.
DROPS Extra 0-1182 |
|||||||||||||
|
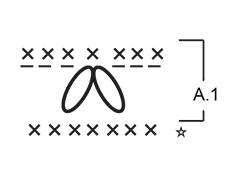
CROCHET INFO: Replace first dc at beg of every dc row with 1 ch. Replace first dtr at beg of every dtr row with 4 ch. Replace first triple tr at beg of every triple tr row with 5 ch. CROCHET TIP: If the crochet tension vertically is not high enough switch all dtr with triple tr. INCREASE TIP-2: Inc 1 dtr by working 2 dtr in same st. In size XXL and XXXL it is necessary to inc 2 dtr in same st some places. Work by making 3 dtr in same st. PATTERN-1: ROW 1 (= WS): Work 1 dc in front loop of every dtr. ROW 2 (= RS): Work 1 dtr in back loop of every dc. Repeat rows 1 to 2 until finished measurements. PATTERN-2: ROUND 1: Work 1 dtr in back loop of every dc. ROUND 2: Work 1 dc in back loop of every dtr. Repeat rounds 1 to 2 until finished measurements. INCREASE TIP-1: Inc 3 dtr before A.1 on BODY as follows: Work as before until 3 dc remain before A.1, work 2 dtr in each of the next 3 dc. Inc 3 dtr after A.1 on BODY as follows: Work 2 dtr in each of the next 3 dc after A.1. Inc 3 dtr before A.1 on SLEEVE as follows: Work 4 dtr in 1 dc before A.1. Inc 3 dtr after A.1 on SLEEVE as follows: Work 4 dtr in 1st dc after A.1 Inc 2 dtr before A.1 as follows: Work as before until 2 dc remain before A.1, work 2 dtr in each of the next 2 dc. Inc 2 dtr after A.1 as follows: Work 2 dtr in each of the next 2 dc after A.1. Inc 1 dtr before A.1 as follows: Work as before until 1 dc remain before A.1, work 2 dtr in dc. Inc 1 dtr after A.1 as follows: Work 2 dtr in first dc after A.1. DECREASE TIP: Work 1 dtr/dc but wait with last pull through (= 2 sts on hook), then work next dtr/dc but on last pull through, pull yarn through all sts on hook = 1 dc/dtr dec. PATTERN: See diagram A.1. Work A.1 as follows: ROW 1: Work 3 ch, skip 1 dc, * work 1 dtr in back loop of next dc but wait with last pull through (= 2 sts on hook), work 2 dtr in same st the same way *, skip 3 dc, repeat from *-* 1 time, pull yarn through all 7 sts on hook, 3 ch, skip 1 dc. ROW 2: Work 1 dc in each of the first 3 ch, 1 dc in next st, 1 dc in each of the next 3 ch. ---------------------------------------------------------- JACKET: Worked top down, back and forth from mid front. YOKE: Work 86-86-90-90-94-94 ch (incl 5 band sts in each side of piece) on hook size 6 mm with Air. Work next row as follows: Work 1 dc in 2nd ch from hook - READ CROCHET INFO, 1 dc in every ch = 86-86-90-90-94-94 dc. Then work as follows from RS: Work all dtr in back loop of dc, and READ CROCHET TIP. Work 1 dtr in each of the first 5 dc (= band), A.1 - see explanation above - over the next 7 dc, 1 dtr in each of the next 4-4-5-5-6-6 dc AT THE SAME TIME inc 1-3-3-5-7-9 dtr evenly - READ INCREASE TIP-2 – (= left front piece), A.1 over the next 7 dc, 1 dtr in each of the next 2 dc, A.1 over the next 7 dc (= left sleeve), 1 dtr in each of the next 22-22-24-24-26-26 dc AT THE SAME TIME inc 2-6-6-10-14-18 dtr evenly (= back piece), A.1 over the next 7 dc, 1 dtr in each of the next 2 dc, A.1 over the next 7 dc, (= right sleeve), 1 dtr in each of the next 4-4-5-5-6-6 dc AT THE SAME TIME inc 1-3-3-5-7-9 dtr evenly, A.1 over the next 7 dc, finish with 1 dtr in each of the last 5 dc (= right front piece). Work PATTERN-1 over dtr and A.1 over A.1 as before. On first row in pattern-1 there are 90-98-102-110-122-130 dc (incl A.1). Repeat pattern-1 and A.1 vertically until finished measurements. REMEMBER THE CROCHET TENSION! On next row (= dtr row) inc for raglan on every row from RS (i.e. every row with dtr) on each side of A.1 – READ INCREASE TIP-1 – as follows: Inc 3 dtr on each side of A.1 1 time in total, then inc 2 dtr on each side of A.1 3-4-4-5-5-5 times in total, then 1 dtr on each side of A.1 1-0-1-0-1-2 times in total (= 170-186-198-214-234-250 sts in total). On next row (= from WS with dc) work as follows: Work all dc in front loop of every dtr. Work 1 dc in each of the first 5 dtr (= band), A.1 as before, 1 dc in each of the next 15-18-20-23-27-30 dtr, work 8 ch, insert 1 marker in 4th ch, skip: A.1 + 22-24-26-28-30-32 dtr + A.1 (= sleeve), work 1 dc in each of the next 44-50-54-60-68-74 dtr, work 8 ch, insert 1 marker in 4th ch, skip: A.1 + 22-24-26-28-30-32 dtr + A.1 (= sleeve), 1 dc in each of the next 15-18-20-23-27-30 dtr, A.1 as before, finish with 1 dc in each of the last 5 dtr (= band) = 98-110-118-130-146-158 dc (incl A.1) and 16 ch. Move the markers upwards when working. Insert 1 marker in piece, NOW MEASURE PIECE FROM HERE. BODY: Work next row (= from RS) as follows: Pattern-1 over the first 5 dc (= band), A.1 as before, pattern-1 over the next 90-102-110-122-138-150 sts (i.e. work 1 dtr in every ch under sleeve), A.1 as before, finish with pattern-1 over the last 5 dc (= band). On next row there are 114-126-134-146-162-174 dc on row (incl A.1). Work pattern-1 and A.1 over body as before. When piece measures 6 cm, adjust so that next row is with dtr, inc 1 dtr on each side of each marker in the side (= 4 sts inc), repeat inc every 8 cm 3 more times. On next row with dc there are 130-142-150-162-178-190 dc on row (incl A.1). When piece measures 38-40-39-41-41-40 cm from marker, adjust so that last row is with dc, fasten off. SLEEVE: = A.1 + 22-24-26-28-30-32 dtr + A.1. Insert 1 marker in piece, NOW MEASURE PIECE FROM HERE. Sleeve is worked in the round, top down. Beg by working mid under sleeve as follows: Work 1 dc in the 5th ch of the 8 ch worked in armhole on body, work 1 dc in each of the next 3 ch, work last round of A.1 (= dc) over A.1, 1 dc in back loop of the next 22-24-26-28-30-32 dtr, last round of A.1 over A.1, before working 1 dc in each of the remaining 4 ch under sleeve = 44-46-48-50-52-54 dc. Insert 1 marker mid under sleeve, move the marker when working. Then work piece with PATTERN-2 - see explanation above. When sleeve measures 4 cm, dec 1 dc/tr on each side of marker - READ DECREASE TIP. Repeat dec every 5-4-4-4-4-3 cm 7-8-8-9-9-10 more times = 28-28-30-30-32-32 dc/dtr. Work until piece measures 46-47-45-46-44-42 cm – adjust so that last round is with dc. Work 2 round with 1 dc in back loop of every dc (= 3 round in total with dc at the bottom of sleeve). Fasten off. Work the other sleeve the same way. NECK EDGE: Beg mid front and work as follows from RS: 1 dc in back loop of every dc while AT THE SAME TIME dec 4-4-5-5-6-6 dc evenly = 82-82-85-85-88-88 dc. Turn piece and work from WS. 1 dc in front loop of every dc while AT THE SAME TIME dec 4-4-5-5-6-6 dc evenly = 78-78-80-80-82-82 dc. Fasten off. ASSEMBLY: Sew the buttons on to left band. Sew on first button in 2nd dc row from neck (= approx. 2 cm down from neck), then sew them approx. 7 cm apart. Button through dc rows. |
|||||||||||||
Diagram explanations |
|||||||||||||
|
|||||||||||||
 |
|||||||||||||
 |
|||||||||||||
Have you finished this pattern?Tag your pictures with #dropspattern or submit them to the #dropsfan gallery. Do you need help with this pattern?You'll find 11 tutorial videos, a Comments/Questions area and more by visiting the pattern on garnstudio.com. © 1982-2026 DROPS Design A/S. We reserve all rights. This document, including all its sub-sections, has copyrights. Read more about what you can do with our patterns at the bottom of each pattern on our site. |
|||||||||||||


With over 40 years in knitting and crochet design, DROPS Design offers one of the most extensive collections of free patterns on the internet - translated to 17 languages. As of today we count 324 catalogues and 12290 patterns translated into English (UK/cm). 12290
We work hard to bring you the best knitting and crochet have to offer, inspiration and advice as well as great quality yarns at incredible prices! Would you like to use our patterns for other than personal use? You can read what you are allowed to do in the Copyright text at the bottom of all our patterns. Happy crafting!
Post a comment to pattern DROPS Extra 0-1182
We would love to hear what you have to say about this pattern!
If you want to leave a question, please make sure you select the correct category in the form below, to speed up the answering process. Required fields are marked *.