
Popular categories
Looking for a yarn?


Comments / Questions (86)
![]() Christine Michellod wrote:
Christine Michellod wrote:
Bonjour, très envie de tricoter ce modèle mais je ne trouve pas d'explication pour le col châle et je ne comprends pas pourquoi le dos et le devant gauche ont le même nombre de mailles alors que le devant droit en a plus...Est-ce correct et puis-je me lancer ainsi ? Merci d'avance pour votre réponse
24.07.2015 - 11:24DROPS Design answered:
Bonjour Mme Michellod, les 2 devants ne se tricotent pas de la même façon (cf réponse ci-dessous), on commence le devant gauche par le côté (couture dos) et on le termine par le milieu devant (après avoir monté les 23-28 m du col châle) - le devant droit se commence par le milieu devant, on rabat les mailles du col châle et on continue en terminant par le côté couture au dos. Bon tricot!
27.07.2015 - 17:10
![]() Nectarine wrote:
Nectarine wrote:
Je me pose les mêmes questions que Loufrani. Le col châle semble avoir été oublié . Pouvez-vous faire apparaître ici vos réponses afin que tout le monde puisse en profiter. Je les attends pour commander ma laine. Merci.
17.07.2015 - 15:25DROPS Design answered:
Bonjour Nectarine, cf réponse ci-dessous pour le nombre de mailles des devants. À la fin du devant gauche, on monte 23-28 m (cf taille) à la fin d'un rang sur l'envers et on tricote encore pendant 6-8 cm. Ces mailles supplémentaires créent le col châle. Pour le devant droit, on commence par le milieu devant, donc on va rabattre les mailles du col (23-28 m) au début d'un rang sur l'endroit quand l'ouvrage mesure 6-8 cm. Bon tricot!
27.07.2015 - 14:29
![]() Annette wrote:
Annette wrote:
Jeg vil gerne strikke den trøje, som vises på fotoet. Opskriften har sjalskrave, hvilket fotoet ikke har. Findes der en opskrift uden sjalskrave (altså opskrift til trøjen på fotoet) ?
15.07.2015 - 10:01DROPS Design answered:
Hej Annette, Jo jakken på fotoet har sjalskrave. Sjalskrave er når kraven fortsætter lige op og om bag i nakken uden indtagninger. Denne jakke strikkes fra side til side og med sjalskrave. God fornøjelse!
30.07.2015 - 14:13
![]() Loufrani wrote:
Loufrani wrote:
Je ne vois pas l'explication du col chale. Merci
11.07.2015 - 13:24
![]() Loufrani wrote:
Loufrani wrote:
Je pense que l'on a interverti le nombre de mailles du dos avec celui du devant droit. Pour la taille S il est noté dos 102 mailles pour le dos, 102 mailles pour le devant gauche et 166 mailles pour le devant droit. Les deux cotes doivent avoir le meme nombre de maillesMerci pour la reponse
11.07.2015 - 13:21DROPS Design answered:
Bonjour Mme Loufrani, le dos se commence à partir du côté (couture devant) vers l'autre côté (on commmence et on termine sous l'emmanchure) = on monte 102 m en taille S et on termine par 102 m. Le devant gauche se commence par le côté couture au dos (= 102 m) et se termine par le milieu devant (166 m), le devant droit se commence par le milieu devant (166 m) et se termine par le côté couture au dos (102 m). Bon tricot!
27.07.2015 - 10:01
![]() Renate wrote:
Renate wrote:
Can't wait to see the pattern for this one. It is lovely.
08.07.2015 - 22:21
![]() Lea Van Otterlo wrote:
Lea Van Otterlo wrote:
Wat een prachtig patroon, kan bijna niet wachten op de vertaling. Wanneer kan ik beginnen????
21.06.2015 - 17:40
![]() Helga Schmitt-minet wrote:
Helga Schmitt-minet wrote:
Sehr schönes Modell, möchte es gerne mit der Maschine Stricken, wenn die Wolle nicht zu dick ist. Bitte um eine Anleitung.
20.06.2015 - 08:46
![]() Helga Schmitt-minet wrote:
Helga Schmitt-minet wrote:
Sehr schönes Modell, möchte es gerne mit der Maschine Stricken, wenn die Wolle nicht zu dick ist. Bitte um eine Anleitung.
19.06.2015 - 16:56
![]() Lise Bjerning wrote:
Lise Bjerning wrote:
Den model og de farver er et must have til efteråret 😀😀😀
19.06.2015 - 16:12
|
|
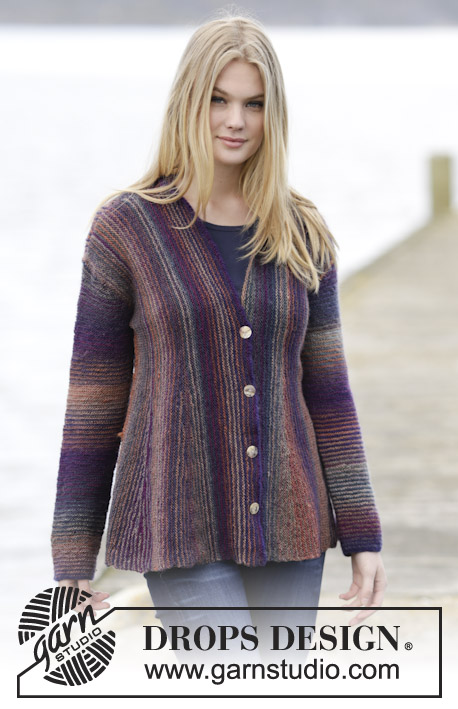
Magic Autumn#magicautumncardigan |
|
 |
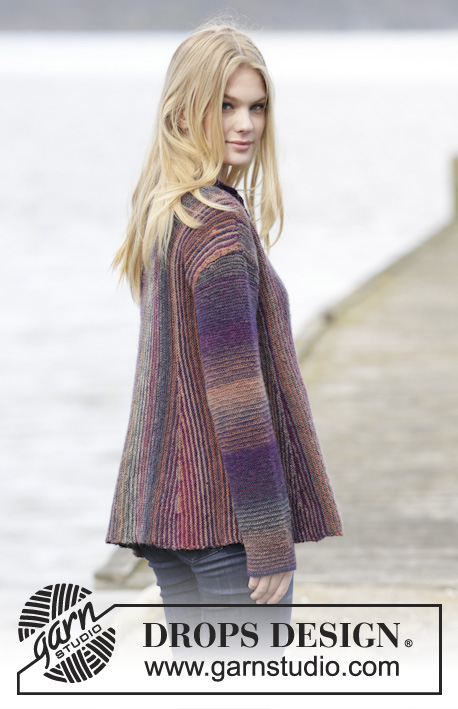 |
Knitted DROPS jacket in garter st with pleats and shawl collar, worked sideways in ”Delight”. Size: S - XXXL.
DROPS 164-15 |
|
|
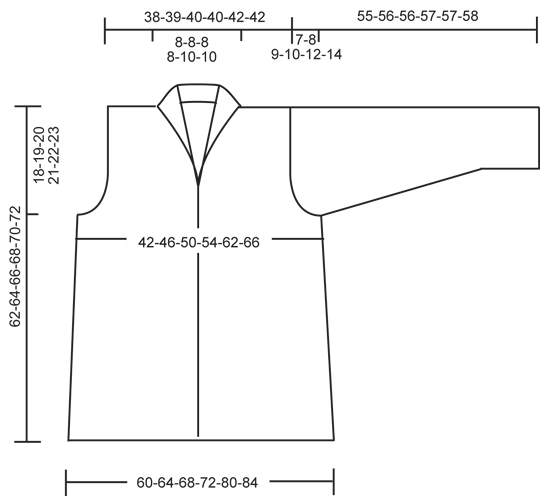
KNITTING TIP: Garter st is very elastic. The garment will therefore be somewhat longer and wider according to the measurements in chart. STRIPES: To get more stripes on garment work alternately with 2 balls. * Work 2 rows with the first ball, work 2 rows with the other ball *, repeat from *-*. Switch yarn at beg of a row from WS. Pull yarn upwards in bottom edge of garment/side of sleeve. PLEAT: Work 1 pleat with short rows as follows (1st row = WS): work 75 sts, turn and work back, work 68 sts, turn and work back, work 62 sts, turn and work back, work 55 sts, turn and work back, work 49 sts, turn and work back, work 42 sts, turn and work back, work 36 sts, turn and work back, work 29 sts, turn and work back, work 23 sts, turn and work back, work 16 sts, turn and work back, work over all sts on needle, turn and work back, work over all sts on needle, turn and work back, work 16 sts, turn and work back, work 23 sts, turn and work back, work 29 sts, turn and work back, work 36 sts, turn and work back, work 42 sts, turn and work back, work 49 sts, turn and work back, work 55 sts, turn and work back, work 62 sts, turn and work back, work 68 sts, turn and work back, work 75 sts, turn and work back. MEASURING TIP: Measure from cast-on edge. Measure where pleat is most narrow. ---------------------------------------------------------- BACK PIECE: Worked back and forth on circular needle. The whole piece is worked in garter st, i.e. K all rows. Beg working in the side. Read KNITTING TIP! Loosely cast on 102-104-106-109-111-113 sts on circular needle size 3.5 mm with Delight. Work STRIPES - see explanation above. Work 5-11-13-15-19-21 rows (1st row = RS). REMEMBER THE KNITTING TENSION At the end of next row (from WS), cast on 3 new sts for armhole. Then cast on new sts at the end of every 6th row (= from WS): 3 sts 0-0-1-2-4-5 times = 105-107-112-118-126-131 sts. On the end of next row from WS, cast on 38-41-40-39-35-35 sts = 143-148-152-157-161-166 sts. Continue to work in garter st over all sts until piece measures 9-10-11-12-14-16 cm (adjust so that next row is from RS). K 1 row from RS. Then work PLEAT - see explanation above. When pleat has been worked, work 1 row over all sts (from WS). Continue back and forth over all sts until piece measures 17-19-21-23-26-28 cm - READ MEASURING TIP. Now cast off 5 sts at beg of next row (from RS) for neck = 138-143-147-152-156-161 sts. Continue to work until piece measures 25-27-29-31-36-38 cm. Now cast on 5 sts at the end of row (from WS) = 143-148-152-157-161-166 sts. Continue back and forth over all sts until piece measures 32-35-38-41-47-49 cm (adjust so that next row is from RS). K 1 row from RS. Then work Pleat. When pleat is done, work 1 row over all sts. Work until piece measures approx. 40-43-45-47-52-54 cm. Now cast off 38-41-40-39-35-35 sts at beg of next row (from RS) for armhole = 105-107-112-118-126-131 sts. On next row (from RS) cast off 3 sts at beg of row. Then cast off at beg of every 6th row: 3 sts 0-0-1-2-4-5 times = 102-104-106-109-111-113 sts. Work back and forth until piece measures 42-46-50-54-62-66 cm. Loosely cast off. LEFT FRONT PIECE: Cast on and work from the side to mid front. Loosely cast on 102-104-106-109-111-113 sts on circular needle size 3.5 mm with Delight. Work stripes and cast on new sts for armhole as on back piece = 143-148-152-157-161-166 sts. When piece measures 6-7-8-9-12-14 cm, work pleat. When pleat has been worked, work 1 row over all sts (from WS). Continue back and forth over all sts. When piece measures 13-15-17-17-19-21 cm - READ MEASURING TIP, work pleat. When pleat has been worked, work 1 row over all sts (from WS). Work until piece measures 3-3-3-5-6-6 cm after last pleat (piece now measures approx. 17-19-21-23-26-28 cm in total). Now cast on 23-23-23-23-28-28 new sts at the end of a row from WS = 166-171-175-180-189-194 sts. Work back and forth over all sts for 6-6-6-6-8-8 cm. Loosely cast off. RIGHT FRONT PIECE: Cast on and work from mid front to the side. Loosely cast on 166-171-175-180-189-194 sts on circular needle size 3.5 mm with Delight. Work stripes back and forth over all sts for 3 cm. Now dec for buttonhole on a row from WS as follows: Work 24 sts, * K 2 tog, 1 YO, work 20-20-20-22-22-22 sts *, repeat from *-* 4 times, work the rest of row. ( = 4 buttonholes). Continue in garter st and stripes over all sts until piece measures 6-6-6-6-8-8 cm. On next row from RS, cast off the first 23-23-23-23-28-28 sts = 143-148-152-157-161-166 sts. Continue back and forth over all sts until piece measures approx. 9-9-9-11-12-13 cm. Then work pleat. When pleat has been worked, work 1 row over all sts (from WS). Continue back and forth over all sts until piece measures approx. 17-18-19-20-20-21 cm (adjust so that next row is from WS). Then work pleat. When pleat has been worked, work 1 row over all sts (from WS). AT THE SAME TIME when piece measures 4-4-3-2-2-2 cm after last pleat, cast off the first 38-41-40-39-35-35 sts (from RS) for armhole. On next row (from RS) cast off 3 sts at beg of row. Then cast off at beg of every 6th row: 3 sts 0-0-1-2-4-5 times = 102-104-106-109-111-113 sts. Continue back and forth over all sts until piece measures 6-7-8-9-12-14 cm after last pleat. Loosely cast off. SLEEVE: Worked back and forth in garter st. Loosely cast on 55-57-60-62-62-66 sts (incl 1 edge st in each side) on circular needle size 3.5 mm with Delight. Work stripes. When piece measures 5-5-5-7-9-7 cm, inc 1 st in each side every 5-4-3½-2½-2-2 cm 9-11-12-15-17-18 times in total = 73-79-84-92-96-102 sts. When piece measures 48-48-47-47-45-44 cm, cast off 3 sts in each side for sleeve cap. NOTE: Shorter measurements in the larger sizes because of longer sleeve cap and wider shoulders. Then cast off for sleeve cap in each side on every other row: 2 sts 2-2-2-2-1-0 times and 1 st 10-12-14-15-24-28 times. Then cast off 2 sts in each side until piece measures 54-55-55-56-56-57 cm. Now cast off 3 sts in each side 1 time. Cast off the remaining sts, piece measures approx. 55-56-56-57-57-58 cm. ASSEMBLY: Sew the shoulder seams. Sew in sleeves. Sew sleeve and side seams in one inside 1 edge st. Sew shawl collar tog mid back and sew it to the neckline. Sew the buttons on to the left band. |
|
 |
|
Have you finished this pattern?Tag your pictures with #dropspattern #magicautumncardigan or submit them to the #dropsfan gallery. Do you need help with this pattern?You'll find 18 tutorial videos, a Comments/Questions area and more by visiting the pattern on garnstudio.com. © 1982-2026 DROPS Design A/S. We reserve all rights. This document, including all its sub-sections, has copyrights. Read more about what you can do with our patterns at the bottom of each pattern on our site. |
|


With over 40 years in knitting and crochet design, DROPS Design offers one of the most extensive collections of free patterns on the internet - translated to 17 languages. As of today we count 324 catalogues and 12290 patterns translated into English (UK/cm). 12290
We work hard to bring you the best knitting and crochet have to offer, inspiration and advice as well as great quality yarns at incredible prices! Would you like to use our patterns for other than personal use? You can read what you are allowed to do in the Copyright text at the bottom of all our patterns. Happy crafting!
Post a comment to pattern DROPS 164-15
We would love to hear what you have to say about this pattern!
If you want to leave a question, please make sure you select the correct category in the form below, to speed up the answering process. Required fields are marked *.