
Popular categories
Looking for a yarn?


Comments / Questions (86)
![]() Judith Williams wrote:
Judith Williams wrote:
I need some help please. I am making size M. If the stripes are every two rows this means changing balls at the end of even rows. If this is correct and the cast on stitches for the armhole shaping is at the end of an even row as the pattern suggests this seems to make the ball change over for the stripes to be at the wrong end of the garment - at the neck edge and not the hem edge making it difficult to knit the pleats Without breaking the yarn. Can you advise?
10.03.2016 - 20:09DROPS Design answered:
Dear Mrs Williams, color change will be made at the end of every row from WS, ie on back piece towards bottom of the jacket. Cast on new sts for armhole at the end of a row from WS with the color you are working on. Pleat start on a WS row, ie towards the color change. Happy knitting!
11.03.2016 - 08:47
![]() Emilie Lanchantin wrote:
Emilie Lanchantin wrote:
De même on parle de faire 5 boutonnière alors que sur la photo on ne voit que 4 boutons! Du coup j'en viens à me demander si les explications correspondent bien à la photo!
27.02.2016 - 20:23DROPS Design answered:
Bonjour Mme Lanchantin, votre question a été transmise à nos stylistes. Merci. Bon tricot!
02.03.2016 - 10:21
![]() Emilie Lanchantin wrote:
Emilie Lanchantin wrote:
J'ai commencé ce modèle mais je me pose une question. On parle de monter 23 mailles pour un col châle or sur la photo, il n'y a clairement pas de col... J'ai donc pensé ne pas monter ces mailles mais je réalise alors que mes deux épaules de devant seront beaucoup plus grandes que les deux épaules du dos. J'ai également peur que du coup cela ne fasse pas ce col en v comme sur la photo... Merci d'avance de m'aider à terminer ce projet.
27.02.2016 - 20:18DROPS Design answered:
Bonjour Mme Lanchantin, les 23 m montées en find e rang sur l'envers pour le devant gauche sont ensuite assemblées le long de l'encolure dos (jusqu'au milieu de l'encolure, l'autre moitié de l'encolure étant "couverte" par les mêmes 23 m rabattues au devant droit, tricoté de la bordure devant vers le côté). On tricote ensuite 6-8 cm (cf taille) sur toutes les mailles pour former la bordure devant et un petit col. L'encolure V se formera d'elle-même en fermant le gilet. Bon tricot!
29.02.2016 - 09:04
![]() Randi Noesgaard wrote:
Randi Noesgaard wrote:
Hvis 1.pind skal være retsidens,så kommer striberne ikke til at se ud som på billedet. For at de skal se sådan ud, må 1. pind være vrangsiden, ellers kan man se hvor der er skiftet garn, som man kan på den ene side i retstrikning. Er det ikke rigtigt?
27.02.2016 - 17:04DROPS Design answered:
Hej, Det stemmer. Hvis du ser under "striber" så skriver vi at du skal skifte tråden i begyndelsen af en pind fra vrangen". God fornøjelse!
29.02.2016 - 12:20
![]() Marianne wrote:
Marianne wrote:
Ik mis het patroon van de sjaalkraag voor dit vest
07.12.2015 - 14:34DROPS Design answered:
Hoi Marianne. Het staat in het patroon. Het zijn de 23 st aan het eind van het linker voorpand en aan het begin van het rechter voorpand.
08.12.2015 - 16:43
![]() Jannie Wouters wrote:
Jannie Wouters wrote:
Op de bol van Drops Delight wordt een stekenverhouding aangegeven van 26 st. X 34 nld. Op het patroon staat er echter 23 st. X 45 nld. Er wordt ook wel een verschillende naalddikte aangegeven, maar dat kan toch niet kloppen. Met een dikkere naald zou je meer toeren moeten breien voor 10 cm. Is er iets verkeerd aangegeven?
22.10.2015 - 14:51DROPS Design answered:
Hoi Jannie. De stekenverhouding verschilt afhankelijk van de type steek, motief of vorm. Op de bol is het tricotsteken, en in dit patroon ribbelsteken.
23.10.2015 - 12:33
![]() Anne Marie wrote:
Anne Marie wrote:
Klopt het dat de breedte van de halsuitsnijding van het rugpand slechts 8 cm bedraagd? Dit is zeer smalletjes...(S-M)
21.10.2015 - 08:42DROPS Design answered:
Hoi Anne Marie. Dat klopt. De sjaalkraag ligt dicht bij de nek. Vind je het te smal voor jezelf, dan kan je natuurlijk altijd aanpassen.
21.10.2015 - 16:51
![]() Andrea Bauch-Jansen wrote:
Andrea Bauch-Jansen wrote:
Ich habe mit dem Rückenteil begonnen und komme mit den Maßen nicht zurecht. Wenn die Gesamtschulterbreite bei Größe s 38 cm ist und für die Armausschnitte je Seite 7 cm dazu gerechnet werden, komme ich nicht auf eine Gesamtbreite von 42 cm, wie in der Anleitung und auch in der Zeichnung angegeben!? Das sind doch 52 cm ?!?! Stimmen denn die anderen Maße? Die Jacke wird so klein! LG Andrea
16.10.2015 - 21:20DROPS Design answered:
Die Rückenbreite und die gesamte Breite sind richtig. Die 7 cm beziehen sich auf die Armkugel, diese folgt ja einer Kurve und ist daher länger. Sie sollten die Größe stricken, die am besten zu Ihren Körpermaßen passt.
18.10.2015 - 19:41
![]() Qris wrote:
Qris wrote:
Ich habe ne Frage ganz zu Anfang beim Armausschnitt für Größe S, es heisst :Dann am Ende jeder 6. R (= Rück-R) 3 M 0-0-1-2-4-5 x anschlagen = 105-107-112-118-126-131 M. Am Ende der nächsten Rück-R 38. Da ich bei Größe S keine weitere Maschen anschlagen muss, soll ich dann direkt die 38 Maschen anschlagen oder auch erst die ca. 30 Reihen stricken? Danke für eine Antwort.
24.09.2015 - 09:18DROPS Design answered:
Ja, Sie schlagen die 38 M direkt an, die Anweisung mit den 3 M übergehen Sie einfach. Der Schritt entfällt bei Größe S komplett.
27.09.2015 - 23:24
![]() Betina Nicolay wrote:
Betina Nicolay wrote:
Måletips: Der måles fra opslagskanten. Mål der hvor folden er smallest. Øh - hvilken fold menes der?
09.09.2015 - 09:35DROPS Design answered:
Hej Betina, Jakken er strikket i kiler. Det er kiler (fold på norsk) vi taler om, det skal vi få rettet, så det bliver tydeligt. God fornøjelse!
18.09.2015 - 15:06
|
|
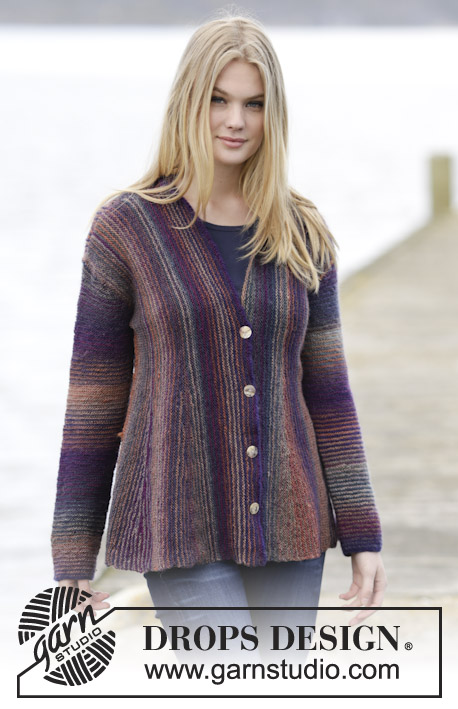
Magic Autumn#magicautumncardigan |
|
 |
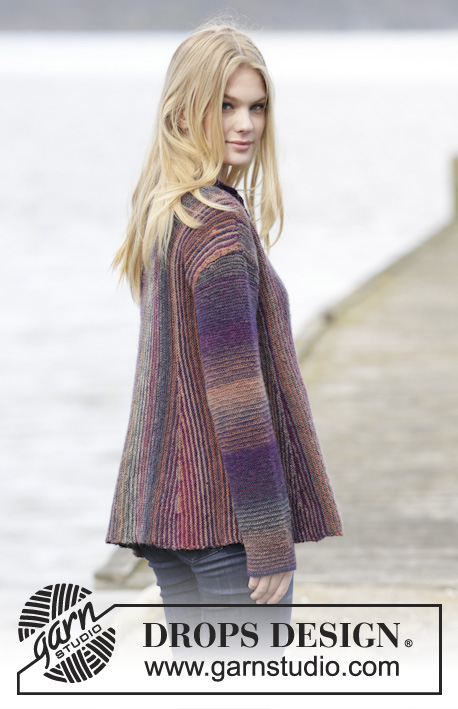 |
Knitted DROPS jacket in garter st with pleats and shawl collar, worked sideways in ”Delight”. Size: S - XXXL.
DROPS 164-15 |
|
|
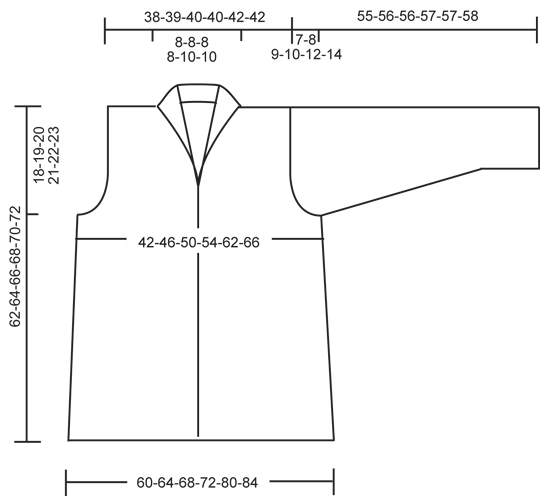
KNITTING TIP: Garter st is very elastic. The garment will therefore be somewhat longer and wider according to the measurements in chart. STRIPES: To get more stripes on garment work alternately with 2 balls. * Work 2 rows with the first ball, work 2 rows with the other ball *, repeat from *-*. Switch yarn at beg of a row from WS. Pull yarn upwards in bottom edge of garment/side of sleeve. PLEAT: Work 1 pleat with short rows as follows (1st row = WS): work 75 sts, turn and work back, work 68 sts, turn and work back, work 62 sts, turn and work back, work 55 sts, turn and work back, work 49 sts, turn and work back, work 42 sts, turn and work back, work 36 sts, turn and work back, work 29 sts, turn and work back, work 23 sts, turn and work back, work 16 sts, turn and work back, work over all sts on needle, turn and work back, work over all sts on needle, turn and work back, work 16 sts, turn and work back, work 23 sts, turn and work back, work 29 sts, turn and work back, work 36 sts, turn and work back, work 42 sts, turn and work back, work 49 sts, turn and work back, work 55 sts, turn and work back, work 62 sts, turn and work back, work 68 sts, turn and work back, work 75 sts, turn and work back. MEASURING TIP: Measure from cast-on edge. Measure where pleat is most narrow. ---------------------------------------------------------- BACK PIECE: Worked back and forth on circular needle. The whole piece is worked in garter st, i.e. K all rows. Beg working in the side. Read KNITTING TIP! Loosely cast on 102-104-106-109-111-113 sts on circular needle size 3.5 mm with Delight. Work STRIPES - see explanation above. Work 5-11-13-15-19-21 rows (1st row = RS). REMEMBER THE KNITTING TENSION At the end of next row (from WS), cast on 3 new sts for armhole. Then cast on new sts at the end of every 6th row (= from WS): 3 sts 0-0-1-2-4-5 times = 105-107-112-118-126-131 sts. On the end of next row from WS, cast on 38-41-40-39-35-35 sts = 143-148-152-157-161-166 sts. Continue to work in garter st over all sts until piece measures 9-10-11-12-14-16 cm (adjust so that next row is from RS). K 1 row from RS. Then work PLEAT - see explanation above. When pleat has been worked, work 1 row over all sts (from WS). Continue back and forth over all sts until piece measures 17-19-21-23-26-28 cm - READ MEASURING TIP. Now cast off 5 sts at beg of next row (from RS) for neck = 138-143-147-152-156-161 sts. Continue to work until piece measures 25-27-29-31-36-38 cm. Now cast on 5 sts at the end of row (from WS) = 143-148-152-157-161-166 sts. Continue back and forth over all sts until piece measures 32-35-38-41-47-49 cm (adjust so that next row is from RS). K 1 row from RS. Then work Pleat. When pleat is done, work 1 row over all sts. Work until piece measures approx. 40-43-45-47-52-54 cm. Now cast off 38-41-40-39-35-35 sts at beg of next row (from RS) for armhole = 105-107-112-118-126-131 sts. On next row (from RS) cast off 3 sts at beg of row. Then cast off at beg of every 6th row: 3 sts 0-0-1-2-4-5 times = 102-104-106-109-111-113 sts. Work back and forth until piece measures 42-46-50-54-62-66 cm. Loosely cast off. LEFT FRONT PIECE: Cast on and work from the side to mid front. Loosely cast on 102-104-106-109-111-113 sts on circular needle size 3.5 mm with Delight. Work stripes and cast on new sts for armhole as on back piece = 143-148-152-157-161-166 sts. When piece measures 6-7-8-9-12-14 cm, work pleat. When pleat has been worked, work 1 row over all sts (from WS). Continue back and forth over all sts. When piece measures 13-15-17-17-19-21 cm - READ MEASURING TIP, work pleat. When pleat has been worked, work 1 row over all sts (from WS). Work until piece measures 3-3-3-5-6-6 cm after last pleat (piece now measures approx. 17-19-21-23-26-28 cm in total). Now cast on 23-23-23-23-28-28 new sts at the end of a row from WS = 166-171-175-180-189-194 sts. Work back and forth over all sts for 6-6-6-6-8-8 cm. Loosely cast off. RIGHT FRONT PIECE: Cast on and work from mid front to the side. Loosely cast on 166-171-175-180-189-194 sts on circular needle size 3.5 mm with Delight. Work stripes back and forth over all sts for 3 cm. Now dec for buttonhole on a row from WS as follows: Work 24 sts, * K 2 tog, 1 YO, work 20-20-20-22-22-22 sts *, repeat from *-* 4 times, work the rest of row. ( = 4 buttonholes). Continue in garter st and stripes over all sts until piece measures 6-6-6-6-8-8 cm. On next row from RS, cast off the first 23-23-23-23-28-28 sts = 143-148-152-157-161-166 sts. Continue back and forth over all sts until piece measures approx. 9-9-9-11-12-13 cm. Then work pleat. When pleat has been worked, work 1 row over all sts (from WS). Continue back and forth over all sts until piece measures approx. 17-18-19-20-20-21 cm (adjust so that next row is from WS). Then work pleat. When pleat has been worked, work 1 row over all sts (from WS). AT THE SAME TIME when piece measures 4-4-3-2-2-2 cm after last pleat, cast off the first 38-41-40-39-35-35 sts (from RS) for armhole. On next row (from RS) cast off 3 sts at beg of row. Then cast off at beg of every 6th row: 3 sts 0-0-1-2-4-5 times = 102-104-106-109-111-113 sts. Continue back and forth over all sts until piece measures 6-7-8-9-12-14 cm after last pleat. Loosely cast off. SLEEVE: Worked back and forth in garter st. Loosely cast on 55-57-60-62-62-66 sts (incl 1 edge st in each side) on circular needle size 3.5 mm with Delight. Work stripes. When piece measures 5-5-5-7-9-7 cm, inc 1 st in each side every 5-4-3½-2½-2-2 cm 9-11-12-15-17-18 times in total = 73-79-84-92-96-102 sts. When piece measures 48-48-47-47-45-44 cm, cast off 3 sts in each side for sleeve cap. NOTE: Shorter measurements in the larger sizes because of longer sleeve cap and wider shoulders. Then cast off for sleeve cap in each side on every other row: 2 sts 2-2-2-2-1-0 times and 1 st 10-12-14-15-24-28 times. Then cast off 2 sts in each side until piece measures 54-55-55-56-56-57 cm. Now cast off 3 sts in each side 1 time. Cast off the remaining sts, piece measures approx. 55-56-56-57-57-58 cm. ASSEMBLY: Sew the shoulder seams. Sew in sleeves. Sew sleeve and side seams in one inside 1 edge st. Sew shawl collar tog mid back and sew it to the neckline. Sew the buttons on to the left band. |
|
 |
|
Have you finished this pattern?Tag your pictures with #dropspattern #magicautumncardigan or submit them to the #dropsfan gallery. Do you need help with this pattern?You'll find 18 tutorial videos, a Comments/Questions area and more by visiting the pattern on garnstudio.com. © 1982-2026 DROPS Design A/S. We reserve all rights. This document, including all its sub-sections, has copyrights. Read more about what you can do with our patterns at the bottom of each pattern on our site. |
|


With over 40 years in knitting and crochet design, DROPS Design offers one of the most extensive collections of free patterns on the internet - translated to 17 languages. As of today we count 324 catalogues and 12290 patterns translated into English (UK/cm). 12290
We work hard to bring you the best knitting and crochet have to offer, inspiration and advice as well as great quality yarns at incredible prices! Would you like to use our patterns for other than personal use? You can read what you are allowed to do in the Copyright text at the bottom of all our patterns. Happy crafting!
Post a comment to pattern DROPS 164-15
We would love to hear what you have to say about this pattern!
If you want to leave a question, please make sure you select the correct category in the form below, to speed up the answering process. Required fields are marked *.