
Popular categories
Looking for a yarn?


Comments / Questions (151)
![]() Elly Braber wrote:
Elly Braber wrote:
Proefpakket spring bliss maken: 3.5 stk groep breed en 9 toeren hoog Hoe haak ik een 3.5 stk groep? Zij dit 3.5 x 3 stokjes in 2 lossen of gewoon 10 stokjes in 10 lossen?
14.08.2025 - 16:02DROPS Design answered:
Dag Elly,
Met één stokjesgroep wordt bedoeld het groep je van 2x2 stokjes (met een losse ertussen) bij elkaar. Je haakt dus een proeflapje in het telpatroon en dan meet je op hoeveel groepen er in 10 cm zitten. Dit zou ongeveer 3,5 groepen moeten zijn.
15.08.2025 - 09:41
![]() DANIELLE wrote:
DANIELLE wrote:
Bonjour je ne comprends pas le dessin comment je pourrai modifier pour éviter la largeur des hanches .. Je vous remercie Cordialement
08.06.2025 - 10:15DROPS Design answered:
Bonjour Danielle, cette veste se crochète d'abord à partir du milieu dos: on fait d'abord un carré puis on va continuer ce carré jusqu'à former les emmanchures et on va terminer par crocheter les devants en allers et retours. La forme finale de la veste se trouve dans le schéma; il n'y a effectivement pas de cintrage sur les côtés pour donner le rendu de la photo. Dans ce type de modèle, on a rarement la taille marquée, il vous faudra probablement vous inspirer d'un autre modèle de la forme souhaitée. Bon crochet!
09.06.2025 - 09:58
![]() Krisztina wrote:
Krisztina wrote:
Mit jelent a 3.5 erp csoport x 9 kör egymás fölött? Hogy kell 3.5 erp-t horgolni? Köszönöm.
04.06.2025 - 18:34DROPS Design answered:
Kedves Krisztina! Nem kell 3,5 erp-t horgolnia. Amikor horgoláspróbát készít, akkor horgoljon kb. 5-6 erp csoportot egymás mellett, és kb 10-12 sort/kört a mintával, majd ebből jelöljön ki egy olyan téglalapot, amely 3,5 rp csoport széles, és 9 sor magas, majd mérje meg, és hasonlítsa össze a megadott kötéspróbával. Ha egyezik a megadottal, akkor használja a mintában megadott méretű tűt, ha annál nagyobb, akkor készítsen újabb próbadarabot kisebb tűvel, és újra mérje meg. Ha kisebb, használjon az újabb próbadarabhoz nagyobb horgolótűt. Sikeres kézimunkázást!
19.07.2025 - 22:50
![]() Claudia wrote:
Claudia wrote:
Die Anleitung für das Vorderteil verstehe ich nicht ganz. Man soll zwischen der 1. und der 2. Ecke häkeln. Muster A2 beginnt am 1. Luftmaschenbogen. Die vorherige Reihe begann mit der Ecke, d.h. 3 Stb, 3 Lm, 3 Stb. Beginne ich erst nach der Ecke mit dem Muster (dann habe ich einen Versatz), oder wie beziehe ich die Ecke in das Muster mit ein?
17.08.2024 - 16:36DROPS Design answered:
Liebe Claudia, die letzte Runde vom Quadrat soll eine 9. Reihe sein, dh eine Runde mit Stäbchen und Luftmaschenbogen (mit je 5 Maschen), dh die Reihe die unter A.2 gezeichnet ist, dann häkeln Sie weiter mit A.2, dh Muster wie zuvor aber zwischen nur 2 Ecken, so in Hin- und Rückreihen; Viel Spaß beim Häkeln!
19.08.2024 - 08:02
![]() Maria wrote:
Maria wrote:
En la vuelta 6 de la espalda pone* (6 p.de cad, 1 p.b. + 2 p.de cad + 1 p.b. en el sig arco)pero no coincide con el diagrama. No sería el último p.b en el mismo arco? Gracias
04.04.2024 - 16:23DROPS Design answered:
Hola Maria, quiere decir que se trabaja en el siguiente arco respecto al de antes del paréntesis. Es decir, trabajas en 1 arco (= esquina), después 6 p.de cad y después (1p.b, 2 p.de cad y 1 p.b) en el siguiente arco (todos en el mismo).
07.04.2024 - 23:52
![]() Annette Comer wrote:
Annette Comer wrote:
You told me to look for size numbers on pattern. I was interested in medium you told me to use second number . I do not see the numbers you mentioned at beging of the patter. I saw some at bottom of page?
19.01.2022 - 20:32DROPS Design answered:
Hi Annette, If there are no numbers in brackets, then it means the instructions apply to all sizes. When the sizes differ in stitch numbers or in measurements, you will find numbers in brackets and, for size M, you then choose the second of these numbers. Happy crocheting!
20.01.2022 - 07:48
![]() Annette Comer wrote:
Annette Comer wrote:
You told me to work second number in patter to find medium size for Spring Blissdrops 162-5 there no numbers for sizes at beginning of pattern?
19.01.2022 - 20:25
![]() Annette Comer wrote:
Annette Comer wrote:
The instructions are for which size? I would like size M
15.01.2022 - 07:03DROPS Design answered:
Dear Annette, these instructions are for all sizes at the same time. To work size M, you need to follow the 2nd number whenever there is a sequence of numbers. Happy knitting!
16.01.2022 - 21:28
![]() Diana wrote:
Diana wrote:
Hallo, betreft Spring Bliss, ik snap niet hoe de armsgaten gemaakt moeten worden. Wat wordt bedoeld met:haak 1 l voor elke overgeslagen l/stk? Dit gedeelte snap ik niet. Ook haak dan in patroon als hiervoor snap ik niet. Hopelijk kunt u mij helpen. ( ik heb toer8 als buitenste toer) Mvg diana
05.04.2021 - 17:56DROPS Design answered:
Dag Diana,
Om een armsgat te maken moet je een aantal steken overslaan, namelijk tot d eerste hoek. In plaats van in patroon te haken, haak je lossen. Het aantal steken dat je overslaat haak je nu in lossen. Daarna ga je weer verder met de hoek.
06.04.2021 - 18:25
![]() Maria Gutierrez Trejo wrote:
Maria Gutierrez Trejo wrote:
Me podrian decir, si hay video de esta prenda, muchas gracias
23.03.2021 - 14:39
|
||||||||||||||||||||||
Spring Bliss#springblisscardigan |
||||||||||||||||||||||
 |
 |
|||||||||||||||||||||
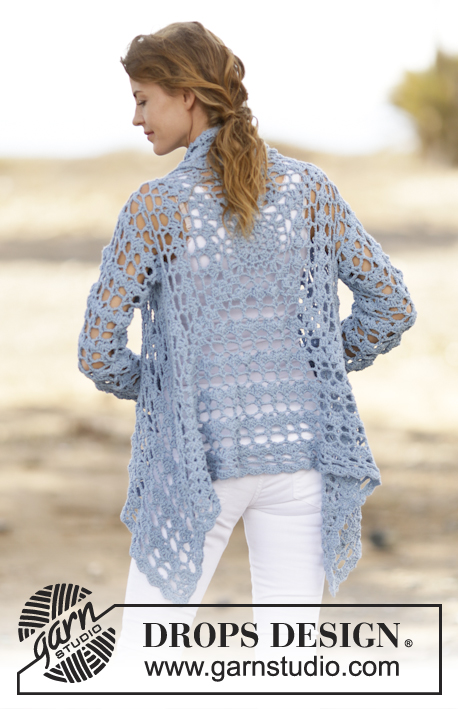
Crochet DROPS jacket with lace pattern in ”Paris”. Size: S - XXXL.
DROPS 162-5 |
||||||||||||||||||||||
|
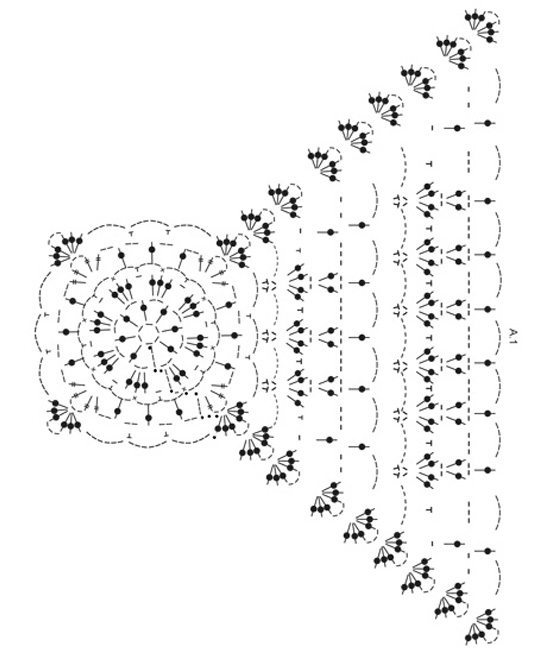
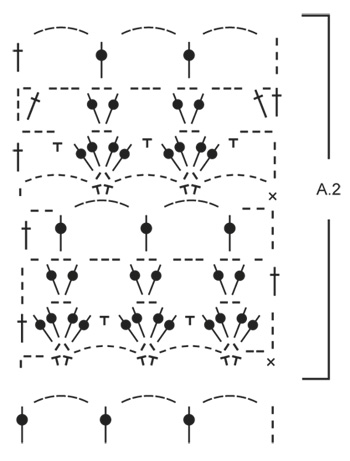
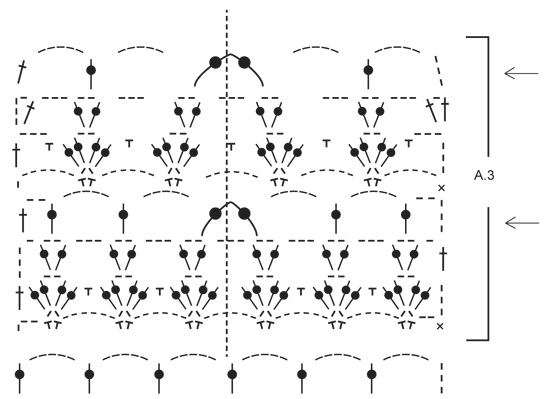
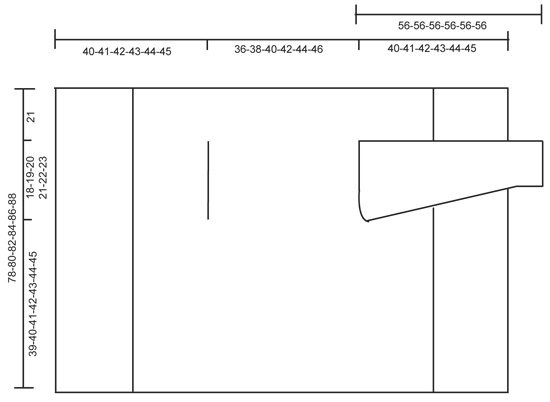
PATTERN: See diagrams A.1 and A.2. DECREASE TIP: Dec 1 tr by working 2 tr tog as follows: Work 1 tr in first ch-space but wait with last pull through, skip 3 ch, work 1 tr in next ch-space but on last pull through, pull yarn through all 3 loops on hook. ---------------------------------------------------------- BODY: Worked in the round from mid back on the back. Work 6 ch with Paris on hook size 5 mm and form a ring with 1 sl st in first ch. Work according to diagram A.1, i.e. work as follows: ROUND 1: 5 ch (= 1 tr + 2 ch), * 1 tr in ring, 2 ch *, repeat from *-* a total of 7 times, finish with 1 sl st in 3rd ch from beg of round = 8 tr with 2 ch between each. ROUND 2: 1 sl st in first ch-space, 3 ch (= 1 tr), 2 tr in same ch-space, * 1 ch, 3 tr in next ch-space *, repeat from *-* 7 times in total, and finish with 1 ch and 1 sl st in 3rd ch from beg of round = 8 tr-groups with 1 ch between each. ROUND 3: 1 ch, 1 dc in the middle tr in tr-group, * 3 ch, 1 dc in ch before next tr-group, 3 ch, 1 dc in the middle tr in next tr-group *, repeat from *-* 7 times in total, 3 ch, 1 dc in last ch, 3 ch and 1 sl st in first dc at beg of round = 16 ch-spaces. ROUND 4: Now work the circle into a square, i.e. work as follows: 1 sl st in first ch-space, 4 ch (= 1 dtr), 1 dtr + 3 ch + 2 dtr in same ch-space (= corner), * (2 ch, 1 tr in next ch-space) repeat from (-) 3 times in total, 2 ch, 2 dtr + 3 ch + 2 dtr in next ch-space (= corner) *, repeat from *-* 3 times in total, repeat from (-) 3 times in total and finish with 2 ch and 1 sl st in 4th ch from beg of round. ROUND 5: Work sl sts until ch-space in the corner, 3 ch (= 1 tr), 2 tr + 3 ch + 3 tr in same ch-space (= corner), * 5 ch, skip 1 ch-space, 1 dc in next ch-space, 5 ch, 1 dc in next ch-space, 5 ch, skip 1 ch-space, in next ch-space (= corner) work 3 tr + 3 ch + 3 tr *, repeat from *-* 3 times in total, 5 ch, skip 1 ch-space, 1 dc in next ch-space, 5 ch, 1 dc in next ch-space, 5 ch, skip last ch-space and finish with 1 sl st in 3rd ch at beg of round. ROUND 6: Work sl sts until ch-space in the corner, 3 ch (= 1 tr), 2 tr + 3 ch + 3 tr in same ch-space (= corner), * (6 ch, 1 dc + 2 ch + dc in next ch-space), repeat from (-) until corner, 6 ch, work 3 tr + 3 ch + 3 tr in ch-space in the corner *, repeat from *-* 3 times in total, repeat from (-) until the corner and finish with 6 ch and 1 sl st in 3rd ch at beg of round. ROUND 7: Work sl sts until ch-space in the corner, 3 ch (= 1 tr), 2 tr + 3 ch + 3 tr in same ch-space (= corner), * 1 ch, (1 dc in 6-ch-space, 2 tr + 2 ch + 2 tr in 2-ch-space), repeat from (-) until one 6-ch-space remains before the corner, 1 dc in 6-ch-space, 1 ch, 3 tr + 3 ch + 3 tr in ch-space in the corner *, repeat from *-* 3 times in total, 1 ch, repeat from (-) until one 6-ch-space remains before the corner and finish with 1 ch and 1 sl st in 3rd ch at beg of round. ROUND 8: Work sl sts until ch-space in the corner, 3 ch (= 1 tr), 2 tr + 3 ch + 3 tr in same ch-space (= corner), * 2 ch, 1 tr in first ch, (3 ch, 1 tr + 2 ch + 1 tr in ch-space in tr-group), repeat from (-) until corner, 3 ch, 1 tr in ch before corner, 2 ch, 3 tr + 3 ch + 3 tr in ch-space in the corner *, repeat from *-* 3 times in total, 2 ch, 1 tr in first ch, repeat from (-) until corner, 3 ch, 1 tr in last ch, 2 ch and 1 sl st in 3rd ch at beg of round. ROUND 9: Work sl sts until ch-space in the corner, 3 ch (= 1 tr), 2 tr + 3 ch + 3 tr in same ch-space (= corner), * 5 ch, 1 tr in first ch-space, (5 ch, 1 tr in ch-space in tr-group), repeat from (-) until 1 ch-space remains before tr-group in the corner, 5 ch, 1 tr in last ch-space before the corner, 5 ch and 3 tr + 3 ch + 3 tr in ch-space in the corner *, repeat from *-* 3 times in total, 5 ch, 1 tr in first ch-space, repeat from (-) until 1 ch-space remains before the corner, 5 ch, 1 tr in last ch-space, 5 ch and 1 sl st in 3rd ch at beg of round. REMEMBER THE CROCHET TENSION! Repeat 6th to 9th round (4 rounds) outwards as shown in diagram. Continue like this until square measures approx. 36-38-40-42-44-46 cm x 36-38-40-42-44-46 cm. Now work arm holes as follows: Work as before until first corner, work 3 tr + 3 ch + 3 tr in ch-space in the corner. Now work ch until the middle of next side (i.e. in the middle between 1st and 2nd corner) as follows: Work 1 ch for every ch/tr skipped. Then work pattern as before until the middle between 3rd and 4th corner. Now work ch until beg of round as follows: Work 1 ch for every ch/tr skipped. On next round work pattern and inc as before over all sts, also in ch for armholes. Continue like this until square measures approx. 78-80-82-84-86-88 cm x 78-80-82-84-86-88 cm (i.e. approx. 21 cm in all sizes from armhole) - adjust to finish after 9th round (round with ch-spaces and trebles). Cut the yarn. FRONT PIECE: Beg from WS and work back and forth between first and second corner. NOTE: Work front piece without inc. Work according to diagram A.2 from first corner, i.e. work as follows: ROW 1: 3 ch (= 1 dc + 2 ch), 1 dc + 2 ch + 1 dc in first ch-space, * 6 ch, 1 dc + 2 ch + 1 dc in next ch-space*, repeat from *-* the entire row and finish with 2 ch and 1 dc in first ch-space in the corner, turn piece. ROW 2 (= RS): 3 ch (= 1 tr), * 2 tr + 2 ch + 2 tr in ch-space between 2 dc, 1 dc in 6-ch-space *, repeat from *-* the entire row and finish with 1 tr in 1st ch from beg of previous row, turn piece. ROW 3: 4 ch (= 1 tr + 1 ch), * 1 tr + 2 ch + 1 tr in ch-space in the middle of tr-group, 3 ch *, repeat from *-* until 1 tr-group remains before the corner, 1 tr + 2 ch + 1 tr in ch-space in last tr-group, finish with 1 ch and 1 tr in 3rd ch from beg of previous row, turn piece. ROW 4 (= RS): 5 ch (= 1 tr + 2 ch), * 1 tr in ch-space in tr-group, 5 ch *, repeat from *-* until 1 tr-group remains, 1 tr in ch-space in last tr-group, 2 ch and 1 tr in 3rd ch from beg of previous row, turn piece. ROW 5: 7 ch (= 1 dc + 6 ch), * 1 dc + 2 ch + 1 dc in 5-ch-space, 6 ch *, repeat from *-* the entire row and finish with 1 dc in 3rd ch from beg of previous row, turn piece. ROW 6 (= RS): 6 ch (= 1 tr + 3 ch), * 1 dc in 6-ch-space, 2 tr + 2 ch + 2 tr in 2-ch-space *, repeat from *-* the entire row and finish with 1 dc in last 6-ch-space, 3 ch and 1 tr in first ch from beg of previous row, turn piece. ROW 7: 4 ch (= 1 tr + 1 ch), 1 tr in same st, * 3 ch, 1 tr + 2 ch + 1 tr in ch-space in the middle of next tr-group *, repeat from *-* the entire row and finish with 3 ch and 1 tr + 1 ch + 1 tr in 3rd ch from beg of previous row, turn piece. ROW 8 (= RS): 8 ch (= 1 tr + 5 ch), * 1 tr in ch-space in the middle of tr-group, 5 ch *, repeat from *-* the entire row and finish with 5 ch and 1 tr in 3rd ch from beg of previous row, turn piece. Repeat rows 1 to 8 outwards. Continue like this until approx. 19-20-21-22-23-24 cm have been worked back and forth, fasten off (adjust after 1st or 5th row in pattern). Repeat on the other side, now work back and forth from third to fourth corner. EDGE: Finally work a round around the entire piece with 2nd or 6th row in pattern but in ch-space in each corner work 6 tr. Fasten off. SLEEVE: Work back and forward and sew togheter at the end. Sleeve is worked straight out of armhole of the body, top down. Beg mid under armhole, from RS. 1 dc in first st, then work ch-space as on 4th or 8th row in A.2. Work so that there are 12-13-14-15-15-16 ch-spaces around armhole. Then continue with pattern according to diagram A.2. Work pattern like this until sleeve measures 26 cm. Now work according to A.3. On every row with arrow work 2 tr tog into 1 tr mid front of sleeve (i.e. dec 1 ch-space on every row with arrow) - READ DECREASE TIP. The dotted line shows mid front of sleeve. Otherwise continue the pattern as before. Dec on every 4th row a total of 4 times. Then work according to diagram A.2 until sleeve measures 56 cm in all sizes. Fasten off. Repeat in the other side. |
||||||||||||||||||||||
Diagram explanations |
||||||||||||||||||||||
|
||||||||||||||||||||||
 |
||||||||||||||||||||||
 |
||||||||||||||||||||||
 |
||||||||||||||||||||||
 |
||||||||||||||||||||||
Have you finished this pattern?Tag your pictures with #dropspattern #springblisscardigan or submit them to the #dropsfan gallery. Do you need help with this pattern?You'll find 12 tutorial videos, a Comments/Questions area and more by visiting the pattern on garnstudio.com. © 1982-2026 DROPS Design A/S. We reserve all rights. This document, including all its sub-sections, has copyrights. Read more about what you can do with our patterns at the bottom of each pattern on our site. |
||||||||||||||||||||||


With over 40 years in knitting and crochet design, DROPS Design offers one of the most extensive collections of free patterns on the internet - translated to 17 languages. As of today we count 325 catalogues and 12298 patterns translated into English (UK/cm). 12298
We work hard to bring you the best knitting and crochet have to offer, inspiration and advice as well as great quality yarns at incredible prices! Would you like to use our patterns for other than personal use? You can read what you are allowed to do in the Copyright text at the bottom of all our patterns. Happy crafting!
Post a comment to pattern DROPS 162-5
We would love to hear what you have to say about this pattern!
If you want to leave a question, please make sure you select the correct category in the form below, to speed up the answering process. Required fields are marked *.