
Popular categories
Looking for a yarn?


Comments / Questions (260)
![]() Birgit Kühn wrote:
Birgit Kühn wrote:
Ich habe ein Problem mit der Anleitung.Reihe 23=273Stb, R.24 169. Stb., R.25 182 Stb. Wo bleiben die fehlenden Stäbchen? LG Birgit
22.08.2016 - 18:04DROPS Design answered:
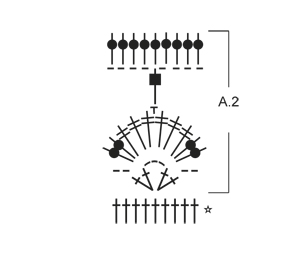
Liebe Birgit, die anderen Stäbchen finden Sie unter A.2 ("169 Stb und 13 x A.2)
25.08.2016 - 18:15Alison Shedwick wrote:
Hi please can you explain how to do the right front piece? the pattern says to insert markers on the WS then on the instructions for the right front piece it says to work between the 1st and second marker beginning from the 2nd marker (ie from RS) but if you start from the RS you cannot start from the 2nd marker, does it mean you start from the 2nd marker working on the WS but that the front itself is being started on the right hand side??
17.08.2016 - 17:46Alison Shedwick answered:
Sorry my apologies I was miss reading the pattern I have solved my problem no many thanks Alison
17.08.2016 - 19:41
![]() Doris Gauthier wrote:
Doris Gauthier wrote:
Combien à - t-il de bride entre le premier marqueur et le quatrième parce que j'ai plus de bride dans tout le tour et je veux m'ajuster merci
16.08.2016 - 22:57DROPS Design answered:
Bonjour Mme Gauthier, vu sur l'endroit, vous aurez entre le 1er et le 4ème marqueur: 14-16-18 B, A.2, 29-33-37 B, A.2, 14-16-18 B. Bon crochet!
17.08.2016 - 09:24
![]() Alison Shedwick wrote:
Alison Shedwick wrote:
Ok now I am really confused, I have now pulled my work back the beginning of row 30. so when I get to the tr over the chains do I continue the A2 pattern in these stitches? which will leave the hole in the work? as that would make more sense than what I had done many thanks
15.08.2016 - 13:27DROPS Design answered:
Dear Mrs Shedwick, on row 28 you have crocheted some chains and skiped tr + A.2 - on row 29 you have crocheted tr in both chains (no A.2 over the armholes on this row) - on row 30, work over the armholes the same row in A.2 as you have to work around, ie there will be 2 rows A.2 missing over the armholes, but all A.2 will be worked the same way around. Happy crocheting!
15.08.2016 - 16:56
![]() Alison Shedwick wrote:
Alison Shedwick wrote:
Hi again I think I have gone terribly wrong. I have completed the work up to the fronts but now I am looking at the sleeves and I do not understand how the sleeves fit. When I made the chains for the sleeves I continued in the pattern on the other stitches above to chain row leaving the chain rows underneath my circle of work or should I have left them on the top?
15.08.2016 - 11:00DROPS Design answered:
Dear Mrs Shedwich, when you worked the chains for armholes, you skipped sts from previous row which created a large hole for sleeve. You will now crochet along this hole for sleeve starting at the bottom of armhole, ie on left sleeve from RS beg along last row on circle from bottom to top of armhole, then crochet in the chain down to the the bottom of armhole. Happy crocheting!
15.08.2016 - 11:27
![]() Melinda wrote:
Melinda wrote:
Na toer 27 snap ik het niet meer. Moet 24-27 herhalen 0-1-1. Zou u dit uit willen leggen, kom er zelf niet uit
14.08.2016 - 19:57DROPS Design answered:
Het vest heeft 3 maten. Als er aantallen met streepjes ertussen staan, gelden die voor de verschillende maten. Herhaal toer 24-27 nog 0-1-1 keer = 208-260-260 stk (= 16-20-20 stk tussen elke A.2) - dit betekent herhaal 0 keer voor de kleinste maat, 1 keer voor de middelste maat en 1 keer voor de grootste maat.
14.08.2016 - 21:40
![]() Alison Shedwick wrote:
Alison Shedwick wrote:
On row 30 when you come to the A2 pattern above the chain row do you continue the pattern so that it is the same as all the other patterns on this row ie ignoring the 2 rows that were missed when making the chain row or do you carry on so that the pattern is the same as all the others meaning that you will always be 2 rows behind the other patterns?
11.08.2016 - 12:07DROPS Design answered:
Dear Mrs Shedwick, you should work same row in A.2 all the round, so that you will miss the 2 skipped rows in A.2 over armholes and work same row in A.2 than over all other repeats of the round. Happy crocheting!
15.08.2016 - 09:46
![]() Elena wrote:
Elena wrote:
Bonjour, au rang 30 que signifie "A2, ajustez par rapport aux autres modeles" ? Au rang 30 j'en suis au 3 rang de A2 lorsque l'on crochete dans les zones sans emmanchures. Comme au rang 29 les emmanchures sont crochetees en brides, est ce que je dois en conclure qu'au rang 30 dans les emmanchures on en est au rang 1 du schema A2 ? Par avance merci
09.08.2016 - 16:58DROPS Design answered:
Bonjour Elena, vous devrez crocheter le même rang de A.2 pour tous les motifs tout le tour, si vous en êtes au rang 3 sur les autres A.2, crochetez également le rang 3 au-dessus des emmanchures. Bon crochet!
10.08.2016 - 08:25
![]() Alison Shedwick wrote:
Alison Shedwick wrote:
Sorry to be a nuisance, but just to clarify, I work in the stitches that I missed out when I made the chain row and adjust that A2 pattern I leave the chain row stitches alone after I have done the double crochet in each of the chain stitches?
08.08.2016 - 13:02DROPS Design answered:
Dear Mrs Shedwick, yes correct, you missed A.2 on round 29 when working in the chains for armholes. On row 29, then work in pattern as before, ie 18-22 tr between A.2. Over the armholes work same row in A.2 than other A.2 between Armholes, ie over armholes, there are 2 rows in A.2 "missing": the one where you crocheted the chains (row 28) + the one where you crocheted only tr in the chain. Happy crocheting!
08.08.2016 - 15:18
![]() ALISON SHEDWICK wrote:
ALISON SHEDWICK wrote:
Hi thank you for your reply, but it did not answer my question, the question I asked was on row 30 am I crocheting in the chain stitches or the row that I missed out when I made the chain stitches?
08.08.2016 - 12:11DROPS Design answered:
Dear Mrs Shedwick, after armholes (row after chain) you have to work the same in all sections to get same number of tr between each A.2 all the round, ie work same number of tr around armholes as between A.2 in other sections + same row in A.2 as all around (ie over armhole continue as if you have worked the row before). Happy crocheting!
08.08.2016 - 12:54
|
||||||||||||||||||||||||||||||||||||||||
Ros#roscardigan |
||||||||||||||||||||||||||||||||||||||||
 |
 |
|||||||||||||||||||||||||||||||||||||||
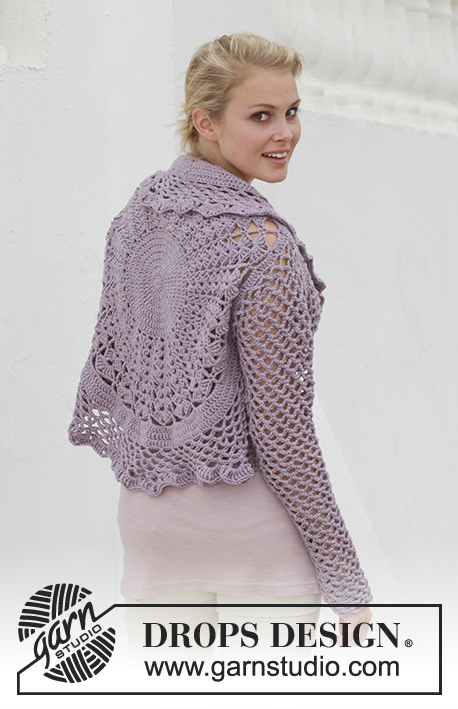
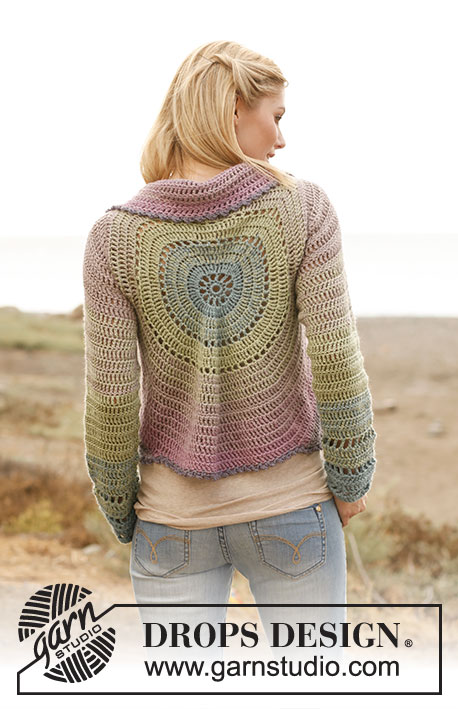
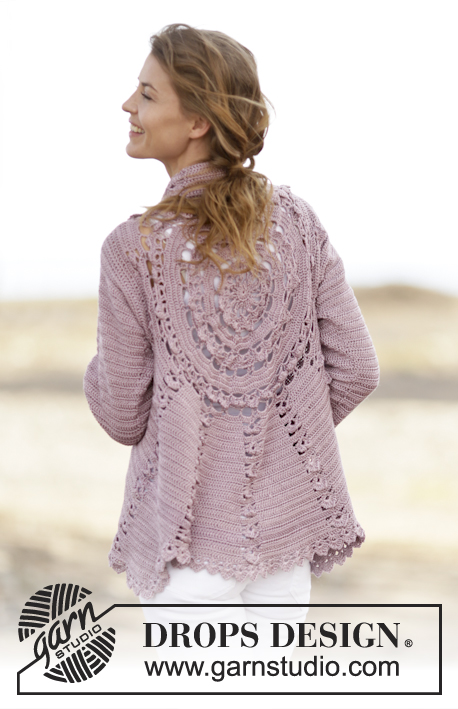
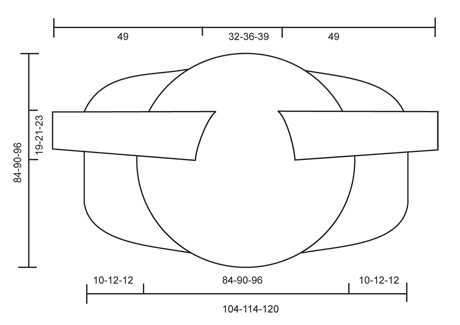
Crochet DROPS jacket worked in a circle with lace pattern in ”Cotton Viscose”. Size: S - XXXL.
DROPS 162-11 |
||||||||||||||||||||||||||||||||||||||||
|
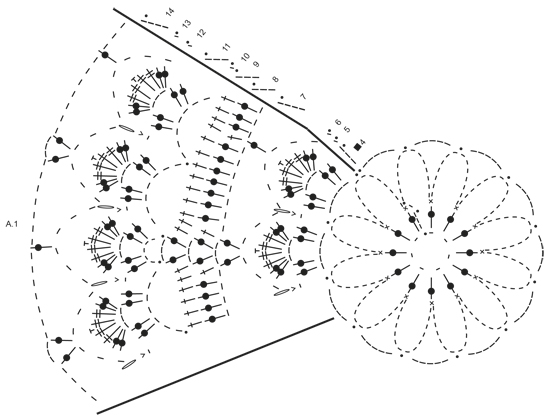
PICOT: Work 2 ch, 1 dc in the 2nd ch from hook. CROCHET INFO: Beg every tr round/row with 3 ch that replace first tr and finish every round/row with 1 sl st in 3rd ch from beg of round/row. PATTERN: See diagrams A.1-A.2. After 3rd round, repeat A.1 6 times in total on round. CROCHET 3 TR TOG: Work 3 tr into 1 tr at beg of row as follows: Work 3 ch (= replace 1 tr), work 1 tr, but wait with last pull through (= 2 strands on hook), then work next tr but on last pull through, pull yarn through all sts on hook. DECREASE TIP (applies to sleeves): Dec at beg of row by working 1 sl st over the tr to be dec. Dec at end of row by working until 1 tr to be dec remains, turn piece. ---------------------------------------------------------- CIRCLE: Work 7 ch on hook size 3.5 mm with Cotton Viscose and form a ring with 1 sl st in first ch. Then work A.1 as follows: ROUND 1: Work 3 ch, 12 tr in ch-ring, finish with 1 sl st in 3rd ch from beg of round. ROUND 2: Work 1 ch, * 1 dc in first tr, 14 ch *, repeat from *-* 12 times in total, finish with 1 sl st in first dc. Fasten off. ROUND 3: Work 1 sl st in first ch-space, 5 ch, * 1 sl st in next ch-space, 5 ch *, repeat from *-* 11 times in total, finish with 1 sl st in first ch-space. A.1 is repeated 6 times in total on round. ROUND 4: Work 3 ch, in first ch-space work: * 2 tr, 3 ch, 2 tr in same ch-space, 1 ch *, repeat from *-* 12 times in total, finish with 1 sl st in 3rd ch from beg of round. ROUND 5: Work 1 ch, in first ch-space work 2 tr, 2 dtr, 1 PICOT – see explanation above, 2 dtr, 2 tr, 1 dc in next ch, * in next ch-space work 2 tr, 2 dtr, 1 picot, 2 dtr, 2 tr, 1 dc in next ch *, repeat from *-* 11 times in total, finish with 1 sl st in first ch = 12 leaves. ROUND 6: Work 1 ch, * 6 ch, 1 dc in dc and ch (from 5th and 4th round) *, repeat from *-* 12 times in total, finish with 1 sl st in first ch. ROUND 7: Work 4 ch, * 3 ch, 1 tr in next ch-space, 7 ch, 1 tr in next ch-space, 3 ch, 1 tr in same ch-space, 4 ch *, repeat from *-* 6 times in total, finish with 1 sl st in 4th ch. ROUND 8: Work 3 ch, 3 tr in next ch-space, * 1 tr in next tr, 7 tr in next ch-space, 1 tr in next tr, 1 tr in next ch-space, 3 ch, 1 tr in same ch-space, 1 tr in next tr, 7 tr in next ch-space *, repeat from *-* 5 times in total, 1 tr in next tr, 7 tr in next ch-space, 1 tr in next tr, 1 tr in next ch-space, 3 ch, 1 tr in same ch-space, 1 tr in next tr, 4 tr in first ch-space, finish with 1 sl st in 3rd ch = 114 tr. REMEMBER THE CROCHET TENSION! ROUND 9: Work 3 ch, * 1 tr in every tr until ch-space, in ch-space as follows: 1 tr, 3 ch, 1 tr *, repeat from *-* the entire round, finish with 1 sl st in 3rd ch = 126 tr. ROUND 10: Work 1 ch, * 7 ch, skip 6 tr, 1 sl st in next tr, 7 ch, skip 6 tr, 1 sl st in next tr, 5 ch, 1 sl st in next tr, 7 ch, skip 6 tr, 1 sl st in next tr *, repeat from *-* 5 times in total, 7 ch, skip 6 tr, 1 sl st in next tr, 7 ch, skip 6 tr, 1 sl st in next tr, 5 ch, 1 sl st in next tr, 7 ch, skip 6 tr, 1 sl st in first ch. ROUND 11: Work 3 ch, in every ch-space work 2 tr, 3 ch, 2 tr, 1 ch, finish with 1 sl st in 3rd ch. ROUND 12: Work 1 ch, * in next ch-space work 2 tr, 2 dtr, 1 picot, 2 dtr, 2 tr, 1 dc in next ch *, repeat from *-* 24 times in total, finish with 1 sl st in first ch = 24 leaves. ROUND 13: Work 1 ch, * 6 ch, 1 dc in dc and ch (from 12th and 11th round) *, repeat from *-* 24 times in total, finish with 1 sl st in first ch. ROUND 14: Work 4 ch, * 3 ch, 1 tr in next ch-space, 7 ch, 1 tr in next ch-space, 3 ch, 1 tr in same ch-space, 4 ch *, repeat from *-* 12 times in total, finish with 1 sl st in 4th ch. ROUND 15: Work 3 ch - READ CROCHET INFO, work 4 tr in first ch-space (i.e. ch-space with 3 ch), now work tr in all ch-space with 7 ch from previous round, do not work in ch-space with 3 ch from previous round. Work * 8 tr in each of the next 7 ch-spaces, 9 tr in next ch-space *, repeat from *-* 2 times in total, 8 tr in each of the next 7 ch-spaces, 5 tr in last ch-space (i.e. ch-space with 4 ch) = 195 tr. ROUND 16: Work * 1 tr in each of the first 14 tr, 2 tr in next tr *, repeat from *-* 13 times in total = 208 tr. ROUND 17: Work * 2 tr in first tr, 1 tr in each of the next 15 tr *, repeat from *-* 13 times in total AT THE SAME TIME inc 1 tr extra on round = 222 tr. ROUND 18: Work 1 ch, * 6 ch, skip 5 tr, 1 sl st in next tr *, repeat from *-* 37 times in total, finish with 1 sl st in first ch. ROUND 19:Work as round 11 in A.1: Work 3 ch, in every ch-space work 2 tr, 3 ch, 2 tr, 1 ch, finish with 1 sl st in 3rd ch. ROUND 20: Work as round 12 in A.1: Work 1 ch, * in next ch-space work 2 tr, 2 dtr, 1 picot, 2 dtr, 2 tr, 1 ch *, repeat from *-* 37 times in total, finish with 1 sl st in first ch = 37 leaves. ROUND 21: Work as round 13 in A.1: Work 1 ch, * 6 ch, 1 dc in dc and ch (from 20th and 19th round) *, repeat from *-* 37 times in total, finish with 1 sl st in first ch. ROUND 22: Work as round 14 in A.1: Work 4 ch, * 3 ch, 1 tr in next ch-space, 7 ch, 1 tr in next ch-space, 3 ch, 1 tr in same ch-space, 4 ch *, repeat from *-* 18 times in total, work 3 ch, 1 tr in last ch-space, 4 ch, finish with 1 sl st in 4th ch. ROUND 23: Work 4 tr in first ch-space (i.e. ch-space with 3 ch), now work tr in all ch-space with 7 ch from previous round, do not work in ch-space with 3 ch from previous round. Work * 7 tr in next ch-space, 8 tr in next ch-space, 7 tr in next ch-space *, repeat from *-* 11 times in total, 8 tr in next ch-space, 8 tr in next ch-space, 7 tr in next ch-space, 4 tr in last ch-space (i.e. ch-space with 4 ch) = 273 tr. Then work piece back and forth. Work every row tog at the end of row with 1 sl st in 3rd ch from beg of row. Turn piece. ROW 24 (= WS): Work * 2 tr in next tr, 1 tr in each of the next 11 tr (= tr-group), A.2 *, repeat from *-* 13 times in total = 169 tr and 13 A.2. Turn piece. A.2 is repeated vertically until finished measurements. ROW 25 (= RS): Work A.2, 2 tr in first tr, 1 tr in each of the next tr in tr-group, * A.2, 2 tr in first tr in tr-group, 1 tr in each of the next tr *, repeat from *-* until 1 tr-group remains, 2 tr in first tr, 1 tr in each of the next tr = 182 tr. Turn piece. ROW 26: Work as row 24 = 195 tr (15 tr between every A.2). ROW 27: Work as row 25 = 208 tr (16 tr between every A.2). Repeat row 24-27 0-1-1 more time = 208-260-260 tr (= 16-20-20 tr between every A.2). Piece measures approx. 20-23-23 cm from centre and outwards. Now work arm holes as follows: ROW 28 (= from WS): Work 2 tr in first tr, 1 tr in each of the next 15-19-19 tr, A.2 as before, 2 tr in next tr, 1 tr in each of the next 15-19-19 tr, A.2, 54-62-62 loose ch (= right armhole), skip: 16-20-20 tr + A.2 + 16-20-20 tr + A.2, work * 2 tr in next tr, 1 tr in each of the next 15-19-19 tr, A.2 *, repeat from *-* 5 times in total, 2 tr in first tr, 1 tr in each of the next 15-19-19 tr, 54-62-62 loose ch (= left armhole), skip: A.2 + 16-20-20 tr + A.2 + 16-20-20 tr, work A.2, 2 tr in next tr, 1 tr in each of the next 15-19-19 tr, A.2 = 153-189-189 tr, 9 A.2 and 108-124-124 ch. ROW 29 (from RS): Work A.2, 2 tr in next tr, 1 tr in each of the next 16-20-20 tr, A.2, in ch-row (= left armhole) work as follows: 1 tr in each of the 54-62-62 ch, * 2 tr in next tr, 1 tr in each of the next 16-20-20 tr, A.2 *, repeat from *-* 5 times in total, 2 tr in next tr, 1 tr in each of the next 16-20-20 tr, in next ch-row (= right armhole) work as follows: 1 tr in each of the 54-62-62 ch, then work A.2, 2 tr in next tr, 1 tr in each of the next 16-20-20 tr, A.2, 2 tr in next tr, 1 tr in each of the next 16-20-20 tr = 270-322-322 tr and 9 A.2. ROW 30 (= from WS): Work 1 tr in each of the next 18-22-22 tr, A.2 as before, 1 tr in each of the next 18-22-22 tr, A.2, 1 tr in each of the next 18-22-22 tr, A.2 (adjust row according to the other repetitions), 1 tr in each of the next 18-22-22 tr, A.2, * 1 tr in each of the next 18-22-22 tr, A.2 *, repeat from *-* 5 times in total, 1 tr in each of the next 18-22-22 tr, A.2, 1 tr in each of the next 18-22-22 tr, A.2, 1 tr in each of the next 18-22-22 tr, A.2, 1 1 tr in each of the next 18-22-22 tr, A.2 = 234-286-286 tr and 13 A.2. Work pattern as before but now inc only on every row from RS until 52-52-60 rows have been worked in total = 377-429-481 tr (29-33-37 tr in every tr-group). Insert 4 markers in the piece as follows from WS: Work 29-33-37 tr, A.2, 14-16-18 tr, insert 1st marker, work 15-17-19 tr, * A.2, 29-33-37 tr *, repeat from *-* 4 times in total, insert 2nd marker here (1st-2nd marker = right front piece). Work A.2, 29-33-37 tr, A.2, 29-33-37 tr and A.2, insert 3rd marker here. * Work 29-33-37 tr, A.2 *, repeat from *-* 4 times in total, 15-17-19 tr, insert 4th marker. (3rd-4th marker = left front piece), 14-16-18 tr, A.2. Tr between 1st and 4th marker are up towards neck. Fasten off. RIGHT FRONT PIECE: Now work right front piece between 1st and 2nd marker, beg from 2nd marker (i.e. from RS) = 131-149-167 tr and 4 A.2. Continue inc in tr-groups as before BUT do not inc in tr-groups in each side of front piece - AT THE SAME TIME dec 2 tr at beg of every row by CROCHET 3 TR TOG - see explanation above. Work until 10-12-12 cm over front piece have been worked, adjust to finish with 1 whole repetition of A.2. Fasten off. LEFT FRONT PIECE: Work left front piece between 3rd and 4th marker the same way as right front piece, beg from 4th marker (i.e. from RS). EDGE: Work an edge around the entire jacket as follows: Work the first 2 rounds of A.2, when working first round of A.2 over tr-rows, skip 2 tr-rows on each side of tr-group. Beg every round with 3 ch and finish with 1 sl st in 3rd ch. SLEEVES: Work back and forth from armhole and down, work every row tog with 1 sl st at the end of row. Insert 1 marker in piece, NOW MEASURE PIECE FROM HERE. Beg by working 86-94-102 tr evenly around the opening for sleeve, beg of row should be under sleeve. Then work 3 rows with 1 tr in every tr. Continue with 1 tr in every tr - AT THE SAME TIME dec differently in the different sizes as follows: READ DECREASE TIP! SIZE S/M: Dec 1 st in each side of piece alternately every 3rd and 2nd row 16 times in total = 54 tr. SIZE L/XL: Dec 1 st in each side of piece every other row 20 times in total = 54 tr. SIZE XXL/XXXL: Dec 1 st in each side of piece every other row 24 times = 54 tr. ALL SIZES: Work 1 tr in every tr until sleeve measures approx. 47 cm, adjust so that next row is from WS. Then work the first 2 rounds of A.2 (= 6 repetitions in width). Fasten off. Work the other sleeve the same way. |
||||||||||||||||||||||||||||||||||||||||
Diagram explanations |
||||||||||||||||||||||||||||||||||||||||
|
||||||||||||||||||||||||||||||||||||||||
 |
||||||||||||||||||||||||||||||||||||||||
 |
||||||||||||||||||||||||||||||||||||||||
 |
||||||||||||||||||||||||||||||||||||||||
Have you finished this pattern?Tag your pictures with #dropspattern #roscardigan or submit them to the #dropsfan gallery. Do you need help with this pattern?You'll find 11 tutorial videos, a Comments/Questions area and more by visiting the pattern on garnstudio.com. © 1982-2026 DROPS Design A/S. We reserve all rights. This document, including all its sub-sections, has copyrights. Read more about what you can do with our patterns at the bottom of each pattern on our site. |
||||||||||||||||||||||||||||||||||||||||


With over 40 years in knitting and crochet design, DROPS Design offers one of the most extensive collections of free patterns on the internet - translated to 17 languages. As of today we count 324 catalogues and 12278 patterns translated into English (UK/cm). 12278
We work hard to bring you the best knitting and crochet have to offer, inspiration and advice as well as great quality yarns at incredible prices! Would you like to use our patterns for other than personal use? You can read what you are allowed to do in the Copyright text at the bottom of all our patterns. Happy crafting!
Post a comment to pattern DROPS 162-11
We would love to hear what you have to say about this pattern!
If you want to leave a question, please make sure you select the correct category in the form below, to speed up the answering process. Required fields are marked *.