
Popular categories
Looking for a yarn?


Comments / Questions (147)
![]() Germana wrote:
Germana wrote:
Salve torno a rompere le scatole......per il lato sinistro da quanto ho capito devo lavorare i ferri accorciati e il motivo sul rovescio del lavoro?
15.09.2018 - 13:38DROPS Design answered:
Buongiorno Germana. Sul lato sinistro, il primo ferro dei ferri accorciati è sul rovescio del lavoro. Quando inizia a lavorare i diagrammi, inizia dalla seconda riga dei diagrammi stessi. Le righe con il motivo (quindi quelle con le maglie gettate) vengono lavorate sul diritto del lavoro. Buon lavoro!
15.09.2018 - 16:22
![]() GERMANA wrote:
GERMANA wrote:
Eureka!!! Ho capito dove sbagliavo ora va tutto bene grazie per i video e le risposte...probabilmente romperò ancora le scatole per l'altro lato ...grazie ancora
13.09.2018 - 10:07
![]() Germana wrote:
Germana wrote:
Buongiorno mi trovo a lavorare la 3 ripetizione del motivo e ho un problema con lo schema A2, sto facendo la taglia L, al 5 ferro mi trovo che dovrei fare il 1 ferro del motivo ma non mi quadra....A me viene da fare il 3....spero di essere stata chiara e grazie per l'aiuto
12.09.2018 - 15:05DROPS Design answered:
Buonasera Germana. Verifichi di aver lavorato correttamente sia il diagramma A2, che la sequenza dei ferri accorciati. Buon lavoro!
12.09.2018 - 20:23
![]() Manuela Marter wrote:
Manuela Marter wrote:
Guten Morgen, gern würde ich dieses Modell für mich in einer anderen Wollstärke stricken. Ich habe mir ausgerechnet, wie viele Maschen ich für die Größe des Strickmusters benötige. Jetzt stellt sich mir aber die Frage, wie berechne ich denn dann die Menge der Zunahmen? Denn, meine Maschen sind ja kleiner als die mit dem angezeigten Garn und der benutzten Nadelstärke. Vielen Dank! Mit freundlichen Grüßen Manuela Marter
30.07.2018 - 08:51DROPS Design answered:
Liebe Frau Marter, leider können wir nicht jeder unseren Anleitungen nach jeder individuellen Anfrage anpassen, gerne bekommen Sie persönnlicher Hilfe von Ihrem DROPS Laden. Viel Spaß beim stricken!
31.07.2018 - 09:34
![]() Jacqueline RICHARD wrote:
Jacqueline RICHARD wrote:
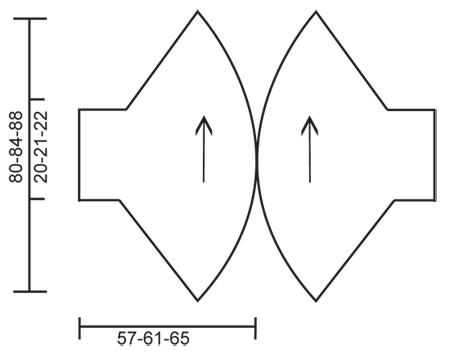
Bonjour sur le diagramme la partie la plus etroite indique 20 cm de large et sur l\'explication 40 cm là je ne comprend pas le modele se fait il en 2 fois ? ensuite on vois les rang raccourcis des 2 cotés et si l\'on suis bien le modele ça fini droit ,c\'est la 1er fois ou je ne comprend pas le diagramme !
15.07.2018 - 12:01DROPS Design answered:
Bonjour Mme Richard, le schéma montre le gilet terminé et posé à plat, on va donc avoir seulement la moitié des 40 cm pour la bordure d'emmanchure soit 20 cm. Bon tricot!
16.07.2018 - 08:54
![]() Christelle wrote:
Christelle wrote:
Bonsoir, Dans la vidéo sur les rangs raccourcis de cette veste (1ère), les mailles ne sont pas relevées au niveau des marqueurs ... ce qui doit former des trous, est ce pour accentuer l'effet du point fantaisie ? Merci à vous Cordialement Christelle
20.02.2017 - 18:38DROPS Design answered:
Bonjour Christelle, dans la vidéo, on sert la 1ère m avant de la tricoter pour éviter qu'il n'y ait de trop gros trous. Vous pouvez utiliser la technique des rangs raccourcis que vous souhaitez. Bon tricot!
21.02.2017 - 09:13
![]() RAVIA Sylvie wrote:
RAVIA Sylvie wrote:
Bonsoir. Les rangs raccourcis doivent ils se faire uniquement sur les 8 premiers rangs et après on a fait plus ou tous les 8 rangs tout le long de l'ouvrage. Merci pour votre réponse.
16.02.2017 - 21:49DROPS Design answered:
Bonjour Mme Ravia, les rangs raccourcis se tricotent tout du long, ce sont eux qui vont donner la forme voulue à l'ouvrage, tricotez les rangs raccourcis et le point fantaisie en même temps. Bon tricot!
17.02.2017 - 09:32
![]() Kerstin Vigård wrote:
Kerstin Vigård wrote:
Väster fram/bakstycke. Efter 2 varv rätstickning och ytterligare 1 varv rät. Skall mönstren stickas på avigsidan eller rätsidan.
20.10.2016 - 22:15DROPS Design answered:
Hej Kerstin. Du starter mönstret paa vrangen som der staar i opskriften. Du skal ogsaa starte paa 2. p i A.1 og A.3,
27.10.2016 - 16:02
![]() Cynthia wrote:
Cynthia wrote:
Can this project be done on a knitting loom, I have a hard time working with knitting needles due to carpal tunnel in my hands?
24.08.2016 - 03:46DROPS Design answered:
Dear Cynthia, this pattern has been written for knitting needles, you are welcome to contact the store where you bought your knitting loom/yarn for any further individual assistance to make it with a knitting loom. Happy knitting!
24.08.2016 - 09:16
![]() Dagmar Fernandes wrote:
Dagmar Fernandes wrote:
Gr. XXXL Ärmel werden zu lang (musste einen ganzen Teil auftrennen). Im 4. Mustersatz einige Maschen weglassen. Die Anleitung ist sehr kompliziert geschrieben. Sollte formatiert werden. Evtl. Grafik Reihe 1-4; ist übersichtlicher u. besser verständlich Bei Gesamthöhe muss es Reihen statt cm heißen.
26.06.2016 - 19:40
|
||||||||||||||||
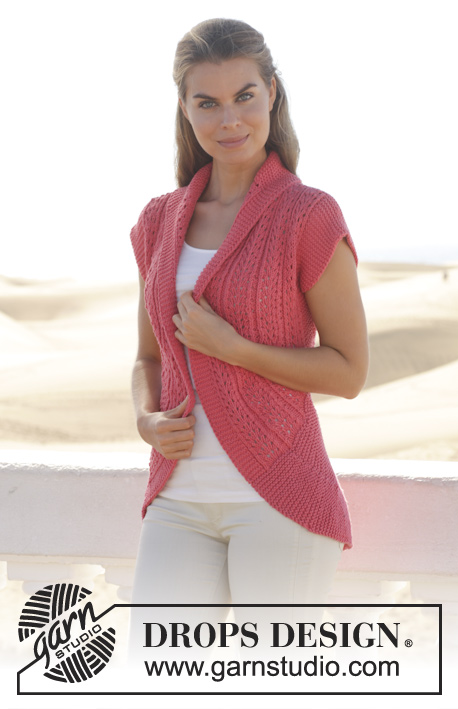
Summer Snug#summersnugjacket |
||||||||||||||||
 |
 |
|||||||||||||||
Knitted DROPS jacket worked in a circle with lace pattern in ”Paris”. Size: S - XXXL.
DROPS 154-8 |
||||||||||||||||
|
GARTER ST (back and forth on needle): K all rows. 1 ridge = 2 rows K. PATTERN: See diagrams A.1 to A.3. The diagrams show all rows in pattern seen from RS. SHORT ROWS: * Work 1 row over the first 10 sts on row, turn and work back. Work 1 row over the first 35 sts on row, turn and work back. Work 1 row over the first 51-57-63 sts on row, turn and work back. Work 1 row over all sts, turn and work back *. Repeat from *-*, i.e. 8 rows at the widest and 2 rows at the most narrow in 1 repetition. ---------------------------------------------------------- RIGHT FRONT/BACK PIECE: Worked back and forth on circular needle. Cast on 86-92-98 sts on circular needle size 6 mm with Paris. Work 1 ridge in GARTER ST - see explanation above. Then work pattern AT THE SAME TIME work SHORT ROWS – see explanation above (1st row = from RS): 5 sts in garter st, K 2, P 3, (turn here), K 2, A.1 (= 23 sts) (turn here), K 1, A.2A, A.2 B over the next 8-14-20 sts, A.2 C, K 2, (turn here), A.1(= 23 sts), K 2, P 3, K 2, 5 sts in garter st. Continue pattern until piece measures 40-42-44 cm at the most narrow and 160-168-176 cm at the widest. Work 1 ridge over all sts and cast off. LEFT FRONT/BACK PIECE: Worked back and forth on circular needle. Cast on 86-92-98 sts on circular needle size 6 mm with Paris. Work 1 ridge in GARTER ST - see explanation above. K 1 row from RS. Then work pattern AT THE SAME TIME work SHORT ROWS – see explanation above (1st row = from WS - NOTE: Beg on 2nd row in A.1 and A.3): 5 sts in garter st, P 2, K 3, (turn here), P 2, A.1 (= 23 sts), (turn here), P 1, A.3A, A.3 B over the next 8-14-20 sts, A.3 C, P 2, (turn here), A.1 (= 23 sts), P 2, K 3, P 2, 5 sts in garter st. Continue pattern until piece measures 40-42-44 cm at the most narrow and 160-168-176 cm at the widest. Work 1 ridge over all sts and cast off. ASSEMBLY: Sew tog the cast-on and cast-off edge. Place the two part towards each other so that the 5 sts in garter st in the widest side meet, and sew tog approx. 58-62 cm mid back, edge to edge – make sure that seam on the parts is mid under sleeve. |
||||||||||||||||
Diagram explanations |
||||||||||||||||
|
||||||||||||||||
 |
||||||||||||||||
 |
||||||||||||||||
Have you finished this pattern?Tag your pictures with #dropspattern #summersnugjacket or submit them to the #dropsfan gallery. Do you need help with this pattern?You'll find 20 tutorial videos, a Comments/Questions area and more by visiting the pattern on garnstudio.com. © 1982-2026 DROPS Design A/S. We reserve all rights. This document, including all its sub-sections, has copyrights. Read more about what you can do with our patterns at the bottom of each pattern on our site. |
||||||||||||||||


With over 40 years in knitting and crochet design, DROPS Design offers one of the most extensive collections of free patterns on the internet - translated to 17 languages. As of today we count 324 catalogues and 12290 patterns translated into English (UK/cm). 12290
We work hard to bring you the best knitting and crochet have to offer, inspiration and advice as well as great quality yarns at incredible prices! Would you like to use our patterns for other than personal use? You can read what you are allowed to do in the Copyright text at the bottom of all our patterns. Happy crafting!
Post a comment to pattern DROPS 154-8
We would love to hear what you have to say about this pattern!
If you want to leave a question, please make sure you select the correct category in the form below, to speed up the answering process. Required fields are marked *.