
Popular categories
Looking for a yarn?


Comments / Questions (147)
![]() Patricia Cardenas wrote:
Patricia Cardenas wrote:
Cuanta lana de va
26.04.2020 - 05:25DROPS Design answered:
Hola Patricia. Necesitas entre 600 - 900 gr de la calidad Paris (es decir, 12- 15-18 ovillos) depende de la talla.
28.04.2020 - 16:52
![]() Jane Coleman wrote:
Jane Coleman wrote:
I love this pattern, but even after watching the video, I don't understand it.
31.03.2020 - 21:39DROPS Design answered:
Dear Mrs Coleman, can you explain more about the part you don't understand? To resume the pattern, you are working 2 different pieces - from mid back/mid front to sleeve edge and with short rows to get sleeve side shorter than the mid back/mid front. Simply turn as explained and work diagrams over the stitches you should work. Read thouroughly the pattern before watching the video to understand what is done - try to adjust the speed of the video by clicking on the icon on the playbar. For any further individual assistance you are welcome to contact your DROPS store or try to ask other knitters in our DROPS Workshop. Happy knitting!
01.04.2020 - 08:39
![]() Karolyn Fredette wrote:
Karolyn Fredette wrote:
I watched the video because I thought it might tell me some clue on this pattern. I know how to do short rows. I have now made 15 3/4" and the shape looks nothing like that pictured. I have remade this twice today. There is NO explanation on what to do FOLLOWING row 7. I am making it up from my past experience. But it does not come out looking like the sketch of the shape. I have been knitting for 50 years. What do you DO with the remaining sts after row 7? Do you work backwards?
12.11.2019 - 09:26DROPS Design answered:
Dear Mrs Fredette, you have to work short rows and pattern at the same time, ie work row 1+2 over 10 sts (turn after P3 on row 1), work row 3+4 over 35 sts (turn on row 3 afterA.1 = you work row 1+2 in A.1), work row 5-6 over 51-57-63 sts (= work row 3+4 inA.1 + row 1 +2 in A.2), work row 7-8 over all sts (= work row 5+6 in A.1 + row 3 +4 in A.2). Continue like this, ie work next row in diagram as shown in diagram when you work over these stitches - when diagram has been worked 1 time in height, repeat from row 1. Happy knitting!
12.11.2019 - 12:36
![]() Elke Schröter wrote:
Elke Schröter wrote:
Ich habe bei der verkürzten Reihe nach dem Lochmuster immer eine kleine und eine sehr große Masche. Wie kann ich das gleichmäßig stricken. Mit freundlichen Grüßen Elke Schröter
05.11.2019 - 16:53DROPS Design answered:
Liebe Frau Schröter, hier sehen Sie, wie man diese verkürzten Reihen strickt - Sie können auch diese Technik mit Umschlag links oder Umschlag rechts stricken. Viel Spaß beim stricken!
06.11.2019 - 08:26
![]() Fiona Mullally wrote:
Fiona Mullally wrote:
So when doing the long full rows is that for 2 rows every 7 and 8th rows? and at the end of 7th row and beginning of 8th row is that when you add in the A1 diagram? Please
17.07.2019 - 19:57DROPS Design answered:
Dear Mrs Mullaly, short rows are repeated over 8 rows: 5 sts in garter st, K2, P3 turn and work WS row, turn and work from RS: 5 sts in garter st, K2, P3, K2, row 1 in A.1, turn and work WS row (= row 2 in A.1), turn and work 5 sts in garter st, K2, P3, K2, row 3 in A.1, K1, row1 in A.2A, row1 in A.2 B, row 1 in A.2 C, K2, turn and work WS row (= row 4 in A.1 and row 2 in A.2), turn, work 5 sts in garter st, K2, P3, K2, row 5 in A.1, K1, row 3 in A.2A, row 3 in A.2 B, row 3 in A.2 C, K2 row 1 in A.1, K2, P3, K2, 5 sts in garter st, turn and work WS row over all sts. Continue that way with next row in diagram as before. Happy knitting!
18.07.2019 - 10:23
![]() Suzann Toresson wrote:
Suzann Toresson wrote:
Behöver inget svar. Har löst problemet.
19.04.2019 - 20:15
![]() Suzann Toresson wrote:
Suzann Toresson wrote:
Hej. Andra delen från avigan ställer till det för mig, jag har stickat från vänster till höger som det står från avigan, men görs alla omslag och ihoptagningar från avigsidan med aviga maskor?
15.04.2019 - 09:40
![]() Michele wrote:
Michele wrote:
I forgot to mention 35 sts were worked so there are 16 sts to be worked{ K 1, A.2A, A.2 B over the next 8-14-20 sts, A.2 C, K 2} (turn here)to make 51sts
31.03.2019 - 15:36DROPS Design answered:
Dear Michele, you work the short rows first over the first 10 sts (2 rows = 1 row from RS + 1 row from WS over the first 10 sts following pattern), then work 2 rows over 35 sts in pattern (= with row 1 and 2 in A.1), then work 2 rows over 51 sts in pattern (= with row 3 and 4 in A.1 + row 1 and 2 in A.2), then work 2 rows over all sts (= row 5 and 6 in A.1 + row 2 and 3 in A.2 + row 1 and 2 in A.1). And repeat the short rows always continuing the next row in diagram you worked before. Happy knitting!
01.04.2019 - 13:26
![]() Michele wrote:
Michele wrote:
Hello, when the pattern says work over next 51 sts...what do I do? K 1, A.2A, A.2 B over the next 8-14-20 sts, A.2 C, K 2, (turn here) can you tell me for size s/m stitch by stitch. I watched video but still can't figure it out..(drops 154/8) Thank you so very much
31.03.2019 - 15:16DROPS Design answered:
Dear Michelle, you are right, that's how you have to work the first 51 sts = as explained with 5 sts in garter st, K 2, P 3, K 2, A.1 (= 23 sts) (work here next row after the one previously worked before), K 1, A.2A, A.2 B over the next 8 sts, A.2 C, K 2, turn and work row from WS as shown in diagram. Happy knitting!
01.04.2019 - 13:17
![]() Germana wrote:
Germana wrote:
Grazieee allora ricapitolando i ferri accorciati sono sul rovescio sempre mentre i motivi si lavorano sul dritto...ma se comincio dal 2 ferro poi devo cominciare il motivo sul dritto dal primo giusto? Scusate le tante domande ....
15.09.2018 - 16:35DROPS Design answered:
Buonasera Germana. Sì ha capito correttamente. Buon lavoro!
15.09.2018 - 20:56
|
||||||||||||||||
Summer Snug#summersnugjacket |
||||||||||||||||
 |
 |
|||||||||||||||
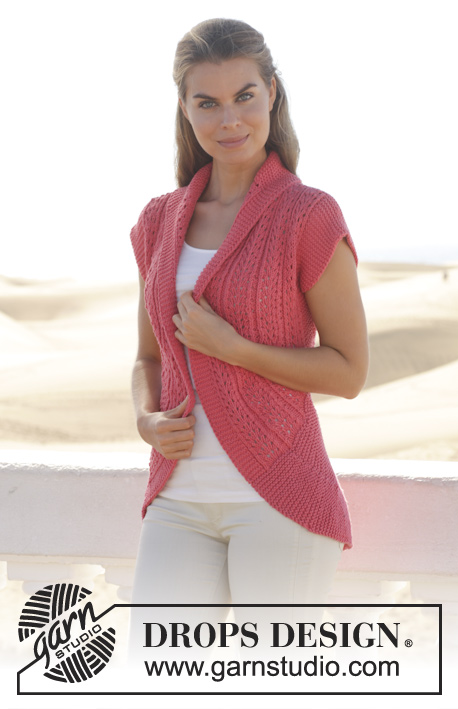
Knitted DROPS jacket worked in a circle with lace pattern in ”Paris”. Size: S - XXXL.
DROPS 154-8 |
||||||||||||||||
|
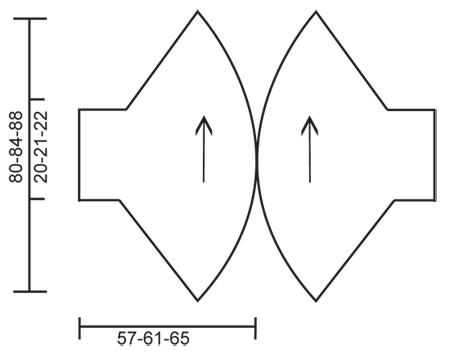
GARTER ST (back and forth on needle): K all rows. 1 ridge = 2 rows K. PATTERN: See diagrams A.1 to A.3. The diagrams show all rows in pattern seen from RS. SHORT ROWS: * Work 1 row over the first 10 sts on row, turn and work back. Work 1 row over the first 35 sts on row, turn and work back. Work 1 row over the first 51-57-63 sts on row, turn and work back. Work 1 row over all sts, turn and work back *. Repeat from *-*, i.e. 8 rows at the widest and 2 rows at the most narrow in 1 repetition. ---------------------------------------------------------- RIGHT FRONT/BACK PIECE: Worked back and forth on circular needle. Cast on 86-92-98 sts on circular needle size 6 mm with Paris. Work 1 ridge in GARTER ST - see explanation above. Then work pattern AT THE SAME TIME work SHORT ROWS – see explanation above (1st row = from RS): 5 sts in garter st, K 2, P 3, (turn here), K 2, A.1 (= 23 sts) (turn here), K 1, A.2A, A.2 B over the next 8-14-20 sts, A.2 C, K 2, (turn here), A.1(= 23 sts), K 2, P 3, K 2, 5 sts in garter st. Continue pattern until piece measures 40-42-44 cm at the most narrow and 160-168-176 cm at the widest. Work 1 ridge over all sts and cast off. LEFT FRONT/BACK PIECE: Worked back and forth on circular needle. Cast on 86-92-98 sts on circular needle size 6 mm with Paris. Work 1 ridge in GARTER ST - see explanation above. K 1 row from RS. Then work pattern AT THE SAME TIME work SHORT ROWS – see explanation above (1st row = from WS - NOTE: Beg on 2nd row in A.1 and A.3): 5 sts in garter st, P 2, K 3, (turn here), P 2, A.1 (= 23 sts), (turn here), P 1, A.3A, A.3 B over the next 8-14-20 sts, A.3 C, P 2, (turn here), A.1 (= 23 sts), P 2, K 3, P 2, 5 sts in garter st. Continue pattern until piece measures 40-42-44 cm at the most narrow and 160-168-176 cm at the widest. Work 1 ridge over all sts and cast off. ASSEMBLY: Sew tog the cast-on and cast-off edge. Place the two part towards each other so that the 5 sts in garter st in the widest side meet, and sew tog approx. 58-62 cm mid back, edge to edge – make sure that seam on the parts is mid under sleeve. |
||||||||||||||||
Diagram explanations |
||||||||||||||||
|
||||||||||||||||
 |
||||||||||||||||
 |
||||||||||||||||
Have you finished this pattern?Tag your pictures with #dropspattern #summersnugjacket or submit them to the #dropsfan gallery. Do you need help with this pattern?You'll find 20 tutorial videos, a Comments/Questions area and more by visiting the pattern on garnstudio.com. © 1982-2026 DROPS Design A/S. We reserve all rights. This document, including all its sub-sections, has copyrights. Read more about what you can do with our patterns at the bottom of each pattern on our site. |
||||||||||||||||


With over 40 years in knitting and crochet design, DROPS Design offers one of the most extensive collections of free patterns on the internet - translated to 17 languages. As of today we count 324 catalogues and 12290 patterns translated into English (UK/cm). 12290
We work hard to bring you the best knitting and crochet have to offer, inspiration and advice as well as great quality yarns at incredible prices! Would you like to use our patterns for other than personal use? You can read what you are allowed to do in the Copyright text at the bottom of all our patterns. Happy crafting!
Post a comment to pattern DROPS 154-8
We would love to hear what you have to say about this pattern!
If you want to leave a question, please make sure you select the correct category in the form below, to speed up the answering process. Required fields are marked *.