
Popular categories
Looking for a yarn?


Comments / Questions (123)
![]() Monika Schiller wrote:
Monika Schiller wrote:
Hallo. Ich verstehe die Abnahme beim Vorderteil am Halsausschnitt nicht. Beim Tipp steht, wenden, wenn noch ein Stäbchen zu häkeln ist..?? Haben Sie darüber kein Video?
07.03.2020 - 17:00DROPS Design answered:
Liebe Frau Schiller, dieses Video zeigt, wie man Stäbchen am Ende einer Reihe abnimmt - Um ein Stäbchen abzunhemen, wird es bis das vorletzte Stäbchen gehäkelt, das letzte nicht häkeln, wenden. Viel Spaß beim häkeln!
09.03.2020 - 10:04
![]() Theresa Collins wrote:
Theresa Collins wrote:
Hi, can you tell me what you mean when you say this is worked according to A1 to A2 ? I don't understand ?? many thanks
10.12.2019 - 11:29DROPS Design answered:
Dear Mrs Collins, this means you have to work pattern as shown in diagrams A.1 (A, B and C) and A.2 (A, B and C) - read more about diagrams here. Happy crocheting!
10.12.2019 - 11:57
![]() Ria wrote:
Ria wrote:
Ik heb vanaf A2 hetzelfde aantal steken als in A1 maar toch is het patroon steeds wijder aan het worden hoewel het aantal steken gelijk is aan de vorige toer . Ik snap het niet het scheelt wel 4 cm
04.10.2019 - 14:34DROPS Design answered:
Dag Ria,
Het patroon zou eigenlijk even wijd moeten worden. Kan het zijn dat je de lossen van A.1 per ongeluk te strak haakt omdat je op het uiteinde van de haaknaald haakt, waardoor deze steken kleiner worden? Misschien is het een oplossing dat je A.2 met een grotere haaknaald haakt.
06.10.2019 - 16:41
![]() Andrea wrote:
Andrea wrote:
Hallo, ich würde gerne aus Lana Grossa Solo Lino Melange den Pullover häkeln. Ich habe 1050 g und Häkelnadel 5 bestellt für ein anderes Modell. Leider funktioniert das hinten und vorne nicht. Würde es zu dem Pulli passen? Das wäre super....👍🙏
03.07.2019 - 20:18DROPS Design answered:
Liebe Andrea, wir bitten um Verständnis, dass wir nicht Produkte unserer Konkurrenz empfehlen können und dass der Kauf des Materials uns hilft, weiterhin kostenlose Anleitungen zur Verfügung stellen zu können. Viel Spaß beim häkeln!
04.07.2019 - 09:23
![]() Mariëtte wrote:
Mariëtte wrote:
Ik begin nu met het patroon en ik zie A1, A1A, A1B, A1C staan.ik begrijp niet goed wat dit inhoudt. Ongetwijfeld een haakschema maar voor mij niet duidelijk.
30.04.2019 - 21:23DROPS Design answered:
Dag Mariëtte,
In de beschrijving staat precies uitgelegd wanneer je welke delen van het telpatroon moet haken. Of kijk anders even bij het tabje 'faq' (naast de opmerkingen); in vraag 11 wordt dit duidelijk uitgelegd.
05.05.2019 - 17:56
![]() Simone wrote:
Simone wrote:
Hallo. Wo finde ich die umrechnung, wie viel wolle ich brauche?Model nr. Cl-015 in xl Danke
05.04.2019 - 17:16DROPS Design answered:
Liebe Simone, die gesamte Garnmenge finden Sie unter dem Kopfzeilen - z.B. 550 g Größe S = 550 / 50 g das Knäuel Cotton Light = 11 Knäuel brauchen Sie für die Größe S. Viel Spaß beim stricken!
08.04.2019 - 09:06
![]() Anja Kleinenberg wrote:
Anja Kleinenberg wrote:
Hoe word de hals afgewerkt?
26.03.2019 - 09:18DROPS Design answered:
Dag Anja,
Nadat je de panden aan elkaar hebt gezet is er verder geen speciale afwerking meer voor de hals.
28.03.2019 - 13:36
![]() Valeria Di Stasio wrote:
Valeria Di Stasio wrote:
Ho realizzato il modello con la lana consigliata ma....non è così morbido come nella foto.Anzi è un mattone.
15.03.2019 - 22:27
![]() Marion wrote:
Marion wrote:
Ik kan er niets van maken ik snap het schema niet
11.01.2019 - 11:11DROPS Design answered:
Dag Marion,
Het telpatroon begint rechts onder en je haakt richting links, dan keer je het werk en lees je de tweede toer van links naar rechts. Zo ga je verder heen en weer hakend.
![]() Lola wrote:
Lola wrote:
No entiendo qué significa hasta que resten 2 p.a/cad
11.11.2018 - 23:47DROPS Design answered:
Hola Lola, quiere decir hasta que queden por trabajar 2 puntos altos / o puntos de cadeneta.
19.11.2018 - 22:33
|
|||||||
Donna#donnasweater |
|||||||
 |
 |
||||||
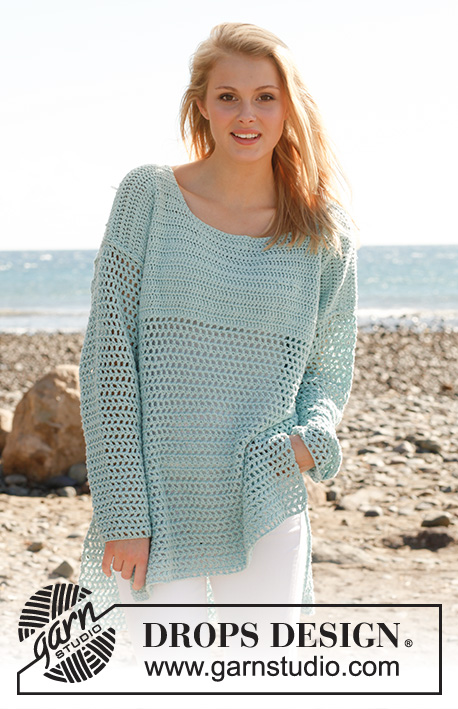
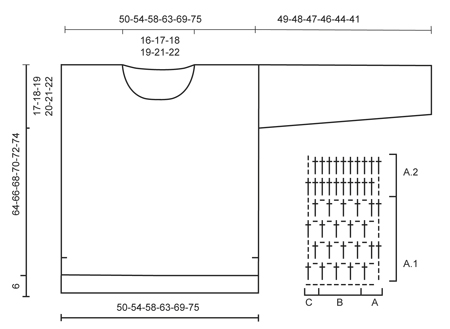
Crochet DROPS jumper in ”Cotton Light”. Size: S - XXXL.
DROPS 145-19 |
|||||||
|
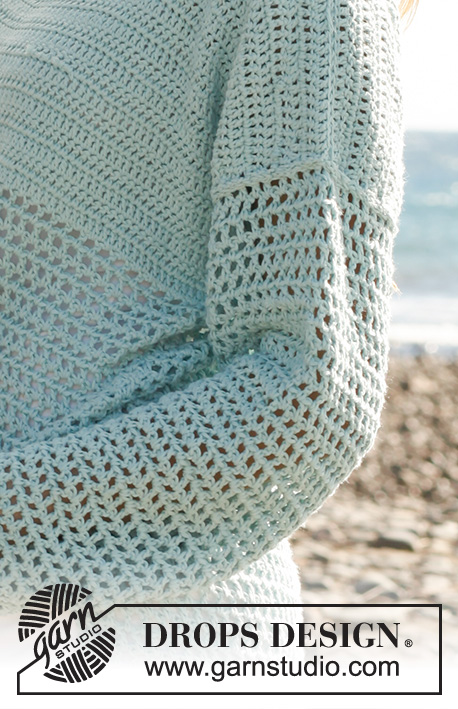
PATTERN: Work according to A.1 and A.2. DECREASE TIP: Turn when one tr remains = 1 tr dec. INCREASE TIP: Inc by working 1 tr + 1 ch extra in outermost tr in each side. Work the inc sts gradually in A.1. ---------------------------------------------------------- BACK PIECE: Worked back and forth. Back piece is worked 6 cm longer than front piece. Work a row with 88-94-102-110-120-130 LOOSE ch (it is important that the ch are loose to avoid a tight edge) on hook size 4 mm with Cotton Light. Turn and work 1 tr in 6th ch from hook (A.1 A has now been worked – see Diagram). Work A.1 B over the next 80-86-94-102-112-122 ch, and finish with A.1 C in the last 2 ch. Then continue to work according to A.1. When piece measures 47-48-49-50-51-52 cm, work as follows: A.2 A, repeat A.2 B until 2 tr/ch remain, work A.2 C = 85-91-99-107-117-127 tr. Continue with A.2 until finished measurements. When piece measures 53-54-55-56-57-58 cm, insert 1 marker in each side (marks where armhole beg). When piece measures 68-70-72-74-76-78 cm, the middle 27-29-31-33-35-37 tr are no longer worked = 29-31-34-37-41-45 tr remain on each shoulder. Now finish each shoulder separately. Continue with A.2, cut and fasten the thread when piece measures 70-72-74-76-78-80 cm. FRONT PIECE: Beg and work as on back piece until piece measures 41-42-43-44-45-46 cm - NOTE: Back piece should be 6 cm longer than front piece - hence the different measures. Now continue as follows: A.2 A, repeat A.2 B until 2 tr/ch remain, work A.2 C = 85-91-99-107-117-127 tr. Continue with A.2 until finished measurements. When piece measures 47-48-49-50-51-52 cm, insert 1 marker in each side (marks where armhole beg). When piece measures 56-58-60-62-64-66 cm, the middle 23-25-27-29-31-33 tr are no longer worked. Now finish each shoulder separately, at the same time dec 1 tr on every row towards the neck 2 times in total – read DECREASE TIP = 29-31-34-37-41-45 tr remain on each shoulder. Continue with A.2, cut and fasten the thread when piece measures 64-66-68-70-72-74 cm. SLEEVE: Work sleeve back and forth. Work a row with 48-48-50-52-54-56 LOOSE ch (it is important that the ch are loose to avoid a tight edge) on hook size 4 mm with Cotton Light. Turn and work 1 tr in 6th ch from hook (A.1 A has now been worked). Work A.1 B over the next 40-40-42-44-46-48 ch, and finish with A.1 C in the last 2 ch = 45-45-47-49-51-53 tr/ch. Then continue to work according to A.1. When piece measures 8 cm, inc 1 st in each side - READ INCREASE TIP! Repeat inc every 7-5-4½-3½-3½-3 cm 5-7-8-9-9-10 more times (6-8-9-10-10-11 inc in total) = 57-61-65-69-71-75 tr/ch. Cut and fasten the thread when piece measures 49-48-47-46-44-41 cm (shorter measurements in the larger sizes because of broader shoulder width). ASSEMBLY: Sew the shoulder seams. Sew in sleeves – from shoulder and down to marker on front and back piece. Sew underarm seams and side seams in one, stop when 26 cm remain on back piece and 20 cm remain on front piece = vent. |
|||||||
Diagram explanations |
|||||||
|
|||||||
 |
|||||||
Have you finished this pattern?Tag your pictures with #dropspattern #donnasweater or submit them to the #dropsfan gallery. Do you need help with this pattern?You'll find 5 tutorial videos, a Comments/Questions area and more by visiting the pattern on garnstudio.com. © 1982-2026 DROPS Design A/S. We reserve all rights. This document, including all its sub-sections, has copyrights. Read more about what you can do with our patterns at the bottom of each pattern on our site. |
|||||||


With over 40 years in knitting and crochet design, DROPS Design offers one of the most extensive collections of free patterns on the internet - translated to 17 languages. As of today we count 324 catalogues and 12290 patterns translated into English (UK/cm). 12290
We work hard to bring you the best knitting and crochet have to offer, inspiration and advice as well as great quality yarns at incredible prices! Would you like to use our patterns for other than personal use? You can read what you are allowed to do in the Copyright text at the bottom of all our patterns. Happy crafting!
Post a comment to pattern DROPS 145-19
We would love to hear what you have to say about this pattern!
If you want to leave a question, please make sure you select the correct category in the form below, to speed up the answering process. Required fields are marked *.