
Popular categories
Looking for a yarn?


Comments / Questions (115)
![]() Tanja wrote:
Tanja wrote:
Das linke Vorderteil ist mit 6,5cm deutlich kürzer als das rechte Vorderteil. Stimmt das? Besten Dank!
24.11.2015 - 07:13DROPS Design answered:
Antwort siehe unten! :-)
30.11.2015 - 12:53
![]() Tanja wrote:
Tanja wrote:
Das linke Vorderteil ist mit 6,5cm deutlich kürzer als das rechte Vorderteil. Stimmt das? Besten Dank!
22.11.2015 - 22:27DROPS Design answered:
Die Maße scheinen nicht ganz zu stimmen, das rechte Vorderteil sollte nur 2,5 cm breiter als das linke sein, bedingt durch die Knopfblende. Stricken Sie das linke Vorderteil also etwas länger, achten Sie dabei darauf, dass Sie die Zunahmen für den Halsausschnitt am linken Vorderteil gegengleich zu den Abnahmen des rechten Vorderteils machen, d.h. in den gleichen Abständen (Sie können am rechten Vorderteil ja sehen, wie viele R Sie zwischen den Abnahmen gestrickt haben), damit beide Vorderteile symmetrisch werden.
30.11.2015 - 12:53
![]() Marta wrote:
Marta wrote:
Perdón por molestar de nuevo. He terminado el delantero izquierdo y no sé desde que lado unirlo al cuerpo. Los 6 nuevos puntos montados quedan al extremo de la labor unida o entre medias? Aun no veo forma a la labor, espero no haberme equivocado. Gracias
10.11.2015 - 15:00DROPS Design answered:
Hola Marta, los 6 pts nuevos están entre el delantero izquierdo y la espalda, serían la parte del escote correspondiente al hombro y son para la manga. Son los mismos pts que has rematado antes en el otro lado.
15.11.2015 - 11:09
![]() Marta wrote:
Marta wrote:
Hola. No entiendo muy bien esta parte "Después dism, en el lado del escote, a cada 1 cm: 1 pt 3 veces en total – dism tejiendo 2 pjd a 2 pts de la orilla = 37-40-47 (53-58) pts en la ag". Sería empezar con dos puntos y luego hacer disminuciones cada 1 cm y 3 veces en total para luego seguir todo del derecho? Gracias
04.11.2015 - 19:38DROPS Design answered:
Hola Marta. Las dism se trabajan como sigue: 2 pts del borde (orilla), 2 pjd. ( es la primera dism), seguimos trabajando toda la fila como antes. Ahora trabajamos 1 cm de la labor sin dism y repetimos las dism de la misma manera de nuevo. Asi un total de 3 vcs.
09.11.2015 - 10:57Danni wrote:
Hi. I'm a beginner knitter, and am stumped on how to create a nice looking neckline. The pattern for the front right neckline states: 'Then dec 1 st towards the neck on every cm / 3/8'' 3 times in total'. Initially I simply bound off one stitch when called for, but this creates a stepped edge which looks loose and ugly. What do I need to do to make the edge like the picture, and to match the edge on the left side? Appreciate any help! Thanks
23.09.2015 - 08:58DROPS Design answered:
Dear Danni, after you will have finished the jacket, you will pick up sts round neck to work the neck edge, so that the stepped edge will be adjusted and rounded. Happy knitting!
23.09.2015 - 11:09
![]() Cimarron wrote:
Cimarron wrote:
I'd really like to do in cotton. Which product USING SINGLE strand would substitute?
12.07.2015 - 20:35DROPS Design answered:
Dear Cimarron, DROPS Alpaca belongs to group A our yarns, you can use Safran or Cotton Viscose as an alternative. Click here to calculate new amount of yarn when using an alternative. Happy knitting!
27.07.2015 - 10:27
![]() Anna wrote:
Anna wrote:
Hallo, ich kann die beschriebenen Knöpfe in Ihrem Sortiment nicht finden. Die angegebene Nummer 525 gehört nicht zu Perlmuttknöpfen, sondern zu Muschelknöpfen (15mm) Für welche Knopfgröße passen denn die Löcher? Viele Grüße
16.05.2015 - 13:59DROPS Design answered:
Liebe Anna, hier lag leider ein Zahlenfehler vor, es muss Nr. 521 heißen (das ist dann ein Perlmuttknopf, auch in 15 mm). Der Fehler wird umgehend behoben. Viel Spaß beim Stricken!
16.05.2015 - 14:46Adela wrote:
Dice : "despues de los ojales seguir tejiendo 2.5cm," esto no queda = a la foto, porque en mi tejido queda un borde de 2.5cm desde los ojales y en foto los ojales estan muy cerca del borde ,En que parte me equivoqué? Abrazo Adela
30.04.2015 - 13:17DROPS Design answered:
Hola Adela, puede parecer que en la foto queda algo más corto. Deben quedar 2-3 pliegues/surcos y me parece que es o que queda en la foto. Las fotos de todos modos a veces son orientativas y no se corresponden con exactitud al patrón.
04.05.2015 - 10:09
![]() Julia Gonzalez wrote:
Julia Gonzalez wrote:
Hola, el patron en el delantero una vez terminada la forma de escote y antes de hacer los botones indica que hay que tejer 14 cm para la talla 6/9, yo creo que eso cm son erróneos porque no abotona en el centro. muchas gracias
08.04.2015 - 11:55DROPS Design answered:
Hola Julia, he repasado el patrón y las medidas son las correctas. 28 cm son para la espalda. Cada delantero mide 2,5 cm más para la cenefa= 14 + 2,5 = 16,5 cm para sobreponer una cenefa sobre otra. la chaqueta se abotona en el centro pero cada delantero sobrepasa el centro.
12.04.2015 - 10:08
![]() Julia Gonzalez wrote:
Julia Gonzalez wrote:
Hola, el patron en el delantero una vez terminada la forma de escote y antes de hacer los botones indica que hay que tejer 14 cm para la talla 6/9, yo creo que eso cm son erróneos porque no abotona en el centro. muchas gracias
08.04.2015 - 11:13
|
||||
Grey Gosling#greygoslingcardigan |
||||
 |
 |
|||
Knitted jacket worked sideways for baby and children in 2 threads DROPS Alpaca
DROPS Baby 21-39 |
||||
|
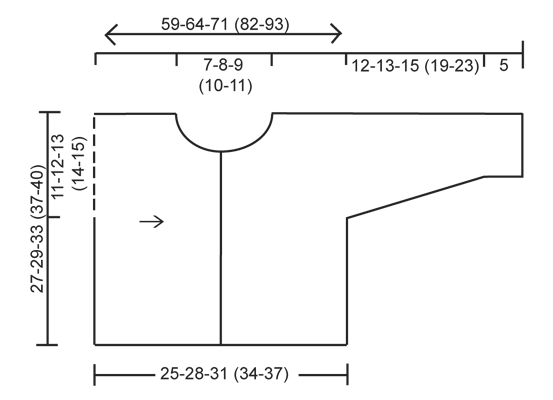
GARTER ST (back and forth on needle): K all rows. INCREASE TIP (applies to neck line): Inc by making 1 YO inside 2 edge sts in garter st. On next row K YO twisted (i.e. work in back loop of st instead of front to avoid holes). NOTE: Work the outermost st in neck line a little tight so that the edge looks nice BUTTON HOLES: 1 button hole = Cast off 1 st and make 1 YO on next row over the cast off st. ------------------------------------------------------- JACKET: Front and back piece is worked in one, sideways from arm to arm. RIGHT SLEEVE: Loosely cast on 26-28-28 (30-30) sts (= bottom of right sleeve) on needle size 5 mm with 2 threads Alpaca. Work in Garter St - see explanation above. When piece measures 5 cm, inc 1 st in each side, repeat inc every other cm a total of 6-6-8 (9-11) times = 38-40-44 (48-52) sts. When piece measures 17-18-20 (24-28) cm, loosely cast on 27-29-34 (39-42) new sts at beg and end of row for front and back piece = 92-98-112 (126-136) sts. Continue to work until piece measures 9-10-11 (12-13) cm from where the sts for front and back piece were cast on (piece measures 26-28-31 (36-41) cm from cast on edge at the bottom of sleeve). Work next row from RS as follows: K the first 46-49-56 (63-68) sts on needle (= front piece) and slip the remaining 46-49-56 (63-68) sts on a stitch holder (= back piece). Insert a marker in last row, now measure back piece from here. FRONT PIECE: = 46-49-56 (63-68) sts. Turn piece and cast off the first 6-6-6 (7-7) sts on row for neck. Then dec for neck line towards the neck every cm: 1 st 3 times in total = 37-40-47 (53-58) sts on needle. Work until width of front piece = 12.5-14-15.5 (17-18.5) cm. Now cast off for 5-5-5 (6-6) button holes evenly on next row – see explanation above, Note the hole at the top are cast off after 2 sts at neck edge. Then work 4 rows in garter stitch. Cast off. BACK PIECE: Slip the 46-49-56 (63-68) sts from stitch holder back on needle and K every row until piece measures 7-8-9 (10-11) cm from last marker. Put the piece aside and work left front piece. LEFT FRONT PIECE: Loosely cast on 37-40-47 (53-58) sts on needle size 5 mm with 2 threads Alpaca. K every row until piece measure 4-4.5-5 (5.5-6) cm. Now inc for neck line in the left side of piece on every cm 1 st a total of 3 times - see Inc.tips above. When piece measure 6-6.5-7 (7.5-8) cm cast on 6-6-6 (7-7) sts in left side = 46-49-56 (63-68) m. When all sts are inc for neck work pieces together - see BODY. BODY: Slip the 46-49-56 (63-68) sts from back piece on to same needle as left front piece = 92-98-112 (126-136) sts on needle. Insert a new marker in the piece - now measure piece from here! Work until piece measures 9-10-11 (12-13) cm. Loosely cast off at beg of the next 2 rows 27-29-34 (39-42) sts in each side = 38-40-44 (48-52) sts remain on needle for left sleeve – now measure piece from here. When piece measures 2-3-1 (3-3) cm, dec 1 st in each side, repeat every other cm a total of 6-6-8 (9-11) times = 26-28-28 (30-30) sts on needle. Loosely cast off when sleeve measures 17-18-20 (24-28) cm (piece measures approx. 59-64-71 (82-93) cm from arm to arm). NECK EDGE: From RS pick up approx 40 - 50 sts around neck with 2 strands on needles size 5 mm/US 8. K3 rows back and forth, then cast/bind off loosely. ASSEMBLY: Fold the piece double at the shoulders and sew sleeve and side seams in one in front loop of outermost st to avoid a chunky seam. Sew on buttons. |
||||
Diagram explanations |
||||
|
||||
 |
||||
Have you finished this pattern?Tag your pictures with #dropspattern #greygoslingcardigan or submit them to the #dropsfan gallery. Do you need help with this pattern?You'll find 11 tutorial videos, a Comments/Questions area and more by visiting the pattern on garnstudio.com. © 1982-2026 DROPS Design A/S. We reserve all rights. This document, including all its sub-sections, has copyrights. Read more about what you can do with our patterns at the bottom of each pattern on our site. |
||||


With over 40 years in knitting and crochet design, DROPS Design offers one of the most extensive collections of free patterns on the internet - translated to 17 languages. As of today we count 324 catalogues and 12290 patterns translated into English (UK/cm). 12290
We work hard to bring you the best knitting and crochet have to offer, inspiration and advice as well as great quality yarns at incredible prices! Would you like to use our patterns for other than personal use? You can read what you are allowed to do in the Copyright text at the bottom of all our patterns. Happy crafting!
Post a comment to pattern DROPS Baby 21-39
We would love to hear what you have to say about this pattern!
If you want to leave a question, please make sure you select the correct category in the form below, to speed up the answering process. Required fields are marked *.