
Popular categories
Looking for a yarn?


Comments / Questions (115)
![]() Kirsche wrote:
Kirsche wrote:
Hallo, ich möchte die Jacke gerne stricken, bin aber ein wenig verunsichert durch die vielen Fragen und Probleme mit der Anleitung. Ich möchte gerne wissen, wo bei der Jacke nun noch Nähte sind. Ich erstehe es so, dass es nur untere Ärmelnähte und seitliche Nähte am Körper gibt. Ist das richtig?
20.08.2018 - 10:54DROPS Design answered:
Ja, das stimmt, Sie müssen an beiden Seiten die untere Ärmelnaht und die Seitennaht von Vorder- und Rückenteil schließen. Lassen Sie sich nicht verunsichern - wenn Sie etwas nicht verstehen, fragen Sie einfach noch einmal nach. :-) Viel Spaß beim Stricken!
22.08.2018 - 22:56
![]() Melanie wrote:
Melanie wrote:
Hallo, eine sehr schöne Jacke die ich gerne nachschicken möchte. Ich verstehe nur nicht warum mit 2 Fäden am Ärmel begonnen wird, wird die ganze Jacke mit doppelter Wolle gestrickt? Oder nur das Bündchen? Kann sie alternativ auch mit Merinowolle gestrickt werden? Danke!
13.06.2018 - 08:56DROPS Design answered:
Liebe Melanie, die ganze Jacke wird mit 2 Fäden gestrickt - siehe Maschenprobe. Gerne können Sie auch mit 2 Fäden BabyMerino oder 1 Faden BigMerino stricken - benutzen Sie unseren Garnumrechner. Viel Spaß beim stricken!
13.06.2018 - 12:02
![]() Novello wrote:
Novello wrote:
Please would you add extra diagrams to help with this pattern. I am an experienced knitter but I’m finding this pattern terribly confusing. It is not explained clearly enough. It would help enormously if extra diagrams were added to show exactly how this is knitted and how it fixes together. I am half way through knitting it at the moment and I’m scratching my head trying to figure out how this will work.
04.04.2018 - 09:04DROPS Design answered:
Dear Mrs Novello, this jacket is worked sideways starting from the right sleeve. You increase for sleeve then cast on new sts on each side for front and back piece. Then continue working only on front piece sts (put the sts for back piece on a st holder). When sts for front piece have been cast off, slip sts for back piece back on needle and work 7-11 cm (see size) and put aside. Work now left front piece and work then left front piece together with back piece until side: cast off sts for front and back piece and continue with left sleeve with dec to the wrist. Happy knitting!
04.04.2018 - 09:13
![]() Dani Toole wrote:
Dani Toole wrote:
Just finishing the left front and getting ready to attach to the body..which is the right side?? Are the increases on the left or right side???
11.01.2018 - 16:19DROPS Design answered:
Hi Dani, When you have the left front piece on a table, flat in front of you, the left hand side of the piece will have the increases for the neck if you are looking at the right side. Happy knitting!
12.01.2018 - 07:51
![]() Ria De Klerk wrote:
Ria De Klerk wrote:
In het patroon Baby 21-39 zit er volgens mij een fout bij de beschrijving van de tweede mouw. Er staat elke cm 1 steek minderen aan weerszijden. Bij de beschrijving van de eerste mouw staat dat gemeerderd moet worden elke 2 cm. Dus moet m.i. bij de tweede mouw elke 2 cm geminderd worden.
14.12.2017 - 12:25
![]() Dirk wrote:
Dirk wrote:
Ich habe eben angefangen, die Jacke zu stricken in Größe 12-18 Monate Und habe schon mit dem Ärmel Probleme Nach 5 cm soll man links und rechts eine Masche zunehmen, und dann 8 mal wieder holen, alle 2cm, macht für mich 16 cm cm. Plus die 5 cm macht es 21 cm. Nun soll man nach 20cm aber auch schon dies Maschen für das Vorder - und Rückenteil. Wie soll das denn gehen?
15.10.2017 - 17:56DROPS Design answered:
Lieber Dirk, die 1. Zunahmen wird nach 5 cm gestrickt, dann nehmen Sie noch 7 x alle 2 cm, dh: nach 7 cm, nach 9 cm, usw die letzte Zunahme wird beim 19 cm sein. Viel Spaß beim stricken!
16.10.2017 - 09:59
![]() EW wrote:
EW wrote:
Hei! En ymmärrä miten vasen etu- ja takakappale yhdistetään.. Jos otan kaikki 126 silmukkaa samalle puikolle ja alan neulomaan niin vasemmasta puolesta tulee tuplasti pidempi kuin oikeasta..?
29.07.2017 - 21:39DROPS Design answered:
Hei, olen tarkistanut ohjeen ja mitat täsmäävät, eli etukappaleista tulee yhtä pitkät. Kiinnitä aina merkit työhön ohjeen mukaan ja ota mitat merkeistä, kuten ohjeessa opastetaan.
30.08.2017 - 14:19
![]() Amanda wrote:
Amanda wrote:
Hello. I have just finished the left front piece and am getting ready to add the stitches from the body. Should the left front piece be be facing or back side? I'm just confused about how to add the body section. Thank you
15.03.2017 - 18:37DROPS Design answered:
Dear Amanda, when left front piece is done, work sts on left front piece from RS, then work the sts from back piece = all sts are now worked, insert a marker and continue back and forth on all sts. Happy knitting!
16.03.2017 - 08:38
![]() Meta wrote:
Meta wrote:
Kan jag använda Big Merino till detta mönster? Alltså sticka med enkel tråd? MVH Meta
31.01.2017 - 10:04DROPS Design answered:
Hej Meta. Ja, det kan du sagtens, men strik en pröve först saa du har strikkefastheden i orden
31.01.2017 - 15:24
![]() Schön wrote:
Schön wrote:
Liebes Drops Team, wenn ich für die Jacke das Garn Big Merino nehme, brauche ich doch nur die Hälfte, oder?
31.01.2017 - 08:09DROPS Design answered:
Liebe Schön, 2 Fäden Alpaca können durch 1 Faden Big Merino erszetzt werden, hier lesen Sie mehr wieviel Garn Sie dann brauchen. Viel Spaß beim stricken!
31.01.2017 - 09:32
|
||||
Grey Gosling#greygoslingcardigan |
||||
 |
 |
|||
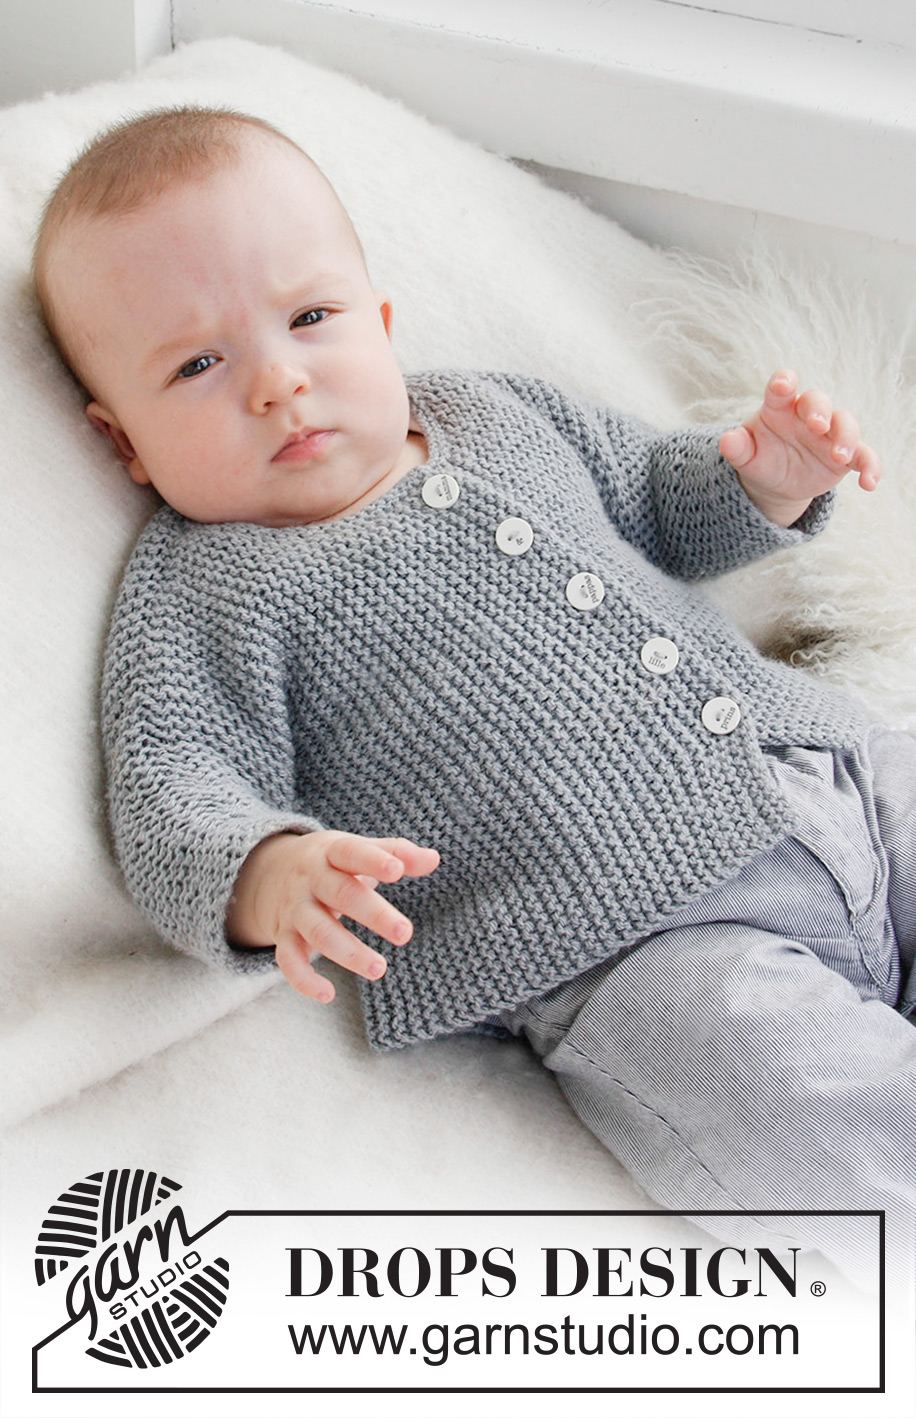
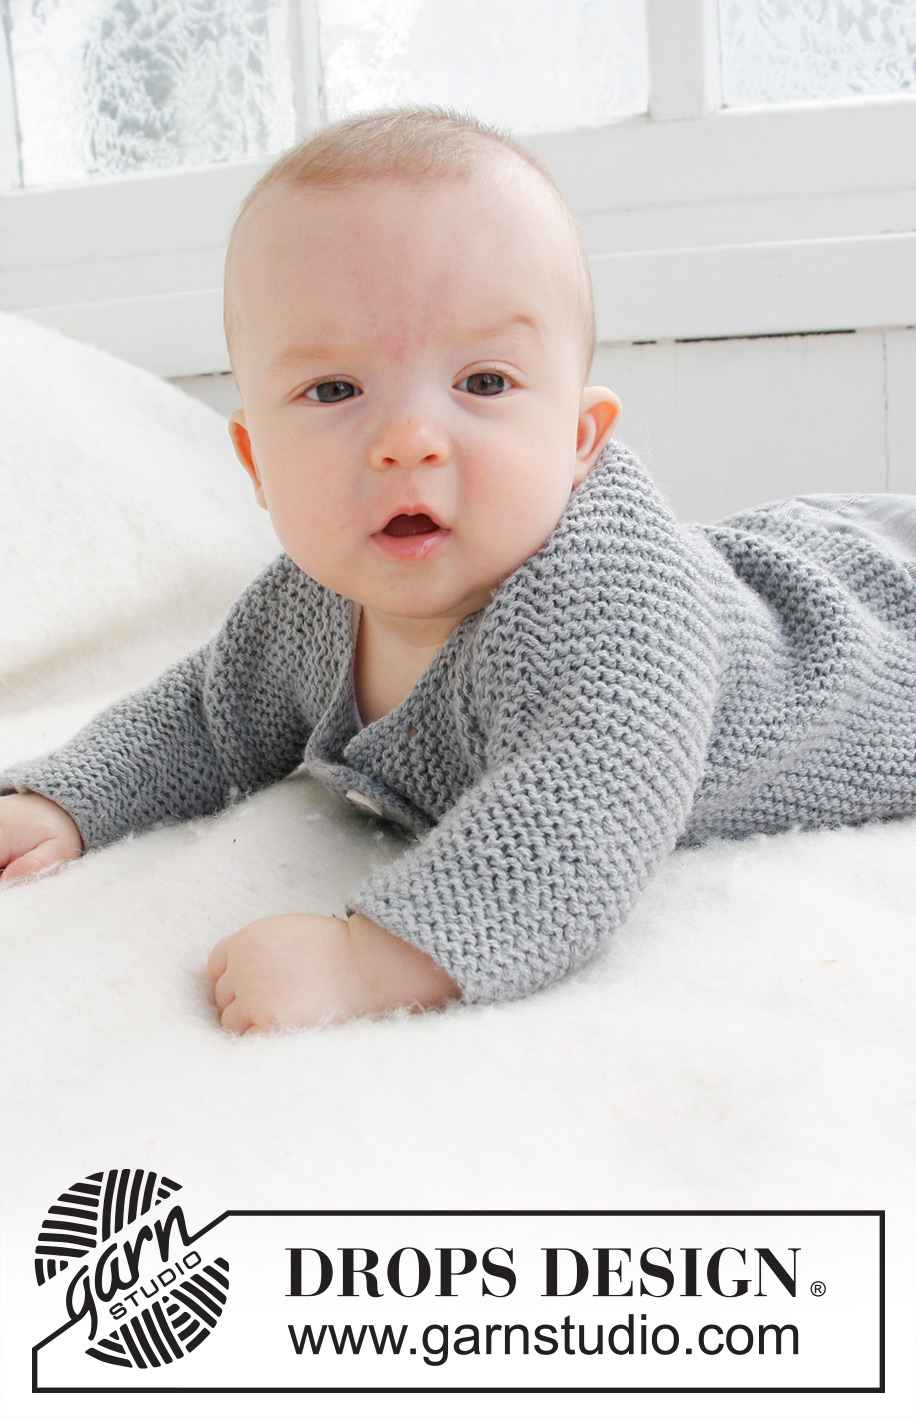
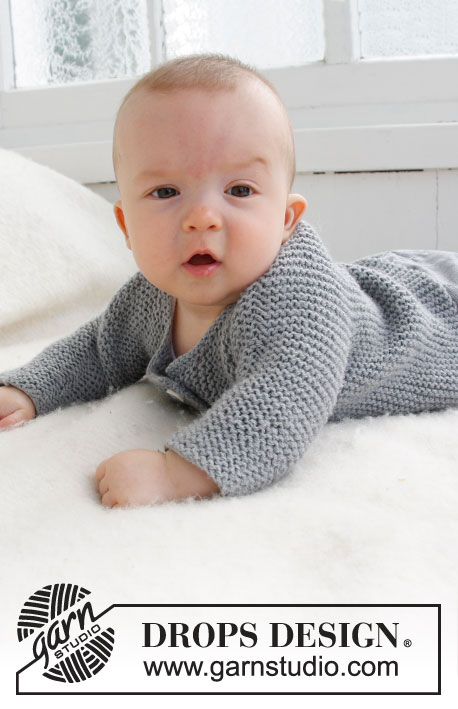
Knitted jacket worked sideways for baby and children in 2 threads DROPS Alpaca
DROPS Baby 21-39 |
||||
|
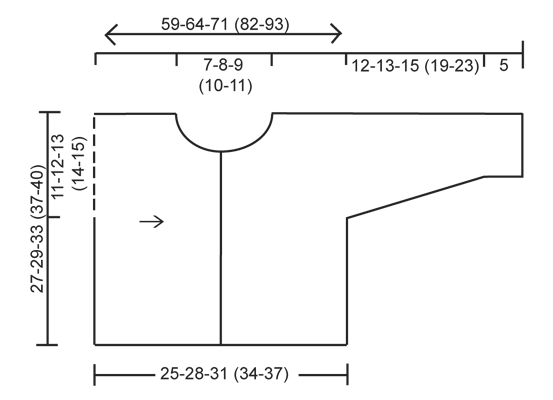
GARTER ST (back and forth on needle): K all rows. INCREASE TIP (applies to neck line): Inc by making 1 YO inside 2 edge sts in garter st. On next row K YO twisted (i.e. work in back loop of st instead of front to avoid holes). NOTE: Work the outermost st in neck line a little tight so that the edge looks nice BUTTON HOLES: 1 button hole = Cast off 1 st and make 1 YO on next row over the cast off st. ------------------------------------------------------- JACKET: Front and back piece is worked in one, sideways from arm to arm. RIGHT SLEEVE: Loosely cast on 26-28-28 (30-30) sts (= bottom of right sleeve) on needle size 5 mm with 2 threads Alpaca. Work in Garter St - see explanation above. When piece measures 5 cm, inc 1 st in each side, repeat inc every other cm a total of 6-6-8 (9-11) times = 38-40-44 (48-52) sts. When piece measures 17-18-20 (24-28) cm, loosely cast on 27-29-34 (39-42) new sts at beg and end of row for front and back piece = 92-98-112 (126-136) sts. Continue to work until piece measures 9-10-11 (12-13) cm from where the sts for front and back piece were cast on (piece measures 26-28-31 (36-41) cm from cast on edge at the bottom of sleeve). Work next row from RS as follows: K the first 46-49-56 (63-68) sts on needle (= front piece) and slip the remaining 46-49-56 (63-68) sts on a stitch holder (= back piece). Insert a marker in last row, now measure back piece from here. FRONT PIECE: = 46-49-56 (63-68) sts. Turn piece and cast off the first 6-6-6 (7-7) sts on row for neck. Then dec for neck line towards the neck every cm: 1 st 3 times in total = 37-40-47 (53-58) sts on needle. Work until width of front piece = 12.5-14-15.5 (17-18.5) cm. Now cast off for 5-5-5 (6-6) button holes evenly on next row – see explanation above, Note the hole at the top are cast off after 2 sts at neck edge. Then work 4 rows in garter stitch. Cast off. BACK PIECE: Slip the 46-49-56 (63-68) sts from stitch holder back on needle and K every row until piece measures 7-8-9 (10-11) cm from last marker. Put the piece aside and work left front piece. LEFT FRONT PIECE: Loosely cast on 37-40-47 (53-58) sts on needle size 5 mm with 2 threads Alpaca. K every row until piece measure 4-4.5-5 (5.5-6) cm. Now inc for neck line in the left side of piece on every cm 1 st a total of 3 times - see Inc.tips above. When piece measure 6-6.5-7 (7.5-8) cm cast on 6-6-6 (7-7) sts in left side = 46-49-56 (63-68) m. When all sts are inc for neck work pieces together - see BODY. BODY: Slip the 46-49-56 (63-68) sts from back piece on to same needle as left front piece = 92-98-112 (126-136) sts on needle. Insert a new marker in the piece - now measure piece from here! Work until piece measures 9-10-11 (12-13) cm. Loosely cast off at beg of the next 2 rows 27-29-34 (39-42) sts in each side = 38-40-44 (48-52) sts remain on needle for left sleeve – now measure piece from here. When piece measures 2-3-1 (3-3) cm, dec 1 st in each side, repeat every other cm a total of 6-6-8 (9-11) times = 26-28-28 (30-30) sts on needle. Loosely cast off when sleeve measures 17-18-20 (24-28) cm (piece measures approx. 59-64-71 (82-93) cm from arm to arm). NECK EDGE: From RS pick up approx 40 - 50 sts around neck with 2 strands on needles size 5 mm/US 8. K3 rows back and forth, then cast/bind off loosely. ASSEMBLY: Fold the piece double at the shoulders and sew sleeve and side seams in one in front loop of outermost st to avoid a chunky seam. Sew on buttons. |
||||
Diagram explanations |
||||
|
||||
 |
||||
Have you finished this pattern?Tag your pictures with #dropspattern #greygoslingcardigan or submit them to the #dropsfan gallery. Do you need help with this pattern?You'll find 11 tutorial videos, a Comments/Questions area and more by visiting the pattern on garnstudio.com. © 1982-2026 DROPS Design A/S. We reserve all rights. This document, including all its sub-sections, has copyrights. Read more about what you can do with our patterns at the bottom of each pattern on our site. |
||||


With over 40 years in knitting and crochet design, DROPS Design offers one of the most extensive collections of free patterns on the internet - translated to 17 languages. As of today we count 324 catalogues and 12290 patterns translated into English (UK/cm). 12290
We work hard to bring you the best knitting and crochet have to offer, inspiration and advice as well as great quality yarns at incredible prices! Would you like to use our patterns for other than personal use? You can read what you are allowed to do in the Copyright text at the bottom of all our patterns. Happy crafting!
Post a comment to pattern DROPS Baby 21-39
We would love to hear what you have to say about this pattern!
If you want to leave a question, please make sure you select the correct category in the form below, to speed up the answering process. Required fields are marked *.