
Popular categories
Looking for a yarn?


Comments / Questions (83)
![]() Barbara wrote:
Barbara wrote:
I only can print pages one and two, how can I chanced this?
27.08.2017 - 08:46DROPS Design answered:
Dear Barbara, we successfully could print this pattern, maybe you should check the settings on your printer? Happy knitting!
29.08.2017 - 11:36Sally Ann Gray wrote:
I adore this pattern but wondered if there is a pattern for the cardigan too please? It is just gorgeous and I would like to make both.
27.07.2017 - 01:37DROPS Design answered:
Dear Sally Ann, the pattern you refer to is actually a cardigan. If you meant if there is a pullover version, there is unfortunately not. However there is lots of patterns in similar styles, and you can also convert this pattern by knitting it in the round and omitting the button band. Happy knitting!
27.07.2017 - 09:08Kerri wrote:
The pattern says knit one row from RS after completing M1. Yet M1 last row would be from RS so the next row would be WS. ???? Solution please. Thanks, Kerri
05.10.2016 - 12:39DROPS Design answered:
Dear Kerri, a correction will be made, after M.1 work 1 row from WS, then change to circular needle size 4 mm. Happy knitting!
05.10.2016 - 14:03
![]() Camilla Sundström wrote:
Camilla Sundström wrote:
Jag ska göra strl M, och ska lägga upp 264 maskor. Stämmer detta verkligen? Om 17m = 10 cm. Den ska vara 100cm i vidd längst ner och det blir ju i så fall 170 maskor vilket känns långt från 264. Så tänker jag galet eller är det felskrivet? Tack på förhand // Camilla
22.08.2016 - 15:14DROPS Design answered:
Hej Camilla. Mönstret er korrekt. Du starter med at strikke rib som traekker sig meget mere sammen en glatstrik (som strikkefastheden er i). Naar du er faerdig med ribben bytter du til p 5 og tager ind til 180 m. Fra her strikker du videre i glatstrik og med 180 m sidder du paa den rette maal.
24.08.2016 - 12:06
![]() Antje Schupp wrote:
Antje Schupp wrote:
Das ist so eine süße Jacke! passt maschenproben-mäßig auf meine Lieblingswolle DropsforYou4, also...
02.12.2015 - 19:54
![]() Giulia Pieretti wrote:
Giulia Pieretti wrote:
Salve, ho una domanda sul modello: nella spiegazione dello SPRONE non mi è chiaro come devo procedere dopo aver lavorato 2 volte a dritto 2 m e ripetere per 20 volte. Grazie
16.10.2015 - 17:35DROPS Design answered:
Buonasera Giulia, se è questa la parte che non le è chiara * lavorare 2 volte a dir ognuna delle 2 m seguenti (si passa da 2 m a 4 m dir), 20 m rov *, ripetere da *-* in totale 10-11-12-13-14-15 volte: vuol dire che deve lavorare aumentare 1 m nelle 2 m seguenti (che diventano 4 m), e lavorare 20 m rov, e ripetere tutta questa parte per le volte indicate per la sua taglia. Se non fosse questo il punto ci riscriva pure. Buon lavoro!!
16.10.2015 - 18:20
![]() Sabine wrote:
Sabine wrote:
Beim Bündchen ist die Vorderseite zuerst 4 li, 2 re. Später wird ja die Vorderseite zur Rückseite. Ist dann das Maschenbild vom Bündchen welches man sieht 4 re, 2 li?
16.02.2015 - 19:08DROPS Design answered:
Die Vorderseite wird nicht zur Rückseite, das ist vielleicht etwas missverständlich beschrieben und wird gleich umformuliert. Die Jacke wird nach dem Bündchen glatt links gestrickt, was zwar theoretisch die Rückseite von glatt rechts ist, aber betrachtet wird hier von vornherein die Vorderseite. Die 1. R des Bündchens ist eine Hin-R, also erscheint das Bündchen 4 M li, 2 M re.
17.02.2015 - 10:27
![]() Anja wrote:
Anja wrote:
Ich habe zwei Fragen: 1. Es wird ja glatt rechts, aber mit der linken Seite außen gestrickt. Ist mit "Hinreihe" dann eine Reihe linker oder rechter Maschen gemeint? 2. Bei den Ärmelkanten soll man am Anfang und am Ende der Reihe mehrere Maschen abketten. Am Ende geht das nur, wenn man dann durch die letzte verbliebene Masche den Faden durchzieht, da ja keine Masche mehr zum drüberziehen da ist, oder? LG Anja
10.01.2015 - 17:52DROPS Design answered:
Glatt rechts mit der linken Seite außen bedeutet glatt links, und damit ist eine Hin-R eine R mit linken M. Und genau, die letzte M ketten Sie ab, indem Sie einfach den Faden durchziehen, wie von Ihnen beschrieben. Gutes Gelingen!
11.01.2015 - 15:55
![]() Judith wrote:
Judith wrote:
Enjoyed making this, especially in the DROPS Big Merino which is so soft and itch free, yet holds its shape for a defined cable. Cable contrasts well with the reverse stocking stitch background. Love the cable pattern - inspired design. Thank you DROPS :-)
29.12.2014 - 21:35
![]() Tortajada wrote:
Tortajada wrote:
Bonjour, je suis en train de réaliser le gilet 121-27 et je voudrais savoir si,, sur le diagramme tous les rangs sont représentés ou si il n'y a que les rangs impairs. en vous remerciant de votre réponse
22.10.2014 - 16:24DROPS Design answered:
Bonjour Mme Tortajada, tous les rangs sont effectivement représentés dans le diagramme, ceux sur l'endroit et ceux sur l'envers, 1 case = 1 m x 1 rang. (vous trouverez ici d'autres informations sur les diagrammes. Bon tricot!
23.10.2014 - 09:32
|
|||||||||||||||||||||||||
Celtic Winter#celticwintercardigan |
|||||||||||||||||||||||||
|
|
|||||||||||||||||||||||||
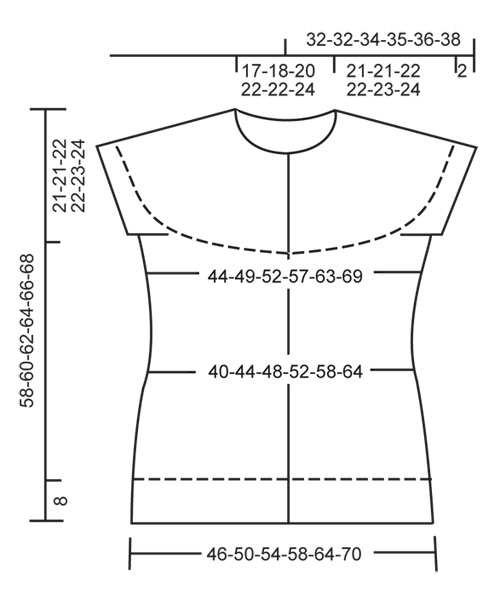
DROPS waistcoat in ”Alaska” with raglan and cables on yoke. Size S to XXXL.
DROPS 121-27 |
|||||||||||||||||||||||||
|
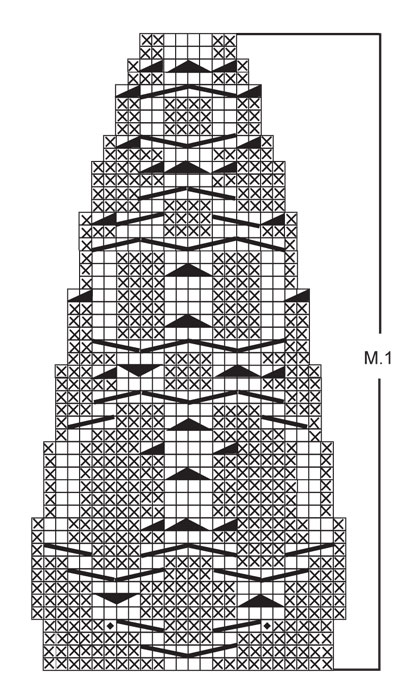
GARTER ST (back and forth on needle): K all rows. PATTERN: See diagrams M.1 – pattern in diagram is seen from RS. BUTTONHOLES: Make buttonholes on right front band. 1 buttonhole = K tog 3rd and 4th st from mid front and make 1 YO. Make buttonholes when piece measures: SIZE S: 12, 19, 26, 34, 41, 49 and 56 cm. SIZE M: 12, 20, 28, 36, 43, 51 and 58 cm. SIZE L: 12, 20, 28, 36, 44, 52, 60 cm. SIZE XL: 12, 21, 29, 37, 45, 54 and 62 cm. SIZE XXL: 12, 21, 30, 39, 47, 56 and 64 cm. SIZE XXXL: 12, 21, 30, 39, 48, 57 and 66 cm. -------------------------------------------------------- -------------------------------------------------------- BODY PIECE: Worked back and forth on circular needle from mid front. Cast on 240-264-282-306-336-366 sts (includes 5 front band sts each side towards mid front) on circular needle size 4 mm with Alaska. Continue as follows from RS: 5 front band sts in GARTER ST – see above, K2, * P4/ K2 *, repeat from *-* and finish with 5 front band sts in garter st. When rib measures 8 cm work (make sure next row is from RS) change to needle size 5 mm. Work next row as follows from RS: 5 front band sts in garter st, K2, * K2 tog, K2 tog, K2 *, repeat from *-* and finish with 5 front band sts in garter st = 164-180-192-208-228-248. Continue in reverse stocking st and front bands in garter st as before. Insert a marker 43-47-50-54-59-64 sts in from each side (= 78-86-92-100-110-120 sts between markers on back piece). REMEMBER THE KNITTING TENSION! When piece measures 10-10-11-11-12-12 cm dec 1 st each side of both markers, and repeat the dec on every 2 cm a total of 5 times = 144-160-172-188-208-228 sts. AT THE SAME TIME when piece measures 12 cm make BUTTONHOLES on right front band – see above! When piece measures 22-22-23-23-24-24 cm inc 1 st each side of both markers, and repeat the inc on every 3 cm a total of 4 times = 160-176-188-204-224-244 sts. When piece measures 37-39-40-42-43-44 cm cast off 6-6-8-8-10-10 sts each side for armhole on next row from RS (= 3-3-4-4-5-5 sts each side of marker) = 148-164-172-188-204-224 sts left on needle. Put piece aside. SLEEVE EDGES: Worked back and forth on circular needle. Cast on 58-61-70-73-78-79 sts on circular needle size 4 mm. K 3 rows and work next row as follows: Cast off the first 3-3-4-4-5-5 sts, K sts on row until 3-3-4-4-5-5 sts remain, cast off theses sts, cut the thread = 52-55-62-65-68-69 sts remain on needle. Put piece aside and knit the other sleeve edge. YOKE: Slip sts from sleeve edges on the same circular needle size 5 mm as body piece where cast off for armholes = 252-274-296-318-340-362 sts. K 1 row from WS and work 0-0-2-2-4-6 rows in reverse stocking st with front bands in garter st. Work next row as follows from RS: 5 front band sts in garter st, P10, * inc 1 st in each of the next 2 sts and K these 4 sts, P20 *, repeat from *-* a total of 10-11-12-13-14-15 times, inc 1 st in each of the next 2 sts and K these 4 sts, P10, and 5 front band sts in garter st = 274-298-322-346-370-394 sts. Now continue in M.1 with front bands in garter st as before (first row = WS). On row 4 in M.1 inc 2 sts in each repeat as per the diagram = 296-322-348-374-400-426 sts. Now complete M.1. After M.1 there are 98-106-114-122-130-138 sts on needle. Work 1 row from WS. Change to circular needle size 4 mm. K 1 row from RS, at the same time dec 16-18-22-24-30-30 sts evenly (do not dec on front bands) = 82-88-92-98-100-108 sts. K 1 row. Insert a marker mid back. Continue in garter st on all sts, at the same time work shortened rows mid back as follows (first row = RS): K 7 sts past marker mid back, turn, K 7 sts past marker on the other side, turn, K 14 sts past marker, turn, K 14 sts past marker on the other side, turn, and continue like this with 7 more sts before each turn until you have work a total of 35-35-35-42-42-42 sts each side of marker. Turn, K all sts on row and then work 3 rows on all sts. Cast off with K sts from RS. ASSEMBLY: Sew sleeve edges tog, edge to edge and sew openings under sleeves. Sew on buttons. |
|||||||||||||||||||||||||
Diagram explanations |
|||||||||||||||||||||||||
|
|||||||||||||||||||||||||
 |
|||||||||||||||||||||||||
 |
|||||||||||||||||||||||||
Have you finished this pattern?Tag your pictures with #dropspattern #celticwintercardigan or submit them to the #dropsfan gallery. Do you need help with this pattern?You'll find 19 tutorial videos, a Comments/Questions area and more by visiting the pattern on garnstudio.com. © 1982-2026 DROPS Design A/S. We reserve all rights. This document, including all its sub-sections, has copyrights. Read more about what you can do with our patterns at the bottom of each pattern on our site. |
|||||||||||||||||||||||||


With over 40 years in knitting and crochet design, DROPS Design offers one of the most extensive collections of free patterns on the internet - translated to 17 languages. As of today we count 324 catalogues and 12290 patterns translated into English (UK/cm). 12290
We work hard to bring you the best knitting and crochet have to offer, inspiration and advice as well as great quality yarns at incredible prices! Would you like to use our patterns for other than personal use? You can read what you are allowed to do in the Copyright text at the bottom of all our patterns. Happy crafting!
Post a comment to pattern DROPS 121-27
We would love to hear what you have to say about this pattern!
If you want to leave a question, please make sure you select the correct category in the form below, to speed up the answering process. Required fields are marked *.