
Popular categories
Looking for a yarn?


Comments / Questions (86)
![]() Kasia wrote:
Kasia wrote:
Nie rozumiem jak jest liczone zamykanie oczek na podkrój rękawów. Zamykając 3 oczka muszę przerobić 4o. naraz? 2o. tzn. 3o. A zamykając 1o. przerabiam 2o. naraz? Bo tylko w ten sposób jestem w stanie z 60 oczek zejść do 34. Pozdrawiam serdecznie
01.11.2020 - 22:48DROPS Design answered:
Witaj Kasiu! Jest dokładnie tak jak piszesz. Zamykając 1 oczko przerabiasz 2 o. razem na prawo/lewo (zalezy od wzoru). Zamykając większą liczbę oczek naraz (np. 2, 3) lepiej to zrobić tak jakbyś zakańczała robótkę, wtedy nie będziesz miała takiej zbitki kliku oczek (grudki) i łatwiej będzie później wszyć rękawy. Jak to zrobić znajdziesz TUTAJ. Powodzenia!
02.11.2020 - 10:33
![]() Ines wrote:
Ines wrote:
Ich möchte fragen,ob jemand diese Jacke mit der vorgegeben,,Drops Eskimo,,Schurwolle gestrickt hat?Wie fühlt sich die Wolle an?Weich oder kratzig und vor allem möchte ich wissen,ob sie sehr fusselt.Welche Wolle kann man als Alternative verwenden?
28.10.2020 - 20:34DROPS Design answered:
Liebe Ines, am besten wenden Sie sich an Ihrem DROPS Laden, da jede hat eine persönnliche und individuelle Empfindlichkeit - Alternative zur Eskimo finden Sie auch beim Garnumrechner. Viel Spaß beim stricken!
29.10.2020 - 08:37
![]() Margreet Maurits-Andrea wrote:
Margreet Maurits-Andrea wrote:
Het gaat om het patroon baby 31-3 Babyvestje Odeta. Het gaat om het stuk "tip voor het minderen". Wat wordt bedoeld met "minder aan de binnenkant van de 1 voorbies steek"
16.10.2020 - 22:35DROPS Design answered:
Dag Margreet,
Er wordt mee bedoeld dat je naast de ene voorbiessteek mindert, dus je zorgt ervoor dat de voorbiessteek niet gebruikt wordt voor het minderen, maar je breit de 2 steken er naast recht samen (of afhalen, breien en overhalen).
21.10.2020 - 12:08
![]() Lisa wrote:
Lisa wrote:
Ich verstehe die Ärmel nicht. Wenn ich 30 Maschen anschlage und 5x 6 m ab- und 2 m aufnehme hab ich doch hinterher nur noch 10 m auf der Nadel und keine 34 m, versteh ich da was falsch? Gruß, Lisa
15.10.2020 - 21:28DROPS Design answered:
Liebe Lisa, wenn Sie 30 Maschen anschlagen, nehmen Sie nach 20 cm 6 M regelmäßig verteilt = 24 M sind noch übrig + die Zunahmen: 2 Maschen/Reihe x 6 Mal = 36 Maschen. Viel Spaß beim stricken!
16.10.2020 - 09:25
![]() Beata wrote:
Beata wrote:
UWAGA: przerabiać 2 o. od środka przodu 2 nitkami do końca (użyć oddzielnego motka) – zdjąć jak do przerobienia na prawo 1-sze od środka przód, a na końcu rzędu przerabiać je na prawo. Nie za bardzo rozumiem tego . Czy to znaczy że od polowy robotki mam przerabiac 2 oczka brzegowe podwojna nitka i pierwsze oczko mam nie przerabiac ?
13.08.2020 - 21:12DROPS Design answered:
Witaj Beato! Prawa strona robótki (środek przodu) - 1-sze o. w każdym rzędzie zdejmujesz na prawy drut jak do przerobienia na prawo. Drugie oczko przerabiasz na prawo 2 nitkami. Kolejne oczka przerabiasz na prawo już 1 nitką. Lewa strona robótki - 1-sze o. w każdym rzędzie zdejmujesz na prawy drut jak do przerobienia na prawo. Kolejne oczka przerabiasz na prawo, itd. Powodzenia!
14.08.2020 - 12:42
![]() Lucia wrote:
Lucia wrote:
Hallo. Habe wiedereinmal eine Frage. Bei den Vorderteilen: Verstehe ich das richtig, dass die Maschen auf der Hilsnadel NICHT abgekettet werden?? Grüssli
01.05.2020 - 13:24DROPS Design answered:
Liebe Lucia, bei den Vorderteilen legen Sie einige Maschen für den Halsausschnitt still, diese Maschen stricken Sie bei der Kapuze wieder. Viel Spaß beim stricken!
04.05.2020 - 10:38
![]() Lucia wrote:
Lucia wrote:
Hallo. Ich habe noch zwei Fragen beim Vorderteil: 1. Das mit dem Doppelfaden stricken habe ich verstanden. Aber muss ich 2 oder 4 M mit Doppelfaden stricken? 2. Es steht, nach 14 cm wie Hinterteil abk. Muss ich auch die M mit doppelfaden abk?
22.04.2020 - 11:28DROPS Design answered:
Liebe Lucia, beim Vorderteil stricken Sie nur die 2 Maschen gegen der Mitte (= Blendemaschen) mit 2 Fäden (Doppelfaden) = die 2 ersten Maschen bei den Hinreihen. Die Abnahmen wie beim Rückenteil stricken Sie auf die andere Seite (= wo die Seite mit dem Rückenteil zusammengenäht wird), dh am Ende der Hinreihe beim rechten Vorderteil (Anfang Hinreihen beim linken Vorderteil), dh nur 7 oder 6 Maschen werden je nach der Größe abgenommen und nicht 14 oder 12 Maschen wie beim Rückenteil. Viel Spaß beim stricken!
22.04.2020 - 11:58
![]() Lucia wrote:
Lucia wrote:
Hallo. Ich bin keine Anfängerin, aber auch kein Profi. Bin jetzt bei den Armlöcher vom Hinterteil angekommen . Ich habs schon x-mal gelesen, aber ich verstehe den nächsten Schritt nicht. Könnten Sie mir das erklären?? Vielen Dank im Voraus Lucia
20.04.2020 - 16:29DROPS Design answered:
Liebe Lucia, für die Armausschnitte sollen Sie je nach der Größen am Anfang jeder Reihe (Hin- sowie Rückreihe) so abketten: 3 Maschen 1 Mal dann 2 Maschen 0-0-1-1-2-3 Mal und 1 Masche 1-2-2-4-4-4 Mal = 30-31-32-32-34-34 Maschen sind jetzt übrig (bei der 1. und 2. Grösse z.B. werden Sie beidseitig nur 3 Maschen 1 Mal und 1 Masche 1-2 Mal abketten). Viel Spaß beim stricken!
20.04.2020 - 16:40
![]() Adela wrote:
Adela wrote:
Hello. I need some help with this part. I am not sure with neck line on right front side."Now slip the 6 sts towards front edge on a stitch holder for neck (work sts first to avoid having to cut the thread). Slip sts at the beg of every row from mid front on the same stitch holder as follows (work sts first): 2 sts 1 time and 1 st 1-2-2-2-2-2 times = 10-10-10-10-11-11 sts left on shoulder. " Thanks
18.02.2020 - 00:30DROPS Design answered:
Hi Adela, This means you add further stitches to the stitch holder on every row from the neck - so if you are working the left shoulder at the beginning of every row from the right side. When you work right shoulder, it will be every row from the wrong side. All the added stitches are worked first before putting them on the holder. I hope this helps and happy knitting!
18.02.2020 - 07:19
![]() Marian wrote:
Marian wrote:
Ik heb gratis patroon aangevraagd maar nog niks in mn mail gehad gr marian
27.11.2019 - 10:55DROPS Design answered:
Dag Marian,
Op onze site kun je de patronen gratis downloaden met de knop 'Afdrukken' welke je vlak onder de materialenlijst vindt. (Het gaat dus niet via e-mail)
02.12.2019 - 08:54
|
|
Silver Bright#silverbrightjacket |
|
 |
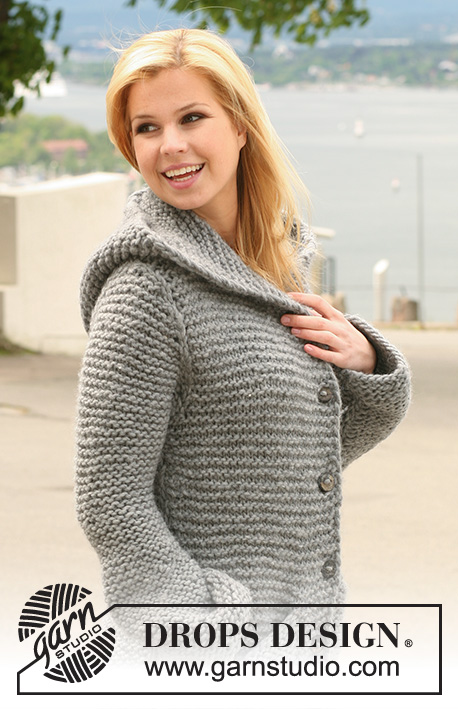 |
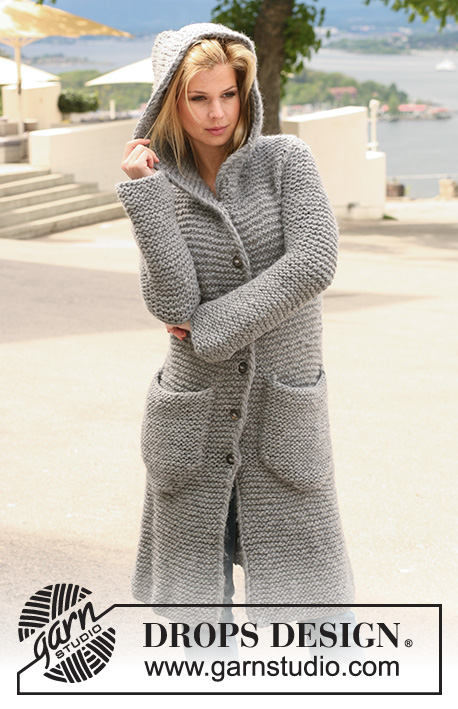
Long DROPS jacket in garter st with hood in ”Snow”. Size S - XXXL.
DROPS 122-40 |
|
|
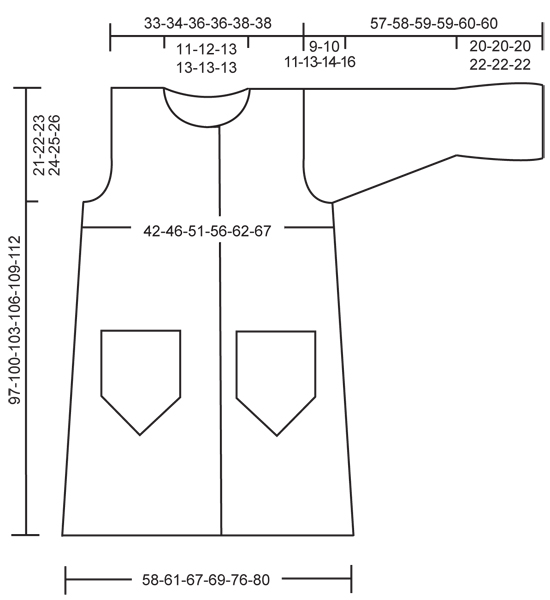
GARTER ST (back and forth on needle): K all rows. MEASUREMENT TIP: Because of the weight of the yarn make all measurements while the garment is hanging otherwise it will be too long when worn. BUTTONHOLES: Make buttonholes on right front piece. 1 BUTTONHOLE = Cast off third st from mid front and cast on 1 new st on next row. Make buttonholes when piece measures: SIZE S: 41, 51, 61, 71, 81 and 91 cm SIZE M: 43, 53, 63, 73, 83 and 93 cm SIZE L: 45, 55, 65, 75, 85 and 95 cm SIZE XL: 43, 52, 61, 70, 79, 88 and 97 cm SIZE XXL: 46, 55, 64, 73, 82, 91 and 100 cm SIZE XXXL: 49, 58, 67, 76, 85, 94 and 103 cm KNITTING TIP (applies to hood): To avoid a hole in each transition when sts are slipped on stitch holder pick up thread between 2 sts and work this tog with first st on needle. INCREASING TIP (applies to pockets): Inc 1 st inside 1 st each side by making 1 YO. On next row K YO into back of loop to avoid a hole. -------------------------------------------------------- JACKET: Worked in parts, back and forth on circular needle. BACK PIECE: Cast on 52-55-60-62-68-72 sts on circular needle size 10 mm with Snow. Work GARTER ST - see above - back and forth on needle. REMEMBER THE KNITTING TENSION! When piece measures 12-12-12-14-14-14 cm - See MEASUREMENT TIP - dec 1 st each side and repeat the dec each side on every 10-10-10-12-12-13 cm a total of 7-7-7-6-6-6 times = 38-41-46-50-56-60 sts. When piece measures 76-78-80-82-84-86 cm - REMEMBER MEASUREMENT TIP – cast off for armhole at the beg of every row each side as follows: 3 sts 1 time, 2 sts 0-0-1-1-2-3 times and 1 st 1-2-2-4-4-4 times = 30-31-32-32-34-34 sts. When piece measures 95-98-101-104-107-110 cm cast off the middle 8-9-10-10-10-10 sts for neck and complete each shoulder separately. Cast off 1 st on neckline on next row = 10-10-10-10-11-11 sts left on shoulder. Cast off when piece measures 97-100-103-106-109-112 cm. RIGHT FRONT PIECE: Cast on 30-32-34-35-38-40 sts (includes 4 front band sts towards front edge) on circular needle size 10 mm with Snow. Work garter st back and forth on needle - NOTE: work the 2 sts towards front edge in 2 strands until finished measurements (use a separate ball) and slip first st from mid front as if to K and K this at the end of next row. When piece measures 12-12-12-14-14-14 cm dec at the side as described for back piece = 23-25-27-29-32-34 sts. AT THE SAME TIME when piece measures 41-43-45-43-46-49 cm - REMEMBER MEASUREMENT TIP – make BUTTONHOLES - see above. When piece measures 76-78-80-82-84-86 cm cast off for armhole at the side as described for back piece – cast off at the beg of every row from the side = 19-20-20-20-21-21 sts. Continue until piece measures 92-94-96-98-101-104 cm. Now slip the 6 sts towards front edge on a stitch holder for neck (work sts first to avoid having to cut the thread). Slip sts at the beg of every row from mid front on the same stitch holder as follows (work sts first): 2 sts 1 time and 1 st 1-2-2-2-2-2 times = 10-10-10-10-11-11 sts left on shoulder. Cast off when piece measures 97-100-103-106-109-112 cm. LEFT FRONT PIECE: Cast on and work like right front piece, but mirrored. NOTE: Do not make buttonholes. SLEEVE: Cast on 30-30-32-32-34-34 sts on circular needle size 10 mm with Snow and work garter st back and forth on needle. When piece measures 20-20-20-22-22-22 cm - REMEMBER MEASUREMENT TIP - dec 6 sts evenly (from RS) = 24-24-26-26-28-28 sts. On next row (= WS) inc 1 st each side and repeat the inc on every 6-5-5-3.5-3-2.5 cm a total of 5-6-6-7-8-9 times = 34-36-38-40-44-46 sts. When piece measures 48-48-48-46-46-44 cm - NOTE! Less for the larger sizes because of longer sleeve cap and wider shoulder- cast off for sleeve cap at the beg of every row each side as follows: 2 sts 1 time and 1 st 5-6-7-8-9-10 times, then 2 sts at the beg of every row each side until piece measures 56-57-58-58-59-59 cm. Now cast off 3 sts at beg of the next 2 rows, cast off remaining sts. Piece measures approx 57-58-59-59-60-60 cm. ASSEMBLY: Sew shoulder seams. Set in sleeves. Sew sleeve and side seams - sew edge to edge in outer loops of sts to avoid a chunky seam. Sew buttons on left front piece. HOOD: Pick up approx 35 to 42 sts round neck (includes sts on stitch holders at front) on circular needle size 10 mm with Snow. K 1 row from WS, AT THE SAME TIME pick up thread between 2 sts to avoid a hole in transitions at front – See KNITTING TIP. Continue in garter st back and forth on needle – NOTE: work the 2 sts each side towards front edge in 2 strands until finished measurement and slip first st from mid front as if to K and K this at the end of next row. After 8 rows garter st inc evenly on next row from RS to 48-50-52-54-56-58 sts - NOTE: do not inc on the 4 sts each side (= front bands). Continue in garter st until hood measures 47-47-48-48-49-49 cm and cast off. Place hood double and sew tog at the top. POCKET: Cast on 3 sts on circular needle size 10 mm with Snow. Work garter st back and forth on needle. AT THE SAME TIME after 2 rows inc 1 st each side – See INCREASING TIP. Repeat the inc each side on every other row a total of 10 times = 23 sts. Continue in garter st until pocket measures 23 cm from cast on row, cast off loosely. Make 2. Place the pockets on each front piece approx 6-8 cm from mid front and approx 26-38 cm from bottom edge (or try on jacket for correct placement) – REMEMBER MEASUREMENT TIP – and sew on. |
|
 |
|
Have you finished this pattern?Tag your pictures with #dropspattern #silverbrightjacket or submit them to the #dropsfan gallery. Do you need help with this pattern?You'll find 15 tutorial videos, a Comments/Questions area and more by visiting the pattern on garnstudio.com. © 1982-2026 DROPS Design A/S. We reserve all rights. This document, including all its sub-sections, has copyrights. Read more about what you can do with our patterns at the bottom of each pattern on our site. |
|


With over 40 years in knitting and crochet design, DROPS Design offers one of the most extensive collections of free patterns on the internet - translated to 17 languages. As of today we count 325 catalogues and 12291 patterns translated into English (UK/cm). 12291
We work hard to bring you the best knitting and crochet have to offer, inspiration and advice as well as great quality yarns at incredible prices! Would you like to use our patterns for other than personal use? You can read what you are allowed to do in the Copyright text at the bottom of all our patterns. Happy crafting!
Post a comment to pattern DROPS 122-40
We would love to hear what you have to say about this pattern!
If you want to leave a question, please make sure you select the correct category in the form below, to speed up the answering process. Required fields are marked *.