
Popular categories
Looking for a yarn?


Comments / Questions (28)
![]() Monika wrote:
Monika wrote:
Selle mustri eestikeelses tõlkes on viga. Seljaosas öeldakse, et tuleb kahandada 4 korda aga tegelikult selgub, et tuleb kasvatada.
02.06.2017 - 13:28
![]() Thea Lubbers wrote:
Thea Lubbers wrote:
Is van dit patroon een teltekening te krijgen?
26.04.2015 - 20:58DROPS Design answered:
Hoi Thea. Wij hebben hier helaas geen teltekening voor.
27.04.2015 - 14:32
![]() Arduin wrote:
Arduin wrote:
Bonjour, Je ne comprends pas pourquoi il faut faire 4 rangs de côtes sur chaque milieu devant. Doit-on remonter les 6mailles rabattues au rang suivant ? Parce qu'il y a un trou, sinon ? est-ce pour passer la ceinture ???? Merci de votre aide. Maria Arduin
17.04.2014 - 13:07DROPS Design answered:
Bonjour Mme Arduin, ces rangs raccourcis vont créer la forme souhaitée. On ne remonte pas les 6 m au rang suivant. Les mailles de la ceinture sont ensuite relevées le long du devant. Bon tricot!
17.04.2014 - 15:44
![]() Arduin wrote:
Arduin wrote:
Bonjour, la laine erait de la Muskat or vous conseillez de l'Alaska... Laquelle dois-je commander pour réaliser le gilet??? Leur grosseur étant différente.... Merci de votre réponse. Mme Arduin
24.03.2014 - 13:46DROPS Design answered:
Bonjour Mme Arduin, ce modèle se tricote bien en Alaska, la correction a été faite, merci. Bon tricot!
24.03.2014 - 14:35
![]() Rosanna wrote:
Rosanna wrote:
Habe die Jacke jetzt fertig gestrickt, allerdings klappen Die Reihen in Krausrippe nach oben, woran liegt das?
23.09.2012 - 14:04DROPS Design answered:
Liebe Rosanna, haben Sie die Jacke nach dem Stricken gut gespannt? Wenn auch das nichts nützt können Sie den Rand evtl. ganz vorsichtig von der linken Seite etwas dämpfen.
24.09.2012 - 16:44
![]() Rosanna wrote:
Rosanna wrote:
Komm nicht weiter...Kragen: Bei der nächsten R. wird mit dem Aufnehmen für den Kragen begonnen. Es wir auf der Innenseite der 3 Randm (1 M Krausrippe, 1 re., 1 li.) aufgenommen. Zum Aufnehmen die M. der vorherigen R. aufnehmen und li. stricken. Bei jeder 3. R. 1 M. aufnehmen total 17 Mal – die aufgenommenen M. werden glatt, ... wenn ich dann wieder Abnehme nehme ich doch die Aufgenommenen linken Maschen für den Kragen wieder ab?
06.09.2012 - 14:33DROPS Design answered:
Es wird nicht über den Kragenmaschen abgenommen, sondern in dem glatt re gestrickten Vorderteil.
10.09.2012 - 15:21
![]() Anne Oeyen wrote:
Anne Oeyen wrote:
Ik ben bezig met dit model te breien in maat XL, maar de steken van de mouw klopt niet. Volgens het patroon moet ik eerst 12 cm boord breien over 44 steken. Daarna geeft het aan dat bij 13 cm hoogte aan weerszijden 27 steken moet meerderen. Volgens het patroon zijn dat 68 st, maar 44+27+27 st is 98 st. Ook de hoogte klopt niet, 13 cm bij de eerste meerdering, en dan nog 26 keer 2,5 cm is 78 cm, veel meer dan de 46 cm waarbij ik al terug zou moeten beginnen minderen.
10.06.2012 - 09:05DROPS Design answered:
Je hebt gelijk. Er was helaas een fout in de vertaling. Het moet zijn: "Meerder vanaf een hoogte van 13 cm 10-11-11-12-12 keer 1 st aan weerskanten op elke 4-3½-3-2½-2½ cm = 58-62-64-68-70 st." Wij hebben het patroon aangepast. Bedankt en veel breiplezier verder.
11.06.2012 - 16:59
![]() Inge wrote:
Inge wrote:
Hvad er og hvordan gør man usynlige maskesting?
26.03.2009 - 18:19
|
|
DROPS 80-15 |
|
|
|
|
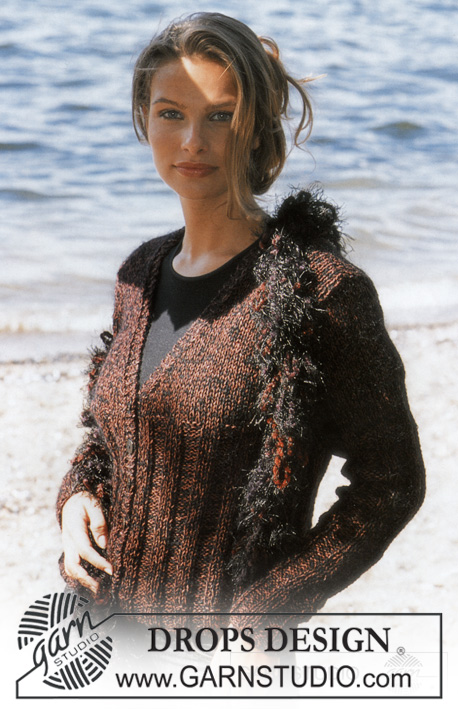
DROPS Cardigan in Alaska
DROPS 80-15 |
|
|
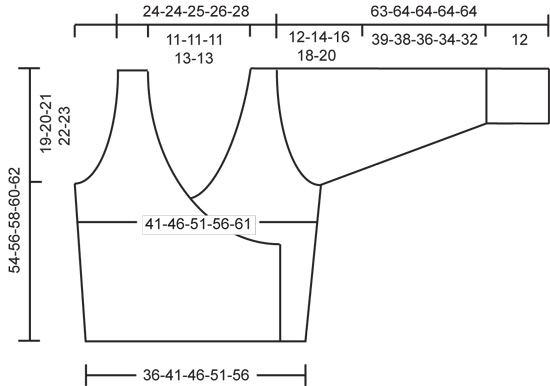
CARDIGAN: Gauge: 16 sts x 20 rows on larger needles in stockinette st = 10 x 10 cm Rib: * K 1, P 1 *. Repeat from * - *. Lace Rib Pattern: Row 1 (right side): * K 1, yo, sl 1 as if to P *, repeat from * - *. Row 2 (wrong side): * P 1 st and yo tog, K 1 *, repeat from * - *. Repeat rows 1 - 2. Knitting tips (for front shaping): All decs are made from right side. Dec 1 st inside 3 edge sts (knit as: K 1 (edge st knit in garter st), K 1, P 1) + the sts increased for collar, as follows: After edge/collar sts: Slip 1 st as if to knit, K 1, psso. Before edge/collar sts: K 2 tog. Back: Cast on 60-68-76-84-92 sts on smaller needles and knit 4 rows garter st. Change to larger needles and stockinette st. When the piece measures 12 cm inc 1 st at each side every 5-5-5-6-6 cm 4 times = 68-76-84-92-100 sts. When the piece measures 35-36-37-38-39 cm bind off 3-4-5-6-8 sts at each side. Dec 1 st for armhole at each side every other row 12-15-17-19-20 times = 38-38-40-42-44 sts. When the piece measures 52-54-56-58-60 cm bind off the center 16-16-16-18-18 sts for the neck. On the next row dec 1 st at each neck edge = 10-10-11-11-12 sts remain on each shoulder. Bind off when the piece measures 54-56-58-60-62 cm. Right Front: Cast on 44-52-60-68-76 sts on smaller needles and knit 4 rows garter st. Change to larger needles and stockinette st, keeping the 3 edge sts (buttonband) knit as follows from edge (seen from the right side): K 1 (edge st knit in garter st), K 1 and P 1. Read the entire next section before knitting: When the piece measures 8 cm knit 4 rows rib over the 7-9-9-9-11 sts at center front edge (incl. the 3 edge sts knit as before – knit the remaining sts in stockinette st). Then bind off the outermost 4-6-6-6-8 sts in rib. Collar: On the next row begin to inc for the collar inside 3 edge sts knit as before. Inc by pulling up sts from previous row – knit increased sts in reverse stockinette st. Inc 1 st every 3rd row a total of 17 times. Neck shaping: At the same time after 1st inc for collar, dec 1 st (see knitting tips): 16-18-22-27-29 times: Sizes XS, S/M and M/L: every 4th row. Sizes XL and XXL: alternately every 2nd and every 4th row. Side inc: When the piece measures 12 cm inc at the side as on back. Armhole: When the piece measures 35-36-37-38-39 cm bind off for armhole at the side as on back. After all shaping is complete 30-30-31-31-32 sts remain. When the piece measures 54-56-58-60-62 cm bind off the 10-10-11-11-12 shoulder-sts. Continue to knit the 20 collar sts in reverse stockinette st (with the 3 edge sts as before) for approx. 6-6-6-7-7 cm, then put sts on a st holder. Left front: Cast on and knit the same as the right, reversing shaping. Sleeve: Cast on 38-40-42-44-46 sts on larger needles. Knit lace rib pattern – see instructions above. When the piece measures 12 cm change to stockinette st. When the piece measures 13 cm inc 1 st at each side every 4-3.5-3-2.5-2.5 cm 10-11-11-12-12 times = 58-62-64-68-70 sts. When the piece measures 51-50-48-46-44 cm bind off for sleeve cap at each side every other row: 3 sts 1 time and 2 sts 2-2-1-1-1 times, then dec 1 st at each side until the piece measures 62-63-63-63-63 cm, then bind off 3 sts at each side 1 time. The piece measures approx. 63-64-64-64-64 cm, bind off the remaining sts. Assembly: Sew shoulder seams. Sew the collar at center back. Sew the collar to neckband. Sew in sleeves. Sew sleeve and side seams using edge sts as a seam allowance, leaving an opening approx. 2 cm in the right side seam for belt – start opening 7 cm from lower edge. Belt: Pick up 11 sts on smaller needles along left front – start where neck shaping begins and pick up over approx. 4 cm below. Knit rib, keeping 1 st in garter st at each edge and begin rib with K 1. When belt measures 3 and 6 cm dec 1 st at each side (inside of edge st) = 7 sts. Knit until belt measures approx. 70-75-80-85-90 cm, bind off in rib. Repeat on right front. SCARF: Measurement: approx. 20 x 180 cm Materials: Garnstudio HIGHLANDER 90% wool, 10% nylon/50 g./80 m 150 gr nr 14, red variegated DROPS 8 mm needles, or size needed to obtain correct gauge. Gauge: 10 sts x 16 rows in rib = 10 x 10 cm. Rib: * K 3, P 3 *, repeat from * - *. Scarf: Cast on 20 sts loosely and knit rib, keeping 1 edge st at each side as follows: slip the edge st at the beginning of each row, K the edge st at the end of each row. When the piece measures 180 cm bind off all sts in rib. |
|
 |
|
Have you finished this pattern?Tag your pictures with #dropspattern or submit them to the #dropsfan gallery. Do you need help with this pattern?You'll find 20 tutorial videos, a Comments/Questions area and more by visiting the pattern on garnstudio.com. © 1982-2026 DROPS Design A/S. We reserve all rights. This document, including all its sub-sections, has copyrights. Read more about what you can do with our patterns at the bottom of each pattern on our site. |


With over 40 years in knitting and crochet design, DROPS Design offers one of the most extensive collections of free patterns on the internet - translated to 17 languages. As of today we count 324 catalogues and 12290 patterns translated into English (UK/cm). 12290
We work hard to bring you the best knitting and crochet have to offer, inspiration and advice as well as great quality yarns at incredible prices! Would you like to use our patterns for other than personal use? You can read what you are allowed to do in the Copyright text at the bottom of all our patterns. Happy crafting!
Post a comment to pattern DROPS 80-15
We would love to hear what you have to say about this pattern!
If you want to leave a question, please make sure you select the correct category in the form below, to speed up the answering process. Required fields are marked *.