
Popular categories
Looking for a yarn?


Comments / Questions (209)
![]() Basia wrote:
Basia wrote:
Dla rozmiaru S mam przerabiać: "M1 ponad 29 nast. o. i M1 ponad 57 nast. o". Co to dokładnie znaczy. M1 obejmuje 4 o. zatem 29o./4=7 zatem zostaje mi 1 o. Podobnie 57o./4=14 i 1 o. zostaje. Dlaczego część wykonywana wg schematu M1 nie równa się 28 o. czy 56 o. Jak przerabiać to oczko które zostaje po przerobieniu wielokrotności 4o. składających się na schemat M1?
29.01.2017 - 16:18DROPS Design answered:
Witaj Basiu! Schemat czytamy od dołu, od prawej do lewej strony. Jeśli zostaje 1 oczko to przerabiasz je jak na początku schematu (patrz właściwy rząd po prawej stronie schematu). Jak odczytywać schematy znajdziesz TUTAJ. POWODZENIA!
30.01.2017 - 17:42Claudia Alarcon wrote:
Hola quiero hacer este sueter en lana Lace, pero aunque pertenece al mismo grupo A, el metraje de esta lana es de 400mts x cada 50 grs y el de la Alpaca es de 167 mts. Si compro la mitad de gamos me alcanza? Es decir 250grs para la talla chica? Saludos
25.01.2017 - 04:31DROPS Design answered:
Hola Claudia. La calidad Lace es bastante más fina que la de Alpaca (es decir que la prenda final no va a tener la misma textura que en la foto si trabajas con Lace en lugar de con Alpaca). Pero los cálculos del material son correctos. Necesitarías 250 gr de Lace.
29.01.2017 - 14:20
![]() Basia wrote:
Basia wrote:
Czy robiąc tył w rozmiarze S nie zamykam żadnego oczka na pokrój pachy bo po zamknięciu oczek tył też ma 65 o. Czy dobrze to zrozumiałam?
24.01.2017 - 13:51DROPS Design answered:
Witaj Basiu! Jest dokładnie jak piszesz. Na podkrój rękawa w rozmiarze S zostały zamknięte tylko 3 o. z każdej strony każdego markera (w części TYŁ & PRZODY). POWODZENIA!
25.01.2017 - 09:20
![]() Karin wrote:
Karin wrote:
Ich habe mir diese Jacke aus einem Faden Alpaca und einem Faden Delight gestrickt. Wunderbares Ergebnis! Der Farbverlauf der Delight ist aufgelöster und feiner. Sieht einfach großartig aus. Danke für dieses tolle Modell!
06.07.2016 - 12:33Debbie Bland wrote:
I understand now what I have to do. Change from rounds to rows. It would be clearer if it was stated at that stage for the not so experienced knitter. Only my opinion. Happy knitter
19.03.2016 - 08:09Debbie Bland wrote:
Hi, I'm struggling to understand how to do the sleeve cap. I've knitted the sleeve in rounds and measures 35cm but don't understand how to bind off EACH SIDE at the beginning of every row? Must have a mental blockage! Kind regards
17.03.2016 - 14:45DROPS Design answered:
Dear Mrs Bland, when sleeve measures 35 cm start bind off 2 sts at the beg of each row on each side, ie you don't work any more in the rounds: bind off 3 sts at the beg of next row(round), work to the end of the round then turn and work now from WS binding off 3 sts at beg of this row, and continue alternately from RS and from WS at the same time bind off for cap sleeve. Happy knitting!
21.03.2016 - 08:13DEBBIE wrote:
Also meant to say that I did the gauge in the M1 pattern. Was that correct? Kind regards Debbie
24.02.2016 - 07:53DROPS Design answered:
Dear Debbie, that's correct, gauge should be worked in M.1, ie 18 sts x 23 rows following diagram M.1 = 10 x 10 cm. Happy knitting!
24.02.2016 - 10:12DEBBIE BLAND wrote:
Sorry I meant 10 cmx 010cm
23.02.2016 - 21:37Debbie Bland wrote:
Hi, I haven't been able to get the correct yarn so have bought a substitute , double knit.. I've done my gauge & had to use size 6mm needles to get 10mmx10mm. Will that work on this pattern?
23.02.2016 - 21:34DROPS Design answered:
Dear Mrs Band, some of our DROPS store are shipping throughout the world, see list here - gauge to this pattern is 18 sts x 23 rows in pattern = 10 x 10 cm - you may need smaller or larger needle depending on how you are working. Happy knitting!
24.02.2016 - 10:11
![]() Gio wrote:
Gio wrote:
Buonasera, quando il lavoro raggiunge i 28 cm devo lavorare una m. di M1 nel bordo davanti,ogni 2cm per 11 volte ( taglia M). Quindi per ottenere 17 m nel bordo a legaccio dovrei crescere di altri 22 cm (11per 2) :28+22 =50 cm di lavoro. Se a 35 cm devo intrecciare per gli scalfi, le 17 maglie le ottengo solo quando lavoro i metà davanti ? Grazie infinite.
07.01.2016 - 21:18DROPS Design answered:
Buonasera Liliana, deve iniziare a incorporare 1 m di M.1 nel bordo davanti quando arriva a 28 cm, e ripeterlo per 11 volte ogni 2 cm per la taglia M, per cui arriverà circa a 48 cm (la prima volta non conta, si parte a 28 cm); a 35 cm deve intrecciare per gli scalfi come indicato, per cui continuerà a lavorare il bordo davanti quando lavorerà i due davanti in modo separato. La foto del modello le può essere di aiuto, l'ampliamento del bordo davanti continua anche dopo lo scalfo. Ci riscriva se ha bisogno di ulteriori chiarimenti. Buon lavoro!
08.01.2016 - 20:58
|
|||||||
Marit#maritcardigan |
|||||||
 |
 |
||||||
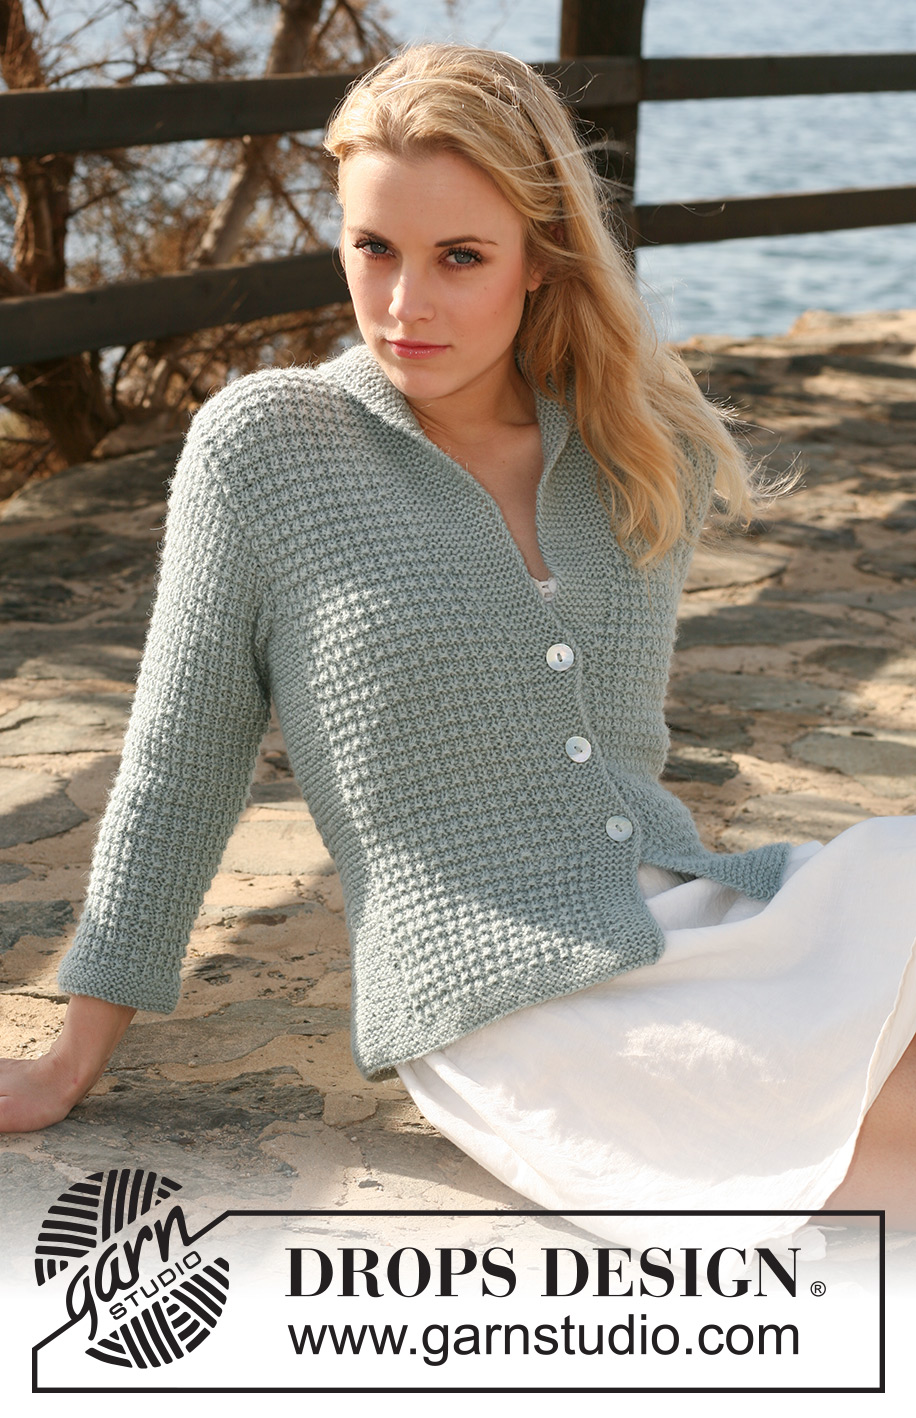
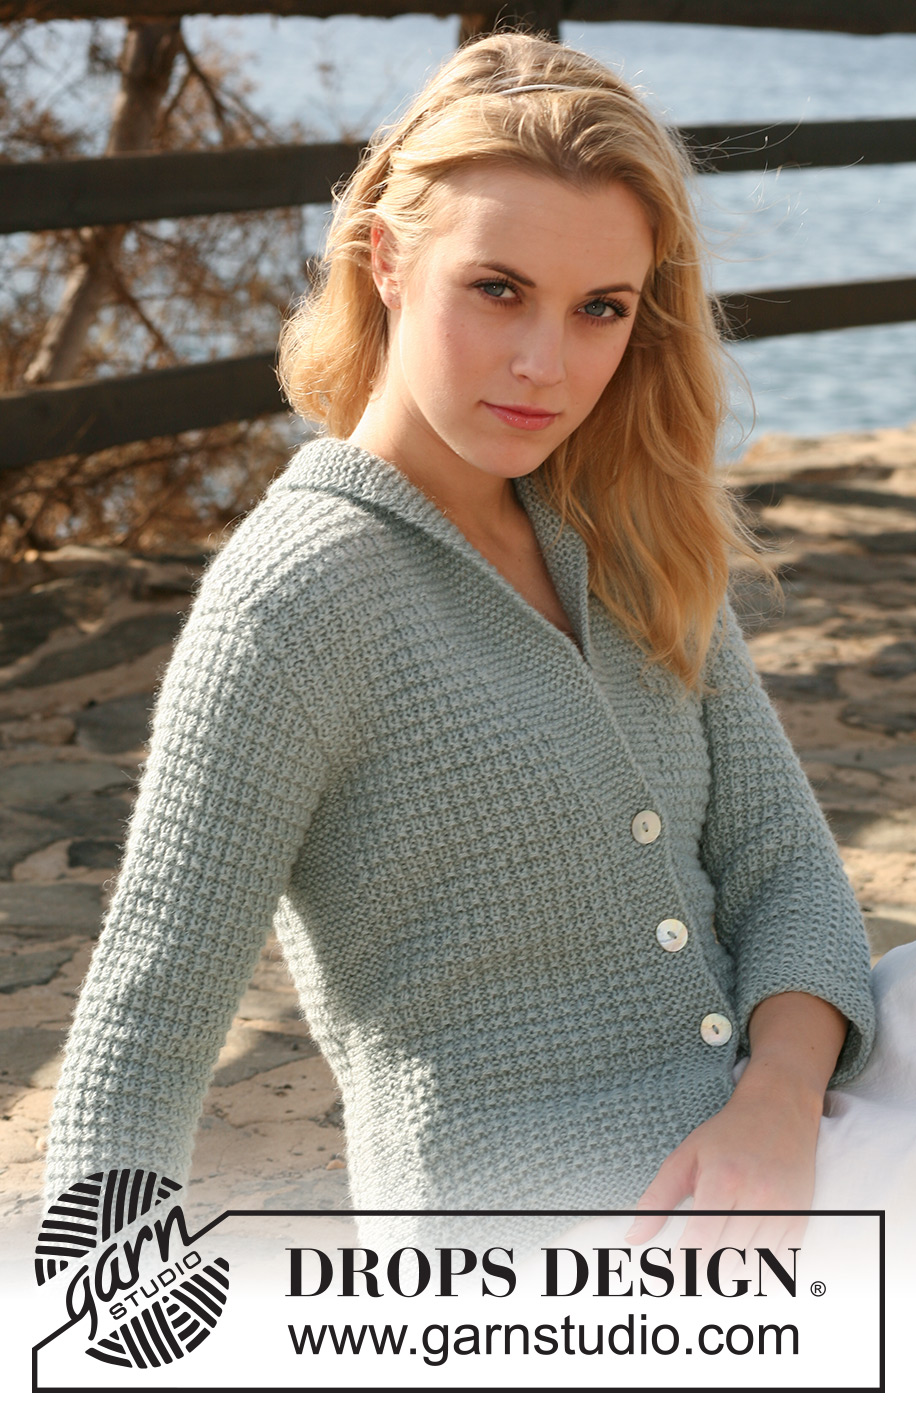
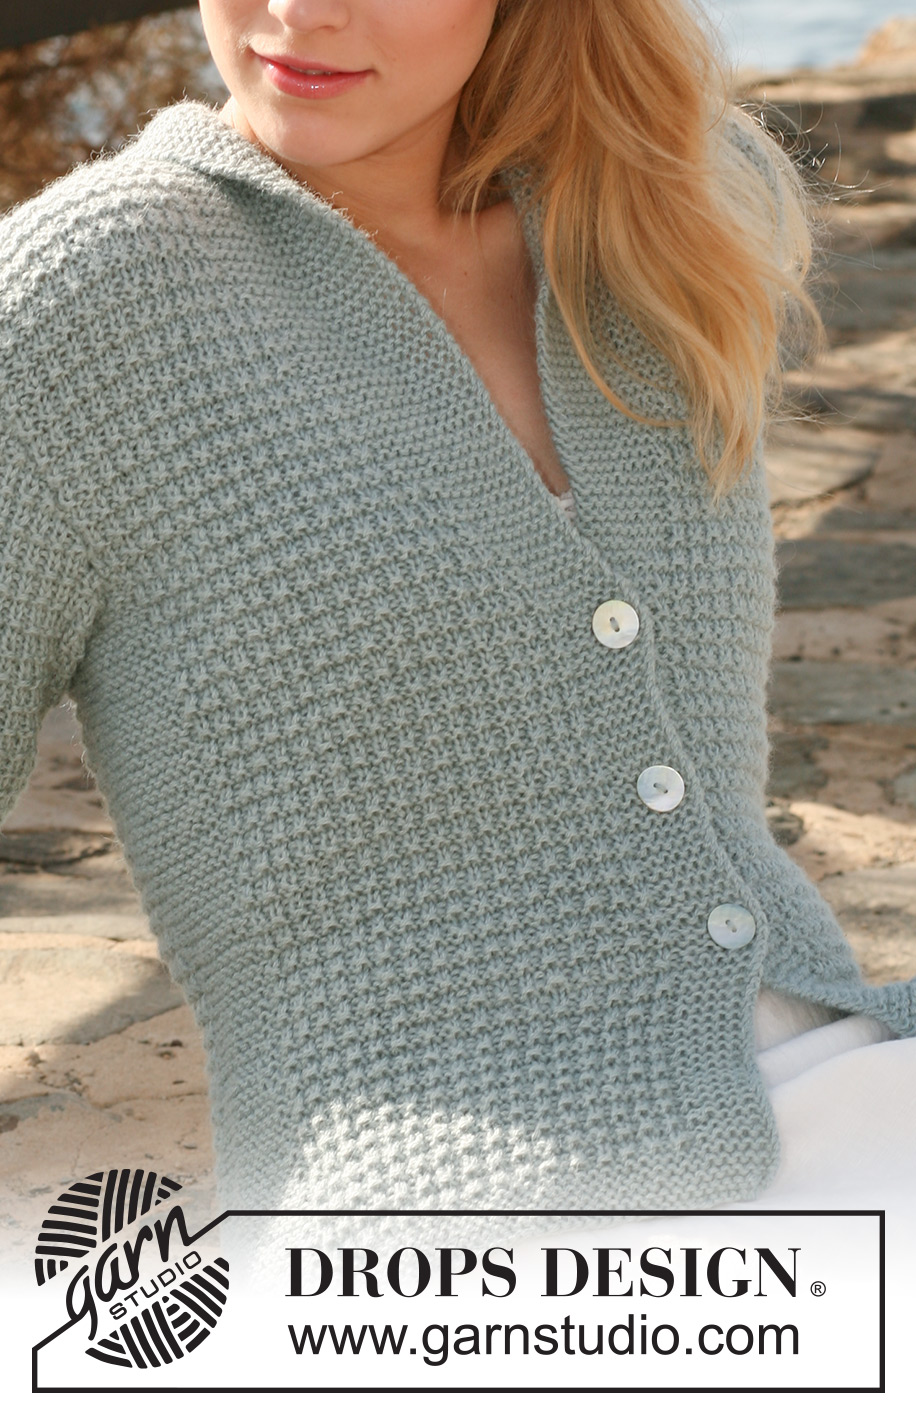
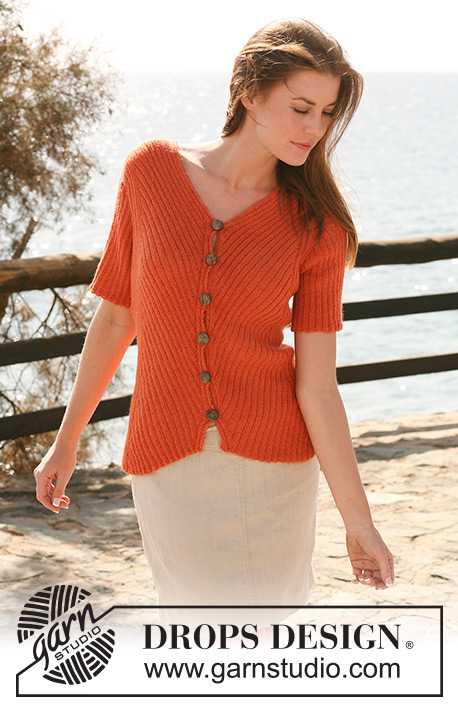
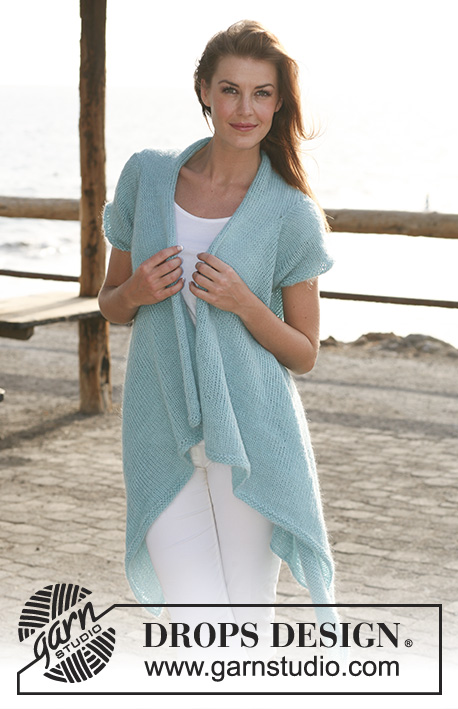
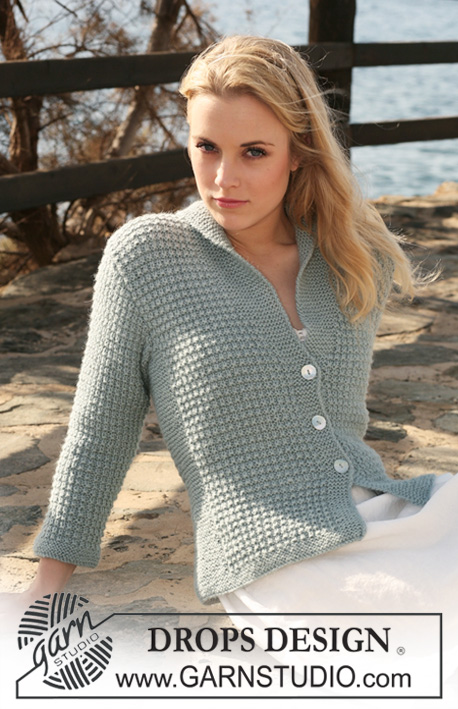
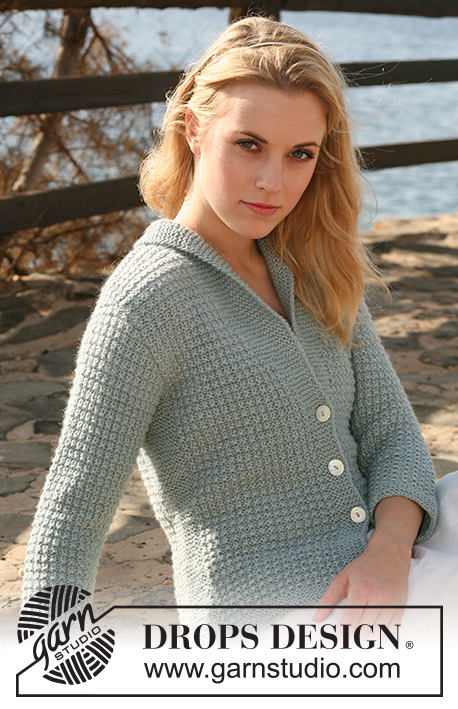
Knitted DROPS jacket with textured pattern and collar in 2 threads ”Alpaca”. Size S - XXXL.
DROPS 119-6 |
|||||||
|
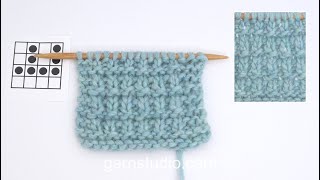
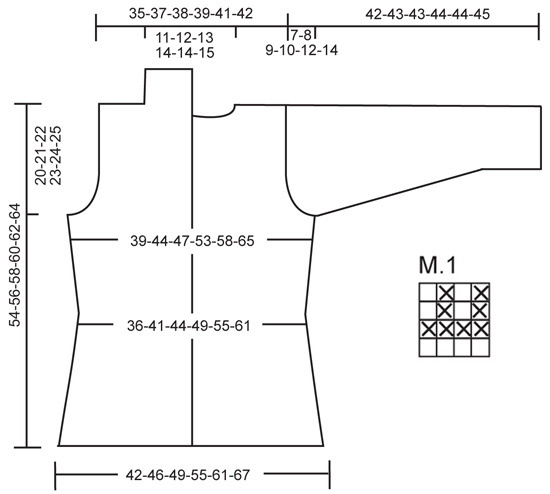
GARTER ST (back and forth on needle): K all rows. GARTER ST (in the round): K 1 round, P 1 round. PATTERN: See diagram M.1. Diagram shows the pattern from RS. BUTTONHOLES: Make buttonholes on right front band. 1 buttonhole = cast off 3rd front band st from mid front and cast on 1 new st on return row. Make buttonholes when piece measures: SIZE S: 14, 21 and 28 cm. SIZE M: 14, 21 and 28 cm. SIZE L: 14, 21 and 28 cm. SIZE XL: 15, 22 and 29 cm. SIZE XXL: 15, 22 and 29 cm. SIZE XXXL: 15, 22 and 29 cm. -------------------------------------------------------- -------------------------------------------------------- BODY PIECE: Worked back and forth on circular needle from mid front. Cast on 163-179-193-211-233-257 sts on circular needle size 4.5 mm with 2 threads Alpaca. Insert a marker 44-48-52-56-62-68 sts in from each side (back piece = 75-83-89-99-109-121 sts). Work 8 rows GARTER ST – SEE ABOVE, and continue as follows from RS: 6 garter sts, M.1 on the next 29-33-37-41-47-53 sts, 18 garter sts (marker sits in the middle of these sts), M.1 on the next 57-65-71-81-91-103 sts, 18 garter sts (marker sits in the middle of these sts), M.1 on the next 29-33-37-41-47-53 sts, and finish with 6 garter sts. REMEMBER THE KNITTING TENSION! Continue in pattern like this, AT THE SAME TIME when piece measures 5 cm dec 1 st each side of garter sts each side by K2 tog, repeat the dec on every 2.5 cm a total of 5 times = 143-159-173-191-213-237 sts. Remember BUTTONHOLES on right front band – SEE ABOVE!! When piece measures 20 cm inc 1 st each side of garter sts each side, and repeat the inc on every 6-6-6-7-7-7 cm a total of 3 times = 155-171-185-203-225-249 sts. AT THE SAME TIME when piece measures 28-28-28-29-29-29 cm work 1 st from M.1 into front band (i.e. number of sts remain the same but no of garter sts on front band inc and no of sts in M.1 dec), and repeat this on every 2 cm a total of 10-11-13-13-14-15 times (= 16-17-19-19-20-21 garter sts on front band). Continue in M.1 and garter st until piece measures 34-35-36-37-38-39 cm. Now cast off 6 sts each side for armhole (= 3 sts each side of marker) and complete each piece separately. BACK PIECE: = 65-73-79-89-99-111 sts. Continue in M.1 on all sts. Cast off for armhole each side at the beg of every row: 2 sts 0-1-2-3-4-6 times and 1 st 0-1-1-3-5-6 times = 65-67-69-71-73-75 sts. When piece measures 52-54-56-58-60-62 cm cast off the middle 17-19-21-23-23-25 sts for neck and complete each shoulder separately. Cast off 1 st on neckline on next row = 23-23-23-23-24-24 sts left on shoulder. Cast off when piece measures 54-56-58-60-62-64 cm. LEFT FRONT PIECE: Continue with garter st on front band and M.1 on remaining sts. Cast off for armhole at the side as described for back piece = 39-40-42-42-44-45 sts. When piece measures 54-56-58-60-62-64 cm cast off the first 23-23-23-23-24-24 sts from RS for shoulder = 16-17-19-19-20-21 sts left on collar. Work remaining sts on row. Now work shortened rows on collar (with start from WS) as follows: * 2 rows on the first 8-8-8-9-9-10 sts only, 2 rows on all sts *, repeat from *-* until collar measures approx 6-6-7-7-8-8 cm on the shorter side (measured from shoulder). Cast off. RIGHT FRONT PIECE: Like left front piece, but mirrored. SLEEVE: Worked in the round on double pointed needles. Cast on 44-46-48-50-52-54 sts on double pointed needles size 4.5 mm with 2 threads Alpaca. Insert a marker at beg of round = mid under sleeve. Work 8 rows GARTER ST – SEE ABOVE, and continue in M.1 on all sts. When piece measures 5 cm inc 1 st each side of marker, and repeat the inc on every 3-2.5-2-2-1.5-1.5 cm a total of 9-11-12-14-15-16 times = 62-68-72-78-82-86 sts. Incorporate inc sts in M.1 as you go along. When piece measures 35-35-34-34-32-31 cm - NOTE! Less for the larger sizes because of longer sleeve cap and wider shoulder – cast off for sleeve cap each side at the beg of every row: 3 sts 1 time, 2 sts 3 times, 1 st 0-1-2-4-5-7 times, then 2 sts each side until piece measures 41-42-42-43-43-44 cm, now cast off 3 sts 1 time each side and cast off remaining sts. Piece measures approx 42-43-43-44-44-45 cm. ASSEMBLY: Sew shoulder seams. Set in sleeves. Sew collar tog mid back and sew to neckline on back piece. Sew on buttons. |
|||||||
Diagram explanations |
|||||||
|
|||||||
 |
|||||||
Have you finished this pattern?Tag your pictures with #dropspattern #maritcardigan or submit them to the #dropsfan gallery. Do you need help with this pattern?You'll find 18 tutorial videos, a Comments/Questions area and more by visiting the pattern on garnstudio.com. © 1982-2026 DROPS Design A/S. We reserve all rights. This document, including all its sub-sections, has copyrights. Read more about what you can do with our patterns at the bottom of each pattern on our site. |
|||||||


With over 40 years in knitting and crochet design, DROPS Design offers one of the most extensive collections of free patterns on the internet - translated to 17 languages. As of today we count 324 catalogues and 12272 patterns translated into English (UK/cm). 12272
We work hard to bring you the best knitting and crochet have to offer, inspiration and advice as well as great quality yarns at incredible prices! Would you like to use our patterns for other than personal use? You can read what you are allowed to do in the Copyright text at the bottom of all our patterns. Happy crafting!
Post a comment to pattern DROPS 119-6
We would love to hear what you have to say about this pattern!
If you want to leave a question, please make sure you select the correct category in the form below, to speed up the answering process. Required fields are marked *.