
Popular categories
Looking for a yarn?


Comments / Questions (56)
Karen wrote:
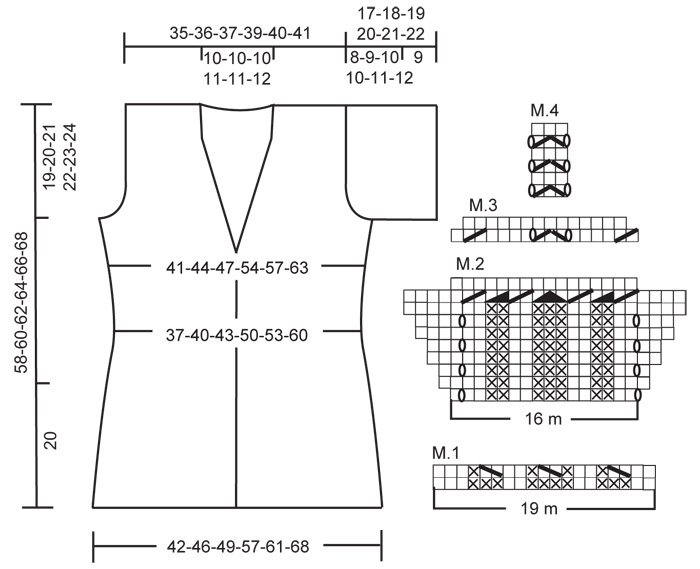
Question on M2 Chart and reading DROPS charts. When working M2 1st row the last 3 stitches are knit 2, yarn over, knit 1 (as I read it the yarn over is between 2 stitches). This produces 4 stitches. I begin to read the second row as purl 3--but I have just created 4 stitches the previous row. So, how is the chart read--right to left and then left to right?
02.05.2013 - 16:41DROPS Design answered:
Dear Karen, read diagram from RS from the right to the left and from WS from left to the right, so that 2nd row = WS starts with P4. Happy knitting!
02.05.2013 - 16:54
![]() Karen wrote:
Karen wrote:
After completing the M1 chart I have 16 stitches between pattern markers when adding the 5 garter on each side, total of 10 stitches I have 250 and not 249 stitches. What have I done wrong?
19.04.2013 - 21:01DROPS Design answered:
Dear Karen, you should repeat 15 times M.1 but the last time, pattern says : in the last repeat do not work the last st (in order to make pattern identical on both front pieces), so that you start with 294 sts and finish with 249 sts. Happy knitting!
20.04.2013 - 16:47Mouton C wrote:
Can someone give me the size correspondance with FR sizes? quelqu'un peut-il m'indiquer la correspondance des tailles avec les tailles FR ?
10.02.2013 - 11:00DROPS Design answered:
Bonjour Madame Mouton, regardez les mesures dans le schéma en bas de la page et comparez à un de vos vêtements analogues pour trouver la taille adéquate. Bon tricot !
11.02.2013 - 09:52
![]() Drobinski wrote:
Drobinski wrote:
Erreur dans explication car M3 et M4 vous dites que les rangs sont sur endroit pour diagramme,comment on fait 2 ensenvers sur envers
10.06.2012 - 13:15DROPS Design answered:
Tous les diagrammes montrent le motif vu sur l'endroit, 1 case = 1 m x 1 rang. Dans les diagrammes, vous avez donc les rangs sur l'endroit aussi bien que les rangs sur l'envers. Bon tricot !
11.06.2012 - 09:17
![]() Drobinski wrote:
Drobinski wrote:
Pour le modèle DROPS 118-17, les explications des points M1 M2 M3 M4, ne sont pas claires, exemple pour le point M2 il fait 20 rgs à répéter ?
09.06.2012 - 21:17DROPS Design answered:
Bonjour Drobinski, les diagrammes montrent 1 rapport du motif a répéter en fonction des explications. M.2 = 16 m x 10 rangs. 1 case du diagramme = 1 m x 1 rang.
11.06.2012 - 09:16
![]() DROPS Design wrote:
DROPS Design wrote:
Yes, you knit 2 extra rows only over the 5 band sts.
18.01.2012 - 11:01
![]() Shanna wrote:
Shanna wrote:
I am not sure about the directions when it says "when piece measures...K 2 rows on the first 5 band sts only, work 1 row on all sts and K 2 rows on the front band sts the other side only (to make the neckline sit nicely). Does this mean to make a short row on the band sts? Please explain, thank you.
15.01.2012 - 18:49
![]() DROPS Design NL wrote:
DROPS Design NL wrote:
Hoi Marina. Bedankt voor de compliment. De knoopsgaten worden standaard niet verder uitgewerkt, maar vindt u dat zelf beter, dan kunt u dat uiteraard ook doen met een beetje van het breigaren. Veel plezier van het vestje.
20.06.2011 - 11:26
![]() Marina De Vulder wrote:
Marina De Vulder wrote:
Chapeau voor wie dit modelletje ontworpen heeft!!!
20.06.2011 - 11:00
![]() Marina De Vulder wrote:
Marina De Vulder wrote:
Model is mooi geslaagd en prima uitgelegd! Een pluim voor wie dit ontworpen heeft, want er is zeker goed over nagedacht!!! Mijn vraagje:Worden de knoopsgaten nog verder uitgewerkt? En zo ja, met het breigaren zelf, of?...
20.06.2011 - 10:59
|
|||||||||||||||||||||||||
Miramar#miramarcardigan |
|||||||||||||||||||||||||
 |
 |
||||||||||||||||||||||||
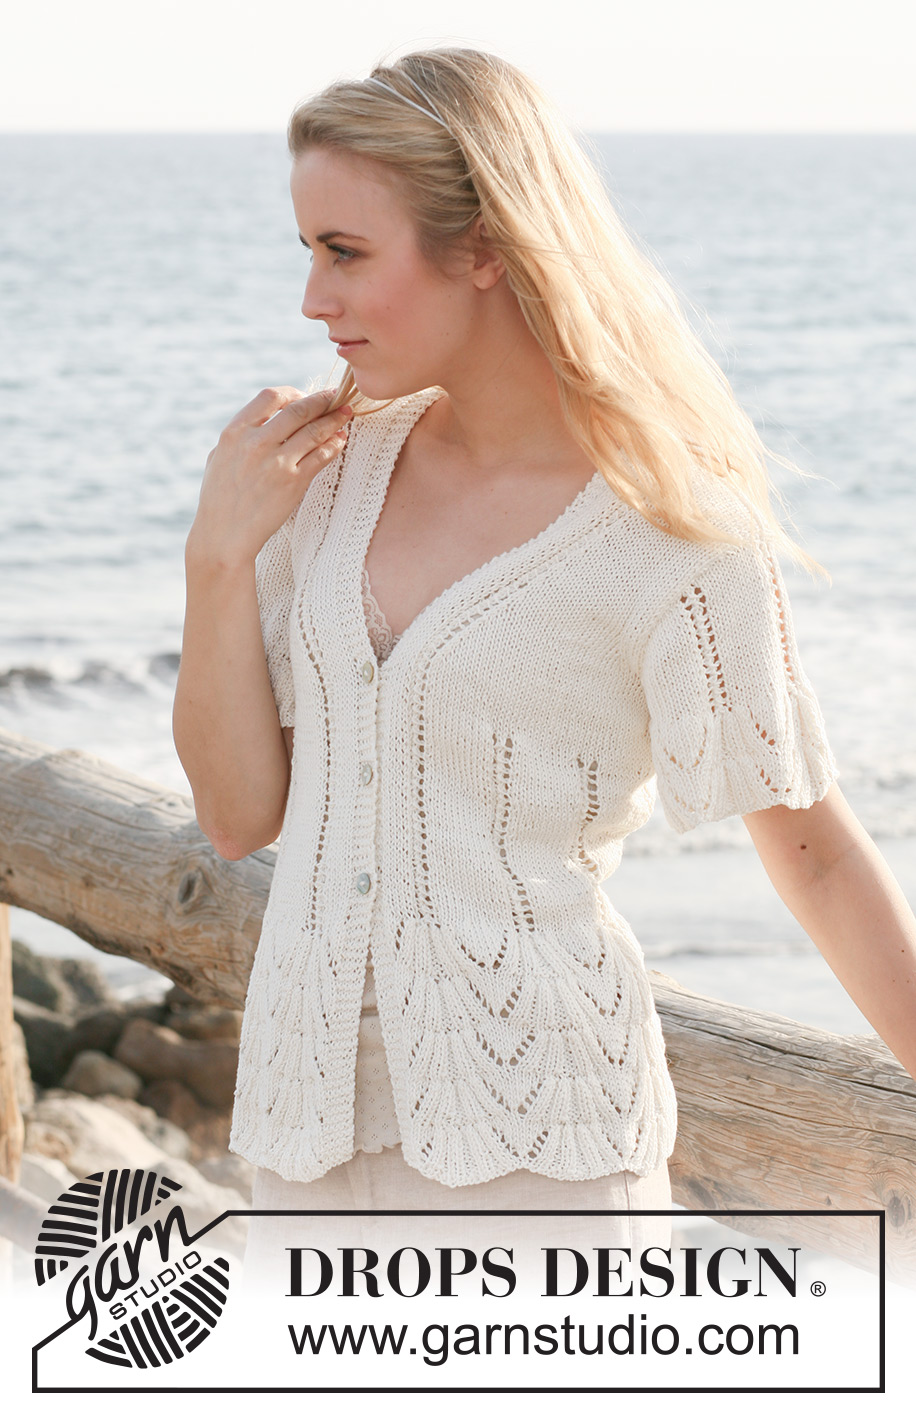
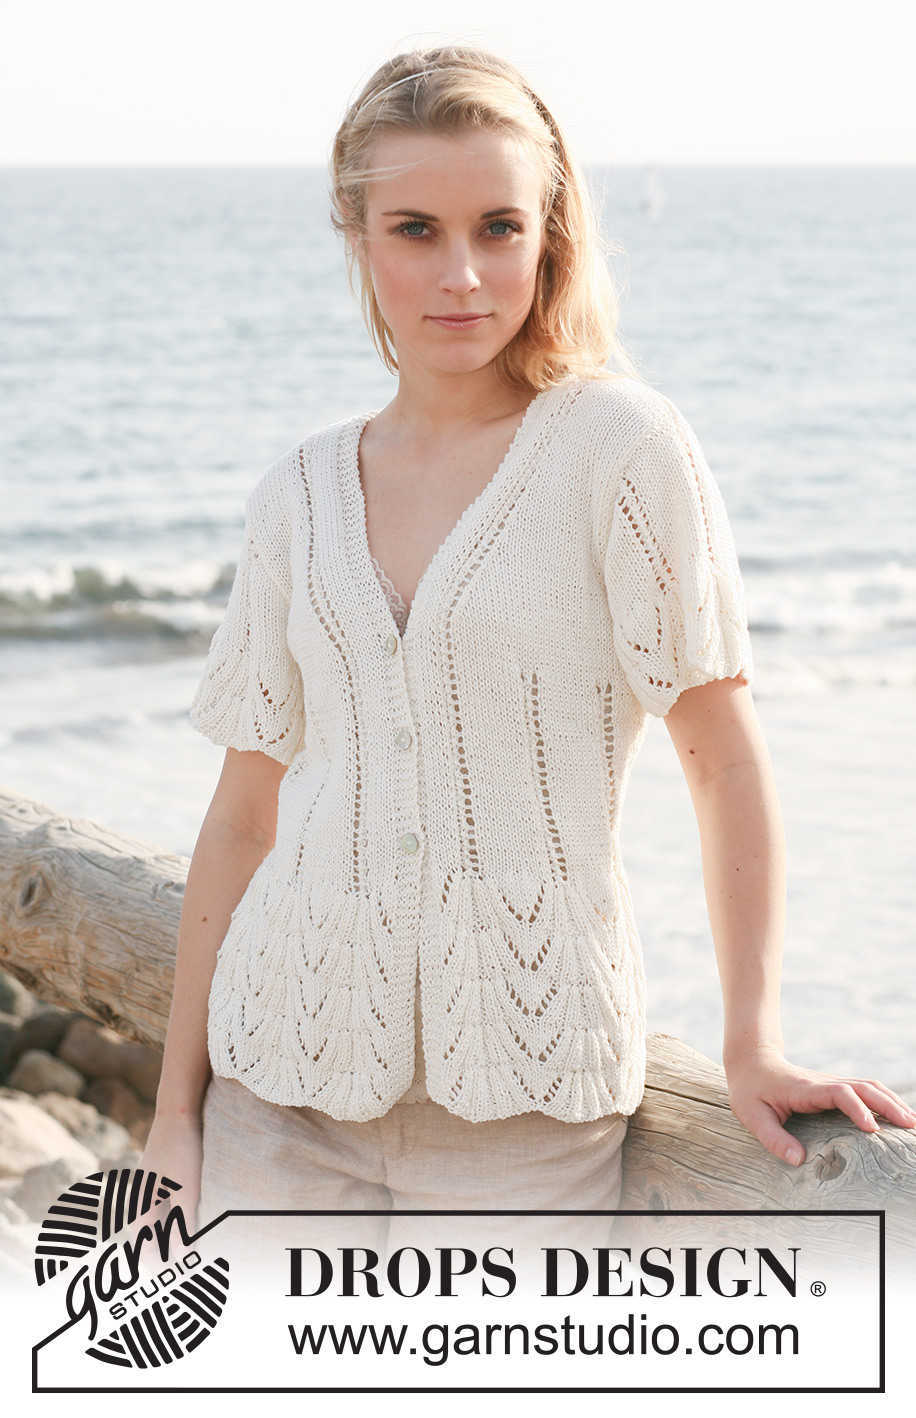
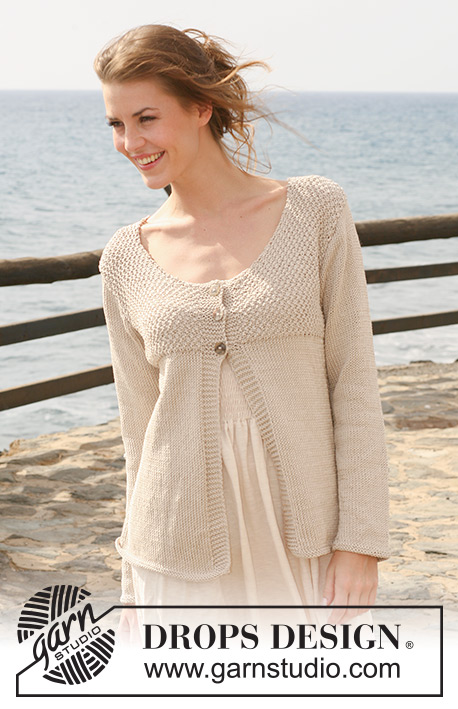
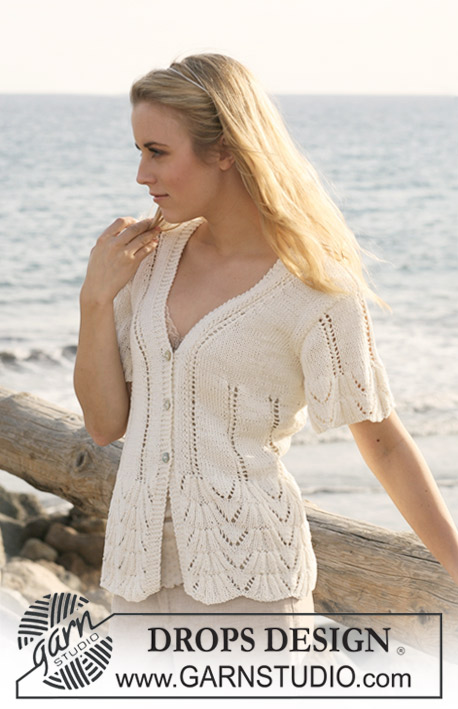
DROPS jacket in ”Muskat” with short sleeves and patterned rib borders. Size S to XXXL.
DROPS 118-17 |
|||||||||||||||||||||||||
|
GARTER ST (back and forth on needle): K all rows. PATTERN: See diagrams M.1 to M.4 - pattern in diagram is seen from RS. BUTTONHOLES: Make 3 buttonholes from RS on right front band. 1 BUTTONHOLE = K tog 3rd and 4th st from mid front and make 1 YO. Make buttonholes when piece measures: Size S: 21, 28 and 35 cm. Size M: 22, 29 and 36 cm. Size L: 23, 30 and 37 cm. Size XL: 24, 31 and 38 cm. Size XXL: 25, 32 and 39 cm. Size XXXL: 26, 33 and 40 cm. DECREASING TIP-1 (applies to neck): Make all dec from RS inside 13 sts (= 5 front band sts in garter st, 5 stocking sts and M.4). Dec as follows AFTER 13 sts: slip 1 st as if to K, K1 and psso. Dec as follows BEFORE 13 sts: K2 tog. DECREASING TIP-2 (applies to armhole): Make all dec from RS inside 4 stocking sts: Dec as follows AFTER 4 sts: slip 1 st as if to K, K1, psso. Dec as follows BEFORE 4 sts: K2 tog. ------------------------------------------------------- -------------------------------------------------------- BODY PIECE: Worked back and forth on circular needle from mid front. Cast on 218-237-256-294-313-351 sts (includes 5 front band sts each side towards mid front) on circular needle size 4 mm with Muskat. Continue as follows (first row = RS): 5 front band sts in GARTER ST – see above, M.1 11-12-13-15-16-18 times across the row - in the last repeat do not work the last st (in order to make pattern identical on both front pieces) – and 5 front band sts in garter st. After M.1 there are 185-201-217-249-265-297 sts on needle. Continue as follows: 5 front band sts in garter st, M.2 11-12-13-15-16-18 times across the row (in the last repeat do not work the last st) and 5 front band sts in garter st. Work 5 vertical repeats of M.2 like this, piece measures approx 20 cm. Continue with M.3 over M.2. After M.3 there are 163-177-191-219-233-261 sts on needle. Continue as follows: 5 front band sts in garter st, 5 stocking sts, * M.4, 11 stocking sts *, repeat from *-* until 13 sts remain, M.4, 5 stocking sts and 5 front band sts in garter st. REMEMBER THE KNITTING TENSION! AT THE SAME TIME when piece measures 21-22-23-24-25-26 cm make BUTTONHOLES – see above! Insert a marker 43-47-50-57-61-68 sts in from each side (= 77-83-91-105-111-125 sts between markers on back piece). When piece measures 26-27-28-29-30-31 cm inc 1 st each side of both markers (inc by K2 in st each side of marker), and repeat the inc on every 3rd cm a total of 4 times = 179-193-207-235-249-277 sts. AT THE SAME TIME when piece measures 33-34-35-36-37-38 cm complete piece in stocking st, BUT work the 13 sts each side towards mid front as before. When piece measures 36-37-38-39-40-41 cm K 2 rows on the first 5 front band sts only, work 1 row on all sts and K 2 rows on the first 5 front band sts the other side only (to make the neckline sit nicely). On next row from RS dec 1 st each side towards mid front – SEE DECREASING TIP-1, and repeat the dec on every other row a total of 8-8-8-8-9-10 times and then on every 4th row a total of 7-8-7-8-8-8 times. AT THE SAME TIME when piece measures 39-40-41-42-43-44 cm cast off 6-8-10-12-14-16 sts each side for armhole (i.e. 3-4-5-6-7-8 sts each side of marker). Now complete front and back pieces separately. LEFT FRONT PIECE: Continue dec for neck – AT THE SAME TIME on next row from RS dec 1 st towards armhole – SEE DECREASING TIP-2, and repeat the dec on every other row a total of 3-4-6-10-11-15 times. When all dec for armhole and neck are complete there are 26-27-28-29-30-31 sts left on shoulder. Cast off when piece measures 58-60-62-64-66-68 cm. RIGHT FRONT PIECE: Like left front piece but mirrored. BACK PIECE: = 79-83-89-101-105-117 sts. Dec for armhole each side as described for front piece = 73-75-77-81-83-87 sts. Continue until piece measures 55-57-59-61-63-65 cm, now work 4 rows garter st on the middle 31-31-31-33-33-35 sts (work remaining sts as before), and then cast off the middle 21-21-21-23-23-25 sts for neck and complete each shoulder (= 26-27-28-29-30-31 sts) separately. Continue with 5 garter sts towards the neck until piece measures 58-60-62-64-66-68 cm, cast off. SLEEVE: Worked back and forth on circular needle. Cast on 97-97-116-116-116-135 sts (includes 1 edge st each side) on circular needle size 4 mm with Muskat. Work M.1 (first row = RS) with 1 edge st each side. After M.1 there are 82-82-98-98-98-114 sts on needle. Continue in M.2 with 1 edge st in garter st each side. Work 2 vertical repeats of M.2, then work M.3 over M.2. After M.3 there are 72-72-86-86-86-100 sts on needle. Continue as follows: 1 edge st, 5 stocking sts, * M.4, 11 stocking sts *, repeat from *-* a total of 4-4-5-5-5-6 times, M.4, 6 stocking sts and 1 edge st. When piece measures 9 cm cast off for sleeve cap at the beg of every row each side: 4 sts 1 time, 2 sts 3 times and 1 st 3-5-6-7-9-10 times, then 2 sts each side until piece measures 16-17-18-19-20-21 cm, now cast off 4 sts 1 time each side, and cast off remaining sts. Sleeve measures approx 17-18-19-20-21-22 cm. ASSEMBLY: Sew shoulder seams. Sew sleeve seams inside 1 edge st and set in sleeves. Sew on buttons. |
|||||||||||||||||||||||||
Diagram explanations |
|||||||||||||||||||||||||
|
|||||||||||||||||||||||||
 |
|||||||||||||||||||||||||
Have you finished this pattern?Tag your pictures with #dropspattern #miramarcardigan or submit them to the #dropsfan gallery. Do you need help with this pattern?You'll find 21 tutorial videos, a Comments/Questions area and more by visiting the pattern on garnstudio.com. © 1982-2026 DROPS Design A/S. We reserve all rights. This document, including all its sub-sections, has copyrights. Read more about what you can do with our patterns at the bottom of each pattern on our site. |
|||||||||||||||||||||||||


With over 40 years in knitting and crochet design, DROPS Design offers one of the most extensive collections of free patterns on the internet - translated to 17 languages. As of today we count 324 catalogues and 12290 patterns translated into English (UK/cm). 12290
We work hard to bring you the best knitting and crochet have to offer, inspiration and advice as well as great quality yarns at incredible prices! Would you like to use our patterns for other than personal use? You can read what you are allowed to do in the Copyright text at the bottom of all our patterns. Happy crafting!
Post a comment to pattern DROPS 118-17
We would love to hear what you have to say about this pattern!
If you want to leave a question, please make sure you select the correct category in the form below, to speed up the answering process. Required fields are marked *.