
Popular categories
Looking for a yarn?


Comments / Questions (16)
Sara wrote:
How can you increase at the back at Both sides of the marker when the marker is behind the last Stitch?
09.09.2017 - 13:57DROPS Design answered:
Dear Sara, the first marker is at the center back, and the second marker at the center front of the slipper, which is put into teh last but one stitch. The last stitch closes the circle, and the piece is crocheted in the round afterwards, which makes possible to increase before and after both markers. I hope this helped. Happy Crafting!
09.09.2017 - 18:13Paula wrote:
I bought my yarns online in germany but don't speak german and would indeed appreciate to know about the decreases. I improvised and made size 6-9 months but can you specify if the decreases are to involve 4 sts (2+2) on each side of the marker, so to decrease 4 sts in each decreasing round? It says "then dec 2 sc - See DECREASING TIP - on each side of marker mid front on every other round a total of 2 times = 28-32-36 (44-52) sc.". Many thanks.
14.08.2017 - 10:39DROPS Design answered:
Dear Paula, no, you should decrease 1 stitch on each side of the marker, which makes a total of 2 decreases, and it is repeated a total of two times every other round.
23.08.2017 - 18:00
![]() B.V wrote:
B.V wrote:
Hej! Näst sista varvet är fel!!!! Arbetet blir bara hälften så högt som på som bilden, fler minskningar och fler varv?? har virkat mönstret 20 gånger!!!!
09.08.2017 - 16:16DROPS Design answered:
Har du kontrollerat virkfastheten? Det är mycket viktigt att den stämmer! Vad exakt är det som inte stämmer på det näst sista varvet?
14.08.2017 - 13:50
![]() Trine C wrote:
Trine C wrote:
Der står i opskriften at man skal starte indtagning midt foran 2 m. fra mærket, så bruger man begge masker til at tage 1 maske ind, men skal tage 2 m. ind på begge sider, hvordan hænger det sammen? skal man så starte 3-4 m fra mærket eller bare fortsætte til man har taget 4 ind i det hele for bliver det i så fald ikke skævt? Eller skal man bare hele tiden tage ned i 1 fm og gøre 1. gennemtræk og så først trække tråden igennem når man har taget alle 4 ind?
28.10.2014 - 03:23DROPS Design answered:
Hej Trine, Du tager 2 m ind på hver side af mærketråden og det gør du 2 gange, så du ialt har taget 8 m ind. God fornøjelse!
28.10.2014 - 10:16Hélène M. wrote:
J'adore ces chaussons, mais je suis incapable de les réaliser au crochet. Est-ce possible d'adapter ce patron afin de le tricoter avec des aiguilles?
07.03.2013 - 20:29DROPS Design answered:
Bonjour Hélène M. d'autres modèles de notre site pourront vous inspirer sans doute, par ex. b20-13 ou b18-29. Bon tricot !
08.03.2013 - 08:46
![]() J. Hoffmann wrote:
J. Hoffmann wrote:
Hallo, verstehe ich folgenden satz:"danach vorne auf beiden Seiten des Markierungsfadens je 2 fM abn. und bei jeder 2. R. total 2 Mal wiederholen" richtig , und gemeint sind hier einfach vier ganze runden bei denen jeweils vorne zwei fm abgenommen werden? vielen dank, j. hoffmann
12.01.2013 - 23:01DROPS Design answered:
Liebe J. Hoffmann, es werden in einer R 4 M abgenommen (auf jeder Seite des Markierungsfadens 2 M) ,dann eine R ohne Abnahmen und dann wieder 1 R mit Abnahmen. Es sind dann 8 M abgenommen.
14.01.2013 - 11:41
![]() DROPS Desing wrote:
DROPS Desing wrote:
Du hekler først på den ene siden av lm-raden (et led) også i på andere siden av lm-Faden (et led).
14.11.2011 - 11:59
![]() Anneli wrote:
Anneli wrote:
Jeg er ingen veldig erfaren hekler, men jeg forstår ikke oppskriften på disse tøflene. etter jeg har snudd arbeidet og heklet på den "andre" siden så får jeg jo ikke plutselig 26 masker? hvor på tøffelen starter man og hvordan kommer man rundt ved å hekle på baksiden?? dette var vanskelig skrevet synes jeg.
12.11.2011 - 20:44
![]() Mille wrote:
Mille wrote:
Er I sikre på, at der ikke er en fejl i opskriften inden man skal starte med at strikke rundt? Jeg synes, der mangler en del masker.
17.09.2011 - 12:52Rebe wrote:
Muchas gracias por publicar patrones gracias a estos patrones he podido hacerle varias cositas hermosas a mi bebe
14.09.2011 - 07:37
|
|
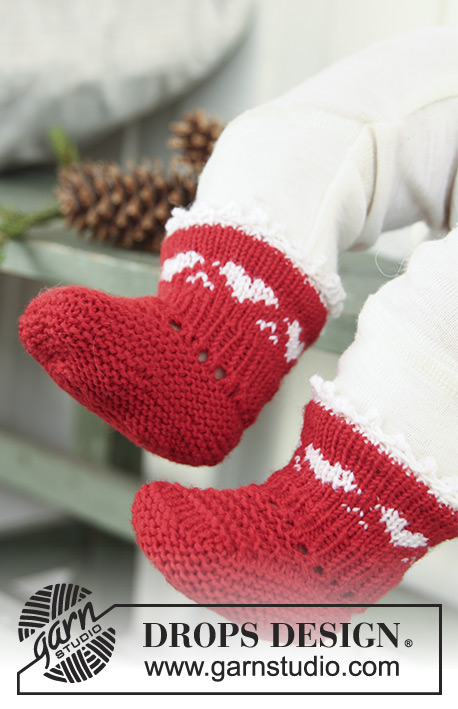
Rosy Toes#rosytoesslippers |
|
|
|
|
Crochet slippers for baby and children in 2 threads DROPS Alpaca
DROPS Baby 19-14 |
|
|
DECREASING TIP: Beg 2 dc before marker. Crochet 1 dc, but wait with the last pull-through (= 2 sts on hook), work next dc, but when doing the last pull-through pull thread through all sts on hook = 1 dc dec. CROCHET TIP: Replace first dc at beg of round/row with 1 ch and finish each round with 1 sl st in ch from beg of round. -------------------------------------------------------- -------------------------------------------------------- LEFT SLIPPER: Crochet 12-14-16 (20-24) ch (includes 1 ch to turn with) with 2 threads Alpaca and crochet hook size 4 mm. Turn piece, skip first ch and crochet 2 dc in 2nd ch from hook, and then 1 dc in each of the next 9-11-13 (17-21) ch, 4 dc in the last ch, (insert a marker in the middle of these 4 dc = mid front), now crochet 1 dc in each of the 9-11-13 (17-21) ch from the other side, and finish with 2 dc in the last but one ch (insert a marker here = mid back) and finish with 1 sl st in ch from beg of round = 26-30-34 (42-50) dc. Now continue in the round - See CROCHET TIP! Crochet 1 dc in each dc, AT THE SAME TIME inc 1 dc on each side of both markers by working 2 dc in 1 dc before and after the markers. Repeat the inc on every round a total of 3 times, BUT the last time ONLY inc by marker mid front = 36-40-44 (52-60) dc. Crochet 4-5-6 (7-8) rounds with 1 dc in each dc, then dec 2 dc - See DECREASING TIP - on each side of marker mid front on every other round a total of 2 times = 28-32-36 (44-52) dc. Crochet 1 round with 1 dc in each dc. Cut and fasten thread. STRAP: Beg 6-6-7 (8-10) dc after marker mid front and crochet 1 dc in each of the next 16-20-22 (28-32) dc, crochet 15-17-19 (21-23) ch, turn, skip the first ch and crochet 1 dc in each of the next 14-16-18 (20-22) ch and 1 dc in each of the next 16-20-22 (28-32) dc = 30-36-40 (48-54) dc. Turn piece. Crochet 1 dc in each dc until 4 dc remain on row, 2 ch, skip 2 dc, 1 dc in each of the last 2 dc on row. Turn piece. Crochet 1 ch, then 1 dc in each dc and each ch = 30-36-40 (48-54) dc. Cut and fasten thread. Sew button on approx 1 cm from the edge of slipper. RIGHT SLIPPER: Crochet in the same way, but crochet the strap on the opposite side. |
|
Have you finished this pattern?Tag your pictures with #dropspattern #rosytoesslippers or submit them to the #dropsfan gallery. Do you need help with this pattern?You'll find 6 tutorial videos, a Comments/Questions area and more by visiting the pattern on garnstudio.com. © 1982-2026 DROPS Design A/S. We reserve all rights. This document, including all its sub-sections, has copyrights. Read more about what you can do with our patterns at the bottom of each pattern on our site. |


With over 40 years in knitting and crochet design, DROPS Design offers one of the most extensive collections of free patterns on the internet - translated to 17 languages. As of today we count 324 catalogues and 12291 patterns translated into English (UK/cm). 12291
We work hard to bring you the best knitting and crochet have to offer, inspiration and advice as well as great quality yarns at incredible prices! Would you like to use our patterns for other than personal use? You can read what you are allowed to do in the Copyright text at the bottom of all our patterns. Happy crafting!
Post a comment to pattern DROPS Baby 19-14
We would love to hear what you have to say about this pattern!
If you want to leave a question, please make sure you select the correct category in the form below, to speed up the answering process. Required fields are marked *.