
Popular categories
Looking for a yarn?


Comments / Questions (120)
![]() Liz M wrote:
Liz M wrote:
I am just doing the collar but am finding the instructions a little confusing- are the 6 stitches slipped or knitted onto the stitch holders? When all 54 stitches are complete how can these then be joined with only one row of k1p1 or do I complete to one end and then turn ? Thanks
27.09.2024 - 00:34DROPS Design answered:
Dear Liz, work the first 6 stitches before slipping them on a thread, so that you don't need to cut the yarn; when all stitches are on a thread, you can then turn work to the end of the row turn and work all stitches so that you don't need to cut the yarn. Happy knitting!
27.09.2024 - 08:50
![]() Célyne Ross wrote:
Célyne Ross wrote:
Bonjour, Ce modèle demande 750 gr de laine (pour la taille M) alors que le modèle 210-36 en demande 350 et ce dernier semble beaucoup plus grand. Est-ce la bonne quantité? Autre question: Quelle taille a la mannequin? Merci!
08.08.2024 - 01:50DROPS Design answered:
Bonjour Mme Ross, ce modèle se tricote avec une laine du groupe B et une tension de 28 m x 38 rangs côtes = 10 x 10 cm et le 210-36 se tricote avec une laine du groupe C et un échantillon de 16 m x 20 rangs = 10 x 10 cm, ces deux modèles ne sont donc pas également comparables en raison de leur texture/groupe de tension mais notez également que leur métrage est différent. Utilisez le convertisseur pour trouver des alternatives à ces deux laines. Nos modèles portent en général une taille S ou M; retrouvez plus d'infos sur les tailles ici. Bon tricot!
08.08.2024 - 09:36
![]() Anna wrote:
Anna wrote:
Einen schönen guten Morgen. Ich möchte demnächst diese Jacke stricken und habe mir besonders die Anleitung des Schalkragens durchgelesen. Sind das verkürzte Reihen bei denen also vor dem auf den Hilfsfaden legen erst wieder zurückgestrickt wird oder soll man den Faden jedesmal abschneiden ? Ich hoffe, ich habe mein Problem gut genug dargelegt.
19.07.2024 - 07:27DROPS Design answered:
Liebe Anna, der Faden wird nicht abgeschnitten, sondern die je 6 Maschen werden am Ende der Reihe, bevor sie gestrickt werden, stillgelegt, dann wird gewendet, die Reihe wird gestrickt, und dann werden am Ende der Reihe vor dem Stricken der letzten 6 Maschen diese Maschen wieder stillgelegt usw., bis Sie die genannte Anzahl an Maschen stillgelegt haben. Dann wird über alle Maschen gestrickt - dabei ist es ratsam, den Querfaden zwischen den Gruppen aus stillgelegten Maschen aufzufassen und diese neue Masche mit der nächsten Masche verschränkt zusammenzustricken, damit keine Löcher in den Übergängen entstehen. Gutes Gelingen!
23.07.2024 - 09:51
![]() Janet Kuscus wrote:
Janet Kuscus wrote:
Could you please explain what the following means? Cast on 130-142-154-168-184-200 sts (includes 1 edge st each side) What does ( includes 1 edge st each side means) ? Thank, Janet
15.07.2024 - 22:18DROPS Design answered:
Dear Janet the edge stitch is the outer most stitch on both side of the piece, usually knitted with a garter stitch (as a KNIT stitch every row). The sentence means that the stitchnumber given already contains this two stitches, you do not have to add extra stitches for it. Happy Knitting!
16.07.2024 - 01:14
![]() Carol H wrote:
Carol H wrote:
I'm working on pattern 112-40 and am stuck on the instructions for creating the shawl collar. Are these supposed to be short rows? Am I supposed knit the 101 stitches on each side before slipping them? Many thanks for any clarification you can provide.
23.06.2024 - 18:17DROPS Design answered:
Dear Carol, yes, it's a type of short rows. You work the 101 stitches on each side and then slip them and do the same for the 6 sts slipped on every row. Happy knitting!
23.06.2024 - 19:45
![]() Marja Stravers wrote:
Marja Stravers wrote:
Het is een mooi vest. Nu heb ik de voorbies gebreid maar in de randen waar de steken op een hulpdraad hebben gestaan zijn nu gaatjes waar ik de steken aan elkaar heb gebreid na ze weer op de naald te gebben gezet. Hoe komt dit?
19.10.2023 - 20:25DROPS Design answered:
Dag Marja,
Er kunnen inderdaad kleine gaatjes/ontstaan. Om dit (een volgende keer) te voorkomen kun je de draad tussen de 2 steken (op de plek waar nu de gaatjes zit) op de linker naald zetten en deze gedraaid samenbreien met de volgende steek.
28.10.2023 - 10:30
![]() Gwen Meythaler wrote:
Gwen Meythaler wrote:
I didn't ask my question clearly before. I'm wondering if the bottom ribbing can be shortened. So that the garter stitch top is longer. Thank you, Gwen
31.10.2022 - 00:03DROPS Design answered:
Hi Gwen, Of course, you can adjust the pattern so you have less ribbing and more garter stitch. Happy knitting!
31.10.2022 - 06:45
![]() Gwen wrote:
Gwen wrote:
Hello, Can the sweater, Jamie, be knitted with no ribbing or a much shorter ribbing? Thank you, Gwen
28.10.2022 - 23:33DROPS Design answered:
Dear Gwen, yes, you can make a narrower rib edge but you will need to ensure that the front pieces are wide enough to be buttoned together. Happy knitting!
30.10.2022 - 23:49
![]() Gwen wrote:
Gwen wrote:
Hello, Can the sweater, Jamie, be knitted with no ribbing or a much shorter ribbing? Thank you, Gwen
28.10.2022 - 23:11DROPS Design answered:
Dear Gwen, please see answer above.
30.10.2022 - 23:49
![]() Lpelkey wrote:
Lpelkey wrote:
Approximately how many stitches should be there to bind off for top of sleeve at shoulder, size large? Basically it says, “ when piece measures 22”. No mention of about how many stitch’s should be left.
23.10.2022 - 01:40DROPS Design answered:
Dear Lpelkey, the number of stitches left on the round is not as important, since it may vary depending on the gauge of each knitter. What is important is that the bind-off takes place when the garment measures 22", regardless of the knitter's gauge, which is why we highlight that. Happy knitting!
23.10.2022 - 23:57
|
|
Jamie#jamiecardigan |
|
|
|
|
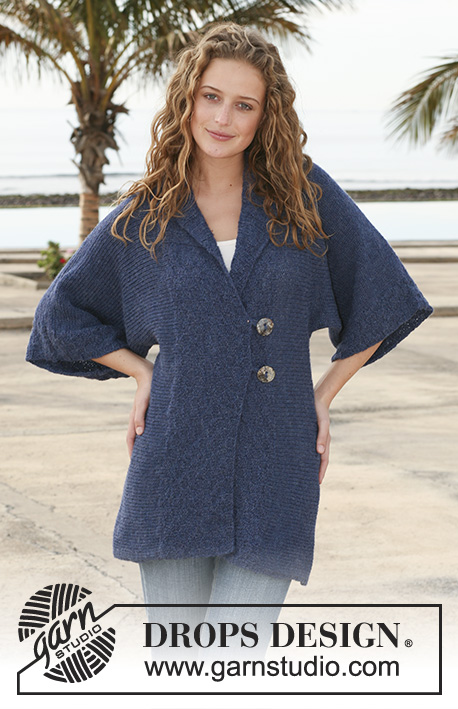
Knitted DROPS Jacket with rib in ”Merino Extra Fine”. Size S - XXXL.
DROPS 112-40 |
|
|
GARTER ST (back and forth on needle): K all rows. BUTTONHOLES: Make buttonholes on right front band. 1 buttonhole: K2 tog and cast on 1 new st on return row. Make buttonholes when piece measures 12, 20 and 28 cm, measured from bottom edge, for all sizes. --------------------------------------------------------- BACK PIECE: Worked back and forth on needle. Cast on 130-142-154-168-184-200 sts (includes 1 edge st each side) on needle size 4 mm with Merino. P 1 row from WS and continue in rib, K1-P1, with 1 edge st each side in garter st. REMEMBER THE KNITTING TENSION. When piece measures 5 cm dec 1 st each side on every 3 cm a total of 8 times = 114-126-138-152-168-184 sts. When piece measures 28 cm continue in garter st – see above. AT THE SAME TIME on first row dec 28-32-34-36-42-46 sts evenly = 86-94-104-116-126-138 sts. When piece measures 40-41-42-43-44-45 cm cast off for armhole each side at the beg of every row: 3 sts 1 time, 2 sts 0-1-3-4-6-8 times and 1 st 1-2-2-5-5-6 times = 78-80-82-84-86-88 sts. When piece measures 58-60-62-64-66-68 cm cast off the middle 16-18-20-22-24-26 sts for neck and complete each shoulder separately. Cast off 1 st on neckline on next row = 30-30-30-30-30-30 sts left on shoulder. Cast off when piece measures 60-62-64-66-68-70 cm. RIGHT FRONT PIECE: Cast on 66-72-78-85-93-101 sts (includes 1 edge st at the side and 1 edge st towards mid front) on needle size 4 mm with Merino. P 1 row from WS and continue in rib, K1/P1, with 1 edge st each side in garter st. When piece measures 5 cm dec at the side as described for back piece = 58-64-70-77-85-93 sts. When piece measures 28 cm continue in garter st, AT THE SAME TIME dec 14-16-17-18-21-23 sts evenly on first row = 44-48-53-59-64-70 sts. When piece measures 35-36-37-38-39-40 cm cast off to shape the neckline at the beg of row from mid front: 1 st on every 2 cm a total of 9-10-11-12-13-14 times. AT THE SAME TIME when piece measures 40-41-42-43-44-45 cm cast off for armhole at the side as described for back piece. When all dec are complete there are 31-31-31-31-31-31 sts left on shoulder (incl 1 edge st towards mid front). Cast off when piece measures 60-62-64-66-68-70 cm. LEFT FRONT PIECE: Like right front piece, but mirrored. SLEEVE: Worked back and forth on needle. Cast on 66-70-72-74-78-80 sts (includes 1 edge st each side) on needle size 4 mm with Merino. Work rib, K1/P1, with 1 edge st each side. When piece measures 8 cm continue in garter st, AT THE SAME TIME dec 16-18-18-18-20-20 sts evenly on first row = 50-52-54-56-58-60 sts. Now inc 1 st each side, and repeat the inc on every 3.5-2.5-2.5-2-2-1.5 cm a total of 12-14-16-18-19-21 times = 74-80-86-92-96-102 sts. When piece measures 49-48-48-47-46-44 cm – less for the larger sizes because of longer sleeve cap and wider shoulder – cast off for sleeve cap each side at the beg of every row: 3 sts 1 time, 2 sts 4-4-5-5-5-5 times, 1 st 0-1-1-2-5-8 times, then 2 sts each side until piece measures 55-55-56-56-57-57 cm, cast off 3 sts each side and cast off remaining sts. Piece measures approx 56-56-57-57-58-58 cm. ASSEMBLY: Sew shoulder seams. Set in sleeves. Sew side and sleeve seams inside 1 edge st. FRONT BANDS: Pick up 375-391-405-421-435-451 sts inside 1 edge st along right front piece, round neckline and down along left front piece. K 1 row from WS and continue as follows: 5 garter sts, rib K1/P1 and finish with K1 and 5 garter sts. When piece measures 3 cm make BUTTONHOLE on right front band – see above. When piece measures 5 cm slip 98-101-104-107-110-113 sts each side (= towards bottom edge) on a stitch holder and continue on remaining sts for collar. AT THE SAME TIME slip 6 sts on the stitch holder each side at the end of every row a total of 8-8-8-9-9-9 times = 146-149-152-161-164-167 sts on stitch holder each side. Rib now measures approx 10-10-10-11-11-11 cm where widest. Slip all sts from stitch holders back on needle and work 1 row rib as before on all sts. Cast off in rib. Sew buttons on left front piece to fit buttonholes. |
|
 |
|
Have you finished this pattern?Tag your pictures with #dropspattern #jamiecardigan or submit them to the #dropsfan gallery. Do you need help with this pattern?You'll find 17 tutorial videos, a Comments/Questions area and more by visiting the pattern on garnstudio.com. © 1982-2026 DROPS Design A/S. We reserve all rights. This document, including all its sub-sections, has copyrights. Read more about what you can do with our patterns at the bottom of each pattern on our site. |


With over 40 years in knitting and crochet design, DROPS Design offers one of the most extensive collections of free patterns on the internet - translated to 17 languages. As of today we count 324 catalogues and 12290 patterns translated into English (UK/cm). 12290
We work hard to bring you the best knitting and crochet have to offer, inspiration and advice as well as great quality yarns at incredible prices! Would you like to use our patterns for other than personal use? You can read what you are allowed to do in the Copyright text at the bottom of all our patterns. Happy crafting!
Post a comment to pattern DROPS 112-40
We would love to hear what you have to say about this pattern!
If you want to leave a question, please make sure you select the correct category in the form below, to speed up the answering process. Required fields are marked *.