
Popular categories
Looking for a yarn?


Comments / Questions (29)
![]() Agnès Regny wrote:
Agnès Regny wrote:
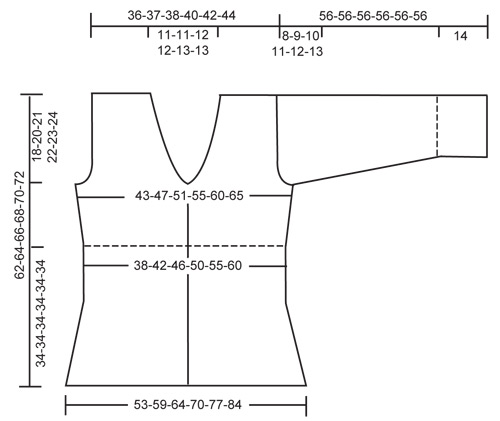
Est ce que j ai les bonnes diminutions 1fois 3mailles,3fois2mailles,6fois1maille,et 2maillestoys les rangs jusqu'à 55cm de hauteur puis 3mailles,merci beaucoup de vos réponses,salutations
12.04.2023 - 08:56DROPS Design answered:
Bonjour Mme Regny, il semble bien effectivement, vous avez bien rabattu ces mailles (au lieu de les diminuer) de chaque côté (= en début de rang sur l'endroit et en début de rang sur l'envers)? Si tel est le cas, c'est bien juste. Bon tricot!
12.04.2023 - 12:46
![]() Agnès Regny wrote:
Agnès Regny wrote:
Merci de votre réponse mais sur le dos et le devant,de l emmanchure à l épaule j ai 22 cm alors comment jepeux faire aller un arrondi de manche de 10cm
12.04.2023 - 08:37DROPS Design answered:
Bonjour Mme Regny, en taille XL vous avez 22 cm d'emmanchure et 11 cm de hauteur de tête de manche. La longueur totale du haut de la manche (à partir des premières mailles rabattues d'un côté le long de tous les rangs des mailles rabattues jusqu'à l'autre côté) doit s'ajuster joliment au-dessus des 44 cm de l'emmanchure. Épinglez si besoin avant de coudre, si vos mesures sont justes, tout devrait tomber impeccablement bien. Bon assemblage!
12.04.2023 - 08:45
![]() Agnès Regny wrote:
Agnès Regny wrote:
Bonjour,j ai un problème de realisation pour les manches au niveau de l arrondi qui me parait petit par rapport à l emmanchure du corps en suivant les indications du modèle.Dans l attente de votre réponse,salutations
11.04.2023 - 18:45DROPS Design answered:
Bonjour Mme Regny, l'arrondi de la manche doit mesurer 8-9-10-11-12-13 cm et s'intégrer ainsi parfaitement le long de l'emmanchure, à partir des mailles rabattues d'un côté jusqu'à l'autre côté. Bon tricot!
12.04.2023 - 08:17
![]() Elisabeth Rehnberg wrote:
Elisabeth Rehnberg wrote:
Repade upp denna då vändningarna blev lite väl synliga hur noga jag än försökte göra det. Tycker nog det syns även på bilden här.
09.06.2021 - 21:58
![]() Sanna wrote:
Sanna wrote:
Koitan neuloa kokoa M. Mutta kun kaarrokkeessa 10 sentin kohdalla aletaan tehdä kädenteitä, miten sitten muka vielä voi jatkaa "kaikilla silmukoilla"?? Eikö kädentien alkaessa ole pakko alkaa neuloa etu- ja takaosia erikseen??
26.02.2017 - 20:58DROPS Design answered:
Hei! Etu- ja takakappaleet neulotaan erikseen. Tässä neuvotaan kuitenkin samalla miten tehdään etureunojen lyhennetyt kerrokset ja kavennukset.
27.02.2017 - 15:47
![]() Patty wrote:
Patty wrote:
Ce modèle est magnifique ! j'ai eu grand plaisir à le tricoter !
21.12.2012 - 09:01
![]() Karin wrote:
Karin wrote:
Håller just på att avsluta den andra tröjan i samma mönster - jättekul att sticka och otroligt fint resultat!
28.03.2009 - 17:44
![]() Merethe wrote:
Merethe wrote:
Strikker denne nå, og resultatet bli supert!
04.02.2009 - 08:40
![]() Jelena wrote:
Jelena wrote:
I tried to do it,but the problem is at the begining it's ok,but later it's smaller and smaller.And at the end it is big difference between 2 sides. Jelena from Serbia
01.02.2009 - 20:22
![]() Sonni wrote:
Sonni wrote:
Sehr schön - habe gleich angefangen zu stricken! Die Strickmuster sind sehr gut erklärt - dickes Lob - weiter so. Werde drops gerne weiterempfehlen!
28.01.2009 - 12:46
|
|
Fairy Breeze#fairybreezecardigan |
|
|
|
|
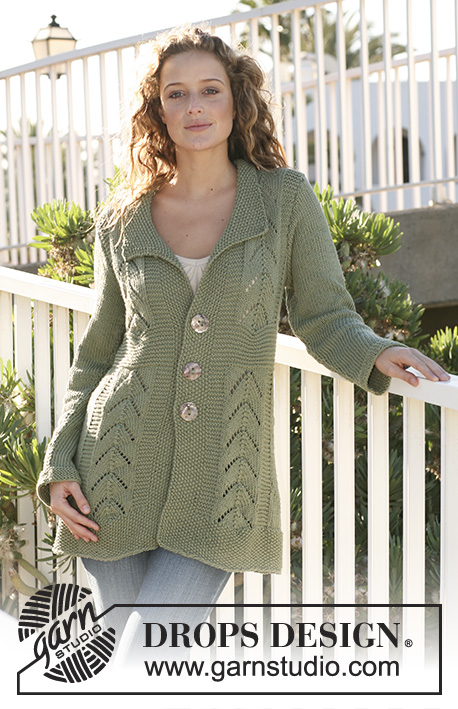
DROPS jacket in ”Muskat” with lace pattern and garter st. Size S – XXXL.
DROPS 111-14 |
|
|
GARTER ST (back and forth on needle): K all rows. SHORTENED ROWS AND PATTERN BODY PIECE: To make the jacket wider at the bottom work shortened rows as follows: Row 1 and 2: K all sts. Row 3: K the first 34 sts, turn piece. Row 4: Tighten thread and K all sts. Row 5 to 8: K all sts. Row 9: K the first 34 sts, turn piece. Row 10: Tighten thread and K all sts. Row 11 and 12: K all sts. Row 13: * K2 tog, 1 YO *, repeat from *-*, and finish with K2. Row 14: K all sts. Repeat row 1-14 until finished measurements. 1 repeat = 10 rows on sts at the top and 14 rows on sts at the bottom. PATTERN YOKE: * 5 rows stocking st, K 1 row from WS *, repeat from *-*. PATTERN CUFFS: * work 4 rows garter st back and forth on needle, work next row as follows: *K2 tog, 1 YO *, repeat from *-* until 2 sts remain, K2, work 3 rows garter st *, repeat from *-* until finished measurements. BUTTONHOLES: Make buttonholes on right front band when piece measures 1, 5 and 9 cm. 1 buttonhole = K tog 2nd and 3rd st from mid front and make 1 YO. DECREASING TIP: Make all dec from RS inside 4 garter sts. Dec as follows after 4 sts: slip 1 st as if to K, K1, psso Dec as follows before 4 sts: K2 tog. ----------------------------------------------------------- BODY PIECE, BOTTOM PART: Worked from side to side, from mid front to mid front. LOOSELY cast on 68 sts for all sizes on needle size 4.5 mm with Muskat. K 8 rows on all sts (first row beg at bottom edge). Now work SHORTENED ROWS AND PATTERN BODY PIECE – see above. REMEMBER THE KNITTING TENSION! Continue until piece measures approx 108-120-130-142-156-170 cm along bottom edge (piece measures approx 78-86-92-102-112-122 cm at the top) – adjust to after row 12 in pattern – and now K 8 rows on all sts, cast off loosely. Turn piece, so that RS becomes the side with 1 row stocking st on each side of lace row. YOKE: Worked back and forth on circular needle from mid front. Pick up 1 st from the RS in approx every other row along the top of bottom part on needle size 4.5 mm with Muskat. K 1 row from WS, AT THE SAME TIME adjust number of sts to 160-176-192-208-228-248. NOW MEASURE PIECE FROM HERE! Insert a marker 42-46-50-54-59-64 sts in from each side (= 76-84-92-100-110-120 sts on back piece) and continue in PATTERN YOKE – see above – with 4 garter sts each side (= front bands). AT THE SAME TIME when piece measures 1 cm make BUTTONHOLE on right front band – see above. AT THE SAME TIME on row 4 inc 1 st on each side of markers at the sides, and repeat the inc on every 4th row a total of 5 times = 180-196-212-228-248-268 sts. READ NECKLINE AND ARMHOLE BEFORE CONTINUING! NECKLINE: When piece measures 10 cm work 2 rows garter st on the 4 garter sts at one side only (to make the neckline neater), work 1 row on all sts and now work 2 rows garter st on the 4 garter sts only at the other side. Continue on all sts, AT THE SAME TIME on next row from RS dec 1 st each towards mid front – SEE DECREASING TIP – and repeat the dec on every other row a total of 10 times and then on every 4th row 5-5-6-6-7-7 times. ARMHOLE: AT THE SAME TIME when piece measures 10-10-11-12-13-14 cm cast off 6-6-8-8-10-10 sts each side for armhole (= 3-3-4-4-5-5 sts on each side of marker) and now complete each piece separately. LEFT FRONT PIECE: Continue in pattern and the dec for neck, AT THE SAME TIME cast off for armhole at the beg of every row from the side: 2 sts 1-2-3-4-5-6 times and 1 st 2-3-3-3-3-4 times. When all dec are complete there are 25-26-26-28-29-31 sts left on shoulder. Cast off when piece measures 28-30-32-34-36-38 cm (jacket measures approx 62-64-66-68-70-72 cm). RIGHT FRONT PIECE: Like left front piece, but mirrored. BACK PIECE: = 80-88-94-102-110-120 sts. Cast off for armhole as described for front piece = 72-74-76-80-84-88 sts. Continue until piece measures 26-28-30-32-34-36 cm. Now work 4 rows garter st on the middle 30-30-32-32-34-34 sts, with remaining sts as before. On next row cast off the middle 22-22-24-24-26-26 sts for neck and complete each shoulder separately with 4 garter sts towards neckline. Cast off when piece 28-30-32-34-36-38 cm. CUFF: Worked from side to side. Cast on 28 sts for all sizes on needle size 4.5 mm with Muskat and work PATTERN CUFFS – see above – until piece measures approx 25-25-27-27-29-31 cm, adjust to a full repeat, and cast off LOOSELY. Turn piece, so that RS becomes the side with 1 row stocking st on each side of lace row. SLEEVE: Pick up 1 st from RS in approx every other row on cuff on needle size 4.5 mm with Muskat. K 1 row from WS, AT THE SAME TIME adjust number of sts to 52-52-56-56-60-64. Continue in stocking st with 1 edge st each side. When piece measures 15 cm (incl cuff) inc 1 st each side on every 4-3-2.5-2-2-2 cm a total of 8-11-11-13-14-14 times = 68-74-78-82-88-92 sts. When piece measures 48-47-46-45-44-43 cm (less for the larger sizes because of longer sleeve cap and wider shoulder) cast off for sleeve cap each side at the beg of every row: 4 sts 1 time, 2 sts 3 times and 1 st 2-4-5-6-8-9 times, then 2 sts each side until piece measures 55 cm, now cast off 3 sts each side 1 time and cast off remaining sts. Piece measures approx 56 cm. ASSEMBLY: Sew shoulder seams. Sew sleeve seams – sew the cuffs edge to edge and the rest of the sleeve inside 1 edge st. Set in sleeves and sew on buttons. |
|
 |
|
Have you finished this pattern?Tag your pictures with #dropspattern #fairybreezecardigan or submit them to the #dropsfan gallery. Do you need help with this pattern?You'll find 20 tutorial videos, a Comments/Questions area and more by visiting the pattern on garnstudio.com. © 1982-2026 DROPS Design A/S. We reserve all rights. This document, including all its sub-sections, has copyrights. Read more about what you can do with our patterns at the bottom of each pattern on our site. |


With over 40 years in knitting and crochet design, DROPS Design offers one of the most extensive collections of free patterns on the internet - translated to 17 languages. As of today we count 324 catalogues and 12290 patterns translated into English (UK/cm). 12290
We work hard to bring you the best knitting and crochet have to offer, inspiration and advice as well as great quality yarns at incredible prices! Would you like to use our patterns for other than personal use? You can read what you are allowed to do in the Copyright text at the bottom of all our patterns. Happy crafting!
Post a comment to pattern DROPS 111-14
We would love to hear what you have to say about this pattern!
If you want to leave a question, please make sure you select the correct category in the form below, to speed up the answering process. Required fields are marked *.