
Popular categories
Looking for a yarn?


Comments / Questions (153)
![]() Uschi wrote:
Uschi wrote:
Beine Gr 50/56: Zu Rundstricknadel Nr. 4,5, wechseln und glatt mit 4 M. Kraussrippe auf beiden Seiten weiter stricken – GLEICHZEITIG nach 6 cm innerhalb der 4 M. Kraussrippe je 1 M. aufnehmen und bei jeder 3.-3.-4. (4.-4.) R. total 9-10-11 (12-13) Mal wiederholen = 54-60-66 (72-78) M. Soll innerhalb der 4 Krausre M zugenommen werden? Oder danach in gl re M? Sonst hätte ich ja 13 M Blende, das sieht auf den Fotos anders aus... Wie stimmt?
13.04.2023 - 15:40DROPS Design answered:
Liebe Uschi, die Zunahmen sind gleichzeitg innerhalb 4 Maschen gestrickt, dh so: die 4 ersten Maschen kraus rechts stricken, 1 Masche zunehmen, dann stricken bis 4 Maschen übrig sind, 1 Masche zunehmen, die letzten 4 Maschen stricken. Die Zunahmen werden glatt rechts gestrickt (es sind immer noch 4 Maschen kraus rechts beidseitig). Viel Spaß beim stricken!
13.04.2023 - 16:39
![]() Ruth Strehle wrote:
Ruth Strehle wrote:
Zur Baskenmütze: nachdem ich nach den Zunahmen 130 M auf der Nadel habe, beziehen sich dann die 7 cm auf die Gesamtlänge, ab Anfang oder ab dem Bündchen von 2cm ?
28.01.2023 - 22:25DROPS Design answered:
Liebe Frau Strehle, die 7,5 cm messen Sie ab der Anschlagskante. Viel Spaß beim stricken!
30.01.2023 - 09:12
![]() Lucie wrote:
Lucie wrote:
Est-il possible sans trop de difficulté de tricoter une taille 9/12 mois ? Des conseils ?
21.01.2023 - 13:31DROPS Design answered:
Bonjour Lucie, ce modèle existe soit en taille 6/9 mois soit en taille 12/18 mois, mesurez un vêtement similaire que l'enfant porte et comparez ces mesures à celles du schéma, vous pourrez ainsi choisir la taille la plus appropriée. Bon tricot!
23.01.2023 - 08:54
![]() Petra wrote:
Petra wrote:
Hallo, bitte erklären Sie mir, wie ich die zweite Reihe der Hose Stricken soll. Die nächste Rd. wie folgt: 18-21-24 (27-30) M. glatt, 2 li., M1, 2 li., M2, 2 li. und glatt über die restlichen M. So weiter stricken Vielen lieben Dank
03.12.2022 - 20:20DROPS Design answered:
Liebe Petra, bei dieser Runde soll man zunehmen, so stricken Sie: 18-30 M glatt rechts (siehe Größe), dann stricken Sie 2 linke Maschen, dann stricken Sie 2 rechte Maschen in die beiden nächsten 2 Maschen (es sind jetzt 4 Maschen anstatt 2 für den Zopf), 2 linke Maschen, dann wieder 2 rechte Maschen in die 2 nächsten Maschen (wieder 4 Maschen anstatt 2 für den Zopf), 2 Linke Maschen und die letzten Maschen glatt rechts. Bei der nächsten Maschen stricken Sie jeweils M.1 und M.2 über diese 4 Maschen. Viel Spaß beim stricken!
06.12.2022 - 09:02
![]() Petra wrote:
Petra wrote:
Hallo, ich stricke gerade den super praktischen Overall und komme hier nicht weiter: Hose: Die nächste Rd. wie folgt: 18-21-24 (27-30) M. glatt , 2 li., M1, 2 li., M2, 2 li. und glatt über die restlichen M. So weiter stricken bis die Arbeit 38-46-54 (59-66) cm misst.? Die erste Reihe habe ich so gestrickt: Das ist doch der Anfang des Zopfmusters, oder (2 links 4 rechts, Mit Zunahmen 2 links , 4 rechts mit Zunahmen 2 links=14 Maschen)oder? Wie muss ich die folgende Reihe Stricken.
02.12.2022 - 20:53
![]() Margarete Helstein wrote:
Margarete Helstein wrote:
Nie rozumiem tej czesci przod i tyl. jak zaczne przerabiac nap.24 oczka dzersejem to warkocze wyjda mi na srodku lewej nogi? Gdybym zaczela przerabiac od srodka lewj nogi tez 24 oczka to warkocze wyjda na poczatku prawej nogi? Tego podzialu z markerami rowniez nie rozumiem? Pozniej na wysokosci 54 cm trzeba robotke podzielic na dwie czesci i warkocze maja sie znajdowac po prawej stronie robotki chociaz zaczac trzeba z lewej stony robotki? Jak podzielic ?
29.11.2022 - 19:11DROPS Design answered:
Witaj Margarete, markery znajdują się między 2 oczkami środkowymi każdej nogawki, co stanowi boki kombinezonu. Zaczynasz przerabiać od markera, wtedy warkocz wyjdzie na środku przodu. Pozdrawiamy!
30.11.2022 - 14:35
![]() Aurelie wrote:
Aurelie wrote:
Bonjour, je suis en train de tricoter la jambe droite et il est indiqué : À 16-20-23 (25-30) cm de hauteur totale, rabattre 4 m de chaque côté = 46-52-58 (64-70) m. Doit on répartir les mailles rabattues? Doit on rabattre les mailles point mousse ou celles d'avant? Merci!
26.10.2022 - 10:25DROPS Design answered:
Bonjour Aurélie, vous devez bien rabattre et non diminuer, autrement dit, à la hauteur requise, rabattez les 4 premières mailles, tricotez jusqu'à ce qu'il reste 4 mailles, et rabattez les 4 dernières mailles (= vous avez 46-52-58 (64-70) m pour la jambe à mettre en attente). Bon tricot!
26.10.2022 - 16:33
![]() Claudia wrote:
Claudia wrote:
HOSE: Die nächste Rd wie folgt – auf der linken Seite der Arbeit anfangen: 18-21-24 (27-30) M. glatt, ......... AB HIER VERSTEHE ICH ES NICHT : 2 li., 2 re. in jede der 2 nächsten M. (= 4 re.), 2 li., 2 re. in jede der 2 nächsten M. (= 4 re.), 2 li. und glatt über die restlichen M. stricken = 96-108-120 (132-144) M.
31.05.2022 - 13:29DROPS Design answered:
Liebe Claudia, bei der 1. Reihe soll man zunehmen, dh: stricken Sie 18-30 Maschen glatt rechts (siehe Größe), dann stricken Sie die 2 nächsten Maschen links, dann stricken Sie die 2 nächsten Maschen je 2 Mal (= siehe Video = es wird 2 Mal zugenommen), dann stricken Sie 2 Maschen links, die 2 nächsten Maschen stricken Sie 2 Mal wie zuvor (2 Zunahmen), und die restlichen Maschen stricken Sie glatt rechts. Viel Spaß beim stricken!
31.05.2022 - 17:02
![]() Fé wrote:
Fé wrote:
Hi! Het meerdere voor de baret ‘om de naald’ wordt daarmee bedoelde elke naald aan de goede kant dus? Of wordt heen en weer als 1 naald gezien? Dank!
15.12.2021 - 13:32DROPS Design answered:
Dag Fé,
Heen en weer wordt als 2 naalden gezien. Dus als er staat om de naald dan meerder je de ene naald wel en de andere naald niet.
20.12.2021 - 16:51
![]() Mirjam wrote:
Mirjam wrote:
Ik heb een gilet met v-hals van Drops baby /21/8 gebreid met het garen Drops Baby Merino mix garengroep A en wil daar een bijkleurende baret van het hierboven beschreven patroon bij breien maar dit patroon is van breigaren groep B. Hoe kan ik dit oplossen? Misschien een dubbele draad van de Merino of werkt dat niet? Hoor heel graag van U. Groetjes Mirjam
26.10.2021 - 22:11DROPS Design answered:
Dag Mirjam,
Met een dubbele draad uit garengroep A, heb je een stekenverhouding overeenkomend met garengroep C. Misschien is dit patroon een idee? Deze is met safran gemaakt, dus ook uit garengroep A. Op die manier heb je dezelfde dikte.
29.10.2021 - 13:00
|
||||||||||
Little Lamb#littlelambset |
||||||||||
|
|
||||||||||
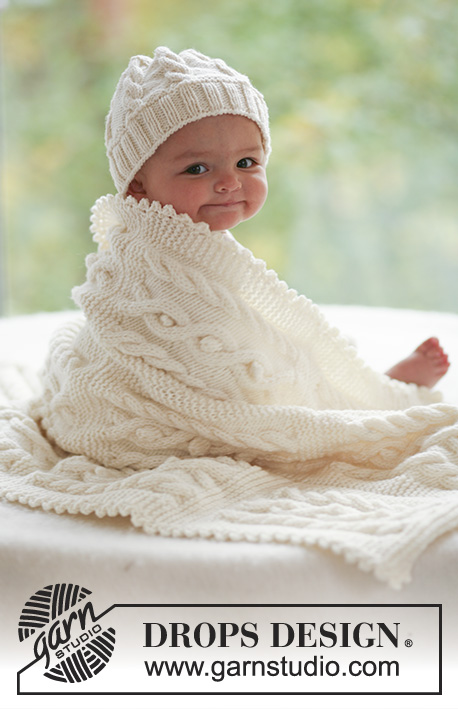
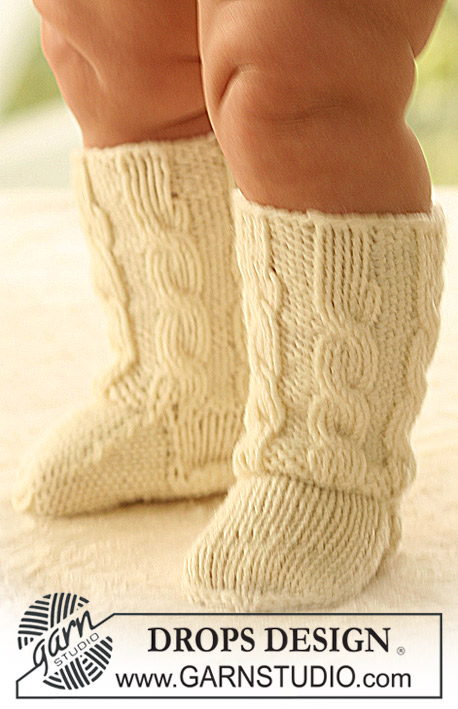
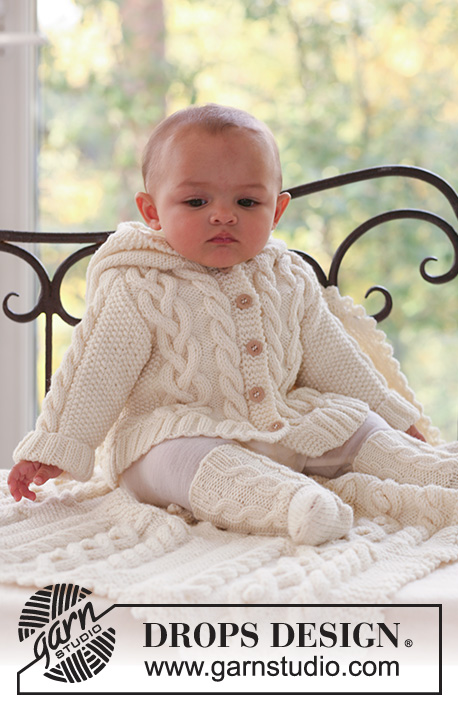
Set of beret hat and onesie with cables for baby in DROPS Merino Extra Fine
DROPS Baby 16-2 |
||||||||||
|
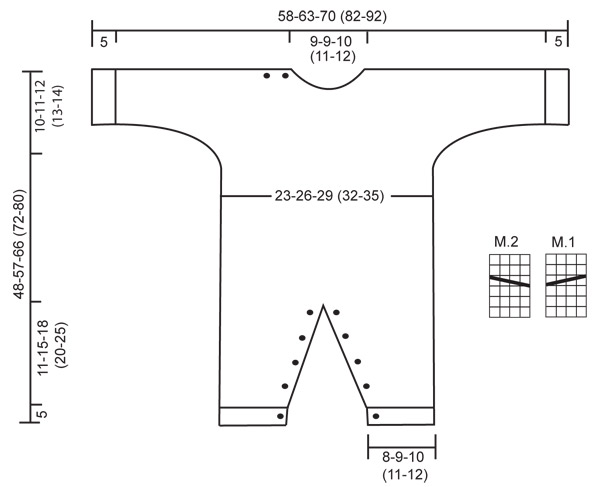
JUMPSUIT: GARTER ST (back and forth on needle): K all rows. PATTERN: See diagram M.1 and M.2. The diagrams show the pattern from the RS. BUTTONHOLES: Make buttonholes on buttonhole edge on front of leg. On right leg make buttonholes from RS and on left leg make buttonholes from WS. 1 buttonhole = K tog 2nd and 3rd st from edge and make 1 YO. Make buttonholes when leg measures: SIZE 1/3 months: 2, 5, 8, 11 and 14 cm. SIZE 6/9 months: 2, 6, 10, 14 and 18 cm. SIZE 12/18 months: 2, 6, 11, 16 and 21 cm. SIZE 2 years: 2, 6, 10, 14, 18 and 23 cm. SIZE 3/4 years: 2, 7, 12, 17, 22 and 28 cm. ---------------------------------------------------------- RIGHT LEG: Worked back and forth on circular needle. Cast on 47-53-53 (59-65) sts on circular needle size 3.5 mm with Merino Extra Fine. P 1 row from WS and continue as follows from RS: 4 garter sts (buttonhole edge) rib K3/P3, on the next 36-42-42 (48-54) sts and finish row with K3 and 4 garter sts (= buttonhole edge). Continue in rib with 4 garter sts each side, AT THE SAME TIME when piece measures 2 cm make buttonhole – SEE ABOVE. When piece measures 5 cm K 2 rows on all sts, AT THE SAME TIME dec 11-13-9 (11-13) sts evenly on first row = 36-40-44 (48-52) sts. Change to needle size 4.5 mm and continue in stocking st with 4 garter sts each side. AT THE SAME TIME when piece measures 6 cm inc 1 st each side inside the 4 garter sts on every 3-3-4 (4-4) row a total of 9-10-11 (12-13) times = 54-60-66 (72-78) sts. REMEMBER THE KNITTING TENSION! When piece measures 16-20-23 (25-30) cm cast off 4 sts each side = 46-52-58 (64-70) sts. Put piece aside and knit the other leg. LEFT LEG: Like right leg, but make buttonholes on the opposite side. BODY PIECE: Slip both legs on the same circular needle = 92-104-116 (128-140) sts. Insert 1 marker each side = 46-52-58 (64-70) sts between markers. Work next round as follows – beg on the left side of piece: 18-21-24 (27-30) stocking sts, P2, K2 in each of the next 2 sts (= K4), P2, K2 in each of the next 2 sts (= K4), P2 and work remaining sts in stocking st = 96-108-120 (132-144) sts. Work next round as follows: 18-21-24 (27-30) stocking sts, P2, M.1, P2, M.2, P2 and work remaining sts in stocking st. Continue like this until piece measures 38-46-54 (59-66) cm. Now divide the piece by markers at sides and complete front and back pieces separately – NOTE: Make sure to divide piece so that the cable row in M.1 and M.2 sits on the RS. FRONT PIECE: = 50-56-62 (68-74) sts. Continue in stocking st with cables as before, AT THE SAME TIME cast on new sts each side for sleeves. Cast on at the end of every row at the sides: 4 sts 2-1-1 (1-1) times, 6 sts 0-1-1 (2-1) times, 8 sts 1-1-1 (1-2) times and 9-9-13 (16-21) sts 1 time = 100-110-124 (148-168) sts – work inc sts in stocking st. When piece measures 44-53-61 (67-75) cm K2 tog on the 2 cables = 96-106-120 (144-164) sts. On next row slip the middle 10-10-12 (14-16) sts on a stitch holder for neck and complete each side separately. RIGHT SHOULDER/SLEEVE: Continue as before, AT THE SAME TIME cast off to shape the neckline at the beg of every row from mid front: 2 sts 1 time and 1 st 2 times = 39-44-50 (61-70) sts left on shoulder/sleeve. AT THE SAME TIME when piece measures 46-55-64 (70-78) cm work garter st on the first 12-13-14 (15-16) sts from mid front (work remaining sts as before). After 4 rows garter st make 2 buttonholes as follows from RS: K2 tog, 1 YO, work 5-6-7 (8-9) sts, K2 tog, 1 YO, work remaining sts on row. Continue in stocking st with garter st on the first 12-13-14 (15-16) sts from mid front until piece measures 48-57-66 (72-80) cm, cast off. LEFT SHOULDER/SLEEVE: Like right shoulder/sleeve, but mirrored = 39-44-50 (61-70) sts on shoulder/sleeve. Continue in stocking st until piece measures 48-57-66 (72-80) cm, cast off. BACK PIECE = 46-52-58 (64-70) sts. Cast on new sts each side for sleeves as described for front piece = 96-106-120 (144-164) sts. When piece measures 46-55-64 (70-78) cm cast off the middle 16-16-18 (20-22) sts for neck and complete each side separately. RIGHT SHOULDER/SLEEVE: = 40-45-51 (62-71) sts. Cast off 1 st on neckline on next row = 39-44-50 (61-70) sts. When piece measures 48-57-66 (72-80) cm cast off the first 27-31-36 (46-54) sts from sleeve edge towards shoulder. Work another 1.5 cm stocking st with 1 garter st each side on the remaining 12-13-14 (15-16) sts (= buttonhole edge). K 1 row from WS and cast off all sts from RS LEFT SHOULDER/SLEEVE: Continue and cast off as described for right shoulder/sleeve, but mirrored = 39-44-50 (61-70) sts left on shoulder/sleeve. Continue in stocking st until piece measures 48-57-66 (72-80) cm, cast off. ASSEMBLY: Sew upper arm seams, edge to edge to avoid a chunky seam – on right shoulder only sew seam up to buttonhole edge. CUFF: Pick up 38-44-50 (50-56) sts on needle size 3.5 mm along sleeve edge. K 2 rows and continue in rib, K3/P3, with 1 edge st each side. Cast off when rib measures 5 cm. Repeat along the other sleeve edge. Sew seams under arms inside 1 edge st. NECK: Pick up approx 48 to 64 sts round neckline (incl sts on stitch holders) on needle size 4.5 mm. K 3 rows and cast off. Sew tog buttonhole edges at the top of the front of legs and sew tog the buttonhole edges at the top of the back of legs. Sew on buttons to fit buttonholes on legs and shoulder. ---------------------------------------------------------- BASQUE HAT: Head circumference: 40/42 - 44/46 - 46/48 (48/50 - 50/52) cm INCREASING TIP: Inc 1 st by making 1 YO. Work YO into back of loop on return row to avoid a hole. ---------------------------------------------------------- HAT: Worked back and forth on pointed needles. Cast on 90-92-94 (96-98) sts on needle size 4 mm with Merino Extra Fine. Work 2 cm rib, K1/P1. Continue in garter st – SEE ABOVE – AT THE SAME TIME dec 5-7-4 (6-3) sts evenly on first row = 85-85-90 (90-95) sts. Insert 5 markers in piece as follows from RS: First marker after 1 st, and the remaining 4 markers with 17-17-18 (18-19) sts between each = 16-16-17 (17-18) sts left after the last marker. On next row from RS inc 1 st to the left of all markers – SEE INCREASING TIP – and repeat the inc on every other row a total of 6-7-8 (9-10) times = 115-120-130 (135-145) sts. REMEMBER THE KNITTING TENSION! When piece measures 6.5-7-7.5 (8-8.5) cm dec 1 st to the left of all markers by K2 tog, and repeat the dec on every other row a total of 18-19-20 (21-22) times = 25-25-30 (30-35) sts. Now K2 tog across the row. Cut the thread, pull through remaining sts and fasten. Sew hat tog mid back in outer loops of sts. Hat measures approx 15-16-17 (18-19) cm. |
||||||||||
Diagram explanations |
||||||||||
|
||||||||||
 |
||||||||||
Have you finished this pattern?Tag your pictures with #dropspattern #littlelambset or submit them to the #dropsfan gallery. Do you need help with this pattern?You'll find 16 tutorial videos, a Comments/Questions area and more by visiting the pattern on garnstudio.com. © 1982-2026 DROPS Design A/S. We reserve all rights. This document, including all its sub-sections, has copyrights. Read more about what you can do with our patterns at the bottom of each pattern on our site. |
||||||||||


With over 40 years in knitting and crochet design, DROPS Design offers one of the most extensive collections of free patterns on the internet - translated to 17 languages. As of today we count 325 catalogues and 12298 patterns translated into English (UK/cm). 12298
We work hard to bring you the best knitting and crochet have to offer, inspiration and advice as well as great quality yarns at incredible prices! Would you like to use our patterns for other than personal use? You can read what you are allowed to do in the Copyright text at the bottom of all our patterns. Happy crafting!
Post a comment to pattern DROPS Baby 16-2
We would love to hear what you have to say about this pattern!
If you want to leave a question, please make sure you select the correct category in the form below, to speed up the answering process. Required fields are marked *.