
Popular categories
Looking for a yarn?


Comments / Questions (165)
![]() Nyllie wrote:
Nyllie wrote:
The 3rd row of all stitches is about 5 rows from cast on row of 166 stitches. Is this far enough from edge for button hole? Is this the row you mean . Thanks
30.10.2015 - 14:24DROPS Design answered:
Dear Nyllie, this looks right. Happy knitting!
30.10.2015 - 14:33
![]() Nyllie wrote:
Nyllie wrote:
Hi there, me again...thanks for the answer to my last question. I now need some clarification as to which row to bind off for buttonhole. I know it says 3rd row worked on all stitches. Is this the 3rd row in the first section between the * * or is it the 3rd row on the 3rd replete between* *. The first one wound be about 5 rows from edge of piece.... The second choice would be about 12 pr 13 rows from piece edge. Help is greatly appreciated.
29.10.2015 - 20:52DROPS Design answered:
Dear Nyllie, buttonholes are worked on 3rd row worked over all sts (count from the beg), the 73rd and 74th sts from MT should be the 2 sts after the turn. Happy knitting!
30.10.2015 - 10:05
![]() Nyllie wrote:
Nyllie wrote:
This was asked before by another but I don't think a clear answer was given to this question. I am knitting size small and don't know if to measure 7 cm from original cast on, from the 3 stitch cast on row, or from the 26 stitch cast on row. I cannot continue the back piece until I know the answer. Please indicate which or these 3 Cast on rows I should measure the 7 cm from. Thanks so much,
20.10.2015 - 00:15DROPS Design answered:
Dear Nyllie, the 7 cm are measured from the first cast on row (where you cast on 94 sts at the beg of the back piece). Happy knitting!
20.10.2015 - 10:39Jessie Cunliffe wrote:
Just begun this jacket, and I have worked the armhole shaping on the back of the jacket, and now the pattern says to work 14cms from casting on row. In my case I have done several rows casting on 3 sts every 4th row, and 22 sts for the final shaping. Could you tell me where to measure from please? Is it the first cast on 3 sts, or the 22 cast on sts? I think it is the former, or the shoulder would be very dropped, but I would appreciate some clarification. Kind regards, Jessie
08.09.2015 - 17:10DROPS Design answered:
Dear Mrs Cunliffe, measurements should be done from casting on row (adjust the 14 cm so that next row is from RS). Happy knitting!
09.09.2015 - 09:40
![]() Ruth Lorking wrote:
Ruth Lorking wrote:
I am very disappointed by your response, why, if that is the case with the right front does the pattern not say so? I find these instructions very confusing & will not be following them I will undo the whole thing & re knit in a another pattern. not a drops one.
05.05.2015 - 10:06
![]() Bourel wrote:
Bourel wrote:
Je suis un peu perdue sur le devant gauche. J'ai l'impression que je n'ai pas compris comment commencer le 2ème pli et comment tricoter le col. Au secours si quelqu'un peut m'adresser un petit dessin
02.05.2015 - 16:49DROPS Design answered:
Bonjour Mme Bourel, quand vous avez augmenté 7-9 fois, continuez en gris foncé (2 rangs sur toues les mailles), tricotez 1 pli (continuez les augm.). Après le pli, vous avez 160-180 m, continuez les augm et en même temps, tricotez des rangs raccourcis. Pour toute assistance plus personnalisée, merci de vous adresser à votre magasin ou au forum DROPS. Bon tricot!
04.05.2015 - 08:39
![]() Ruth Lorking wrote:
Ruth Lorking wrote:
As I have stated in my previous comments. it is the right front piece,
01.05.2015 - 09:31DROPS Design answered:
Dear Mrs Lorking, right front piece is worked reversed from left front piece, ie starting from mid front (front bands/collar) towards side (= seam towards back piece). 1st row from RS starts towards top of jacket (collar/neck) and ends on bottom edge. Start with dark greay and change to charcoal greay after 1 pleat + 2 rows (= 146 sts in size L) ,then continue with dark grey after 7 cm from MT and work 1 pleat. Finish then with charcoal grey. Happy knitting!
02.05.2015 - 14:56
![]() Ruth Lorking wrote:
Ruth Lorking wrote:
I am ding the large size, but this is irrelevant to my query. If you read through the pattern nowhere does it tell you to change colour & also refers to increase stitches, when clearly there are no instructions to increase in the first place, I am sure that if you were to try and knit this you would understand the problem, this only applies to the right front side instructions, I have completed all the rest of the garment.
29.04.2015 - 18:14DROPS Design answered:
Dear Mrs Lorking, could you please tell me which piece you are talking about ? I checked back piece and both front pieces and colour changes are stated. It could be also helpful for the increases you mention. Thank you!
30.04.2015 - 08:49
![]() Ruth Lorking wrote:
Ruth Lorking wrote:
I have posted about this before & you assured me that the pattern was correct, however I have shown this to some professional knitters & they all agree that the instructions for pattern 101-1 right front are incorrect, has anyone actually looked at this ? a lot of money has been spent buying the wool for this jacket & I am very disappointed with the result & assistance given by you
28.04.2015 - 16:46DROPS Design answered:
Dear Mrs Lorking, We have been looking into this pattern, but if you disagree, then please let us know which size you are making with a description of your problem. Then we can look more specific into your question and maybe explain it further.
28.04.2015 - 17:06
![]() Ruth Lorking wrote:
Ruth Lorking wrote:
Having a real problem with the instructions for right side of this jacket. have consulted with the shop where I bought the pattern & wool but they too are baffled, is there a problem with the instructions?
19.04.2015 - 20:50DROPS Design answered:
Dear Mrs Lorking, pattern is correct and has already been made several times succesfully. You are welcome to ask your question here. Happy knitting!
20.04.2015 - 10:09
|
|
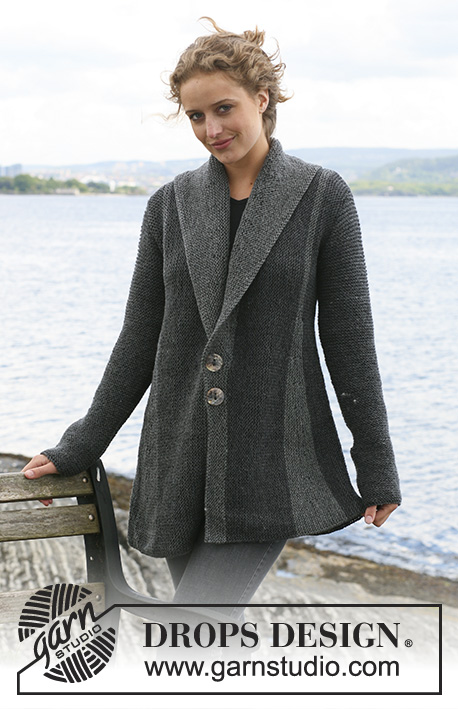
Pleasing in Pleats |
|
 |
 |
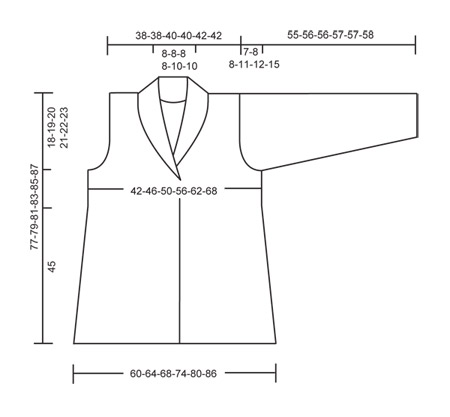
DROPS jacket with pleats worked from side to side in garter st in ”Karisma ”. Size S - XXXL. Yarn alternative ”Merino Extrafine”.
DROPS 110-1 |
|
|
Knitting tip: Garter st becomes very elastic. The garment will therefore be slightly longer and wider than measurements in measurement chart. Pleats: Work pleats in dark grey. 1 pleat with shortened rows: work 72 sts, turn piece and work return row, work 60 sts, turn piece and work return row, work 52 sts, turn piece and work return row, work 44 sts, turn piece and work return row, work 36 sts, turn piece and work return row, work 28 sts, turn piece and work return row, work 20 sts, turn piece and work return row, work 12 sts, turn piece and work return row, work all sts on row, turn piece and work return row, work all sts on row, turn piece and work return row, work all sts on row, turn piece and work return row, work all sts on row, turn piece and work return row, work 12 sts, turn piece and work return row, work 20 sts, turn piece and work return row, work 28 sts, turn piece and work return row, work 36 sts, turn piece and work return row, work 44 sts, turn piece and work return row, work 52 sts, turn piece and work return row, work 60 sts, turn piece and work return row, work 72 sts, turn piece and work return row. Measurement tip: Measure from cast on row and measure where pleat is narrowest. Buttonhole: At the same time on the 3rd row worked on all sts cast off for 2 buttonholes as follows: Cast off st 73 and 74 from Marking Thread (MT) (i.e. the 2 sts after the turn) and cast off st 86 and 87 after MT (= 11 sts between buttonholes). On next row cast on 2 new sts over the cast of sts. Back piece: Worked back and forth on needle. The whole piece is worked in garter st, i.e. K all rows. Beg at side. See Knitting tip! Loosely cast on 94-96-98-99-101-102 sts on needle size 5 mm with charcoal grey. Work 5-7-7-13-15-21 rows garter st (row 1 = RS). Remember the knitting tension! At the end of next row (from WS) cast on 3 sts for armhole and now cast on 3 sts at the end of every 4th row from WS a total of 0-1-2-3-4-5 times. At the end of next row from WS cast on 26-24-23-22-20-19 sts 1 time = 123-126-130-133-136-139 sts. Seen from the RS, the sts on the right side of piece = towards neckline and sts on the left side of piece = towards bottom edge. Continue in garter st on all sts until piece measures 7-9-11-14-16-19 cm from casting on row (adjust so that next row is from RS). Change to dark grey. K 1 row from RS and now work 1 pleat – see above. When pleat is completed, K 1 row from WS on all sts. Change to charcoal grey and continue back and forth on all sts until piece measures 17-19-21-24-26-29 cm – see Measurement tip! Now cast off 3 sts at the beg of row from RS for neck = 120-123-127-130-133-136 sts. Continue until piece measures 25-27-29-32-36-39 cm and now inc 3 sts at the end of row from WS = 123-126-130-133-136-139 sts. Continue back and forth on all sts until piece measures 32-34-36-39-43-46 cm (adjust so that next row is from RS). Change to dark grey. K 1 row from RS and then work 1 pleat. When pleat is completed K 1 row on all sts from WS and change to charcoal grey. Continue until piece measures 40-42-45-48-52-55 cm and now cast off 26-24-23-22-20-19 sts at the beg of row from RS for armhole = 97-102-107-111-116-120 sts. On next row from RS cast off 3 sts at the beg of row and now cast off 3 sts at the beg of row on every 4th row from RS a total of 0-1-2-3-4-5 times = 94-96-98-99-101-102 sts. Work 5-7-7-13-15-21 rows back and forth on all sts. Piece now measures approx 42-46-50-56-62-68 cm. Cast off loosely. Left front piece: Cast on and work piece from the side towards mid front. Loosely cast on 94-96-98-99-101-102 sts on needle size 5 mm with charcoal grey. Work garter st back and forth on needle and cast on new sts for armhole as described for back piece = 123-126-130-133-136-139 sts. When piece measures 7-9-11-14-16-19 cm (adjust so that next row is from RS) change to dark grey. K 1 row from RS and now work 1 pleat – see above. When pleat is completed K 1 row on all sts from WS and now change to charcoal grey. Continue back and forth on needle on all sts until piece measures 17-19-21-24-26-29 cm – see Measuring tip! Insert 1 Marking Thread (MT) at the beg of row (as seen from RS) and continue back and forth on all sts, at the same time inc 8-8-8-8-10-10 sts at the end of next row from WS = 131-134-138-141-146-149 sts. Now inc 1 st at the end of every row from WS a total of 35-35-35-35-37-37 times. At the same time after 7-7-7-7-9-9 inc change to dark grey on the next row from RS. K 1 row and K 1 row from WS. Remember to continue inc 1 st at the end of row! Now work 1 pleat (Note! no of sts in Pleat is from MT, the inc sts are additional). When pleat is completed K 1 row from RS and K 1 row from WS (also inc on this row). There are now 160-163-167-170-177-180 sts on row. Now work front band/collar (at the same time continue to inc 1 st at the end of every row from WS) as follows: * work 72 sts (from MT, the inc sts are additional), turn piece and work return row, work all sts on row, turn piece and work return row *. Repeat from *-* a total of 3 times. All inc are now complete = 166-169-173-176-183-186 sts on row. Cast of loosely. Right front piece: Cast on and work piece from mid front towards the side. Loosely cast on 166-169-173-176-183-186 sts on needle size 5 mm with dark grey. Insert 1 MT 43-43-43-43-47-47 sts in from beg of row (from RS). K 1 row from RS, at the same time beg dec 1 st at the beg of every row (from RS) a total of 35-35-35-35-37-37 times. K 1 row from WS and continue as follows: Remember to continue to dec 1 st at the beg of every row! * work 72 sts (from MT, inc sts before MT are additional), turn piece and work return row, work all sts on row, turn piece and work return row *. Repeat from *-* a total of 3 times. Remember to cast off for buttonholes! – see above. There are now 159-162-166-169-176-179 sts on row. Work 1 pleat. When pleat is completed (= 139-142-146-149-156-159 sts on row), K 1 row from RS (also dec on this row), K 1 row from WS and change to charcoal grey. Work 14-14-14-14-18-18 rows back and forth on all sts. All dec are now complete = 131-134-138-141-146-149 sts on row. At the beg of next row (from RS) cast off 8-8-8-8-10-10 sts = 123-126-130-133-136-139 sts. Insert 1 MT in piece, and now measure piece from here. Continue back and forth on all sts until piece measures 7 cm from MT and change to dark grey (adjust so that next row is from RS). K 1 row from RS and now work 1 pleat (the pleat will be at the left side of piece as seen from the RS, i.e. same side as pleat on back piece). When pleat is completed K 1 row on all sts (from WS) and now change to charcoal grey, Continue back and forth on all sts until piece measures 15-15-16-16-16-16 cm from MT and now cast off the first 26-24-23-22-20-19 sts on row (from RS) = 97-102-107-111-116-120 sts. Cast off 3 sts at the beg of next row from RS and now cast off 3 sts at the beg of every 4th row from RS a total of 0-1-2-3-4-5 times = 94-96-98-99-101-102 sts on row. Work 5-7-7-13-15-21 rows and cast off loosely. Sleeve: Worked back and forth on needle. Loosely cast on 44-46-48-48-50-52 sts (includes 1 edge st each side) on needle size 5 mm with charcoal grey. Work garter st back and forth on needle. When piece measures approx 6 cm dec 1 st each side and repeat the dec when piece measures 14 cm = 40-42-44-44-46-48 sts. Now complete sleeve in reverse stocking st. When piece measures 18 cm inc 1 st each side on every 5-4.5-3.5-2.5-2-2 cm a total of 6-7-9-10-12-12 times = 52-56-62-64-70-72 sts. When piece measures 48-48-48-46-45-43 cm (less on the larger sizes because of longer sleeve cap and wider shoulder) cast off 3 sts each side for armhole. Cast off to shape the sleeve cap each side at the beg of every row: 2 sts 3-3-4-3-4-2 times, 1 st 0-1-0-5-4-10 times, then 2 sts each side until piece measures 54-55-55-56-56-57 cm, now cast off 3 sts each side 1 time and cast off remaining sts. Sleeve measures approx 55-56-56-57-57-58 cm. Assembly: Sew shoulder seams (the pleats on front and back piece should meet at the top of shoulder). Set in sleeves. Sew sleeve and side seams inside 1 edge st. Sew collar tog mid back and sew to neckline. Sew on buttons. www.garnstudio.com |
|
 |
|
Have you finished this pattern?Tag your pictures with #dropspattern or submit them to the #dropsfan gallery. Do you need help with this pattern?You'll find 18 tutorial videos, a Comments/Questions area and more by visiting the pattern on garnstudio.com. © 1982-2026 DROPS Design A/S. We reserve all rights. This document, including all its sub-sections, has copyrights. Read more about what you can do with our patterns at the bottom of each pattern on our site. |
|


With over 40 years in knitting and crochet design, DROPS Design offers one of the most extensive collections of free patterns on the internet - translated to 17 languages. As of today we count 325 catalogues and 12298 patterns translated into English (UK/cm). 12298
We work hard to bring you the best knitting and crochet have to offer, inspiration and advice as well as great quality yarns at incredible prices! Would you like to use our patterns for other than personal use? You can read what you are allowed to do in the Copyright text at the bottom of all our patterns. Happy crafting!
Post a comment to pattern DROPS 110-1
We would love to hear what you have to say about this pattern!
If you want to leave a question, please make sure you select the correct category in the form below, to speed up the answering process. Required fields are marked *.