
Popular categories
Looking for a yarn?


Comments / Questions (165)
Maureen Troake wrote:
Hello from South Africa. I love this pattern and want to make it for a friend. However, she wants a hood as well. Is it possible for someone to assist in adapting the collar design to become a hood?
14.06.2018 - 21:20DROPS Design answered:
Dear Mrs Troake, we are unfortunately not able to adjust every pattern to every individual request, for any indiividual assistance for adjustements, you are welcome to contact the store where you bought the yarn (even per mail or telephone) or to request help from a knitting forum. Happy knitting!
15.06.2018 - 08:23
![]() Johane wrote:
Johane wrote:
Je suis incapable d imprimer le diagramme merci
08.10.2016 - 20:15DROPS Design answered:
Bonjour Johane, un test d'impression sur les explications de ce modèle a été effectué avec succès. Pensez à bien vérifier les paramètres de votre imprimante, n'hésitez pas à demander conseil à votre magasin DROPS. Bon tricot!
10.10.2016 - 09:15
![]() Ruth wrote:
Ruth wrote:
Hallo!! Die Jacke wird wunderschön. wird beim Kragen das zunehmen von den 35 Maschen in verkürzten reihen gestrickt ( bis zum Marker) oder immer in ganzen Reihen?
30.08.2016 - 07:49DROPS Design answered:
Liebe Ruth, die M wird am Schluss der Reihe zugenommen.
31.08.2016 - 14:03
![]() Beryl Fraser wrote:
Beryl Fraser wrote:
Hi I made a mistake on my last question. I meant 37 times to decrease not 47. I'd like to know also. Does the above pleat [collar] go from the marker and down towards the bottom of the sweater. If so what happens to the width of the pleat at the marker? Thanks
08.03.2016 - 21:37DROPS Design answered:
Dear Mrs Fraser, right piece is worked from the top towards the bottom: the marker is inserted from the top of piece (beg of row from RS), then work the dec rows, the short rows, the pleat to the marker, 14-18 rows garter st and change colour - remember to continue dec 1 st at beg of every row from RS as before. Happy knitting!
09.03.2016 - 08:49
![]() Beryl Fraser wrote:
Beryl Fraser wrote:
I am doing this wonderful sweater, but I think its going to get the better of me. In right front when you say decrease every row 47 times from right side. Do you mean every right side row, or every row right and wrong side.
08.03.2016 - 21:01DROPS Design answered:
Dear Mrs Fraser, dec are done at the beg of every row from RS, work return row from WS and repeat these 2 rows, ie you will dec every other row (only from RS of piece). Happy knitting!
09.03.2016 - 08:37
![]() Anne wrote:
Anne wrote:
Hej jeg vil høre om man skal lave 2 ens stykker af ryg stykke eller kun 1 gang også vil jeg høre når jeg skal lave læg om der skal strikkes nogle masker af nr 53 inden jeg begynder på nr 16 hilsen Anne
05.02.2016 - 12:20DROPS Design answered:
Hej Anne. Du strikker rygstykket één gang (ca 42-46-50-56-62-68 cm). Nej, du skal ikke strikke i 53 först. Du starter p med 72 m nr 16 og vender osv.
10.02.2016 - 15:47
![]() Alie wrote:
Alie wrote:
Would also like to have an answer to question regarding the sleeves asked by Nyllie.
02.11.2015 - 21:40DROPS Design answered:
Dear Alie, see answer below. Happy knitting!
03.11.2015 - 09:39
![]() Nyllie wrote:
Nyllie wrote:
Hopefully last question... Are the sleeves actually done in reverse stockinet the as stated or is this a misprint. The rest of the jacket is in garter stitch so shouldn't the sleeves also be in garter. Again thanks for all the help. Sorry posted this sa a comment last time.
02.11.2015 - 16:46DROPS Design answered:
Dear Nyllie, the sleeves are here worked in reversed stocking st after a 6cm-edge in garter st. Happy knitting!
03.11.2015 - 09:26
![]() Nyllie wrote:
Nyllie wrote:
Hopefully last question... Are the sleeves actually done in reverse stockinet the as stated or is this a misprint. The rest of the jacket is in garter stitch so shouldn't the sleeves also be in garter. Again thanks for all the help.
31.10.2015 - 21:00
![]() Nyllie wrote:
Nyllie wrote:
Hopefully last question... Are the sleeves actually done in reverse stockinet the as stated or is this a misprint. The rest of the jacket is in garter stitch so shouldn't the sleeves also be in garter. Again thanks for all the help.
31.10.2015 - 20:59
|
|
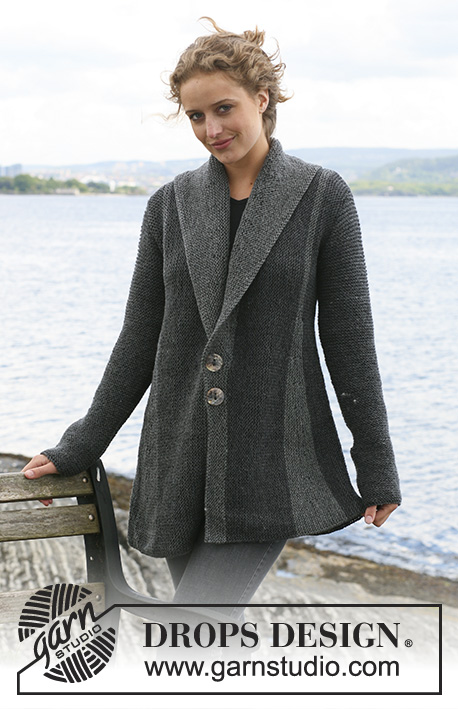
Pleasing in Pleats |
|
 |
 |
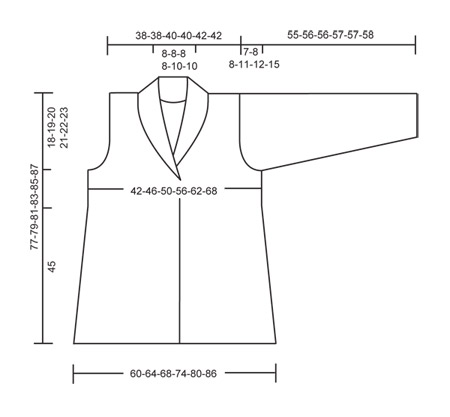
DROPS jacket with pleats worked from side to side in garter st in ”Karisma ”. Size S - XXXL. Yarn alternative ”Merino Extrafine”.
DROPS 110-1 |
|
|
Knitting tip: Garter st becomes very elastic. The garment will therefore be slightly longer and wider than measurements in measurement chart. Pleats: Work pleats in dark grey. 1 pleat with shortened rows: work 72 sts, turn piece and work return row, work 60 sts, turn piece and work return row, work 52 sts, turn piece and work return row, work 44 sts, turn piece and work return row, work 36 sts, turn piece and work return row, work 28 sts, turn piece and work return row, work 20 sts, turn piece and work return row, work 12 sts, turn piece and work return row, work all sts on row, turn piece and work return row, work all sts on row, turn piece and work return row, work all sts on row, turn piece and work return row, work all sts on row, turn piece and work return row, work 12 sts, turn piece and work return row, work 20 sts, turn piece and work return row, work 28 sts, turn piece and work return row, work 36 sts, turn piece and work return row, work 44 sts, turn piece and work return row, work 52 sts, turn piece and work return row, work 60 sts, turn piece and work return row, work 72 sts, turn piece and work return row. Measurement tip: Measure from cast on row and measure where pleat is narrowest. Buttonhole: At the same time on the 3rd row worked on all sts cast off for 2 buttonholes as follows: Cast off st 73 and 74 from Marking Thread (MT) (i.e. the 2 sts after the turn) and cast off st 86 and 87 after MT (= 11 sts between buttonholes). On next row cast on 2 new sts over the cast of sts. Back piece: Worked back and forth on needle. The whole piece is worked in garter st, i.e. K all rows. Beg at side. See Knitting tip! Loosely cast on 94-96-98-99-101-102 sts on needle size 5 mm with charcoal grey. Work 5-7-7-13-15-21 rows garter st (row 1 = RS). Remember the knitting tension! At the end of next row (from WS) cast on 3 sts for armhole and now cast on 3 sts at the end of every 4th row from WS a total of 0-1-2-3-4-5 times. At the end of next row from WS cast on 26-24-23-22-20-19 sts 1 time = 123-126-130-133-136-139 sts. Seen from the RS, the sts on the right side of piece = towards neckline and sts on the left side of piece = towards bottom edge. Continue in garter st on all sts until piece measures 7-9-11-14-16-19 cm from casting on row (adjust so that next row is from RS). Change to dark grey. K 1 row from RS and now work 1 pleat – see above. When pleat is completed, K 1 row from WS on all sts. Change to charcoal grey and continue back and forth on all sts until piece measures 17-19-21-24-26-29 cm – see Measurement tip! Now cast off 3 sts at the beg of row from RS for neck = 120-123-127-130-133-136 sts. Continue until piece measures 25-27-29-32-36-39 cm and now inc 3 sts at the end of row from WS = 123-126-130-133-136-139 sts. Continue back and forth on all sts until piece measures 32-34-36-39-43-46 cm (adjust so that next row is from RS). Change to dark grey. K 1 row from RS and then work 1 pleat. When pleat is completed K 1 row on all sts from WS and change to charcoal grey. Continue until piece measures 40-42-45-48-52-55 cm and now cast off 26-24-23-22-20-19 sts at the beg of row from RS for armhole = 97-102-107-111-116-120 sts. On next row from RS cast off 3 sts at the beg of row and now cast off 3 sts at the beg of row on every 4th row from RS a total of 0-1-2-3-4-5 times = 94-96-98-99-101-102 sts. Work 5-7-7-13-15-21 rows back and forth on all sts. Piece now measures approx 42-46-50-56-62-68 cm. Cast off loosely. Left front piece: Cast on and work piece from the side towards mid front. Loosely cast on 94-96-98-99-101-102 sts on needle size 5 mm with charcoal grey. Work garter st back and forth on needle and cast on new sts for armhole as described for back piece = 123-126-130-133-136-139 sts. When piece measures 7-9-11-14-16-19 cm (adjust so that next row is from RS) change to dark grey. K 1 row from RS and now work 1 pleat – see above. When pleat is completed K 1 row on all sts from WS and now change to charcoal grey. Continue back and forth on needle on all sts until piece measures 17-19-21-24-26-29 cm – see Measuring tip! Insert 1 Marking Thread (MT) at the beg of row (as seen from RS) and continue back and forth on all sts, at the same time inc 8-8-8-8-10-10 sts at the end of next row from WS = 131-134-138-141-146-149 sts. Now inc 1 st at the end of every row from WS a total of 35-35-35-35-37-37 times. At the same time after 7-7-7-7-9-9 inc change to dark grey on the next row from RS. K 1 row and K 1 row from WS. Remember to continue inc 1 st at the end of row! Now work 1 pleat (Note! no of sts in Pleat is from MT, the inc sts are additional). When pleat is completed K 1 row from RS and K 1 row from WS (also inc on this row). There are now 160-163-167-170-177-180 sts on row. Now work front band/collar (at the same time continue to inc 1 st at the end of every row from WS) as follows: * work 72 sts (from MT, the inc sts are additional), turn piece and work return row, work all sts on row, turn piece and work return row *. Repeat from *-* a total of 3 times. All inc are now complete = 166-169-173-176-183-186 sts on row. Cast of loosely. Right front piece: Cast on and work piece from mid front towards the side. Loosely cast on 166-169-173-176-183-186 sts on needle size 5 mm with dark grey. Insert 1 MT 43-43-43-43-47-47 sts in from beg of row (from RS). K 1 row from RS, at the same time beg dec 1 st at the beg of every row (from RS) a total of 35-35-35-35-37-37 times. K 1 row from WS and continue as follows: Remember to continue to dec 1 st at the beg of every row! * work 72 sts (from MT, inc sts before MT are additional), turn piece and work return row, work all sts on row, turn piece and work return row *. Repeat from *-* a total of 3 times. Remember to cast off for buttonholes! – see above. There are now 159-162-166-169-176-179 sts on row. Work 1 pleat. When pleat is completed (= 139-142-146-149-156-159 sts on row), K 1 row from RS (also dec on this row), K 1 row from WS and change to charcoal grey. Work 14-14-14-14-18-18 rows back and forth on all sts. All dec are now complete = 131-134-138-141-146-149 sts on row. At the beg of next row (from RS) cast off 8-8-8-8-10-10 sts = 123-126-130-133-136-139 sts. Insert 1 MT in piece, and now measure piece from here. Continue back and forth on all sts until piece measures 7 cm from MT and change to dark grey (adjust so that next row is from RS). K 1 row from RS and now work 1 pleat (the pleat will be at the left side of piece as seen from the RS, i.e. same side as pleat on back piece). When pleat is completed K 1 row on all sts (from WS) and now change to charcoal grey, Continue back and forth on all sts until piece measures 15-15-16-16-16-16 cm from MT and now cast off the first 26-24-23-22-20-19 sts on row (from RS) = 97-102-107-111-116-120 sts. Cast off 3 sts at the beg of next row from RS and now cast off 3 sts at the beg of every 4th row from RS a total of 0-1-2-3-4-5 times = 94-96-98-99-101-102 sts on row. Work 5-7-7-13-15-21 rows and cast off loosely. Sleeve: Worked back and forth on needle. Loosely cast on 44-46-48-48-50-52 sts (includes 1 edge st each side) on needle size 5 mm with charcoal grey. Work garter st back and forth on needle. When piece measures approx 6 cm dec 1 st each side and repeat the dec when piece measures 14 cm = 40-42-44-44-46-48 sts. Now complete sleeve in reverse stocking st. When piece measures 18 cm inc 1 st each side on every 5-4.5-3.5-2.5-2-2 cm a total of 6-7-9-10-12-12 times = 52-56-62-64-70-72 sts. When piece measures 48-48-48-46-45-43 cm (less on the larger sizes because of longer sleeve cap and wider shoulder) cast off 3 sts each side for armhole. Cast off to shape the sleeve cap each side at the beg of every row: 2 sts 3-3-4-3-4-2 times, 1 st 0-1-0-5-4-10 times, then 2 sts each side until piece measures 54-55-55-56-56-57 cm, now cast off 3 sts each side 1 time and cast off remaining sts. Sleeve measures approx 55-56-56-57-57-58 cm. Assembly: Sew shoulder seams (the pleats on front and back piece should meet at the top of shoulder). Set in sleeves. Sew sleeve and side seams inside 1 edge st. Sew collar tog mid back and sew to neckline. Sew on buttons. www.garnstudio.com |
|
 |
|
Have you finished this pattern?Tag your pictures with #dropspattern or submit them to the #dropsfan gallery. Do you need help with this pattern?You'll find 18 tutorial videos, a Comments/Questions area and more by visiting the pattern on garnstudio.com. © 1982-2026 DROPS Design A/S. We reserve all rights. This document, including all its sub-sections, has copyrights. Read more about what you can do with our patterns at the bottom of each pattern on our site. |
|


With over 40 years in knitting and crochet design, DROPS Design offers one of the most extensive collections of free patterns on the internet - translated to 17 languages. As of today we count 325 catalogues and 12298 patterns translated into English (UK/cm). 12298
We work hard to bring you the best knitting and crochet have to offer, inspiration and advice as well as great quality yarns at incredible prices! Would you like to use our patterns for other than personal use? You can read what you are allowed to do in the Copyright text at the bottom of all our patterns. Happy crafting!
Post a comment to pattern DROPS 110-1
We would love to hear what you have to say about this pattern!
If you want to leave a question, please make sure you select the correct category in the form below, to speed up the answering process. Required fields are marked *.