
Popular categories
Looking for a yarn?


Comments / Questions (50)
![]() Anne Louise wrote:
Anne Louise wrote:
Hvor starter forstykket - midt foran, eller ved sidesømmen?\\r\\nIflg opskriften starter man med højre forstykke. Hvor man sætter m af til ærmegab bliver derfor forneden. Skulle der stå, at man starter på venstre forstykke? Der står,at de yderste 28 m sættes på tråd til ærmegab. Hvis man starter på en retpind, er det så de første 28 m eller de sidste 28 m? I øvrigt står der senere: venstre forstykke strikkes som venstre, men omvendt. Hvad meners der med det?
04.12.2024 - 20:31
![]() Astrid wrote:
Astrid wrote:
Hallo, kann ich diese Jacke auch mit der Wolle einer anderen Garngruppe stricken? Ich würde gerne "Snow" gegen 2 Fäden "Belle" austauschen. Ist das möglich? Rechnerisch ergibt sich dann eine Menge von 11 Knäueln?
14.05.2022 - 10:37DROPS Design answered:
Liebe Astrid, 1 Faden der Garngruppe E (wie Snow), kann man durch 2 Fäden der Garngruppe C (Nepal, Paris, Bomull-Lin...) ersetzen - aber nicht Belle, das der Garngruppe B gehört. Benutzen Sie unseren Umrechner, so sehen Sie die Alternative sowie die neue Garnmenge. Viel Spaß beim Stricken!
16.05.2022 - 08:16
![]() Sabrina El Darwisch wrote:
Sabrina El Darwisch wrote:
Guten Tag, wäre es möglich, daß Sie von diesem schönen Modell auch ein Foto der Rückseite abbilden? Vielen Dank
11.06.2019 - 22:38DROPS Design answered:
Liebe Frau El Darwisch, wir haben kein Foto vom Rückenteil, er wird einfach von unten nach oben glatt rechts gestrickt - mit Abnahmen für die Taille und Zunahme für den Brust, dann abketten für die Armlöcher. Viel Spaß beim stricken!
12.06.2019 - 07:25
![]() Artmonique wrote:
Artmonique wrote:
Il y a une lacune dans les explications en français, au 3ème paragraphe: Placer un marqueur dans la 1re, 3e, 9e.... il manque la 5e maille. C'est un modèle magnifique que je fais en Drops Loves you 2. Merci
26.04.2014 - 12:37
![]() Marcia wrote:
Marcia wrote:
I made this pattern with an alpaca boucle and it's lovely and snuggly. It's become my favorite sweater to grab even on a cool summer evening! I love it and plan to make another one.
21.06.2008 - 02:00
![]() DROPS / Lena wrote:
DROPS / Lena wrote:
Keep the marking thread in the same original stitch all the time, not in the inc stitch.
25.11.2007 - 18:13
![]() Diane Opheim wrote:
Diane Opheim wrote:
When making the increases on the 1,3,5,9,11,13,what stitches do you move the markers up to, for the next increase row?
24.11.2007 - 18:43
![]() ina Fortuin wrote:
ina Fortuin wrote:
Wat een apart model.Hier zou ik heeeeeeeel graag het patroon van willen hebben
22.10.2006 - 18:54
![]() Hanne Helbo wrote:
Hanne Helbo wrote:
Jeg er meget begejstret for denne model, Synes den ser spændende ud,men ville ønske at den var strikket i en tyndere garn, da jeg ikke er glad for at strikke i de tykke garner.
07.10.2006 - 18:39
![]() Gull-Britt Gamlén wrote:
Gull-Britt Gamlén wrote:
Blir glad om ni vill skicka mönster till mig.
28.09.2006 - 12:57
|
|
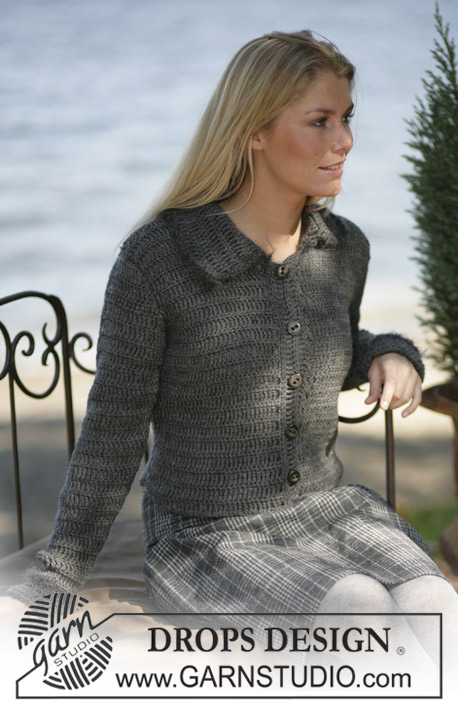
DROPS 97-8 |
|
|
|
|
DROPS Jacket in Snow with circle effect at the sides
DROPS 97-8 |
|
|
Knitting Tension: 10 sts x 14 rows on needles size 9 mm in Snow and stocking sts = 10x10 cm. Knitting tips (applies for the circle on the front piece): It is very important to adhere to the knitting tension, both width and length-wise as otherwise the circle on front piece will not be of the right shape. Decreasing tips (applies to the collar): Decrease for the collar inside the first st. All decreases done from the RS. Dec as follows after 1 st: Slip a st as if to knit, K1, psso. Dec as follows before 1 st: K2 tog. Increasing tips: Inc 1 st by making a yo. Twist and purl the yo on the returning row (purl into the back part of the st instead of the front). Right front piece: Read Knitting tips! To be able to see the circle effect progressing, knit back and forth on circular needles. Cast on 4 sts on circular needle size 9. 1st row (= WS) and all following rows knitted from the WS: Purl (twist and purl yo’s from previous row to avoid a hole). 2nd row: (= RS): *K1, make a yo*, repeat from *-* a total of 3 times, K1 = 7 sts. 4th row: *K1, make a yo*, repeat from *-* a total of 6 times, K1 = 13 sts. Insert a marking thread in the 1st, 3rd, 5th, 9th, 11th and 13th st. Inc 1 st after each of the first 3 marking threads and 1 st before each of the last 3 marking threads – see increasing tips! Inc on every other row (= RS) for the first 5 marking threads – but before the last marking thread only inc on every 4th row – this is very important because otherwise the cardigan could become too wide at the top Continue to inc this way until theer are a total of 73-79-84-90-95 sts on row. Purl on returning row. Put the outer 28-30-33-35-38 sts on a thread (towards the armhole) = 45-49-51-55-57 sts left. Continue in stocking sts at the same time casting off loosely each side on every other row. NB: To avoid an uneven edge slip the 1st st as if to knit before casting it off. Towards the bottom edge: Size S: 7 sts 1 time, 6 sts 1 time and 5 sts 1 time. Size M: 6 sts 1 time, 5 sts 1 time, 4 sts 1 time and 3 sts 1 time. Size L: 5 sts 1 time, 4 sts 1 time and 3 sts 3 times. Size XL: 4 sts 2 times, 3 sts 4 times. Size XXL: 4 sts 2 times, 3 sts 2 times and 2 sts 3 times. Towards the collar: 2 sts 3-4-5-6-7 times After all dec are complete there are 21-23-23-23-23 sts left. Cast off. The piece measures approx. 24-26-29-32-35 cm from the casting on edge to the centre front. Put the sts from thread back on needle, and pick up an additional 8-11-14-17-19 sts in the cast-off edge over the 6-8-10-12-14 sts cast off towards the collar = 36-41-47-52-58 sts. Continue in stocking sts at the same time cast off for armhole and knit the collar as follows: Armhole: Dec for armhole each side on every other row as follows: 3 sts 1 time, 2 sts 0-1-1-2-3 times and 1 st 2-1-3-3-3 times. Collar – see decreasing tips: Cast off on every other row: 1 st 0-0-1-3-5 times and then on every 4th row 1 st 9-11-12-12-12 times. To make sure the collar turns out nicely knit some extra rows up towards the shoulder as follows: *2 row over all sts, 2 rows over the outermost 10-11-12-13-14 sts towards the collar side*, repeat from *-* - NB: To avoid a hole in between the first 10-11-12-13-14 sts and the rest, pick up 1 st from previous row “ in the hole”, and K it tog with the next st on row. When the armhole measures 19-20-21-22-23 cm cast off 12-13-14-14-15 sts from the armhole and inwards. Continue in stocking sts over the remaining 10-11-12-13-14 sts for the collar for another 6-6-6-7-7 cm, put the sts on a thread. Left front: Knit as right front but reverse, this means inc only on every 4th row at the 1st marking thread and on every other row at the following 5 marking threads. Back piece: Cast on 48-52-58-64-70 sts (incl. 1 edge st each side) on needle size 9 mm. Knit in stocking sts. When piece measures 10 cm dec 1 st each side on every 5th cm a total of 3 times = 42-46-52-58-64 sts. When piece measures 30-31-32-33-34 cm inc 1 st each side. Repeat the inc. when the piece measures 36-38-40-42-44 cm = 46-50-56-62-68 sts. When piece measures approx. 41-44-47-50-53 cm (measure the front piece for the length for the armhole) dec for armhole each side as done for the front pieces = 36-38-40-42-44 sts. When the piece measures approx. 57-61-65-69-73 cm cast off the centre 10-10-10-12-12 sts for neck. Dec 1 st at neckline on next row = 12-13-14-14-15 sts left on each shoulder. Cast off when piece measures 60-64-68-72-76 cm. Sleeve: Cast on 26-26-32-32-32 sts (incl. of 1 edge st each side) on needle size 9mm. Knit in Rib = K4/P2, with an edge st each side. When the rib measures 4 cm continue in stocking sts until finished. At the same time when piece measures 10 cm, inc 1 st each side on every 8-6.5-10-6-5 cm a total of 5-6-4-6-7 times = 36-38-40-44-46 sts. When piece measures 48-47-45-44-42 cm cast off for sleeve cap each side on every other row as follows: 3 sts 1 time and 2 sts 1 time and then 1 st each side until piece measures 52 cm. Now dec 2 sts 1 time and 3 sts 1 time each side. Cast off remaining sts, the piece measures approx. 56 cm. Assembly: Sew shoulder seams. Sew the collar at the centre back with knitting stitches and sew it to the neck shaping at the back having the seam towards the WS. Set in sleeves. Sew sleeve and side seams within 1 edge st. Crochet edge: Crochet around the entire opening – starting at the back of the neck, along one front piece, along the bottom of the back piece and then up along the other front piece. Crochet on hook size 8 mm as follows: 1st round: 1 dc, 1 ch, *skip approx 1 cm, 1 dc in the next st, 1 ch*, repeat from *-*, finish round with a sl st in the first st. 2nd round: 1 dc in the first ch, *4 ch, skip 1 ch, 1 dc in the next ch*, repeat from *-*, finish round with a sl st in the first st. Steam the collar well so it becomes flat. Close the cardigan with a kilt pin or a broche. |
|
 |
|
Have you finished this pattern?Tag your pictures with #dropspattern or submit them to the #dropsfan gallery. Do you need help with this pattern?You'll find 24 tutorial videos, a Comments/Questions area and more by visiting the pattern on garnstudio.com. © 1982-2026 DROPS Design A/S. We reserve all rights. This document, including all its sub-sections, has copyrights. Read more about what you can do with our patterns at the bottom of each pattern on our site. |


With over 40 years in knitting and crochet design, DROPS Design offers one of the most extensive collections of free patterns on the internet - translated to 17 languages. As of today we count 324 catalogues and 12290 patterns translated into English (UK/cm). 12290
We work hard to bring you the best knitting and crochet have to offer, inspiration and advice as well as great quality yarns at incredible prices! Would you like to use our patterns for other than personal use? You can read what you are allowed to do in the Copyright text at the bottom of all our patterns. Happy crafting!
Post a comment to pattern DROPS 97-8
We would love to hear what you have to say about this pattern!
If you want to leave a question, please make sure you select the correct category in the form below, to speed up the answering process. Required fields are marked *.