
Popular categories
Looking for a yarn?


Comments / Questions (195)
![]() Graciela wrote:
Graciela wrote:
No uso agujas circulares. Está disponible un patrón para dos agujas? Si asi fuera, les agradezco me indiquen cómo hacerlo. Gracias
09.05.2021 - 21:52DROPS Design answered:
Hola Gabriela, mira la leccion drops AQUI. Recuérda que cada uno de nuestros patrones tiene videos tutoriales específicos para ayudarte. Buen trabajo!
09.05.2021 - 21:56
![]() Wuschel wrote:
Wuschel wrote:
Wie kann ich bei dem Modell Richard die beiden Fäden Karisma und Alpaca durch einen Faden ersetzen? Welche Garngruppe ergibt sich dabei?
07.05.2021 - 07:09DROPS Design answered:
Liebe Frau Wuschel, hier finden Sie alle unsere Modellen mit 15 Maschen; vielleicht können Sie mal mit Garngruppe C mal versuchen, ob Ihnen die Textur mit dieser Maschenprobe für dieses Modell gefällt. Hier lesen Sie mehr - gerne wird Ihnen auch Ihr DROPS Laden damit weiterhelfen - auch telefonisch oder per E-Mail. Viel Spaß beim stricken!
07.05.2021 - 07:47
![]() Mariette wrote:
Mariette wrote:
Hallo. Ik ben aan de raglan toe maar begrijp de tips voor mindering raglan niet. Ik heb 4 merkdraden geplaatst. Na het voorpand en voor het begin van de mouw. Dan aan het eind van de mouw en het begin van het achterpand. Spiegelbeeld aan het eind vd nld. Is dit wel goed? In de tip wordt n.l. gesproken over merkdraden op de mouw en van de panden. Ik begrijp niet waar precies ik moet beginnen met de raglanmindering.
21.04.2021 - 23:36DROPS Design answered:
Dag Mariette,
De markeerdraden zitten in de overgangen tussen de mouwen en de panden en zitten tussen 2 steken in. Wanneer je mindert voor de raglan en je bent op dat moment op het pand aan het breien en breit dus richting een markeerdraad die de overgang tussen dat pand en de mouw aangeeft dan begin je de mindering 5 steken voor de markeerdraad. Wanneer je op een mouw aan het breien bent en je breit dus richting de markeerdraad die de overgang tussen de mouw en het pand aangeeft, start je de mindering 3 steken voor de markeerdraad. In de tip voor het minderen heb ik de omschrijving nog wat verbeterd.
29.04.2021 - 14:20
![]() Ana Isabel Moledo Vigil wrote:
Ana Isabel Moledo Vigil wrote:
No entiendo en la confección del cuello que quieren decir con "levantar"
01.03.2021 - 18:41
![]() Petra wrote:
Petra wrote:
Hi, I should now increase the number of stitches after 11 cm of knitting. How do I do that so that the vertical "lines" in pattern doesn't get messed up? It would help to have more photos of the cardigan. Thanks!
25.02.2021 - 14:27DROPS Design answered:
Dear Petra, you should increase on each side of the knit stitch with a marker, the first increase will be worked in stocking stitch (there will be K3 at both markers, seen from RS), then the next extrease will be worked in garter stitch (so that pattern will fit again at the sides). Repeat these both increases. Pattern fit again on the sides. Happy knitting!
25.02.2021 - 15:30
![]() Mariangela wrote:
Mariangela wrote:
Se voglio lavorare con i ferri normali?
08.02.2021 - 09:39DROPS Design answered:
Buonasera Mariangela il cardigan è lavorato in piano, quindi può usare i ferri normali. Buon lavoro!
09.02.2021 - 21:48
![]() Jeanne wrote:
Jeanne wrote:
Guten Tag, ich bin gerade dabei, diese Jacke zu stricken, und bin nun an den Raglanabnahmen angelangt. Bisher war die Anleitung sehr verständlich, aber bei der Anleitung zum Raglan steht, man sollle bei jeder 2. Reihe abnehemen. Ist hiermit dann gemeint, man solle jede Hinreihe oder nur jede zweite Hinreihe abnehemen?
31.01.2021 - 14:16DROPS Design answered:
Liebe Jeanne, die Raglanabnahmen werden in jeder 2. Reihe = in jeder Hinreihe bearbeitet. Viel Spaß beim stricken!
01.02.2021 - 10:31
![]() Riitta Tommila wrote:
Riitta Tommila wrote:
Hei, Ohje: Kun raglankorkeus on 18 cm, onko se mitattuna raglanin kavennuslinjaa myöden vai, että kappaleen keskikohdasta linjassa raglanin aloituksesta ylös kaula-akon alimpaan kohtaan. : Ohje jatkuu: Päätä molemmista etureunoista pääntietä varten joka 2 krs L-koossa 0 silmukkaa. Tarkoittaako se että kuitenkin kudotaan 2 krs ilman kavennusta päättämistä vai jätetäänkö nuo kerrokset pois? Kiitos vastauksesta. T. Riitta
07.01.2021 - 16:32
![]() Jeanne wrote:
Jeanne wrote:
Ich wiede diese Jacke gerne stricken, vertehe aber den Beginn der Anleitung nicht. Wir die Jacke von unten nach oben gearbeitet und zwar Rpckebteil und die beiden Seitenteile zusammen an einem Stück? Und das Bündchen wird über die gesamten angeschlagenen Maschen gestrickt? Was ist dann mit "auf beiden Seiten gegen die Mitte Stricken" gemeint? Danke für ihre Hilfe.
17.12.2020 - 08:52DROPS Design answered:
Liebe Jeanne, genau, die Jacke wird von unten nach oben gestrickt, dh Rumpfteil wird in einem Stück gestrickt, von der rechten Vorderteil bis zum linken Vorderteil (Hinreihen). Mit "gegen die Mitte" ist die Blende gemeint, dh Jede Reihe beginnt mit 3 M kraus rechts + 1 M re und endet mit 1 M re + 3 M kraus rechts. Viel Spaß beim stricken!
17.12.2020 - 09:08
![]() Teresa Mas wrote:
Teresa Mas wrote:
In the decreasing tips for raglan, I have a question: when it says " K 2 tog, 1 st in seed st, K 1, 1 st in seed st, slip 1 st as if to knit, K 1, psso" does it mean that when I knit the wrong side of the jacket I should knit K those stitches in seed?
04.12.2020 - 10:53DROPS Design answered:
Dear Mrs Mas, if the stitch in seed stitch is worked K from RS it should be K from WS, and if this stitch is worked P from RS it should be P from WS - this video shows how to knit seed stitch back and forth. Happy knitting!
04.12.2020 - 11:59
|
|||||||
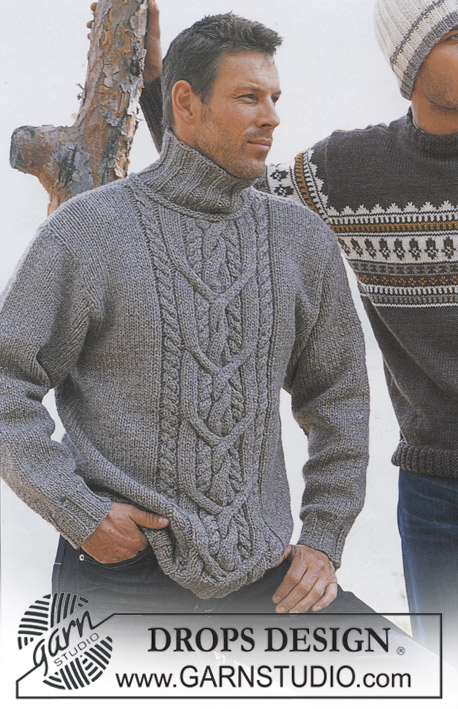
Richard |
|||||||
|
|
|||||||
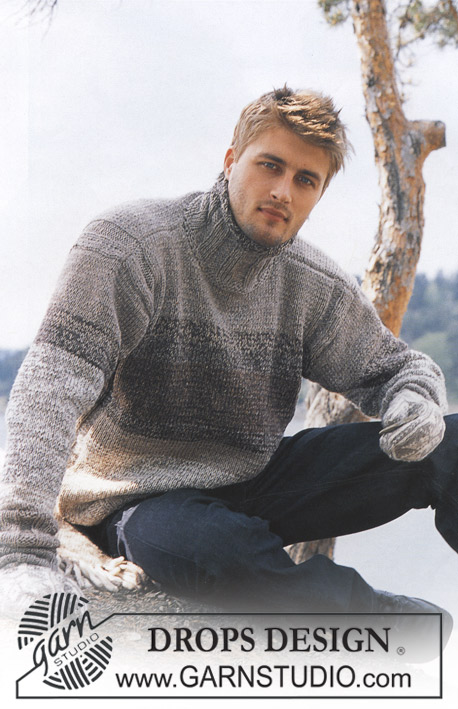
Knitted jacket for men, with raglan, high neck and zipper in DROPS Karisma and DROPS Alpaca
DROPS 85-13 |
|||||||
|
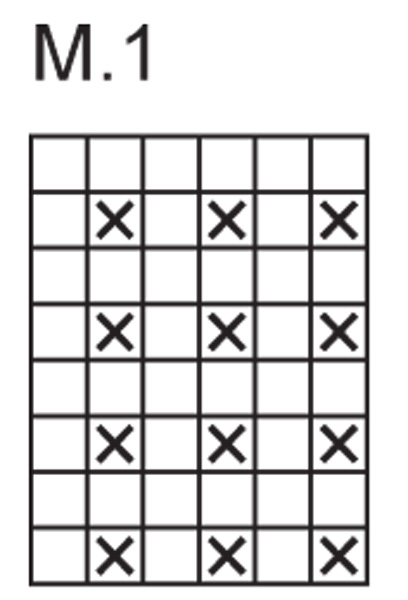
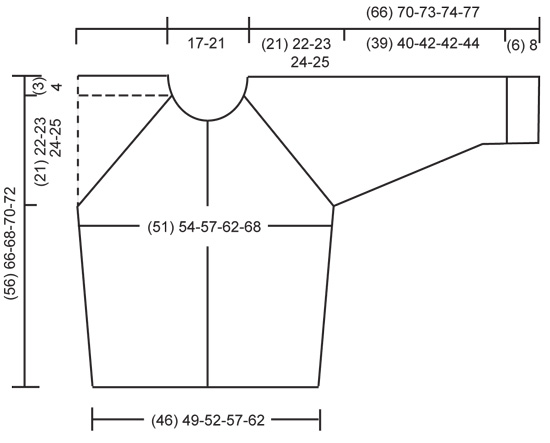
Gauge: 15 sts x 21 rows with 1 strand of each yarn on larger needles in stockinette st = 10 x 10 cm. Rib: *K 1, P 1*, repeat from *-*. Pattern: The diagrams are showing all rows seen from the right side. Decreasing tips (for raglan): All decs are made on the right side. On front- and back piece dec before the 3 sts before/after the marker, and on the sleeves dec right beside the marker. Start 2 sts before the marker on the sleeves and 5 sts before the marker on front and back, and work as follows: K 2 tog, 1 st in seed st, K 1, 1 st in seed st, slip 1 st as if to knit, K 1, psso. ___________________________________________________________________ BODY The cardigan are worked back and fort on circular needle. Cast on 137-147-155-171-187 sts on smaller circular needles with 1 strand Karisma + 1 strand Alpaca. Knit rib, keeping 3 sts in garter st at each side for front edges, and begin and end rib with K 1 (seen from the right side). When the piece measures 3-4-4-4-4 cm change to larger circular needles and Pattern 1, keeping 3 sts in garter st at each side for front edges. See that the K rib in the pattern is above the K rib in ribbing. Place a marker in the 36-38-40-44-48th st in from each side (it will be a K 1), there are 65-71-75-83-91 sts between markers on back. When the piece measures 10-12-12-12-12 cm inc 1 st at each side of both sts with markers. Inc every 5-6-6-6-6 cm a total of 4 times = 153-163-171-187-203 sts – knit the increased sts into the pattern as you go along. When the piece measures 32-40-41-42-43 cm bind off 7 sts at each side for armholes (= bind off the st with the marker + 3 sts each side of that st) = 67-73-77-85-93 sts on back and 36-38-40-44-48 sts on each front. Lay piece aside and knit the sleeves. SLEEVES Sleeves knitted in the round. Cast on 32-34-36-36-40 sts on smaller double-pointed needles with 1 strand Karisma + 1 strand Alpaca; join and place a marker at the join. Knit rib – start with K 1 at marker. When the piece measures 6-8-8-8-8 cm change to larger double-pointed needles and Pattern 1 – see that the K rib in the pattern is above the K rib in the ribbing. When the piece measures 10-14-10-14-10 cm inc 1 st each side of the K st at marker every 2.5-2-2.5-2-2.5 cm a total of 14-16-16-17-17 times = 60-66-68-70-74 sts – knit the increased sts in the pattern as you go along. When the piece measures 45-48-50-50-52 cm bind off 7 sts at marker (bind off the the K st at marker + 3 sts each side of it) = 53-59-61-63-67 sts. Lay piece aside and knit second sleeve. YOKE Put the sleeves in on the same circular needles as Body where you bound off for armholes = 245-267-279-299-323 sts Put a marker in each transition between Body and sleeves = 4 markers. Knit 3-1-1-1-0 rows before beginning shaping. Read entire section before knitting: Raglan shaping: Dec at each side of all markers (= 8 decs) – see Decreasing tips above – every other row 21-23-24-25-27 times. Neck: When the piece measures 49-57-59-60-62 cm put 3-4-5-6-6 sts at each center front edge on st holders for the neck. Then bind off at each neck edge every other row: 2 sts 2-0-0-2-4 times and 1 st 2-6-6-4-2 times. After all shaping is complete 59-63-65-71-75 sts remain. Neckband: Pick up and knit approx. 10-16 sts at each side of neck on fronts (including sts on st holders) with 1 strand of each yarn and put all sts on smaller circular needles. K 1 row from wrong side, then K 1 row from right side, adjusting (inc/dec) to 83-83-91-103-111 sts on 2nd row. Then knit rib, keeping 3 sts in garter st at each side and beginning rib with K 1 (as seen from the right side). When the collar measures 20-22-22-24-24 cm bind off all sts in rib. ASSEMBLY Sew opening under the sleeve. Sew in zipper – start at lower edge. Fold the collar in half to wrong side and stitch in place, covering end of zipper. |
|||||||
Diagram explanations |
|||||||
|
|||||||
 |
|||||||
 |
|||||||
Have you finished this pattern?Tag your pictures with #dropspattern or submit them to the #dropsfan gallery. Do you need help with this pattern?You'll find 24 tutorial videos, a Comments/Questions area and more by visiting the pattern on garnstudio.com. © 1982-2026 DROPS Design A/S. We reserve all rights. This document, including all its sub-sections, has copyrights. Read more about what you can do with our patterns at the bottom of each pattern on our site. |
|||||||


With over 40 years in knitting and crochet design, DROPS Design offers one of the most extensive collections of free patterns on the internet - translated to 17 languages. As of today we count 324 catalogues and 12291 patterns translated into English (UK/cm). 12291
We work hard to bring you the best knitting and crochet have to offer, inspiration and advice as well as great quality yarns at incredible prices! Would you like to use our patterns for other than personal use? You can read what you are allowed to do in the Copyright text at the bottom of all our patterns. Happy crafting!
Post a comment to pattern DROPS 85-13
We would love to hear what you have to say about this pattern!
If you want to leave a question, please make sure you select the correct category in the form below, to speed up the answering process. Required fields are marked *.