
Popular categories
Looking for a yarn?


Comments / Questions (15)
![]() Paula Schuit wrote:
Paula Schuit wrote:
Dank voor je antwoord en ga dat zo doen maar waar begint het patroon eigenlijk? is dat in het midden van het voorpand? en hoe lang moet ik met 2 rondbreinaalden breien en waar gaat het ene deel en het andere deel naartoe? groet paula
21.10.2015 - 11:33DROPS Design answered:
Hoi Paula. Ja, het begint in het midden (de kleine zwarte streep in het midden van het voorpand is je begin) Je breit op beide naalden tot je het afkanten middenvoor. Je breit van boven (schouder), naar beneden (je hebt twee markeerders, die zijn de "hoeken" die je ziet op de foto) en weer naar boven.
21.10.2015 - 16:42
![]() Paula Schuit wrote:
Paula Schuit wrote:
Ik heb de eerste pen gedaan --> 100 st en een pen recht gebreid, toen met de andere rondbreipen 100 st opgenomen dus nu heb ik 2 parallel pennen en zou nu een pen av moeten breien maar de draad zit aan het andere eind nl aan het eind van de 2e rondbreinaald en dus opposite van het begin van de 1e rondbreinaald. ik hoop dat je begrijpt wat ik bedoel. dank alvast paula schuit
19.10.2015 - 19:51DROPS Design answered:
Hoi Paula. Je hebt dus nu in totaal 202 st op de nld (op beide zijkanten van de eerste 100 st. Heb je de steken opgenomen met de werkdraad van de bol? Dan zou de werkdraad nu aan het eind van de tweede naald zitten? Dan brei je terug over alle st (verkeerde kant).
20.10.2015 - 16:06
![]() Paula Schuit wrote:
Paula Schuit wrote:
Ik begrijp dit patroon helemaal niet, heeft u een duidelijkere uitleg. groet paula
19.10.2015 - 10:43DROPS Design answered:
Beste Paula. Nee, dit is het patroon zoals het is, maar als je wat duidelijker kan uitleggen waar je probleem is, dan kan ik proberen verder te helpen.
19.10.2015 - 11:34
![]() Carmen wrote:
Carmen wrote:
Möchte mich heute endlich mal für die schnelle und kompetente Hilfe bedanken. Hatte eigentlich nur ein Brett vorm Kopf ;-), denn noch bevor ihre überarbeitete Version erschien, wusste ich, wie die Anleitung gemeint war. Habe aber zur Sicherheit noch mal alles nachgelesen. Die Jacke ist seit geraumer Zeit fertig und fand nur lobende Kritiken. Nochmals vielen lieben Dank und weiter so. LG Carmen
24.10.2014 - 00:11
![]() Carmen wrote:
Carmen wrote:
Hallo Ich sitze schon seit Std an der Anleitung dieser Jacke (Vorderteile), um herauszufinden, wie und was denn eigentlich gemeint ist. Habe schon Probe gestrickt. Ohne Ergebnis. Müsste es nicht auch beim Halsausschnitt zunehmen statt abketten heißen? Würde mich über ein Video freuen, daß dieses Vorderteil zu stricken deutlich erklärt. Oder aber wenigstens eine deutliche Beschreibung recht vielen lieben Dank ein großer Fan von eurer Seite und fleißige Strickerin
14.08.2014 - 09:42DROPS Design answered:
Liebe Carmen, die Anleitung wurde gerade komplett neu formuliert. Vielleicht hilft Ihnen das nun beim Verständnis weiter. Sie müssen auf jeden Fall für den Halsausschnitt abketten und nicht zunehmen. Wenn weiterhin Unklarheiten bestehen, fragen Sie einfach noch mal nach. Gutes Gelingen!
15.08.2014 - 13:22
|
|||||||||||||||||||||||||||||||
DROPS 80-17 |
|||||||||||||||||||||||||||||||
|
|
|||||||||||||||||||||||||||||||
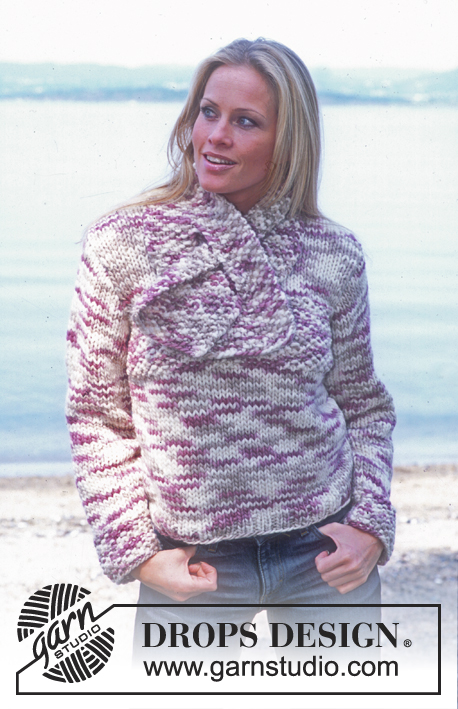
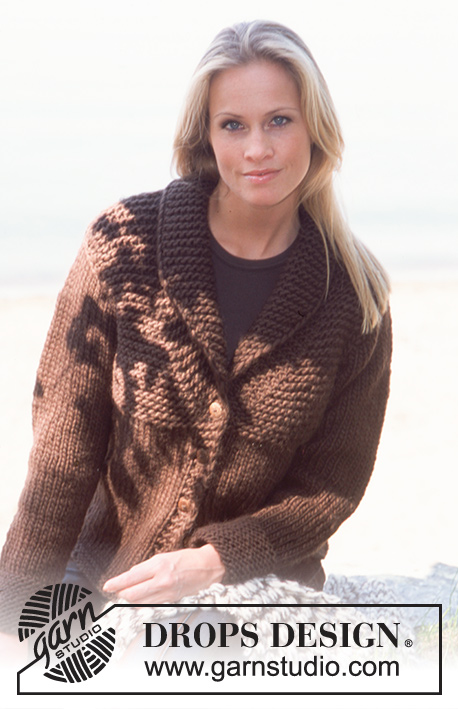
DROPS Cardigan in Silke-Tweed and Shawl in Vienna
DROPS 80-17 |
|||||||||||||||||||||||||||||||
|
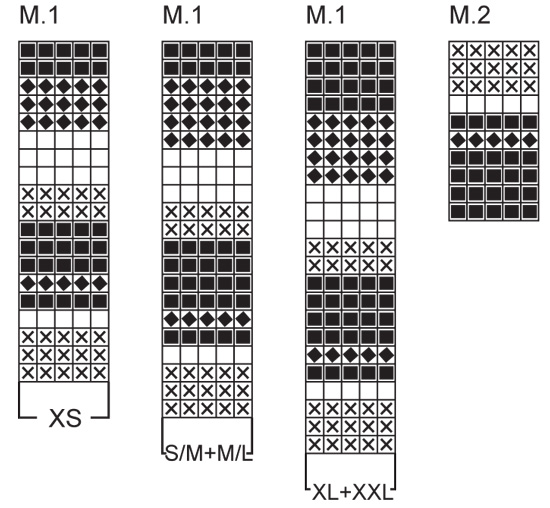
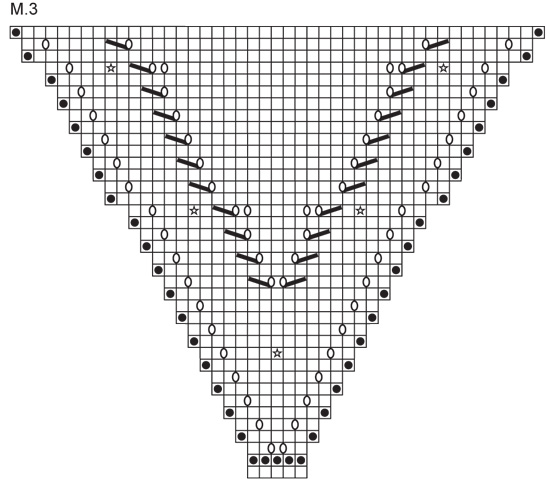
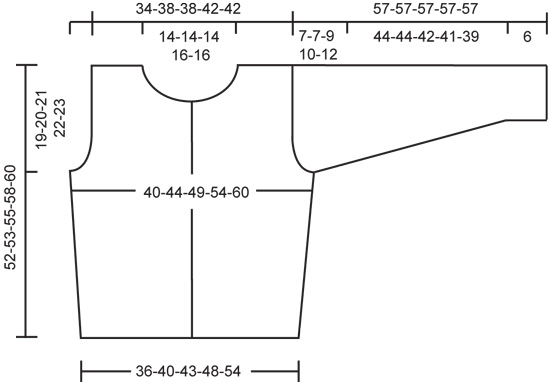
Gauge: 23 sts x 46 rows in garter st = 10 x 10 cm. Pattern: See charts. There are 3 charts for Pattern 1 (M.1) – note the sizes shown on the top of the chart and use the appropriate chart for your size. The pattern is seen from the right side. 1 row of chart = 2 rows garter st. -------------------------------------------------------------------- Left Front: Cast on 100-102-106-110-114 sts on one of the circular needles with black (this is the middle of the piece). Read the entire section before knitting: Row 1 (right side): Knit all sts, in the last st knit 2 sts. Starting from the same point you just ended, pick up and K (with the other circular needle) 2 sts in the first st, then 1 st in each st on the other side of the cast-on edge = 202-206-214-222-230 sts. Row 2 (wrong side): Turn the work, and K all sts. Row 3 (right side): Put a marker before the last st on the 1st circular needle and a marker after the first st on the other circular needle – there are 2 sts between markers, these are for bottom edge of the cardigan. Change to grey and knit stripe pattern following Pattern 1 for color changes (use the appropriate chart for your size) as follows: K until 1 st before the 1st marker, K 2 sts in the st before the marker and 2 sts in the st after the marker, repeat at 2nd marker. Repeat this increase at each marker every other row. Neckband: When you have knit 8-12-12-12-12 rows garter st (after 3-5-5-5-5 stripes) bind off for neck from right side at the beginning of every other row as follows: 4 sts 1 time, 3 sts 2 times, 2 sts 3 times and 1 st 2 times = 18 sts bound off for the neck. After all incs and decs are complete 260-272-280-296-304 sts are on the needles and the piece measures approx. 17-19-19-21-21 cm in width and 52-53-55-58-60 cm in height. Now bind off at the side edge (= 119-123-127-133-137 sts) and at lower edge (= 40-44-44-48-48 sts). Knit 12 rows garter st with black over the 101-105-109-115-119 sts at the center front edge for buttonband, bind off. Right front: Knit the same as the left , reversing all shaping. Make 6 buttonholes evenly distributed along the buttonbands after 4 rows garter st have been knit. The bottom buttonhole = approx. 3 cm from lower edge and top buttonhole approx. 6 cm from top edge (there will be 1 more buttonhole in neckband). (1 buttonhole = bind off 2 sts and cast on 2 new sts over the bound off sts on the next row.) Back + sides: Cast on 86-96-112-124-152 sts with black. Knit garter st. When the piece measures 8 cm put 1 marker 2-2-6-7-14 sts in from each side to mark the side «seam». Then inc 1 st each side of each marker every 5-5-4.5-4-4 cm 5-5-6-7-7 times = 106-116-136-152-180 sts. When the piece measures 33-33-34-36-37 cm bind off 3 sts at each side of both markers (= 6 sts for armhole). Knit each piece separately. Side-front: = 4-4-9-11-18 sts. Bind off every other row: 2 sts 1-1-3-4-6 times and 1 st 2-2-3-3-6 times. Repeat on the other side-front. Back: = 86-96-106-118-132 sts. Bind off at each side as on side-front = 78-88-88-96-96 sts. When the piece measures 50-51-53-56-58 cm bind off the center 26-26-26-30-30 sts for the neck. Then bind off at each neck edge every other row: 2 sts 1 time and 1 st 1 time = 23-28-28-30-30 sts remain on each shoulder. Bind off when the piece measures 52-53-55-58-60 cm. Sleeve: Cast on 52-54-56-56-60 sts with black. Knit Pattern 2, and then with black to finished measurements. When the piece measures 6 cm inc 1 st at each side every 3-3-2.5-2-2 cm a total of 14-15-16-19-19 times = 80-84-88-94-98 sts. When sleeve measures 50-50-48-47-45 cm bind off for sleeve cap at each side every other row: 3 sts 1 time, 2 sts 3-3-2-2-1 times, 1 st 8-8-15-17-23 times, then bind off 2 sts at each side until the piece measures 57 cm. Bind off the remaining sts. Assembly: Sew back to fronts. Sew shoulder seams. Neckband: Pick up approx. 92-102 sts around the neck with black. Knit 6 rows garter st – after 2 rows make a buttonhole over the others on buttonband. Bind off. Sew sleeve seams and sew in sleeves. Sew on buttons. -------------------------------------------------------------------- SHAWL: Measurements: Width: approx. 150 cm Length at center back: approx. 90 cm Materials: DROPS VIENNA from Garnstudio 200 gr nr 21, natural DROPS 12 mm circular needles, or size needed to obtain correct gauge. Gauge: 8 sts in stockinette st = 10 cm in width. Pattern: See chart. The pattern is seen from the right side. -------------------------------------------------------------------- Shawl: Loosely cast on 5 sts and follow chart for Pattern 3 (M.3) – row 1 = right side. After chart is complete continue to inc in the same manner – that is, make a yo inside of 2 sts at each side every other row, and on every row with bobbles (every 12th row) make a yo at each side and an extra yo inside the stockinette st in the middle. When shawl measures 90 cm K 1 row from wrong side and bind off with double strands of yarn. |
|||||||||||||||||||||||||||||||
Diagram explanations |
|||||||||||||||||||||||||||||||
|
|||||||||||||||||||||||||||||||
 |
|||||||||||||||||||||||||||||||
 |
|||||||||||||||||||||||||||||||
 |
|||||||||||||||||||||||||||||||
Have you finished this pattern?Tag your pictures with #dropspattern or submit them to the #dropsfan gallery. Do you need help with this pattern?You'll find 16 tutorial videos, a Comments/Questions area and more by visiting the pattern on garnstudio.com. © 1982-2026 DROPS Design A/S. We reserve all rights. This document, including all its sub-sections, has copyrights. Read more about what you can do with our patterns at the bottom of each pattern on our site. |
|||||||||||||||||||||||||||||||


With over 40 years in knitting and crochet design, DROPS Design offers one of the most extensive collections of free patterns on the internet - translated to 17 languages. As of today we count 324 catalogues and 12290 patterns translated into English (UK/cm). 12290
We work hard to bring you the best knitting and crochet have to offer, inspiration and advice as well as great quality yarns at incredible prices! Would you like to use our patterns for other than personal use? You can read what you are allowed to do in the Copyright text at the bottom of all our patterns. Happy crafting!
Post a comment to pattern DROPS 80-17
We would love to hear what you have to say about this pattern!
If you want to leave a question, please make sure you select the correct category in the form below, to speed up the answering process. Required fields are marked *.