
Popular categories
Looking for a yarn?


Comments / Questions (53)
![]() Anke Van Drempt-Dienske wrote:
Anke Van Drempt-Dienske wrote:
Duidelijker aangeven HOE de zijkant gehaakt moet worden. IK kom er niet uit . HOE moet ik in toer 2 de 3 lossen maken , eerst een halve vaste en dan de 3 lossen? FRUSTREREND !!!! Kan ik dit kantpatroon misschien op een VIDEO vinden .? Vriendelijke groeten Anke
20.03.2024 - 11:21
![]() Annagun Martinsson wrote:
Annagun Martinsson wrote:
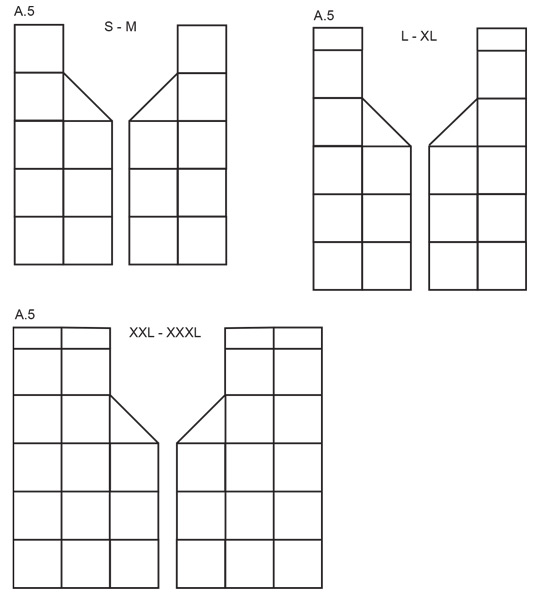
Tournesol Cardigan Virkad kofta. Hej! Virkar denna kofta men förstår inte diagrammet A5, Rutan som är halv vid axeln, ska det vara en hel ruta? Tycker att koftan blir mycket urringat bak vid halsen. Har ni någon bild på koftan bakifrån? Önskar svar på min fråga. Tack!
18.03.2024 - 12:36DROPS Design answered:
Hei Annagun. Vi har dessverre ingen bilder bak. Om du hekler str. L-XL-XXL-eller XXXL vil halve ruten øverst på skulderen tilhøre forstykkene og halve ruten tilhøre bakstykket Altså du hekler en hel rute, men den deler seg oppe ved skulderen. mvh DROPS Design
02.04.2024 - 09:28
![]() Georgiana Argento wrote:
Georgiana Argento wrote:
Hi, my question: if I make this sweater ( 239-17) in one color how much total yarn will I need ? Also is there any way you can send me this pattern ? I used to be able to print the patterns off the computer but not any more.. Thank you so much. I printed so many of your patterns off the computer. You have a great collection of patterns.I've made many baby blankets and children's socks from your patterns . Thanks again. Georgiana
15.03.2024 - 00:02DROPS Design answered:
Dear Georgiana, as this pattern was worked with different colour we only have the amount with all the colours and we don't have the jacket anymore, so the best would be to add all amount for each colour, you might probably required a bit less. To get the pattern be printed feel free to ask your DROPS Store while ordering yarn. See list of DROPS store for USA here. Happy crocheting!
15.03.2024 - 09:31
![]() Annagun Martinsson wrote:
Annagun Martinsson wrote:
Hej ! Förstår inte diagrammet A5, Rutan som är halv vid axeln, tycker att det blir mycket urringat bak vid halsen. Har ni någon bild på koftan bakifrån?
13.03.2024 - 09:51DROPS Design answered:
Hej Annagun, det har vi desværre ikke, vi forstår ikke rigtig hvor du mener, kan du evt lave en hel rude istedet for ½ hvis den bliver for udringet?
19.03.2024 - 11:27
![]() Dorothee wrote:
Dorothee wrote:
Hm, also ein Bild vom Rücken würde mir glaube ich weiterhelfen! Ich weiß auch nicht genau ob wir von den gleichen Quadraten reden. Die zwei äußeren Quadrate gehören 1/2 zur Rückseite und zur Vorderseite. Die zwei mittleren nur zur Rüchseite?!? LG Dorothee
04.03.2024 - 13:39DROPS Design answered:
Liebe Dorothee, Rückenteil ist 4 Quadrate in der Breite und 5 Quadrate in der Höhe (wie ein Rechteck) = 20 Quadrate + 8 Quadrate für jedes Vorderteil + 1 Quadrat für jede Schulter, so haben Sie: 20+8+1+8+1= 38 Quadrate insgesamt. Viel Spaß beim Häkeln!
04.03.2024 - 15:39
![]() Dorothee wrote:
Dorothee wrote:
Hallo, sehr schöne Jacke🥰! Ich hänge gerade bei dem zusammenhäckeln der Vorder und Rückseite. Was passiert mit den 2 halben Quadraten von den 4 Qudraten, die bei Größe L zu den Vorderteilen gehören? Geben die einen Kragen am Nacken🤔. Denn die obere Reihe von der Rückseite die über die Schultern mit der Vorderseite verbunden wird betrifft ja nur die 2 äußeren Quadrate😬. LG Dorothee
04.03.2024 - 08:22DROPS Design answered:
Liebe Dorothee, diese 2 halben Quadraten werden zum Hals zusammengehäkelt, wie in der Skizze gezeigt, dh neben dem 4. Quadrat von unten gezählt, oder misverstehe ich Ihre Frage?
04.03.2024 - 10:10
![]() Carina Richard wrote:
Carina Richard wrote:
Hej Jag kan inte förstå sidostyckena ,hur kan man virka A3C över de sista 4 maskorna där är ju bara en stolpe i diagrammet. Och hur fortsätter jag sen fram o tillbaka ?
16.11.2023 - 14:05DROPS Design answered:
Hej Carina, jo i A.3C afslutter du rækken med en stolpe i 4:e m, så vender du arbejdet og virkar 3 luftmaskor i början av varvet osv :)
17.11.2023 - 10:50
![]() Van Damme Eveline wrote:
Van Damme Eveline wrote:
Ik begrijp de uitleg niet van het rugpand en er is ook geen foto te zien, ofwel zijn er vierkanten/halve vierkanten te kort ofwel klopt het patroon niet, foto of patroon van de achterkant is ook niet te zien, dus graag meer verduidelijking, eventueel met schema. Bedankt
27.10.2023 - 11:31DROPS Design answered:
Dag Eveline,
Onderaan de paragraaf over 'VIERKANTEN SAMEN HAKEN' staat een regel over hoeveel vierkanten er in de breedte en de hoogte op het achterpand komen. Dit zijn dezelfde vierkanten, met ook dezelfde afmetingen als die je voor de voorpanden hebt gehaakt. Als je alle vierkanten voor de panden aan elkaar hebt gehaakt heb je een rechthoekige lap voor het achterpand en 2 lappen voor de voorpanden zoals in het schema onderaan.
28.10.2023 - 10:23
![]() Betina wrote:
Betina wrote:
Hej Når jeg hækler sidestykket i xxl med 10 masker, bliver det helt skævt. Det er som om, der er for mange masker i bunden. Hvad gør jeg forkert ?
31.08.2023 - 10:41DROPS Design answered:
Hei Betina. Sidestykket hekles over 9 masker (bortsett fra 1. rad / 10 masker). Sett maskemarkører etter hvert diagram, så har du en bedre oversikt. Hekle A.3a over 1 maske (sett en maskemarkør), hekle A.3b over 4 masker (sett en maskemarkør), hekle A.3c over de 4 siste maskene, snu. Nå skal du hekle A.3a over A.3a, A.3b over A.3b og A.3c over A.3c og hele tiden over 9 masker. mvh DROPS Design
11.09.2023 - 13:20
![]() Britt wrote:
Britt wrote:
Hallo, ich versuche mich gerade am ersten Seitenteil. Wenn ich A3C aber so stricke wie angegeben. Also für die 4 festen Maschen nur 1 Stäbchen dann wird das ganze schräg. Soll das so sein? Kann ich mir irgendwie nicht vorstellen.
07.07.2023 - 15:57DROPS Design answered:
Liebe Britt, Vor A.3C haben Sie 3 Stäbchen aus A.3B. Wenn sie geöffnet sind, füllen sie den Raum der übersprungenen Tiefpunkte aus. Auf diese Weise sollte es sich nicht neigen. Wenn es kippt, überprüfen Sie, ob die Maschenprobe korrekt ist. Viele Spass zum häkeln!
26.07.2023 - 16:48
|
|||||||||||||||||||||||||||||||||||||
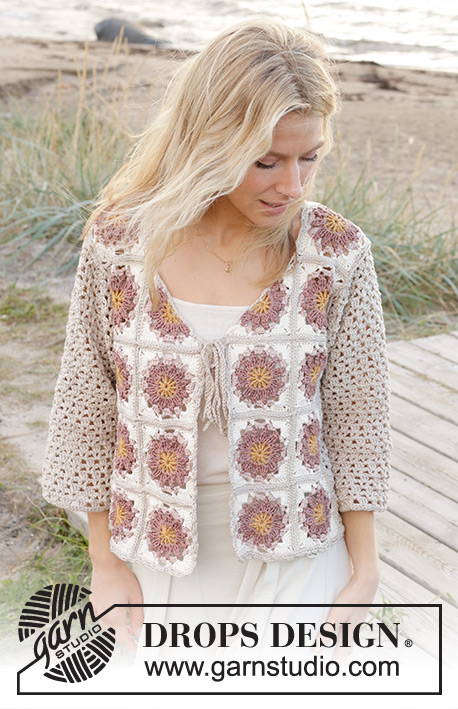
Tournesol Cardigan#tournesolcardigan |
|||||||||||||||||||||||||||||||||||||
 |
 |
||||||||||||||||||||||||||||||||||||
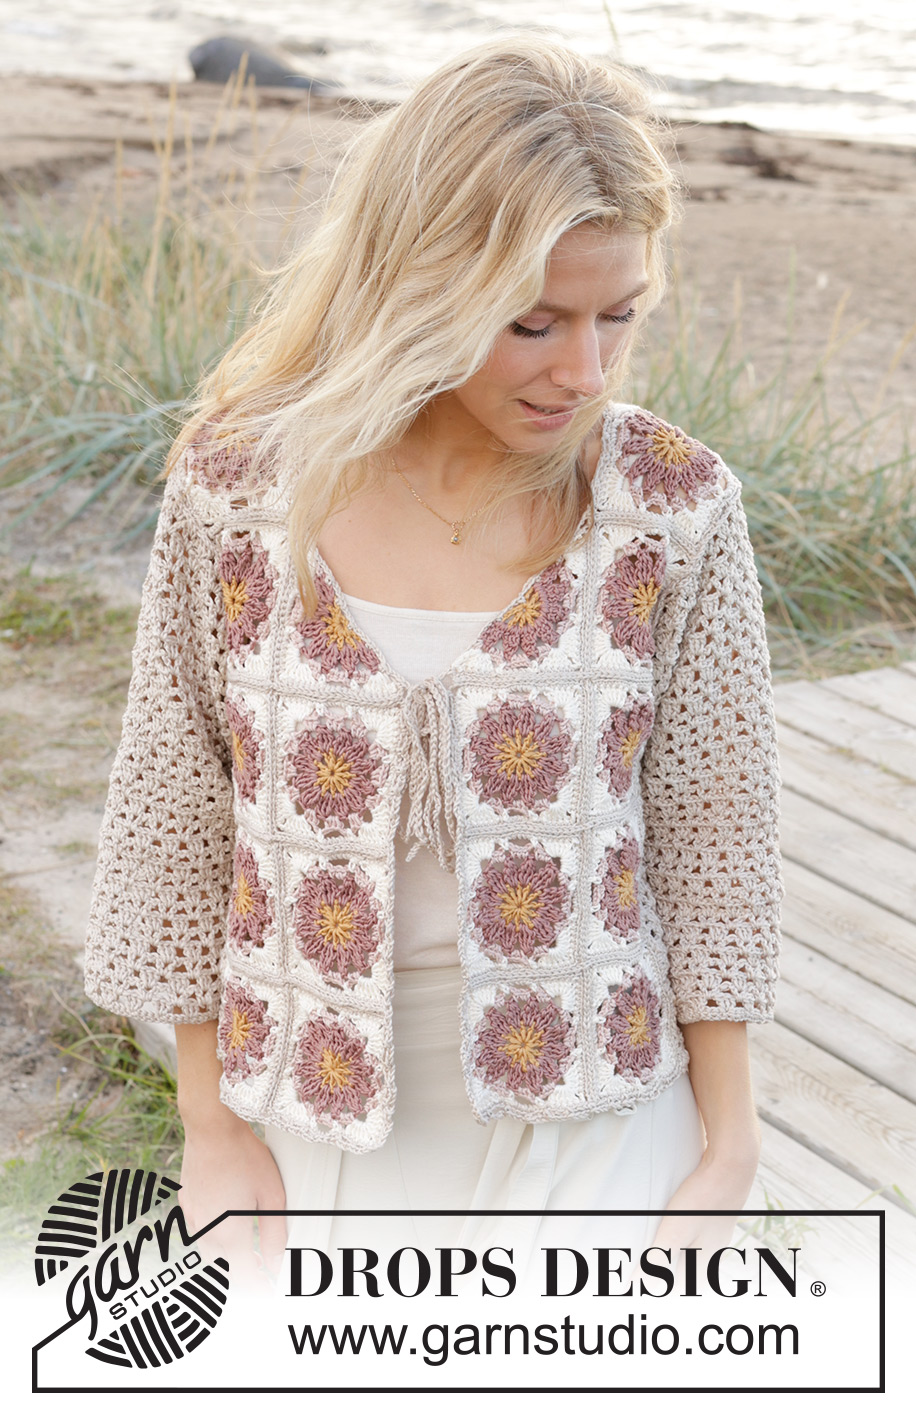
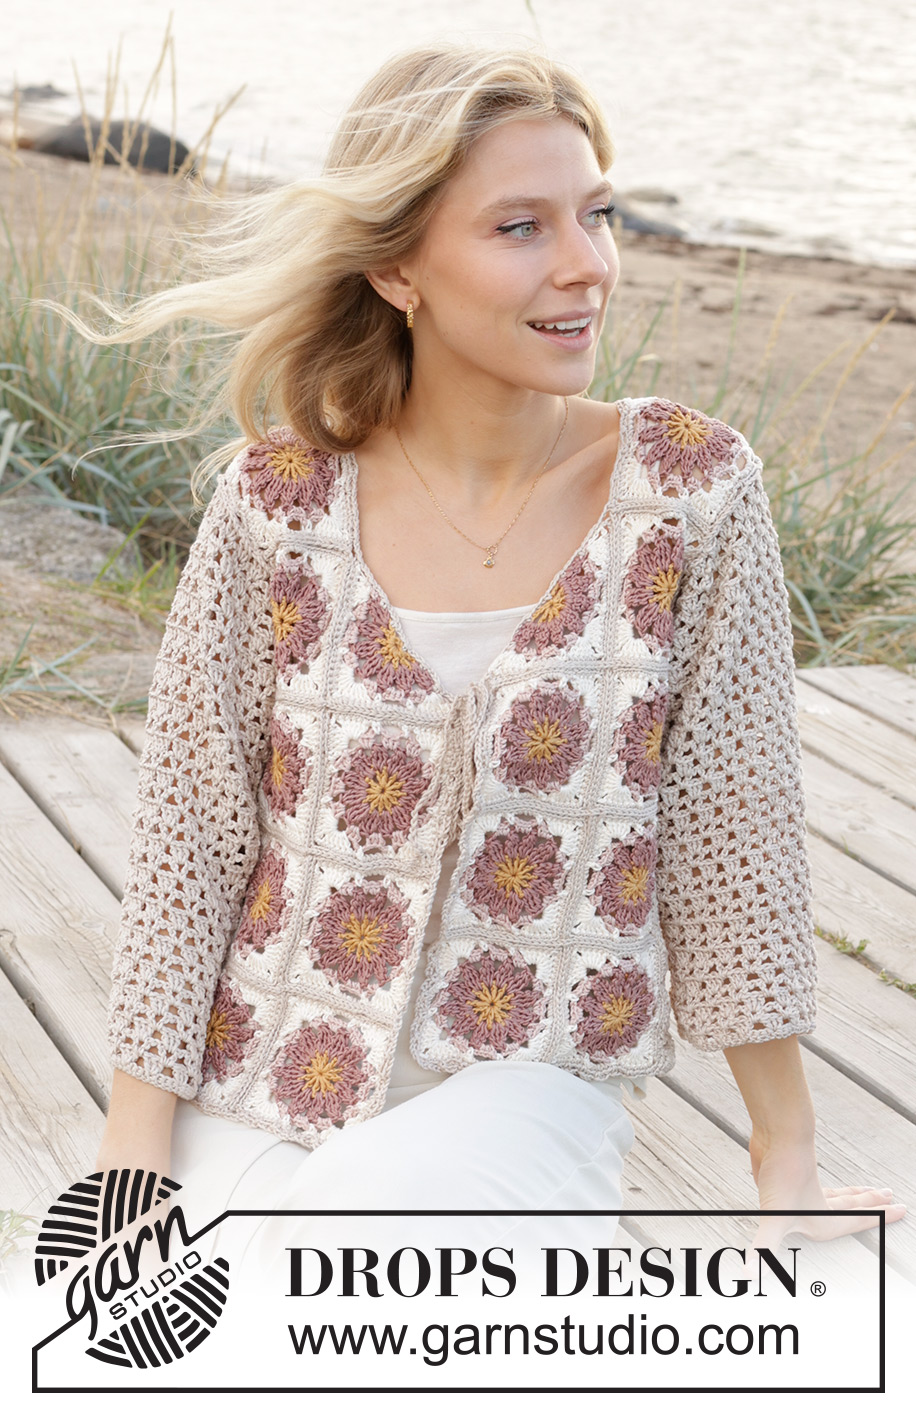
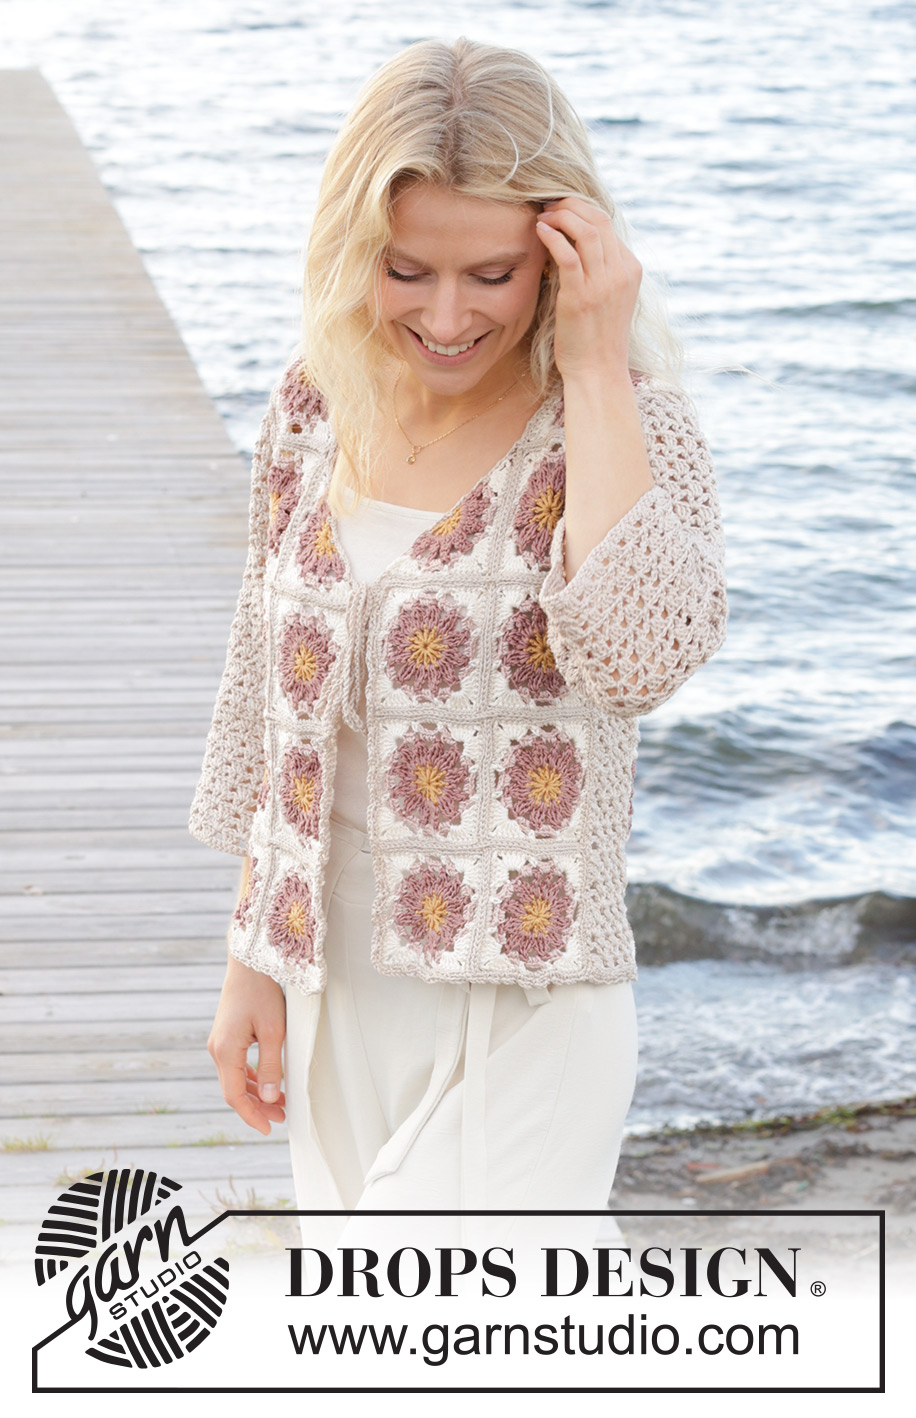
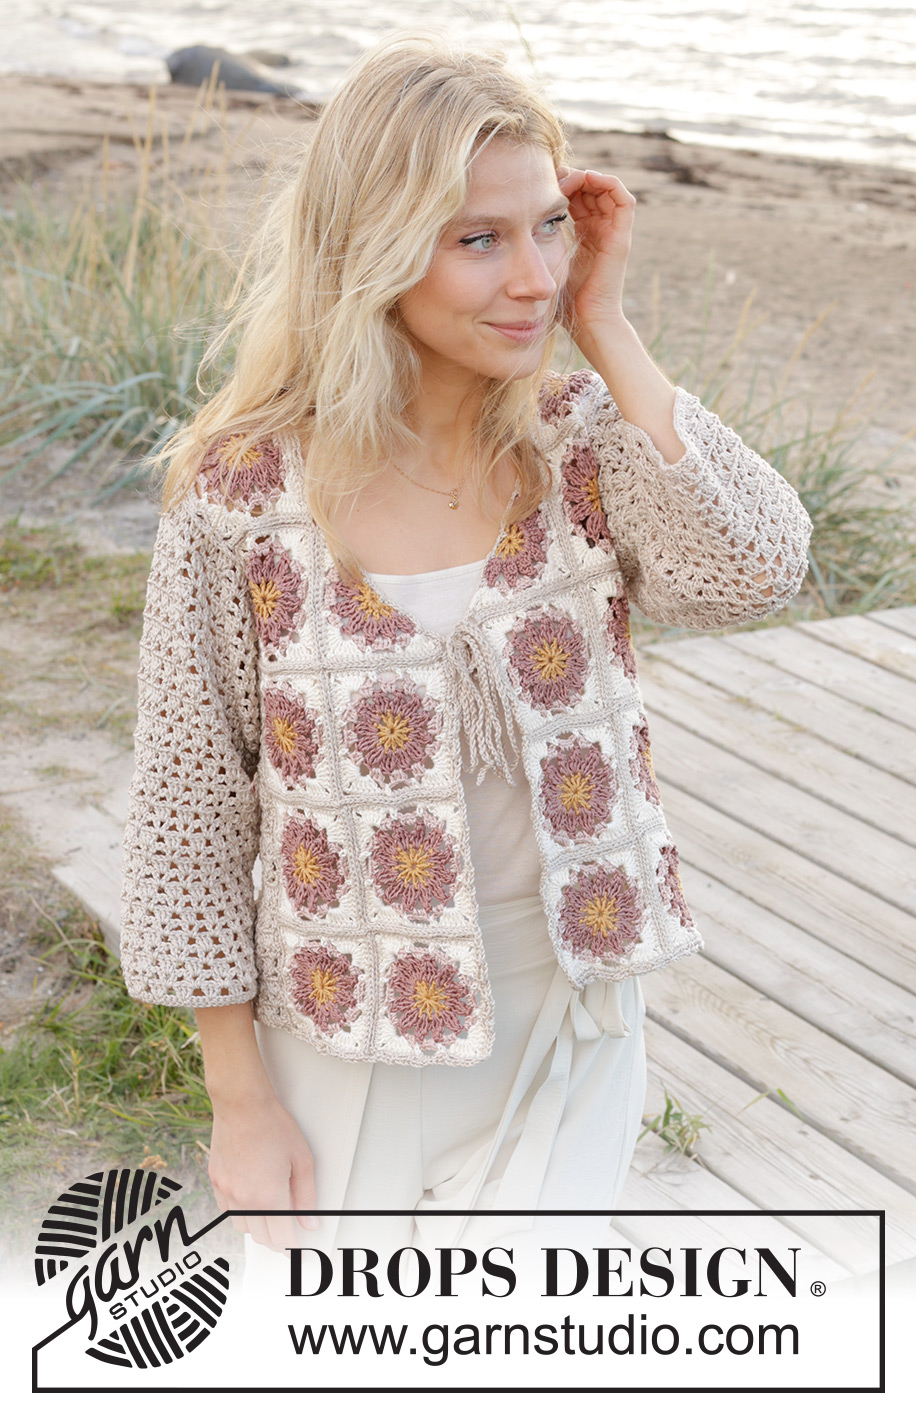
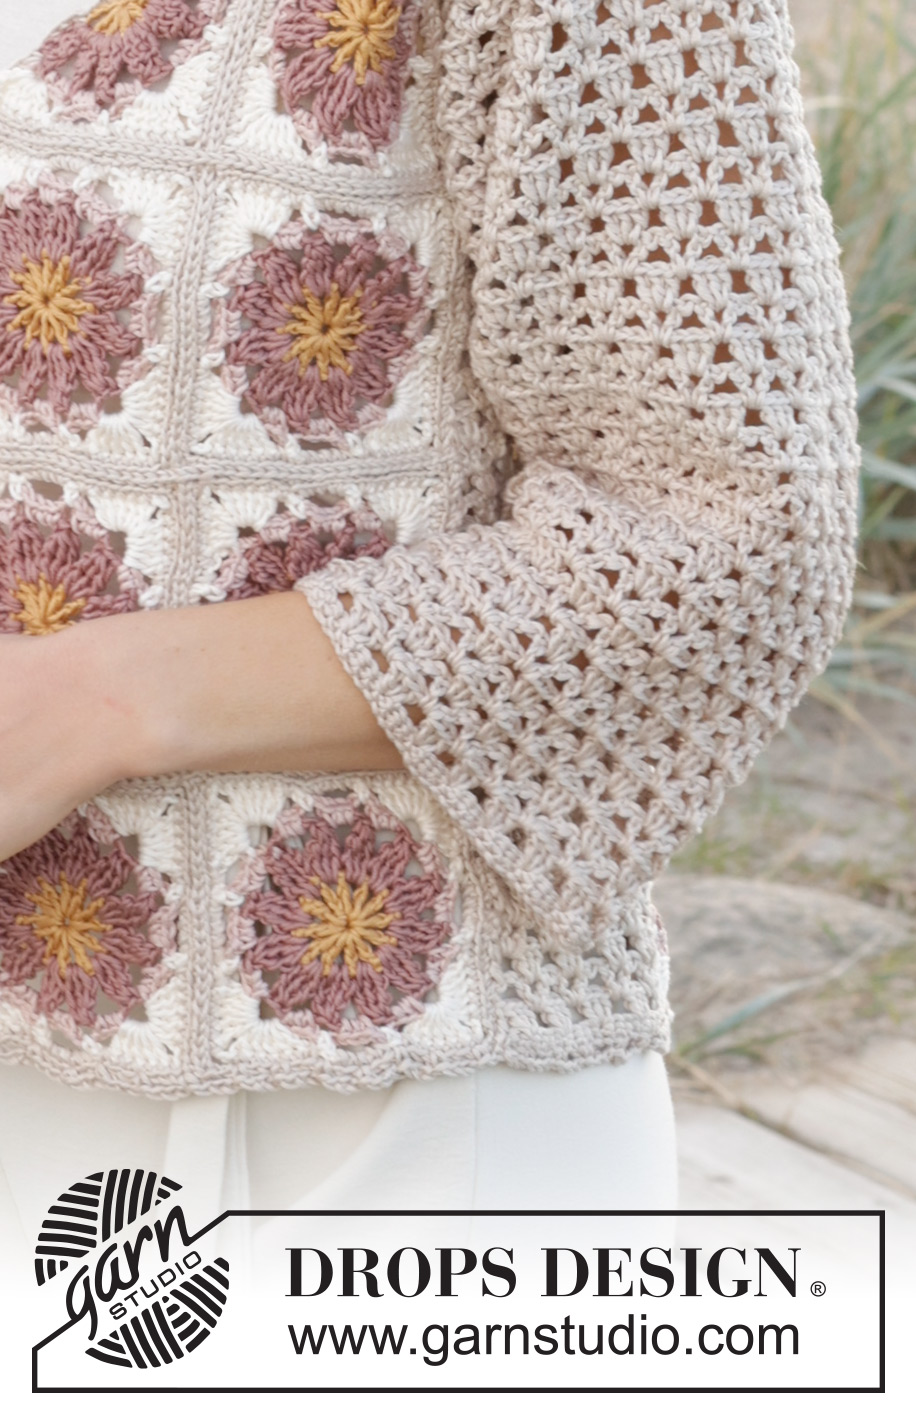
Crocheted jacket with ¾-length sleeves in DROPS Muskat. Sizes S - XXXL.
DROPS 239-17 |
|||||||||||||||||||||||||||||||||||||
|
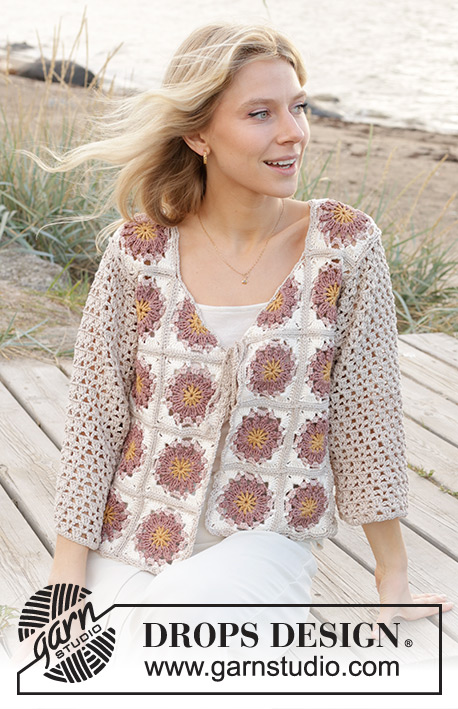
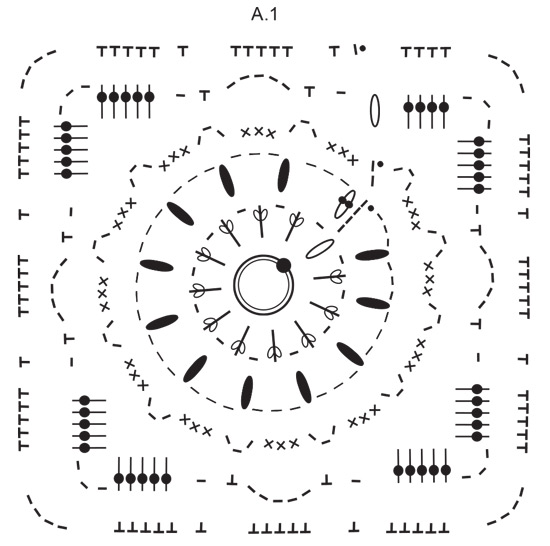
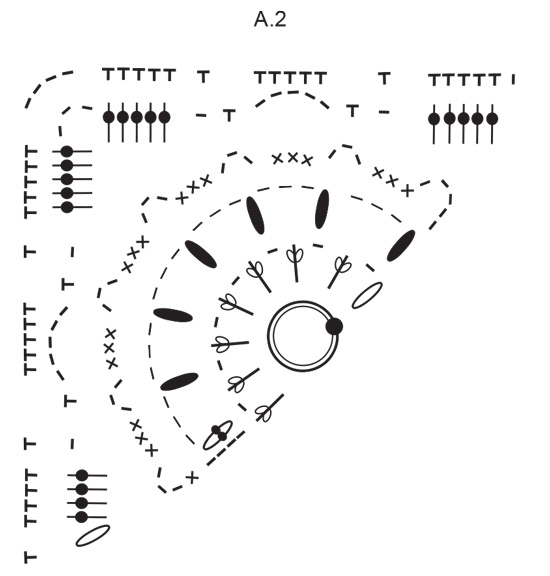
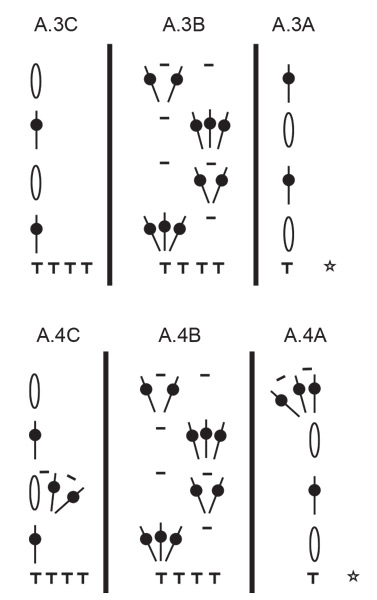
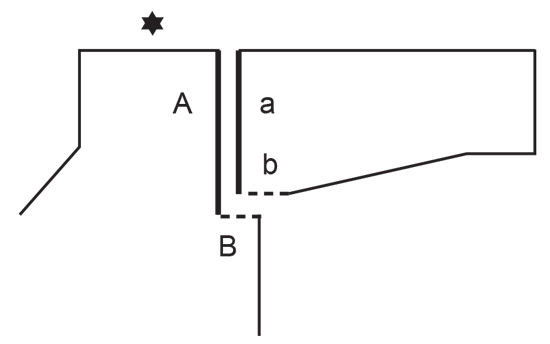
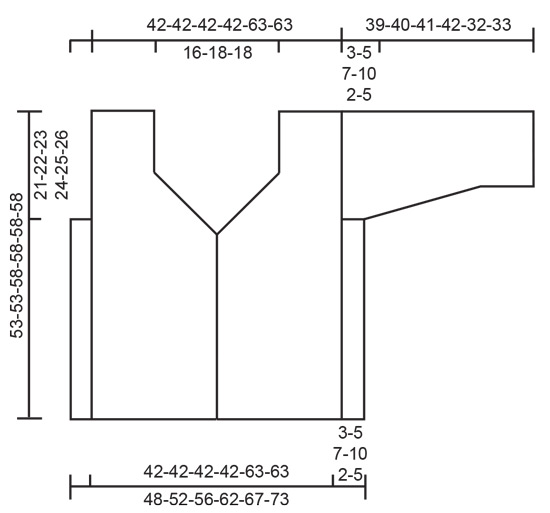
------------------------------------------------------- EXPLANATIONS FOR THE PATTERN: ------------------------------------------------------- CHAIN STITCH: If you work outermost on the hook the chain stitch will often be too tight; 1 chain stitch should be as long as 1 double/treble crochet is wide. CROCHET INFORMATION: Each row of treble crochets starts with 3 chain stitches, which replace the first treble crochet. The row ends with 1 treble crochet in the 3rd chain stitch from the beginning of previous row. COLOURS (for squares): CAST ON and ROUND 1: colour mustard ROUND 2: colour nutmeg ROUND 3: colour pink sand ROUND 4: colour off white ROUND 5: colour light taupe COLOUR-CHANGE TIP: For a neat transition when changing colours, work the last slip stitch on the round with the new colour as follows: Insert the hook in the first chain stitch at the beginning of the round, make 1 yarn over with the new colour and pull it through the loop on the hook. Fasten strands as you go. PATTERN: See diagrams A.1 to A.4. A.1 worked in the round. A.2 to A.4 are worked back and forth. ASSEMBLY OF SQUARES (front pieces): See diagram A.5 – choose diagram for your size. ------------------------------------------------------- START THE PIECE HERE: ------------------------------------------------------- JACKET – SHORT OVERVIEW OF THE PIECE: Squares are worked, then crocheted together for the front and back pieces. The sides and sleeves are worked in sections and the jacket assembled as described in the text. An edge around the jacket and two cords are worked to finish. WHOLE SQUARE: Read CHAIN STITCH, COLOURS and COLOUR-CHANGE TIP in explanations above. Work 4 chain stitches with hook size 3.5 mm and colour mustard DROPS Muskat. Form them into a ring with 1 slip stitch in the first chain stitch. Continue in the round with pattern A.1. REMEMBER THE CROCHET TENSION! When A.1 is finished, cut and fasten the strands. Work 36-36-38-38-60-60 whole squares. HALF SQUARE: Remember CHAIN STITCH, COLOURS and COLOUR-CHANGE TIP. Work 4 chain stitches with hook size 3.5 mm and colour mustard DROPS Muskat. Form them into a ring with 1 slip stitch in the first chain stitch. Continue in the round with pattern A.2. When A.2 is finished, cut and fasten the strands. Work 2 half squares in all sizes. WORKING SQUARES TOGETHER: Lay the squares for both front pieces as shown in diagram A.5 (choose diagram for your size), making sure the squares are right-side up. Work the squares on each front piece together, first length-wise then width-wise. Use colour light taupe to crochet together. Lay 2 squares edge to edge (there are 19 stitches along each side and 1 chain stitch from each corner-space) and work as follows: Start in one corner, * Insert the hook from the right side and down through the back loop on one square, insert the hook from the right side again and down through the back loop on the other square, pull the strand through both loops on the hook *, work from *-* until these 2 squares are worked together along the one side, work 1 chain stitch, work from *-* along the next 2 squares. Work like this until all squares in the length are worked together. When all the lengths are finished, work them together in width in the same way. NOTE: In sizes L, XL, XXL and XXXL, half the square at the top of the shoulder will belong to the front piece and half to the back piece. Work the squares on the back piece together in the same way, with 4-4-4-4-6-6 squares in width and 5-5-5-5-5 squares in height. Work the shoulders together – NOTE: In sizes S and M the squares are crocheted together on the top of the shoulder, in sizes L, XL, XXL and XXXL the squares are crocheted together on the back piece. SIDE SECTIONS: Work 14-22-30-42-10-22 chain stitches with hook size 3.5 mm and colour light taupe DROPS Muskat. Work 1 double crochet in the 2nd chain stitch from the hook, then 1 double crochet in each chain stitch = 13-21-29-41-9-21 stitches. Work the next row as follows from the right side: Work A.3A in the first stitch, A.3B 2-4-6-9-1-4 times, A.3C over the last 4 stitches = 11-19-27-39-7-19 stitches. Continue this pattern back and forth as shown in diagram until the piece measures 32-31-35-34-33-32 cm. Cut and fasten the strands. Work 1 more side section in the same way. SLEEVES: Work 62-66-70-74-78-82 chain stitches with hook size 3.5 mm and colour light taupe DROPS Muskat. Work 1 double crochet in the 2nd chain stitch from the hook, then 1 double crochet in each chain stitch = 61-65-69-73-77-81 stitches. Work the next row as follows from the right side: Work A.3A in the first stitch, A.3B 14-15-16-17-18-19 times, A.3C over the last 4 stitches = 59-63-67-71-75-79 stitches. Continue this pattern back and forth as shown in diagram until the piece measures 10 cm. Now increase 1 treble-crochet group both at the beginning and at the end of the row as shown in A.4. Repeat this increase when the piece measures 24-24-22-20-18-18 cm = = 75-79-83-87-91-95 stitches. When the piece measures 36-35-34-32-30-28 cm, insert 1 marker in each side. Work until the sleeve measures 39-40-41-42-32-33 cm. Cut and fasten the strands. Work 1 more sleeve in the same way. ASSEMBLY: Insert 1 marker 21-22-23-24-25-26 cm from the top of the shoulder, down both the front and back pieces on each side; mark the armholes. Sew the side sections to the front and back pieces. The cast-on edge on the side sections should be at the bottom. Start at the bottom and sew edge to edge as far as the markers. Sew the sleeve seams – start at the bottom and sew edge to edge as far as the markers. Sew the sleeve cap to the armhole – stretch the sleeve cap slightly as it is sewn so it fits the armhole. Sew the split at the top of the sleeve to the bottom of the armhole – see sketch. EDGE: Use colour light taupe, start on one side of one side section at the bottom of the jacket, work 1 double crochet in the first stitch, * 3 chain stitches, skip 1½ cm, 1 double crochet in the next stitch *, work from *-* along the bottom edge, up the front piece, around the neck, down the other front piece and along the bottom edge, finish with 3 chain stitches and 1 slip stitch in the first double crochet. Cut and fasten the strands. CORD-TIES: Use colour light taupe and work a chain-stitch row of 80-80-90-90-100-100 cm. Tie a knot in each end. Lay the cord double. Thread the loop through a chain-space at the bottom of the V-neck on one front piece, thread the ends through the loop and pull tight. Make a second cord in the same way and thread through the bottom of the V-neck on the other front piece. |
|||||||||||||||||||||||||||||||||||||
Diagram explanations |
|||||||||||||||||||||||||||||||||||||
|
|||||||||||||||||||||||||||||||||||||
 |
|||||||||||||||||||||||||||||||||||||
 |
|||||||||||||||||||||||||||||||||||||
 |
|||||||||||||||||||||||||||||||||||||
 |
|||||||||||||||||||||||||||||||||||||
 |
|||||||||||||||||||||||||||||||||||||
 |
|||||||||||||||||||||||||||||||||||||
Have you finished this pattern?Tag your pictures with #dropspattern #tournesolcardigan or submit them to the #dropsfan gallery. Do you need help with this pattern?You'll find 17 tutorial videos, a Comments/Questions area and more by visiting the pattern on garnstudio.com. © 1982-2026 DROPS Design A/S. We reserve all rights. This document, including all its sub-sections, has copyrights. Read more about what you can do with our patterns at the bottom of each pattern on our site. |
|||||||||||||||||||||||||||||||||||||


With over 40 years in knitting and crochet design, DROPS Design offers one of the most extensive collections of free patterns on the internet - translated to 17 languages. As of today we count 324 catalogues and 12291 patterns translated into English (UK/cm). 12291
We work hard to bring you the best knitting and crochet have to offer, inspiration and advice as well as great quality yarns at incredible prices! Would you like to use our patterns for other than personal use? You can read what you are allowed to do in the Copyright text at the bottom of all our patterns. Happy crafting!
Post a comment to pattern DROPS 239-17
We would love to hear what you have to say about this pattern!
If you want to leave a question, please make sure you select the correct category in the form below, to speed up the answering process. Required fields are marked *.