
Popular categories
Looking for a yarn?


Comments / Questions (50)
![]() Manoa wrote:
Manoa wrote:
Bonjour, Merci pour votre aide.Pour le rang 2 des côtes anglaises, si je fais la 1ère augmentation à 3 m. du 1er marqueur, je fais un jeté et glisse la maille du marqueur à l'envers. Si je tricote les 5 m. suivantes en m. anglaises comme avant, la 2ème augmentation n'est pas du tout centrée autour du marqueur : est-ce normal, svp ? Du coup, la 1ère augmentation du 2ème marqueur est presque juxtaposée à la 2ème augmentation du 1er marqueur... Est-ce normal, svp ?Merci bq,
26.09.2022 - 17:50DROPS Design answered:
Bonjour Manoa, tricotez jusqu'à ce qu'il reste 3 mailles avant la maille avec le marqueur, augmentez en tricotant 3 fois cette maille, tricotez les 2 mailles suivantes + celle avec le marqueur + les 2 mailles suivantes (= 5 mailles au total), et augmentez dans la maille suivante = vous avez ainsi augmenté de part et d'autre des 5 mailles du raglan. Bon tricot!
27.09.2022 - 09:36
![]() Manoa wrote:
Manoa wrote:
Bonjour, Je rencontre le même problème que Mme Pol pour les augmentations : comment les intégrer, puisque le bloc des 3 mailles créées rompt la sequence des mailles anglaises, svp ? Merci beaucoup !
17.09.2022 - 23:17DROPS Design answered:
Bonjour Manoa, les 3 mailles crées ne vont pas rompre le rythme des côtes anglaises mais vont être tricotées en côtes anglaises en suivant le rythme des côtes du devant, du dos ou des manches (pas celui des mailles du raglan qui doivent toujours être au nombre de 7 mailles car vous augmentez de part des 7 mailles du raglan. Bon tricot!
19.09.2022 - 09:57
![]() Paulette Pol wrote:
Paulette Pol wrote:
Tour 1 se termine par "1 jeté, glisser 1 maille à l'envers". Tour 2 commence par "1 jeté, glisser 1 maille à l'envers" . Gros doute sur les jetés. Comment les faire pour qu'ils tiennent et pour obtenir le clair résultat qu'on voit sur les vidéos ? Plusieurs essais m'ont conduite à des points jolis mais qui ne ressemblent aucunement à des côtes anglaises. Je tricote selon la méthode continentale. Merci de votre aide.
18.08.2022 - 18:55DROPS Design answered:
Bonjour Mme Pol, vous aurez effectivement 2 jetés côte à côté tous les 2 tours au changement de tour: lorsque vous terminez le tour par (1 jeté, glissez 1 m à l'env), repassez le fil par-dessus l'aiguille droite pour qu'il soit derrière (et qu'il enveloppe ainsi la maille glissée pour former le jeté) et tricotez ensuite la 1ère maille du tour suivant ensemble à l'endroit avec son jeté (le jeté de la dernière maille est bien par-dessus la maille glissée et vous avez tricoté la 1ère maille ensemble avec son jeté). Il faut souvent tricoter plusieurs tours pour avoir un meilleur aperçu des côtes anglaises. Bon tricot!
19.08.2022 - 08:43
![]() Paulette Pol wrote:
Paulette Pol wrote:
En panne sur les augmentations. J'ai vu et revu le tuto que j'ai trouvé sur votre site mais il y est spécifié que dans le bloc formé par les augmentations on devait ne pas traiter certaines mailles comme des côtes anglaises. Comme vous ne précisez rien de tel dans les explications, je doute et essaie l'une et l'autre méthode sans parvenir à un résultat correct. Merci de votre aide.
11.08.2022 - 01:31DROPS Design answered:
Bonjour Mme Pol, les augmentations doivent être tricotées en côtes anglaises, mais effectivement, vous ne pouvez pas tricoter (ensemble à l'endroit/à l'envers 1 maille et son jeté) si vous n'avez qu'un seul jeté, vous le tricoterez alors simplement soit à l'endroit, soit à l'envers. Bon tricot!
11.08.2022 - 10:40
![]() Marissa wrote:
Marissa wrote:
Is het mogelijk om de hals wat kleiner te maken zodat de hals wat strakker om de nek valt? Zoja, hoe zou ik dit dan kunnen doen? Ik wil de trui breien in maat 2 jaar.
25.06.2022 - 11:45DROPS Design answered:
Dag Marissa,
Je zou dan minder steken op kunnen zetten (wel deelbaar door 2 i.v.m. de boordsteek) en wanneer je 1 naald averecht breit vlak voor de pas, deze steken weer meerderen. Let er wel op dat je de steken losjes opzet en dus de halsrand elastisch houd, zodat het hoofd er door past.
26.06.2022 - 09:56
![]() Vanessa Timeus wrote:
Vanessa Timeus wrote:
Merci beaucoup ☺
24.01.2022 - 12:21
![]() Vanessa Timeus wrote:
Vanessa Timeus wrote:
Bonjour 👋 Je n'arrive pas à placer correctement mes marqueurs pour la séparation. Pourriez vous m'expliquer plus clairement car je me retrouve avec 4 mailles supplémentaire alors que mes 60 lisibles du début. Je tricote la petite version. Merci beaucoup ☺
23.01.2022 - 20:06DROPS Design answered:
Bonjour Mme Timeus, placez vos marqueurs ainsi: comptez 10 mailles, placez le 1er marqueur dans la maille suivante, comptez 7 mailles, placez le 2ème marqueur dans la maille suivante, comptez 21 mailles, placez le 3ème marqueur dans la maille suivante, comptez 7 mailles, placez le 4ème marqueur dans la maille suivante, il vous reste 11 mailles jusqu'à la fin du tour; soit: 10 m, 1 m avec marqueur, 7 m, 1 m avec marqueur, 21 m, 1 m avec marqueur, 7 m, 1 m avec marqueur, 11 m = 10+1+7+1+21+1+7+1+11=60 m. Bon tricot!
24.01.2022 - 10:03
![]() Gunilla Holmgren Schmieg wrote:
Gunilla Holmgren Schmieg wrote:
Hanne. Titta på svaret jag fick så löser det sig nog.
16.12.2021 - 14:46
![]() Hanne wrote:
Hanne wrote:
Okay, prøver lige med mit spørgsmål formuleret anderledes. Denne opskrift strikkes I helpatent. Hvordan slår man masker op til Raglan når det skal høresag helpatent. Og hvordan strikker man de nye masker med fra vrangpinden (3.Pind ) Jeg kan kun se video som forklarer på rundpind, IKKE video hvor det er patent.
13.12.2021 - 15:27
![]() Hanne Bach wrote:
Hanne Bach wrote:
Så fin sweater! Kunne I oploade en video af raglanudtagning ,patentstrik på rundpind? Jeg kan slet ikke finde ud af at slå ekstra masker op og strikke dem med i næste omgang….. Kan ikke få det til at passe med mærketråde og antal masker :(
10.12.2021 - 11:21DROPS Design answered:
Hej Hanne, begge videoer ligger nederst i opskriften :)
13.12.2021 - 15:11
|
|
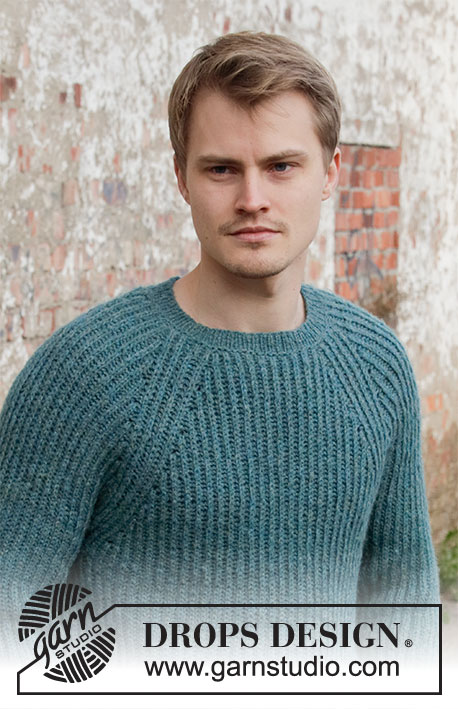
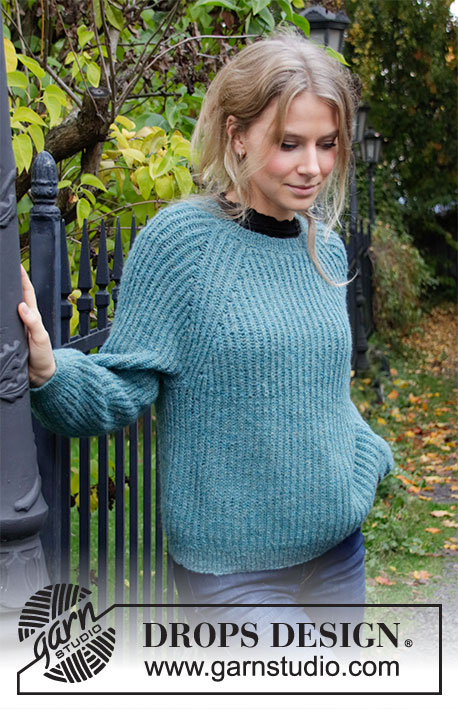
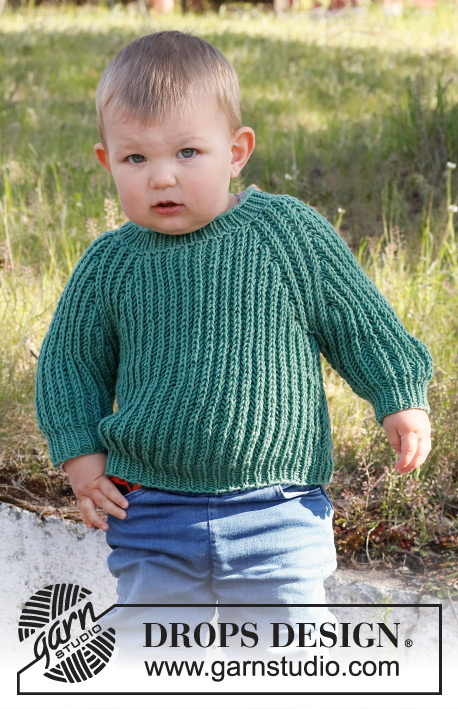
The Outdoors#theoutdoorssweater |
|
 |
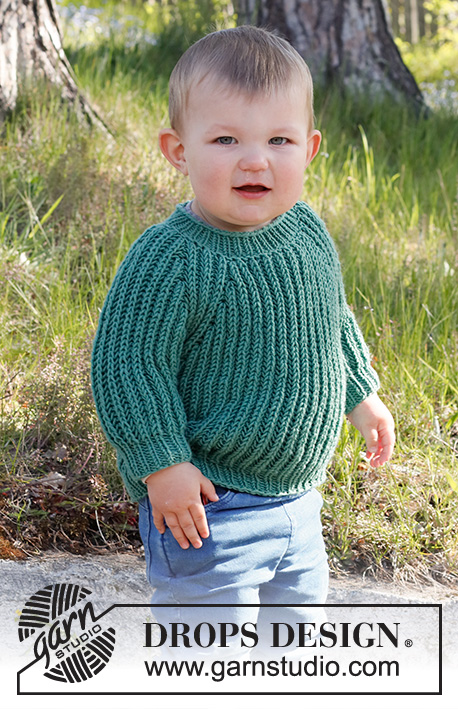 |
Knitted jumper for baby and kids with raglan in DROPS Merino Extra Fine. Piece is knitted top down with English rib. Size 12 month - 10 years
DROPS Baby & Children 38-7 |
|
|
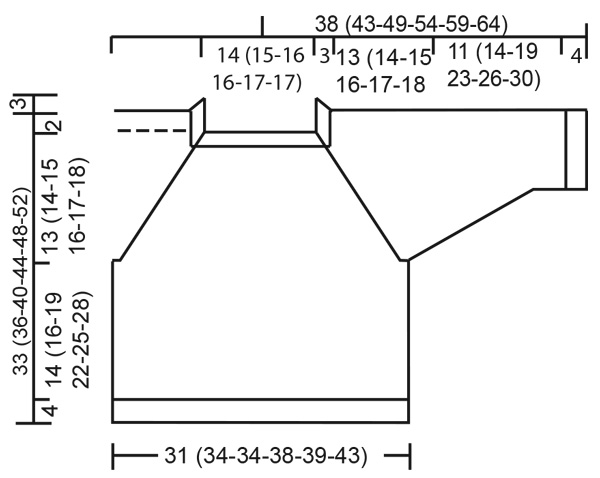
------------------------------------------------------- EXPLANATION FOR THE PATTERN: ------------------------------------------------------- DECREASE TIP-1 (evenly): To calculate how to decrease evenly, use the total number of stitches on row (e.g. 70 stitches) and divide stitches by number of decreases to be done (e.g. 10) = 7. In this example decrease by work every 6th and 7th stitch together. ENGLISH RIB: ROUND 1: * Knit 1, 1 yarn over, slip 1 stitch purlwise *, work from *-*. ROUND 2: * Make 1 yarn over, slip 1 stitch purlwise, purl together yarn over and slipped stitch *, work from *-*. ROUND 3: * Knit together yarn over and slipped stitch, 1 yarn over, slip 1 stitch purlwise *, work from *-*. Repeat rounds 2 to 3. ENGLISH RIB STITCH: When counting the stitches, the yarn overs are not counted as stitches. RAGLAN: All increases are done on 1 round where yarn over and stitch are purled together (i.e. 2nd round in English rib). INCREASE AS FOLLOWS: Work until 3 stitches remain before stitch with marker. Increase 2 stitches in next stitch (1 purl stitch + yarn over) as follows: Purl yarn over and stitch together but wait to slip stitch and yarn over off the needle, make 1 yarn over on right needle, purl stitch and yarn over together 1 more time = 3 stitches (= 2 stitches increased). Slip the stitch worked off the needle. Work the next 5 stitches in English rib as before. Increase 2 stitches in next stitch as explained above. Repeat at all markers (= 16 stitches increased in total on round). On next round work increased stitches in English rib - there are no English rib yarn overs in the 3 increased stitches, so on first round after increase knit knit stitch without yarn over. DECREASE TIP-2 (applies to sleeves): All decreases are done on 1 round where yarn over and stitch are knitted together (i.e. 3rd round in English rib). DECREASE 2 STITCHES BEFORE STITCH WITH MARKER AS FOLLOWS: Work until 3 stitches remain before purl stitch with marker, knit the next 3 stitches and associated yarn overs together (= 2 stitches decreased). DECREASE 2 STITCHES AFTER STITCH WITH MARKER (i.e. begin after purl stitch with marker): Slip first knit stitch and yarn over on to right needle as if to knit together, knit the next 2 stitches together (i.e. 1 purl + knit stitch and the yarn over), then pas the slipped stitch and yarn over, over the stitches worked together (= 2 stitches decreased). CAST-OFF TIP: To avoid a tight cast-off edge you may use a larger needle size. If this also is too tight, work a 1 yarn over after approx. every 4th stitch while casting off (cast off yarn overs as regular stitches). ------------------------------------------------------- START THE PIECE HERE: ------------------------------------------------------- JUMPER - SHORT OVERVIEW OF THE PIECE: Worked in the round on circular needle, top down. Work sleeves in the round on double pointed needles. NECK EDGE: Cast on 70 (74-76-76-80-80) stitches on a short circular needle size 3.5 mm with Merino Extra Fine. Knit 1 round, then work rib = knit 1/purl 1 for 3 cm. Knit 1 round while decreasing 10 (6-4-4-0-0) stitches evenly - read DECREASE TIP-1 = 60 (68-72-72-80-80) stitches. Purl 1 round. Insert a marker here (= beginning of round approx. mid back). NOW MEASURE PIECE FROM HERE! YOKE: Switch to circular needle size 4.5 mm. Then work ENGLISH RIB - read explanation above. When 1 round has been worked with English rib, insert 4 markers in piece without working (insert all markers in a knit stitch) - read ENGLISH RIB STITCH, as follows: Skip the first 10 (12-14-14-16-16) stitches, insert a marker in next stitch (= in transition between back piece and right sleeve), skip the next 7 stitches, insert a marker in next stitch (= in transition between right sleeve and front piece), skip the next 21 (25-27-27-31-31) stitches, insert a marker in next stitch (= in transition between front piece and left sleeve), skip the next 7 stitches, insert a marker in next stitch (= in transition between left sleeve and back piece), there are now 11 (13-13-13-15-15) stitches between last marker and beginning of round. REMEMBER THE KNITTING TENSION! There is now a marker in every transition between front/back and sleeves. Move the markers upwards when working, increase should be done on each side of every marker. Continue in the round with English rib, AT THE SAME TIME on next round (= 2nd round in English rib) begin increase for RAGLAN - read explanation above. Increase like this every 8th round 6 (6-6-7-7-8) times in total = 156 (164-168-184-192-208) stitches. When all increases are done, continue with English rib until piece measures 13 (14-15-16-17-18) cm from marker - finish after 2nd round in English rib. Now divide piece for body and sleeves as follows: Work the first 22 (24-24-28-28-32) stitches (= approx. half back piece), slip the next 33 (33-35-37-39-41) stitches on a stitch holder for sleeve and cast on 5 new stitches on needle (= in the side under sleeve), work the next 45 (49-49-55-57-63) stitches (= front piece), insert the next 33 (33-35-37-39-41) stitches on a stitch holder for sleeve and cast on 5 new stitches on needle (= in the side under sleeve), work the last 23 (25-25-27-29-31) stitches on round (= approx. half back piece). Finish body and sleeves separately. BODY: = 100 (108-108-120-124-136) stitches. Continue in the round with English rib. Work the new stitches cast on under sleeve without English rib yarn over on first round. Work until piece measures 14 (16-19-22-25-28) cm from division (approx. 4 cm remain before finished measurements, try the jumper on and work to desired length). Switch to circular needle size 3.5 mm. Work rib in the round (= knit 1/purl 1) - on first round work yarn overs together with stitches. When rib measures 4 cm, cast off with knit over knit and purl over purl stitch - read CAST-OFF TIP. Jumper measures approx. 33 (36-40-44-48-52) cm from shoulder and down. SLEEVES: Slip the 33 (33-35-37-39-41) stitches from stitch holder in one side of piece back on double pointed needles size 4.5 mm and pick in addition up 1 stitch in each of the 5 new stitches cast on in the side under sleeve = 38 (38-40-42-44-46) stitches. Continue in the round with English rib. On first round work stitches picked up under sleeve without English rib yarn overs. When sleeve measures 4 cm from division – adjust so that next round is 1 round where stitches are purled, insert a marker in the middle stitch under sleeve (= 1 stitch purl). On next round decrease 4 stitches under sleeve - read DECREASE TIP-2 = 34 (34-36-38-40-42) stitches. Repeat decrease when piece measures 7 (8-13-16-18-20) cm = 30 (30-32-34-36-38) stitches. When sleeve measures 11 (14-19-23-26-30) cm, switch to double pointed needles size 3.5 mm. Work rib (= knit 1/purl 1) for 4 cm. Cast off. Sleeve measures 15 (18-23-27-30-34) cm from division. Work the other sleeve the same way. |
|
 |
|
Have you finished this pattern?Tag your pictures with #dropspattern #theoutdoorssweater or submit them to the #dropsfan gallery. Do you need help with this pattern?You'll find 22 tutorial videos, a Comments/Questions area and more by visiting the pattern on garnstudio.com. © 1982-2026 DROPS Design A/S. We reserve all rights. This document, including all its sub-sections, has copyrights. Read more about what you can do with our patterns at the bottom of each pattern on our site. |
|


With over 40 years in knitting and crochet design, DROPS Design offers one of the most extensive collections of free patterns on the internet - translated to 17 languages. As of today we count 324 catalogues and 12290 patterns translated into English (UK/cm). 12290
We work hard to bring you the best knitting and crochet have to offer, inspiration and advice as well as great quality yarns at incredible prices! Would you like to use our patterns for other than personal use? You can read what you are allowed to do in the Copyright text at the bottom of all our patterns. Happy crafting!
Post a comment to pattern DROPS Baby & Children 38-7
We would love to hear what you have to say about this pattern!
If you want to leave a question, please make sure you select the correct category in the form below, to speed up the answering process. Required fields are marked *.