DROPS Merino Extra Fine
100% Wool
from 3.50 £ /50g
DROPS SS24

The Outdoors

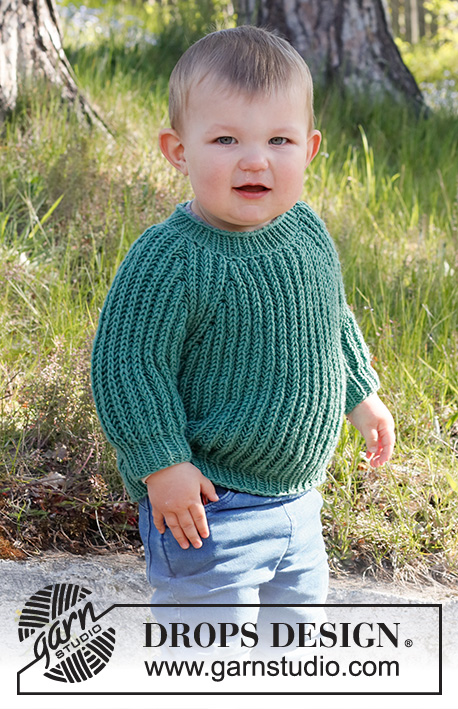
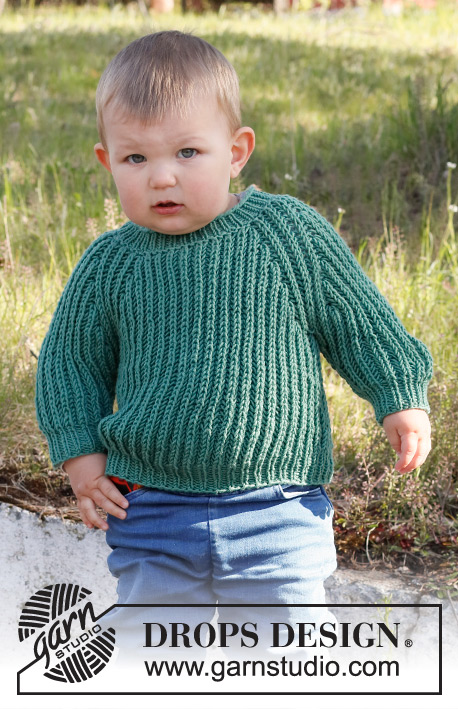
Knitted jumper for baby and kids with raglan in DROPS Merino Extra Fine. Piece is knitted top down with English rib. Size 12 month - 10 years

DROPS Baby & Children 38-7
DROPS design: Pattern me-075-bn
Yarn group B
----------------------------------------------------------

SIZE:
12/18 months (2 - 3/4 - 5/6 - 7/8 - 9/10) years
Size equals approx. kid’s height in cm:
80-86 (92 - 98/104 - 110/116 - 122/128 - 134/140)

MATERIALS:
DROPS MERINO EXTRA FINE from Garnstudio (belongs to yarn group B)
200 (250-250-300-300-350) g colour no 31, forest green

KNITTING TENSION:
16 stitches in width and 40 rows vertically with English rib = 10 x 10 cm.

NEEDLES:
DROPS DOUBLE POINTED NEEDLES SIZE 4.5 mm
DROPS CIRCULAR NEEDLE SIZE 4.5 mm : Length 40 and 60 or 80 cm for English rib.
DROPS DOUBLE POINTED NEEDLES SIZE 3.5 mm
DROPS CIRCULAR NEEDLE SIZE 3.5 mm : Length 40 and 60 or 80 cm for rib.
Needle size is only a suggestion! If you have too many stitches on 10 cm switch to a larger needle size. If you have too few stitches on 10 cm switch to a smaller needle size.

-------------------------------------------------------

Alternative Yarn – See how to change yarns here
Yarn Groups A to F – Use the same pattern and change the yarn here
Yarn usage using an alternative yarn – Use our yarn converter here

-------------------------------------------------------

DROPS Merino Extra Fine
100% Wool
from 3.50 £ /50g

Pattern instructions

NOTE: This pattern is written in British English. All measurements in charts are in cm. For conversion from cm to inches - click here. There are different terms for crocheting in British and American English. If this pattern includes crochet, click for "crochet terms" here. For this pattern in American English, please click here.
-------------------------------------------------------

EXPLANATION FOR THE PATTERN:

-------------------------------------------------------

DECREASE TIP-1 (evenly):
To calculate how to decrease evenly, use the total number of stitches on row (e.g. 70 stitches) and divide stitches by number of decreases to be done (e.g. 10) = 7. 
In this example decrease by work every 6th and 7th stitch together.

ENGLISH RIB:
ROUND 1: * Knit 1, 1 yarn over, slip 1 stitch purlwise *, work from *-*.
ROUND 2: * Make 1 yarn over, slip 1 stitch purlwise, purl together yarn over and slipped stitch *, work from *-*.
ROUND 3: * Knit together yarn over and slipped stitch, 1 yarn over, slip 1 stitch purlwise *, work from *-*.
Repeat rounds 2 to 3.

ENGLISH RIB STITCH:
When counting the stitches, the yarn overs are not counted as stitches.

RAGLAN:
All increases are done on 1 round where yarn over and stitch are purled together (i.e. 2nd round in English rib).
INCREASE AS FOLLOWS:
Work until 3 stitches remain before stitch with marker.
Increase 2 stitches in next stitch (1 purl stitch + yarn over) as follows:
Purl yarn over and stitch together but wait to slip stitch and yarn over off the needle, make 1 yarn over on right needle, purl stitch and yarn over together 1 more time = 3 stitches (= 2 stitches increased).
Slip the stitch worked off the needle.
Work the next 5 stitches in English rib as before.
Increase 2 stitches in next stitch as explained above.
Repeat at all markers (= 16 stitches increased in total on round).
On next round work increased stitches in English rib - there are no English rib yarn overs in the 3 increased stitches, so on first round after increase knit knit stitch without yarn over.

DECREASE TIP-2 (applies to sleeves):
All decreases are done on 1 round where yarn over and stitch are knitted together (i.e. 3rd round in English rib).
DECREASE 2 STITCHES BEFORE STITCH WITH MARKER AS FOLLOWS:
Work until 3 stitches remain before purl stitch with marker, knit the next 3 stitches and associated yarn overs together (= 2 stitches decreased).
DECREASE 2 STITCHES AFTER STITCH WITH MARKER (i.e. begin after purl stitch with marker):
Slip first knit stitch and yarn over on to right needle as if to knit together, knit the next 2 stitches together (i.e. 1 purl + knit stitch and the yarn over), then pas the slipped stitch and yarn over, over the stitches worked together (= 2 stitches decreased).

CAST-OFF TIP:
To avoid a tight cast-off edge you may use a larger needle size. If this also is too tight, work a 1 yarn over after approx. every 4th stitch while casting off (cast off yarn overs as regular stitches).

-------------------------------------------------------

START THE PIECE HERE:

-------------------------------------------------------

JUMPER - SHORT OVERVIEW OF THE PIECE:
Worked in the round on circular needle, top down. Work sleeves in the round on double pointed needles.

NECK EDGE:
Cast on 70 (74-76-76-80-80) stitches on a short circular needle size 3.5 mm with Merino Extra Fine. Knit 1 round, then work rib = knit 1/purl 1 for 3 cm. Knit 1 round while decreasing 10 (6-4-4-0-0) stitches evenly - read DECREASE TIP-1 = 60 (68-72-72-80-80) stitches.
Purl 1 round. Insert a marker here (= beginning of round approx. mid back). NOW MEASURE PIECE FROM HERE!

YOKE:
Switch to circular needle size 4.5 mm.
Then work ENGLISH RIB - read explanation above.
When 1 round has been worked with English rib, insert 4 markers in piece without working (insert all markers in a knit stitch) - read ENGLISH RIB STITCH, as follows:
Skip the first 10 (12-14-14-16-16) stitches, insert a marker in next stitch (= in transition between back piece and right sleeve), skip the next 7 stitches, insert a marker in next stitch (= in transition between right sleeve and front piece), skip the next 21 (25-27-27-31-31) stitches, insert a marker in next stitch (= in transition between front piece and left sleeve), skip the next 7 stitches, insert a marker in next stitch (= in transition between left sleeve and back piece), there are now 11 (13-13-13-15-15) stitches between last marker and beginning of round.
REMEMBER THE KNITTING TENSION!
There is now a marker in every transition between front/back and sleeves.
Move the markers upwards when working, increase should be done on each side of every marker.
Continue in the round with English rib, AT THE SAME TIME on next round (= 2nd round in English rib) begin increase for RAGLAN - read explanation above.
Increase like this every 8th round 6 (6-6-7-7-8) times in total = 156 (164-168-184-192-208) stitches.
When all increases are done, continue with English rib until piece measures 13 (14-15-16-17-18) cm from marker - finish after 2nd round in English rib.
Now divide piece for body and sleeves as follows:
Work the first 22 (24-24-28-28-32) stitches (= approx. half back piece), slip the next 33 (33-35-37-39-41) stitches on a stitch holder for sleeve and cast on 5 new stitches on needle (= in the side under sleeve), work the next 45 (49-49-55-57-63) stitches (= front piece), insert the next 33 (33-35-37-39-41) stitches on a stitch holder for sleeve and cast on 5 new stitches on needle (= in the side under sleeve), work the last 23 (25-25-27-29-31) stitches on round (= approx. half back piece).
Finish body and sleeves separately.

BODY:
= 100 (108-108-120-124-136) stitches. Continue in the round with English rib. Work the new stitches cast on under sleeve without English rib yarn over on first round. Work until piece measures 14 (16-19-22-25-28) cm from division (approx. 4 cm remain before finished measurements, try the jumper on and work to desired length).
Switch to circular needle size 3.5 mm. Work rib in the round (= knit 1/purl 1) - on first round work yarn overs together with stitches.
When rib measures 4 cm, cast off with knit over knit and purl over purl stitch - read CAST-OFF TIP.
Jumper measures approx. 33 (36-40-44-48-52) cm from shoulder and down.

SLEEVES:
Slip the 33 (33-35-37-39-41) stitches from stitch holder in one side of piece back on double pointed needles size 4.5 mm and pick in addition up 1 stitch in each of the 5 new stitches cast on in the side under sleeve = 38 (38-40-42-44-46) stitches.
Continue in the round with English rib. On first round work stitches picked up under sleeve without English rib yarn overs.
When sleeve measures 4 cm from division – adjust so that next round is 1 round where stitches are purled, insert a marker in the middle stitch under sleeve (= 1 stitch purl). On next round decrease 4 stitches under sleeve - read DECREASE TIP-2 = 34 (34-36-38-40-42) stitches.
Repeat decrease when piece measures 7 (8-13-16-18-20) cm = 30 (30-32-34-36-38) stitches.
When sleeve measures 11 (14-19-23-26-30) cm, switch to double pointed needles size 3.5 mm.
Work rib (= knit 1/purl 1) for 4 cm.
Cast off.
Sleeve measures 15 (18-23-27-30-34) cm from division.
Work the other sleeve the same way.

Diagram

diagram measurements

Each of our patterns has specific tutorial videos to help you.

Do you have a question? See a list of frequently asked questions (FAQ)

Knitting tension is what determines the final measurements of your work, and is usually measured per 10 x 10 cm. It is provided like so: number of stitches in width x number of rows in height - eg: 19 stitches x 26 rows = 10 x 10 cm.

The knitting tension is very individual; some people knit/crochet loosely while others work tightly. You adjust the knitting tension with the needle size, which is why the suggested needle size is only meant as a guide! You need to adjust this (up or down) to ensure that YOUR knitting tension matches the knitting tension provided in the pattern. If you work with a different knitting tension than provided you will have a different yarn consumption, and your work will have different measurements than what the pattern suggests.

The knitting tension also determines which yarns can replace each other. As long as you achieve the same knitting tension you can replace one yarn with another.

See DROPS lesson: How to measure your tension/gauge

See DROPS video: How to make a gauge tension swatch

The required amount of yarn is provided in grams, eg: 450 g. To calculate how many balls you’ll need you first need to know how many grams are in 1 ball (25g, 50g or 100g). This information is available if you click on the individual yarn quality on our pages. Divide the amount required with the amount of each ball. For example, if each ball is 50g (the most common amount), the calculation will be as follows: 450 / 50 = 9 balls.

The important thing when changing from one yarn to another is that the knitting/crochet tension remains the same. This is so that the measurements of the finished piece will be the same as on the sketch provided. It is easier to achieve the same knitting tension using yarns from the same yarn group. It is also possible to work with multiple strands of a thinner yarn to achieve the knitting tension of a thicker one. Please try our yarn converter. We recommend you to always work a test swatch.

Please NOTE: when changing yarn the garment might have a different look and feel to the garment in the photo, due to individual properties and qualities of each yarn.

See DROPS lesson: Can I use a different yarn than the one mentioned in the pattern?

All our yarns are categorised into yarn groups (from A to F) according to thickness and knitting tension – group A contains the thinnest yarns and group F the thickest. This makes it easier for you to find alternative yarns to our patterns, should you wish to switch yarn. All yarns within the same group have a similar knitting tension and can easily replace each other. However, different yarn qualities have different structures and properties which will give the finished work a unique look and feel.

Click here for an overview of the yarns in each yarn group

At the top of all our patterns you’ll find a link to our yarn calculator, which is a helpful tool should you wish to use a different yarn than suggested. By filling in the yarn quality you wish to replace, the amount (in your size) and number of strands, the calculator will present good alternative yarns with the same knitting tension. Additionally it will tell you how much you’ll require in the new qualities and whether you’ll need to work with multiple strands. Most skeins are 50g (some are 25g or 100g).

If the pattern is worked with multiple colours, every colour will have to be calculated separately. Similarly, if the pattern is worked with several strands of different yarns (for example 1 strand Alpaca and 1 strand Kid-Silk) you will have to find alternatives for each, individually.

Click here to see our yarn calculator

Since different yarns have different qualities and textures we have chosen to keep the original yarn in our patterns. However, you can easily find options among our available qualities by using our yarn calculator, or simply pick a yarn from the same yarn group.

It is possible that some retailers still have discontinued yarns in stock, or that someone has a few skeins at home that they would like to find patterns for.

The yarn calculator will provide both alternative yarn as well as required amount in the new quality.

If you think it's hard to decide what size to make, it can be a good idea to measure a garment you own already and like the size of. Then you can pick the size by comparing those measures with the ones available in the pattern's size chart.

You'll find the size chart at the bottom of the pattern.

See DROPS lesson: How to read size chart

The needle size provided in the pattern serves only as a guide, the important thing is to follow the knitting tension. And since knitting tension is very individual, you will have to adjust the needle size to ensure that YOUR tension is the same as in the pattern – maybe you’ll have to adjust 1, or even 2 needle sizes, up or down to achieve the correct tension. For this, we recommend that you work test swatches.

Should you work with a different knitting tension than the one provided, the measurements of the finished garment might deviate from the measurement sketch.

See DROPS lesson: How to measure your tension/gauge

See DROPS video: How to make a tension/gauge swatch

Working a garment top-down provides more flexibility and room for personal adjustment. For example it is easier to try the garment on while working, as well as making adjustments to length of yoke and shoulder caps.

The instructions are carefully explaining every step, in the correct order. Diagrams are adjusted to the knitting direction and are worked as usual.

The diagram depicts all rows/rounds, and every stitch seen from the right side. It is read from bottom to top, from right to left. 1 square = 1 stitch.

When working back and forth, every other row is worked from the right side and every other row is worked from the wrong side. When working from the wrong side, the diagram will have to be worked reversed: from left to right, knit stitches are purled, purl stitches are knit etc.

When working in the round every round is worked from the right side and the diagram are worked from right to left on all rounds.

See DROPS lesson: How to read knitting diagrams

The diagram depicts all rows/rounds, and every stitch seen from the right side. It is worked from bottom to top, from right to left.

When working back and forth every other row is worked from the right side: from right to left and every other row is worked from the wrong side: from left to right.

When working in the round, every row in the diagram are worked from the right side, from right to left.

When working a circular diagram you start in the middle and work your way outwards, counter clockwise, row by row.

The rows usually start with a given number of chain stitches (equivalent to the height of the following stitch), this will either be depicted in the diagram or explained in the pattern.

See DROPS lesson: How to read crochet diagrams

Instructions for working several diagrams after each other on the same row/round, will often be written like so: “work A.1, A.2, A.3 a total of 0-0-2-3-4 times". This means you work A.1 once, then A.2 is worked once, and A.3 is repeated (in width) the number of times provided for your size – in this case like so: S = 0 times, M = 0 times, L=2 times, XL= 3 times and XXL = 4 times.

The diagrams are worked as usual: begin with the first row in A.1, then work the first row in A.2 etc.

See DROPS lesson: How to read knitting diagrams

See DROPS lesson: How to read crochet diagrams

The total width of the garment (from wrist-to-wrist) will be larger in the larger sizes, despite the actual sleeves being shorter. The larger sizes have longer sleeve caps and wider shoulders, so there will be a good fit in all sizes.

The measurement sketch/schematic drawing provides information regarding the full length of the garment. If it’s a jumper or a jacket the length is measured from the highest point on the shoulder closest to the neckline, and straight down to the bottom of the garment. It is NOT measured from the tip of shoulder. Similarly, the length of yoke is measured from the highest point on the shoulder and down to where yoke is split into body and sleeves.

On a jacket measures are never taken along bands, unless specifically stated. Always measure inside band stitches when measuring the length.

See DROPS lesson: How to read a schematic drawing

Diagrams are often repeated on the round or in height. 1 repeat is the diagram the way it appears in the pattern. If it says to work 5 repeats of A.1 in the round, then you work A.1 a total of 5 times after/next to each other in the round. If it says to work 2 repeats of A.1 vertically/in height you work the entire diagram once, then begin again at the start and work the entire diagram one more time.

Chain stitches are slightly narrower than other stitches and to avoid working the cast-on edge too tight, we simply chain more stitches to begin with. The stitch count will be adjusted on the following row to fit the pattern and measurement sketch.

The rib edge is more elastic and will contract slightly compared to, for example, stocking stitch. By increasing before the rib edge, you avoid a visible difference in width between the rib edge and the rest of the body.

It’s very easy to cast off too tightly, and by making yarn overs while casting off (and simultaneously casting these off) you avoid a too tight cast off edge.

See DROPS video: How to bind off with yarn overs (yo)

To achieve an even increase (or decrease) you can increase on, for example: every 3rd and 4th row alternately, like so: work 2 rows and increase on the 3rd row, work 3 rows and increase on the 4th. Repeat this until the increase is complete.

See DROPS lesson: Increase or decrease 1 st on every 3rd and 4th row alternately

Should you prefer to work in the round instead of back and forth, you may of course adjust the pattern. You’ll need to add steeks mid-front (usually 5 stitches), and follow the instructions. When you would normally turn and work from the wrong side, simply work across the steek and continue in the round. At the end you’ll cut the piece open, pick up stitches to work bands, and cover the cut edges.

See DROPS video: How to knit steeks and cut open

Should you prefer to work back and forth instead of in the round, you may of course adjust the pattern so you work the pieces separately and then assemble them at the end. Divide the stitches for the body in 2, add 1 edge stitch in each side (for sewing) and work the front and back pieces separately.

See DROPS lesson: Can I adapt a pattern for circular needles into straight needles?

Pattern repeats can vary slightly in the different sizes, in order to get the correct proportions. If you’re not working the exact same size as the garment in the photo, yours might deviate slightly. This has been carefully developed and adjusted so that the complete impression of the garment is the same in all sizes.

Make sure to follow instructions and diagrams for your size!

If you have found a pattern you like which is available in women’s size it’s not very difficult to convert it to men’s size. The biggest difference will be the length of sleeves and body. Start working on the women size that you think would fit across the chest. The additional length will be worked right before you cast off for the armhole/sleeve cap. If the pattern is worked top-down you can add the length right after the armhole or before the first decrease on sleeve.

Regarding additional yarn amount, this will depend on how much length you add, but it is better with a skein too many than too few.

All yarns will have excess fibres (from production) that might come off as lint or shedding. Brushed yarns (ie hairier yarns) have more of these loose, excess fibres, causing more shedding.

Shedding also depends on what is worn under or over the garment, and whether this pulls at the yarn fibres. It’s therefore not possible to guarantee that there will be no shedding

Below are some tips on how to get the best result when working with hairier yarns:

1. When the garment is finished (before you wash it) shake it vigorously so the looser hairs come off. NOTE: do NOT use a lint roller, brush or any method that pulls at the yarn.

2. Place the garment in a plastic bag and put it in your freezer - the temperature will cause the fibres to become less attached to each other, and excess fibres will come off easier.

3. Leave in the freezer for a few hours before taking it out and shaking it again.

4. Wash the garment according to the instructions on the yarn label.

Pilling is a natural process that happens to even the most exclusive of fibers. It's a natural sign of wear and tear that is hard to avoid, and that is most visible in high friction areas of your garment like a sweater's arms and cuffs.

You can make your garment look as new by removing the pilling, using a fabric comb or a pill/lint remover.

Still can't find the answer you need? Then scroll down and leave your question so one of our experts can try to help you. This will be done normally within 5 to 10 working days.
In the meantime, you can read the questions and answers that others have left to this pattern or join the DROPS Workshop on Facebook to get help from fellow knitters/crocheters!

You might also like...

The Outdoors

Elke, Netherlands

The Outdoors

Mayke, Netherlands

Post a comment to pattern DROPS Baby & Children 38-7

We would love to hear what you have to say about this pattern!

If you want to leave a question, please make sure you select the correct category in the form below, to speed up the answering process. Required fields are marked *.

Comments / Questions (33)

country flag Cornelia wrote:

Na de eerste naald heb ik de steken verdeeld in 14-7-27-7-13 als ik verder Lees dan staat er 5 steken in engelse patentsteek moet breien in plaats 7 als ik dat doe klopt het patroon niet .groetjes Cornelia.

10.04.2024 - 12:50

country flag Cecilia wrote:

Varför ligger detta mönster under garngrupp c då man filtrerar?

17.01.2024 - 17:46

DROPS Design answered:

Hei Cecilia. Kommer an på hvordan du filtrerer. Når man strikker med Merino Extra Fine er vanligvis strikkefastheten 21 masker x 28 pinner = 10 x 10 cm, men i helpatent har denne genseren 16 masker i bredden, noe som garngruppe C har. mvh DROPS Design

18.01.2024 - 10:20

country flag Elke wrote:

Bij maat 3/4 en 7/8 zou de middelste steek onder de mouw volgens mij een rechte moeten zijn, geen averechte.

16.11.2023 - 16:39

country flag Dumont Denise wrote:

Merci pour tous vos modèles qui me donnent beaucoup de plaisir à tricoter. Pour ce modèle avec côtes anglaises, je ne comprends pas pourquoi la vidéo explicative ne correspond pas à vos explications écrites. 2° tour tricoter ensemble à l’envers ou à l’endroit la maille glissée et le jeté....ça ne ressemble a rien sur mon tricot si je suis vos écrits. OK quand je suis là vidéo. Que faire? Merci

19.09.2023 - 13:36

DROPS Design answered:

Bonjour Mme Dumont et merci. Dans cette vidéo, nous montrons comment tricoter ce type de côtes anglaises, ce devrait être ainsi plus facile pour vous de visualiser comment on procède. Bon tricot!

19.09.2023 - 15:58

country flag Bettina wrote:

Wie kann ich die Raglanzunahmen im Vollpatent einarbeiten? In der Anleitung steht: ... 2 Maschen in der nächsten Masche (1 Linksmasche + Umschlag) wie folgt zunehmen: Den Umschlag und die Masche links zusammenstricken, jedoch beides noch nicht von der Nadel gleiten lassen, 1 Umschlag arbeiten und die Masche + Umschlag nochmals links zusammenstricken und von der linken Nadel gleiten lassen = 3 Maschen (= 2 Maschen zugenommen). Leider finde ich hierzu kein Video und verstehe es nicht.

07.09.2023 - 18:25

DROPS Design answered:

Liebe Bettina, in diesem Video zeigen wir (für ein anderes Modell) wie diese Zunahme (ca 1:04) gearbeitet wird und wie diese Zunahmen (ca 4:14) bei der nächsten Runde gestrickt werden. Viel Spaß beim stricken!

08.09.2023 - 08:02

country flag Agneta Hofstedt Blom wrote:

Har fastnat på första ökningen raglan på mönster 38-7.stickar tills det är 3 m.kvar innan markör, jag har inte räknat med omslaget då ,men när jag gör ökningen bror det en maska över innan nästa markör stämmer det ?

25.05.2023 - 17:18

DROPS Design answered:

Hei Agneta Det økes i 2. omgang i patentmønstret), strikker du slik: Strikk til det gjenstår 3 masker før masken med merke i. Så øker du i neste maske som er en vrangmaske med kast. Øk slik: Strikk kastet og masken vrang sammen, men vent med å løfte masken og kastet det strikkes i av pinnen, lag 1 kast om høyre pinne, strikk masken og kastet vrang sammen 1 gang til = 3 masker (= 2 masker økt). Slipp masken det ble strikket i av pinnen. På neste omgang strikkes de økte maskene inn i patentmønsteret – det er ingen patentkast i de 3 økte maskene, så på første omgang etter økningen strikkes rettmasken rett uten kast. mvh DROPS Design

30.05.2023 - 13:11

country flag Edith Salminen wrote:

Kan man göra denna tröja fast men garnet drops belle?

10.01.2023 - 10:16

DROPS Design answered:

Hej Edith, ja det kan du, prøv garn-konverteraren, vælg DROPS Merino, antal g i din størrelse og 1 tråd, så får du Belle op som alternativ sammen med hvor mange g du skal købe :)

10.01.2023 - 11:48

country flag Michielsen Conny wrote:

Is er een video met uitleg over het meerderen voor Rahman in averechts patentsteek. Ik begrijp de uitleg niet zo goed. Merci

01.11.2022 - 08:56

DROPS Design answered:

Dag Conny,

In deze video kun je zien hoe er gemeerderd wordt in Engelse patentsteek. Hoewel er bij deze video recht (samen) gebreid wordt heb je wellicht toch iets aan de video. Het verplaatsen van de markeernaald is op jouw patroon niet van toepassing.

02.11.2022 - 14:44

country flag Michielsen Conny wrote:

Is er een video met uitleg over het meerderen voor Rahman in averechts patentsteek. Ik begrijp de uitleg niet zo goed. Merci

01.11.2022 - 08:27

country flag Ola wrote:

Witam, kiedy rozpocząć okrążenie zaczynając rękawy? Jeśli robię to za 5 dodanymi oczkami to zamykanie oczek wypada na przełomie dwóch okrążeń (przed markerem wypada na "prawym" okrążeniu, ale już po wypada na "lewym" okrążeniu). Wg instrukcji oba powinny być zamknięte na prawej stronie. Natomiast, jeśli zaczynam okrążenie przed dodanymi oczkami to nie wychodzi mi wtedy prawidłowy ścieg (2 oczka z narzutem wypadają obok siebie). Dziękuję za odpowiedź!

23.10.2022 - 19:27

DROPS Design answered:

Witaj Olu, przerabiając rękaw okrążenie zaczynamy na środku 5 oczek pod rękawem. Pozdrawiamy!

25.10.2022 - 08:33