
Popular categories
Looking for a yarn?


Comments / Questions (83)
![]() Lisa wrote:
Lisa wrote:
Stämmer det att det ska vara 2 st på ena sidan och 3 st på andra sidan på de två sista varven (i luftmaskan högst upp) gällande på bröstkupan (stl S)? Då blir det inte helt symmetriskt.
11.07.2020 - 11:44DROPS Design answered:
Hei Lisa. Ja, det stemmer. Men du kan fint hekle 3 staver i hver side om du ønsker det eller når du hekler cup nr. 2 hekler du 2 staver - 1 luftmaske - 3 staver. Slik blir begge cupene like. Bare husk at når cupene hekles sammen at delene med 2 staver vender inn mot brystet og de 3 stavene vender mot ermene. God Fornøyelse!
13.07.2020 - 11:42
![]() Irena wrote:
Irena wrote:
Salve! Ho un cotone da lavorare con uncinetto 2.5 , per fare il modello R-379 devo aumentare il n. delle maglie? Di quanto?
06.05.2020 - 01:08DROPS Design answered:
Buongiorno Irena, per un aiuto così personalizzato può rivolgersi al suo rivenditore DROPS di fiducia. Buon lavoro!
06.05.2020 - 08:42
![]() Louise wrote:
Louise wrote:
Hej drops Jeg er lidt i tvivl om hvad er menes med "den øverste luftmaske" ? hvordan finder jeg ud af hvad et er for en?
02.04.2020 - 12:18DROPS Design answered:
Hei Louise. Den øverste luftmasken, menes med den første luftmasken det ble heklet (den blir den første øverste luftmasken i toppen ). I denne luftmasken skal det hekles 2 staver, 1 luftmaske, 2 staver. God Fornøyelse!
17.04.2020 - 10:15
![]() Syl wrote:
Syl wrote:
Is het verstandig om de losse van de ketting, langs de cups en weer een een ketting, met een iets grotere maat haaknaald te haken? Het word nl nogal strak en als ik de toer vaste heb gekaakt en verder ga met de kanten onderrand.
11.08.2019 - 12:17DROPS Design answered:
Dag Syl,
Dat is een goed idee, vaak wordt er namelijk automatisch meer op het uiteinde van de haaknaald gehaakt bij het haken van lossen, waardoor de lossen te klein worden. Dus je kunt een grotere haaknaald nemen.
11.08.2019 - 15:33
![]() Verónica wrote:
Verónica wrote:
Hola Cuando ponéis "p.e" os referís a ¿punto enano o punto elástico? Gracias
21.07.2019 - 22:41DROPS Design answered:
Hola Verónica. p.e. = punto enano.
21.07.2019 - 23:22
![]() Lydia wrote:
Lydia wrote:
Is het ook mogelijk om de cups in maat L te maken en de rest in een maat M of klopt het patroon dan niet meer?
09.03.2019 - 22:37DROPS Design answered:
Dag Lydia,
Dat zou je inderdaad kunnen doen. Je haakt dan eerst de cups en als je de cups samenhaakt om daarna de onderkant te haken, zorg je dat je het totaal aantal lossen en halve vasten hebt van maat M.
13.03.2019 - 08:46
![]() Alessandra wrote:
Alessandra wrote:
Grazie per la risposta velocissima al mio dubbio! Persone davvero serie!😃👍🏼 Grazie davvero e Buon Lavoro!
20.02.2019 - 09:58
![]() Alessandra wrote:
Alessandra wrote:
Non c'è il diagramma 1, quello per il Top? Qui ho visto solo quello per la gonna... Grazie!
19.02.2019 - 18:25DROPS Design answered:
Buongiorno Alessandra. Trova le spiegazioni per il top nel testo. Alla fine lavora il diagramma 1 che è lo stesso del bordo della gonna. Buon lavoro!
19.02.2019 - 18:58
![]() Kelly wrote:
Kelly wrote:
On the blossoms what does a long line mean . I see a small one is a ch.
25.07.2018 - 06:51DROPS Design answered:
Dear Kelly, correct, the long line means a chain, it's just longer in the diagram due to the other symbols, but this is a very standard one chain. Happy crocheting!
25.07.2018 - 08:22Claire Chalcraft wrote:
Hi I love this pattern but need some help figuring out rows 5 and 6 (especially 6). It all goes smoothly until the slip stitch in row 5... when and where does the slip stitch occur? Are the adjacent 5 ch in row 5 or 6? And finally, in row 4 are the longer stitches DC or TR ? Thanks for your help. Claire PS I am using US terminology
11.06.2018 - 22:45DROPS Design answered:
Dear Mrs Chalcraft, do not take care of the length of the sts/symbols, they are just due to the diagram. On row 5 you will crochet the sl st to close the 5 ch between the 2 dtr in the middle of repeat. On row 6 work 1turning chain, 1 sc in the dc, and work around ch-space: 2 dtr, 5 ch, 1 sc, 5 ch, 1 dtr, 5 ch, 1 sc, 5 ch, 1 dtr, 5 ch, 1 sc, 5 ch, 1 dtr, 5 ch, 1 sc, 5 ch, 2 dtr = 5 leaves. Happy crocheting!
12.06.2018 - 08:18
|
||||||||||||||||||||||
Summer Festival |
||||||||||||||||||||||
 |
 |
|||||||||||||||||||||
Crochet top and bottom edge on skirt in DROPS Den-M-nit or Cotton Light
DROPS 69-3 |
||||||||||||||||||||||
|
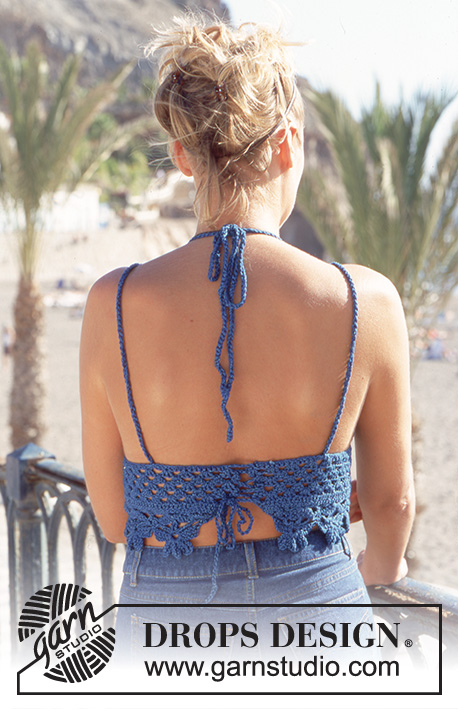
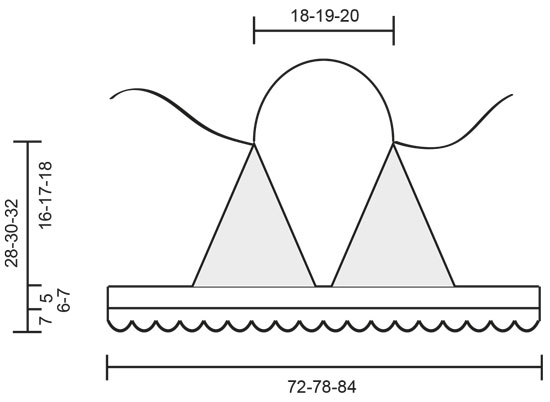
Crochet gauge: 18 dc x 10 rows = 10 x 10 cm [4" x 4"]. 1 repeat of Diag. 1 (1 blossom) measures 6.5 cm [2.5"] in width. Pattern: See diagram for the blossom pattern. «1 rapport» = «1 repeat»; «13 luftm» = «ch 13"; «rad» = «row». Bodice (make 2): Ch 9-11-13. Crochet dc up along one side of chain (first st replaces 2 ch sts) = 7-9-11 dc. In the last ch work 2 dc, ch 1, 2 dc, the continue with dc down the other side of chain. Turn the work, crochet back and forth on each side of center chain - 1 dc in each dc from the previous row and in the ch from previous row at the top, work 2 dc, ch 1 and 2 dc every row. Crochet 6-7-8 rows back and forth. Crochet the next 2 rows as follows: ch 2 + 2 dc in the first dc from previous row, * ch 1, skip over 2 dc, 3 dc in the next dc *, repeat from * - * up to the top, in ch from previous row at the top work 3 dc, ch 1, 2 dc. Repeat from * - * down other side. Top: Place the 2 bodice halves together. Ch 37-39-41 loosely, then sl 35-39-43 along lower edge of one bodice half, ch 1 between halves and sl 35-39-43 along lower edge of the other bodice half, finish with ch 37-39-41. Work 1 row sc in each ch and sl st = 145-157-169 sc. Crochet the next 5-6-7 rows as follows: 3 dc in first sc, * ch 1, skip over 3 sc, 3 dc in the next sc *, repeat from * - * across row (= 36-39-42 times). Then follow Diagr. 1 - start on the 2nd row = 145-157-169 sc. There will be 11-12-13 blossoms on lower edge – each blossom is made on 13 sc of the previous row, therefore on the next row you will need to dec 2-1-0 sts by skipping over 1 sc. Note: on sizes S and L there will be 1 blossom at center front; on size M the space between 2 blossoms will be at center front. Assembly: Sew the 2 bodice halves together at center front for approx. 5 cm [2"]. Make 3 ch-st cords approx. 100 cm [39⅜"] long with 2 strands Den-M-nit. 2 of the cords are used as straps. Sew 1 cord to each side of back, then thread cord through top of bodice halves on front. Tie cords at back of neck. The 3rd cord is used to tie the back together. Start at top and thread cords alternately thought right and left sides of back, cross-crossing cords. CROCHETED BORDER ON SKIRT: The bottom border of the top, (blossoms) can be crocheted to desired length and sewn around bottom edge of skirt or pant leg. Materials: DROPS DEN-M-NIT (disc.) (alternative MUSKAT rom Garnstudio) 50 g of yarn will make approx. 12 flowers. Crocheted border: Measure around bottom edge of skirt and calculate how many blossoms you need - 1 blossom measures approx. 6.5 cm [2.5"] in width. Ch 13 per blossom to start and crochet according to Diagr.1. |
||||||||||||||||||||||
Diagram explanations |
||||||||||||||||||||||
|
||||||||||||||||||||||
 |
||||||||||||||||||||||
 |
||||||||||||||||||||||
Have you finished this pattern?Tag your pictures with #dropspattern or submit them to the #dropsfan gallery. Do you need help with this pattern?You'll find 7 tutorial videos, a Comments/Questions area and more by visiting the pattern on garnstudio.com. © 1982-2026 DROPS Design A/S. We reserve all rights. This document, including all its sub-sections, has copyrights. Read more about what you can do with our patterns at the bottom of each pattern on our site. |
||||||||||||||||||||||


With over 40 years in knitting and crochet design, DROPS Design offers one of the most extensive collections of free patterns on the internet - translated to 17 languages. As of today we count 324 catalogs and 12290 patterns - 12280 of which are translated into English (US/in).
We work hard to bring you the best knitting and crochet have to offer, inspiration and advice as well as great quality yarns at incredible prices! Would you like to use our patterns for other than personal use? You can read what you are allowed to do in the Copyright text at the bottom of all our patterns. Happy crafting!
Post a comment to pattern DROPS 69-3
We would love to hear what you have to say about this pattern!
If you want to leave a question, please make sure you select the correct category in the form below, to speed up the answering process. Required fields are marked *.