
Popular categories
Looking for a yarn?


Comments / Questions (135)
![]() Tammy wrote:
Tammy wrote:
Is there a simplified version or a video?
09.01.2016 - 15:44DROPS Design answered:
Dear Tammy, pattern is only written, follow row after row instructions as stated - you will find some videos showing the general techniques - and remember you will get help, tips & advices from your DROPS Store. Happy crocheting!
11.01.2016 - 09:44
![]() Tammy wrote:
Tammy wrote:
This is very pretty and I would love to make one for each of my grand daughters however the pattern is very confusing (I've been crocheting for over 30 years) is there a simplified version or a video?
09.01.2016 - 15:41
![]() Eddie Marsh wrote:
Eddie Marsh wrote:
It appears that all the "tc" stitch references in this pattern have changed to "dc" since I downloaded this pattern a couple of weeks ago. I've finished the main garment body in triple crochet, and wondering now if it all should have been done in double crochet, instead. (This might explain why I've have had problems getting stitches and measurements to match up.)
11.12.2015 - 15:50Eddie Marsh answered:
Nevermind. I see now I got tangled up in the English/American terminology difference. Thanks!
11.12.2015 - 15:57
![]() Nina Kufner wrote:
Nina Kufner wrote:
Hallo liebes DROPS-Team, erst einmal ein großes Dankeschön für die vielen Anleitungen! Ich häkeln die Jacke für meine Tochter (Größe 9/10 Jahre), da sie unbedingt noch eine Jacke für ihre Kommunion braucht😊! Ich habe den Rumpfteil fertig komme aber nicht weiter, weil ich nicht weiß wo ich mit dem linken Vorderteil anfangen soll! Danke für eure Antwort!
28.10.2015 - 11:52DROPS Design answered:
Sie müssen oben vom Nacken ausgehend zählen, d.h. Sie häkeln nicht über die 39 M oben im Nacken/oberer Halsrand. Sie setzen die beiden Vorderteile so an, dass dazwischen 39 Stb frei sind und die Armausschnitte symmetrisch liegen.
19.11.2015 - 21:34
![]() Marie Josee Lauwerys wrote:
Marie Josee Lauwerys wrote:
Ik weet niet hoe ik het voorste moet doen ,eerst meerderen en dan minderen ?of allebei te samen?En over hoeveel steken moet ik haken? Ik haak nu het grootste patroon.Wat betreft de mouwen daar vind ik de uitleg ook moeilijk Heb het pakket online gekocht en kan dus aan de verkoper geen uitleg vragen Bedankt
16.10.2015 - 12:10DROPS Design answered:
Beste Marie Josee. Bovenaan het patroon staan informatie over strepen, minderen enzovoort. Daaronder begint het patroon zelf (onder LIJF). Volg het patroon zoals beschreven en heb je dan nog vragen, geef dan door wat precies het probleem is, dan zal ik proberen verder te helpen.
05.11.2015 - 10:28
![]() Marlene Hvorvarp Bøjer wrote:
Marlene Hvorvarp Bøjer wrote:
Hej, Jeg er begyndt på denne skønne cardigan, men er simpelthen så meget i tvivl om hvorledes jeg skal starte på forstykket mht INDTAGNINGSTIPS-1. Er det rigtig forstået at der IKKE skal indtages fra starten af, altså i de 3 første st? Det skal der jo nu i de resterende rækker? Hvis de ikke skal indtages i første række, så bliver de to forstykker jo ikke ens, idet jeg i venstre side starter foroven ved nakkestykket og i højre side starter nederst på ryggen!!
07.10.2015 - 12:57DROPS Design answered:
Hej Marlene, Jo det stemmer, du tager ind sidst på hver række ifølge INDTAGNINGSTIPS-1, så det bliver indtagninger i hver side, men ja du starter i hver sin side på de to forstykker. God fornøjelse!
09.10.2015 - 13:55Ruchika Bakshi wrote:
Hi. I have made the body part of this design size 3 andI'm Stuck now . I can't understand the front part at all. It's written60-68-74-83 tr. Insert 1 marker after 18-20-22-24 sts ..... I can't understand this whole part Please explain this more simply .. Thank you
12.08.2015 - 20:57DROPS Design answered:
Dear Mrs Bakshi, this part is now for all sizes, ie first number is for 1st size (= 60 tr, 18 sts), 2nd for 2nd size (= 74 tr, 20 sts) and so on. Happy crocheting!
13.08.2015 - 09:33
![]() Jessica wrote:
Jessica wrote:
I do not understand the sleeves. If row 1 is the top of the sleeve and it has 26 sts, how can it be sew into an armhole that is 54 sts around?
02.07.2015 - 21:47DROPS Design answered:
Dear Jessica, you start with 26 sts on 1st row in 3rd size, then inc 4 sts on row 2 (= 30 sts), 2 sts on row 3 + 4 + 5 = 36 sts, then 6 more sts on row 6 = 40 sts and continue in dc, this shape the sleeve cap that should fit the armhole. Happy crocheting!
03.07.2015 - 09:36
![]() Monika Holmström wrote:
Monika Holmström wrote:
Förstår inte mönstret där jag sa virka på framstycket! Jag har 226 maskor och ska virka 74 på var sida och inte vid kragen och inte nertill. Sen står det att det ska vara 30 maskor mellan markörerna men det är 39 över uppe och nere när dom 74 är borträknade. Förstår inte heller det med 22 maskor in. Kan någon förklara?
01.06.2015 - 22:18DROPS Design answered:
jo men det stämmer med 39 st enligt beskrivningen: "dvs att det inte längre virkas över de 39 st överst vid nacken och de 39 st nederst på ryggen. Fortsätt med förkl under framst." Lycka till!
04.06.2015 - 11:46
![]() Shiravila wrote:
Shiravila wrote:
So I have to increase before the marker and in the marker in row 1?? How many inc i have to make in row 1
13.04.2015 - 23:35DROPS Design answered:
Dear Shiravila, on 1st row increase 1 st before each marker (2 sts inc), on 2nd row, increase 1 st after each marker (2 sts inc) repeat these 2 rows decreasing at the same time at beg and end of row until a total of 6-8 rows (see size) have been worked. Happy crocheting!
14.04.2015 - 10:11
|
|
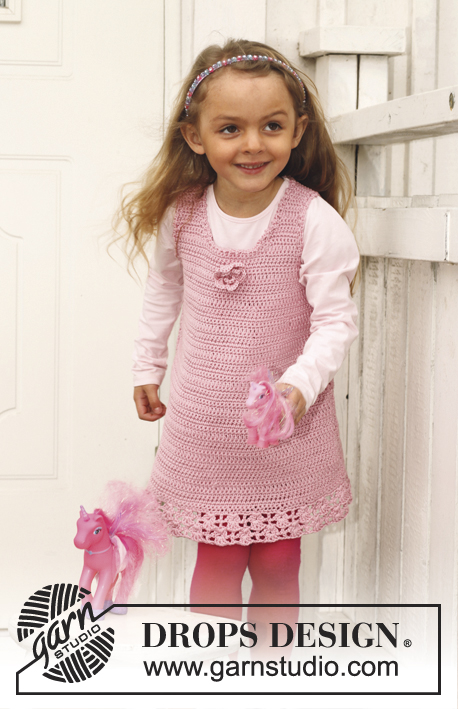
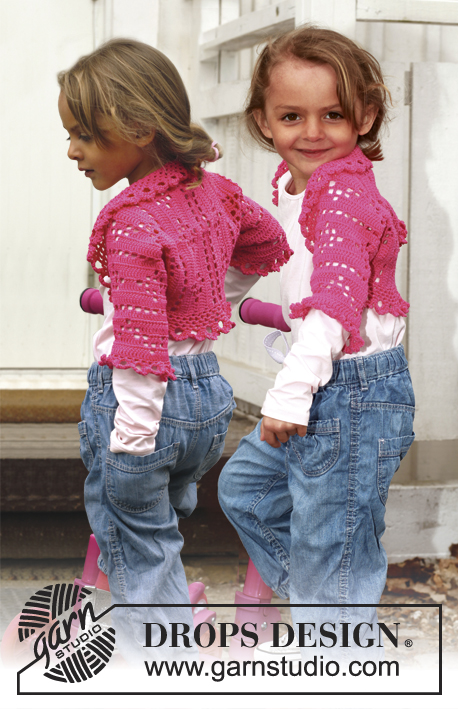
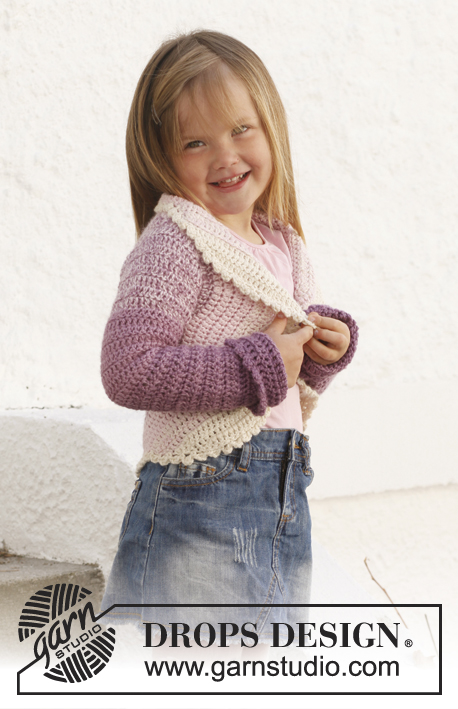
Princess Petal#princesspetalcardigan |
|
 |
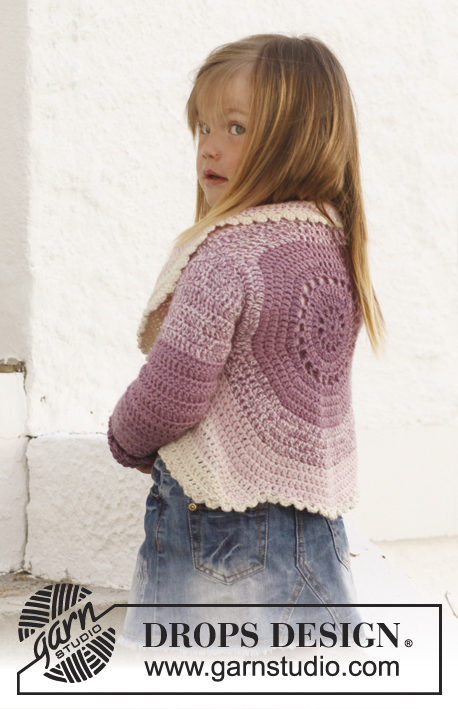 |
Circle jacket crocheted in 2 strands DROPS BabyAlpaca Silk. Size children 3 - 12 years.
DROPS Children 24-1 |
|
|
STRIPES - BODY: Worked in a circle from mid back. Beg with 2 strands of color 4088. Continue as follows: 3-3-4-4 rounds with 2 strands of color 4088. 3-3-4-4 rounds with 1 strand of color 4088 + 1 strand of color 3250. 3-4-4-4 rounds with 2 strands of color 3250. 4-4-4-5 rounds with 1 strand of color 3250 + 1 strand of color 3125. 4-4-4-5 rounds with 2 strands of color 3125. 3-4-4-4 rounds/rows with 1 strand of color 3125 + 1 strand of color 0100. 3-3-5-5 rows with 2 strands of color 0100. STRIPES - SLEEVE: Worked from sleeve cap and down in stripes as follows: Beg with 1 strand of color 3250 + 1 strand of color 3125. Work 9-10-11-12 cm / 3½"-4"-4½"-4 3/4" with this color combination. Continue with 9-10-11-12 cm / 3½"-4"-4½"-4 3/4" with 2 strands of color 3250 and then 10-10-11-12 cm / 4"-4"-4½"-4 3/4" with 1 strand of color 4088 + 1 strand of color 3250. Then finish the sleeve with 2 strands of color 4088 = approx. 10-11-12-12 cm / 4"-4½"-4 3/4"-4 3/4". CROCHET INFO: Replace first dc on every round/row with 3 ch. Finish every round with 1 sl st in 3rd ch from beg of round. DECREASE TIP 1 (applies to body): Dec as follows: Work dc until 3 dc remain, * in the first of these work 1 hdc, in the next 1 sc and in the last 1 sl st, turn with ch 1, skip sl st, work 1 sl st in sc, 1 sc in hdc, 1 hdc in first dc, continue with dc until 3 dc remain at the end of row *, repeat from *-* until 6-7-7-7 rows have been worked in total. DECREASE TIP 2 (applies to sleeves): Dec 1 dc at beg and end of row by working the second and third dc tog and the 2 next to last dc tog, this is done as follows: Work 1 dc in first dc but wait with last pull through, work 1 dc in next dc but on last pull through, pull yarn through all 3 loops on hook. -------------------------------------------------------- BODY: Worked in the round in a circle from mid back with 2 strands and STRIPES – see explanation above. Ch 5 on hook size 5 mm / H/8 and form a ring with 1 sl st in first ch. READ CROCHET INFO! ROUND 1: 12 dc in ch-ring. ROUND 2: 1 dc, * ch 2, 1 dc in next dc *, repeat from *-* the entire round, finish with 2 ch and 1 sl st in 1st dc = 12 dc with 2 ch between each. ROUND 3: 1 dc in every dc and 2 dc in every ch-space the entire round = 36 dc. ROUND 4: * 1 dc in each of the first 2 dc, 2 dc in next dc *, repeat from *-* the entire round = 48 dc. ROUND 5: 1 dc, * ch 2, skip 1 dc, 1 dc in next dc *, repeat from *-* the entire round, finish with 2 ch and 1 sl st in 1st dc = 24 dc with 2 ch between each. ROUND 6: 1 dc in every dc and 2 dc in every ch-space the entire round = 72 dc. ROUND 7: Work 1 dc in every dc but in every 6th dc work 2 dc = 84 dc. ROUND 8: Work 1 dc in every dc but in every 7th dc work 2 dc = 96 dc. ROUND 9: Work 1 dc in every dc but in every 8th dc work 2 dc = 108 dc. ROUND 10: Work 1 dc in every dc but in every 9th dc work 2 dc = 120 dc. ROUND 11: Work 1 dc in every dc but in every 10th dc work 2 dc = 132 dc. Piece measures approx. 14 cm / 5½'' from the middle to edge. SIZE 3/5 YEARS: ROUND 12: Work 1 dc in each of the first 30 dc (= up towards neck), ch 22 loosely, skip the next 20 dc (= armhole), then work 1 dc in each of the next 62 dc (= down towards back), ch 22 loosely, skip the next 20 dc (= armhole) and fasten with 1 sl st in first dc at beg of round. ROUND 13: Work 1 dc in each of the first 30 dc but inc 2 dc evenly (= 32 dc), then work 22 dc in ch-row over armhole, work 1 dc in each of the next 62 dc but inc 2 dc evenly (= 64 dc), work 22 dc in ch-row over armhole, and fasten with 1 sl st in first dc at beg of round = 140 dc. ROUND 14 to 17: Continue with dc – at the same time inc 10 dc evenly on every round. After 17th round there are 180 dc on round and piece measures approx. 21 cm / 8 1/4'' from the middle to edge. Fasten off. Then work only over 60 dc in each side - i.e. the 30 dc at the top by neck and the 30 dc at the bottom of back are no longer worked. Continue with explanation below front piece. SIZE 6/8 YEARS: ROUND 12: Work 1 dc in every dc but in every 11th dc work 2 dc = 144 dc. ROUND 13: Work 1 dc in each of the first 35 dc (= up towards neck), ch 23 loosely, skip the next 21 dc (= armhole), then work 1 dc in each of the next 67 dc (= down towards back), ch 23 loosely, skip the next 21 dc (= armhole) and fasten with 1 sl st in first dc at beg of round. ROUND 14: Work 1 dc in each of the first 35 dc but inc 3 dc evenly (= 38 dc), then work 23 dc in ch-row over armhole, work 1 dc in each of the next 67 dc but inc 3 dc evenly (= 70 dc), work 23 dc in ch-row over armhole, and fasten with 1 sl st in first dc at beg of round = 154 dc. ROUND 15 to 19: Continue with dc – at the same time inc 10 dc evenly on every round. After 19th round there are 204 dc on round and piece measures approx. 23 cm / 9'' from the middle to edge. Fasten off. Then work only over 68 dc in each side - i.e. the 34 dc at the top by neck and the 34 dc at the bottom of back are no longer worked. Continue with explanation below front piece. SIZE 9/10 YEARS: ROUND 12: Work 1 dc in every dc but in every 11th dc work 2 dc = 144 dc. ROUND 13: Work 1 dc in every dc but in every 12th dc work 2 dc = 156 dc. ROUND 14: Work 1 dc in each of the first 38 dc (= up towards neck), ch 25 loosely, skip the next 23 dc (= armhole), then work 1 dc in each of the next 72 dc (= down towards back), ch 25 loosely, skip the next 23 dc (= armhole) and fasten with 1 sl st in first dc at beg of round. ROUND 15: Work 1 dc in each of the first 38 dc but inc 3 dc evenly (= 41 dc), then work 25 dc in ch-row over armhole, work 1 dc in each of the next 72 dc but inc 3 dc evenly (= 75 dc), work 25 dc in ch-row over armhole, and fasten with 1 sl st in first dc at beg of round = 166 dc. ROUND 16 to 21: Continue with dc – at the same time inc 10 dc evenly on every round. After 21st round there are 226 dc on round and piece measures approx. 26 cm / 10 1/4'' from the middle to edge. Fasten off. Then work only over 74 dc in each side - i.e. the 39 dc at the top by neck and the 39 dc at the bottom of back are no longer worked. Continue with explanation below front piece. SIZE 11/12 YEARS: ROUND 12: Work 1 dc in every dc but in every 11th dc work 2 dc = 144 dc. ROUND 13: Work 1 dc in every dc but in every 12th dc work 2 dc = 156 dc. ROUND 14: Work 1 dc in every dc but in every 13th dc work 2 dc = 168 dc. ROUND 15: Work 1 dc in each of the first 42 dc (= up towards neck), ch 27 loosely, skip the next 25 dc (= armhole), then work 1 dc in each of the next 76 dc (= down towards back), ch 27 loosely, skip the next 25 dc (= armhole) and fasten with 1 sl st in first dc at beg of round. ROUND 16: Work 1 dc in each of the first 42 dc but inc 4 dc evenly (= 46 dc), then work 27 dc in ch-row over armhole, work 1 dc in each of the next 76 dc but inc 4 dc evenly (= 80 dc), work 27 dc in ch-row over armhole, and fasten with 1 sl st in first dc at beg of round = 180 dc. ROUND 17 to 23: Continue with dc – at the same time inc 10 dc evenly on every round. After 23rd round there are 250 dc on round and piece measures approx. 28 cm / 11'' from the middle to edge. Fasten off. Then work only over 83 dc in each side - i.e. the 42 dc at the top by neck and the 42 dc at the bottom of back are no longer worked. Continue with explanation below front piece. LEFT FRONT PIECE - ALL SIZES: = 60-68-74-83 dc. Insert 1 marker after 18-20-22-24 sts in from each side (= 24-28-30-35 sts between markers). Then work stripes and dc back and forth while AT THE SAME TIME inc 1 st at each marker on every row (i.e. inc 2 dc on row - inc alternately before and after each marker outwards) until a total of 6-6-8-8 rows have been worked back and forth and AT THE SAME TIME work according to DECREASE TIP 1 Fasten off. RIGHT FRONT PIECE: Work same way as on left front piece over 60-68-74-83 dc in right side. SLEEVE: Worked back and forth from sleeve cap and down - see STRIPES - SLEEVE above. Ch 24-27-28-34 LOOSELY with 1 strand of color 3250 + 1 strand of color 3125. ROW 1: Turn and work 1 dc in 4th ch from hook (the first 3 ch = 1 dc), then work 1 dc in every ch the entire row = 22-25-26-32 dc. Turn piece. ROW 2: ch 3 + 2 dc in first dc, 1 dc in every dc until last dc and 3 dc in last dc = 26-29-30-36 dc. Turn piece. ROW 3: ch 3 + 1 dc in first dc, 1 dc in every dc until 1 dc remains and 2 dc in last dc. Turn piece. Work 1-1-2-2 more rows as 3rd row = 30-33-36-42 dc. NEXT ROW: ch 3 + 2 dc in first dc, 1 dc in every dc until last dc and 3 dc in last dc = 34-37-40-46 dc. Turn piece. Now work 1 dc in every dc until piece measures 7-8-9-10 cm / 2 3/4"-3"-3½"-4". Continue with dc while AT THE SAME TIME dec 1 dc in each side - SEE DECREASE TIP! Repeat dec every 8th-6th-5th-4th row 2-3-4-6 more times = 28-29-30-32 dc. Continue with 1 dc in every dc until sleeve measures 38-41-45-48 cm / 15"-16"-17 3/4"-19". Fasten off. ASSEMBLY: Sew sleeve seams edge to edge to avoid a chunky seam. Work 1 round around the entire body as follows with 2 strands of color 0100: 1 sl st in first st, * ch 3, 1 dc in first ch (= 1 picot), skip 1 dc, fasten with 1 sc in next st *, repeat from *-* the entire round and finish with 1 sl st in first sl st. Sew sleeves in body - make sure that sleeve cap is sewn in at the top of armholes, i.e. where the distance is shortest. Work an edge around the sleeves the same way as around body but with 2 strands of color 4088. |
|
 |
|
Have you finished this pattern?Tag your pictures with #dropspattern #princesspetalcardigan or submit them to the #dropsfan gallery. Do you need help with this pattern?You'll find 8 tutorial videos, a Comments/Questions area and more by visiting the pattern on garnstudio.com. © 1982-2026 DROPS Design A/S. We reserve all rights. This document, including all its sub-sections, has copyrights. Read more about what you can do with our patterns at the bottom of each pattern on our site. |
|


With over 40 years in knitting and crochet design, DROPS Design offers one of the most extensive collections of free patterns on the internet - translated to 17 languages. As of today we count 324 catalogs and 12272 patterns - 12262 of which are translated into English (US/in).
We work hard to bring you the best knitting and crochet have to offer, inspiration and advice as well as great quality yarns at incredible prices! Would you like to use our patterns for other than personal use? You can read what you are allowed to do in the Copyright text at the bottom of all our patterns. Happy crafting!
Post a comment to pattern DROPS Children 24-1
We would love to hear what you have to say about this pattern!
If you want to leave a question, please make sure you select the correct category in the form below, to speed up the answering process. Required fields are marked *.